To avoid these ads, REGISTER NOW!

Woodworking 101--Tools and Tips

BobLon

ALLIANCE MEMBER
Joined
Apr 19, 2017
Messages
141
Location
Florida
Thanks Jim.

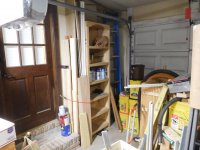
I have been stockpiling wood for years knowing that when the day came funds would be limited. When we bought the house the main shed was there but I added a 12' extension down the side of it for storage so as to not eat up valuable shop space.

IMG_0815sm.jpg

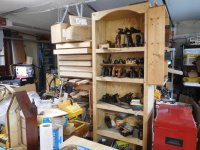
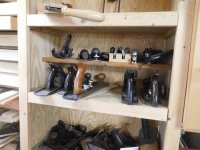
So first I built some lumber racks and shelves....

IMG_0822sm.jpg

Then moved my 'stash' in.

IMG_0846.jpg

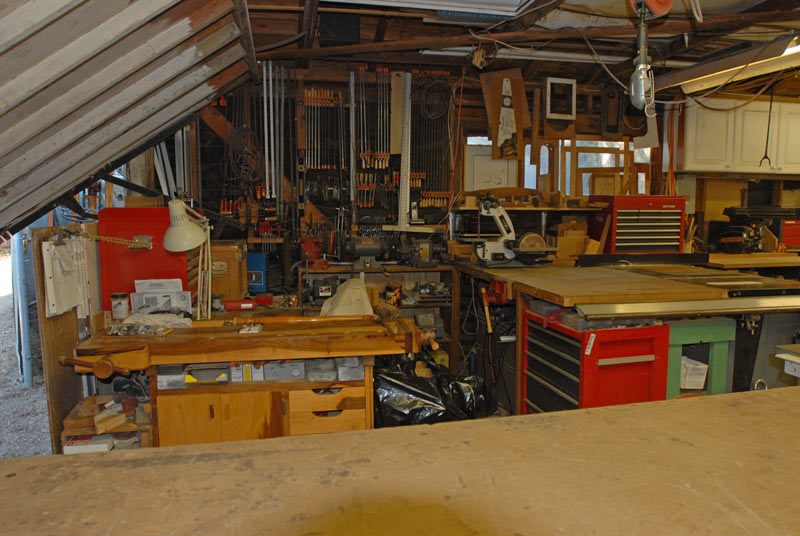
So now I am working on the shop proper.

IMG_0920.jpg

I want to insulate it well as I live in Florida and want/need to be comfy in the shop as I plan on spending a lot of hot days in there.

In the meantime I will continue to live vicariously through the posts here.
Thanks to everyone for a lot of good info, entertainment and motivation.

BobL.
 
To avoid these ads, REGISTER NOW!

Bob Heine

ALLIANCE MEMBER
Joined
Oct 24, 2009
Messages
10,703
Location
Boca Raton, Florida
So far I have the walls up, 25K btu AC installed. Electrical mostly done. Now working on ceiling joists. Then insulation and wall panels.

BobL.
BobL, the shop looks great. As a fellow Floridian, that A/C is as important as any other tool in my shop (and garage). From the last picture it looks like the A/C unit is in a fairly small room so 25K btu may be overkill.

I have one 12K btu window shaker in the 28'x25' garage and I can maintain a 20-degree differential (as long as I turn it on in the morning). The 8K btu window shaker in the 12'x18' shop does about the same. The only difference is the humidity. I get flash rust in the shop but not in the garage. I think it's because the temperature in the shop drops faster so the unit cycles on and off more frequently, reducing the temperature but not the humidity. I'm comfortable with 78*F as long as the humidity is under 50%.

The insulation is probably the most important thing. The walls in my garage have R-13 and the ceiling R-19 while the shop has R-19 in both walls and ceiling. Because of radiant heat, the ceiling insulation seems to be more important than the wall insulation. I have found R-19 to be the sweet spot in Florida. Doubling it to R-38 doesn't seem to have much effect (my office ceiling has extra leftover insulation above it).

Wind down over the next month and you'll be home free. Your biggest surprise might be the absence of unnecessary stress. Second surprise might be that money isn't as scarce as you expected.
 

BobLon

ALLIANCE MEMBER
Joined
Apr 19, 2017
Messages
141
Location
Florida
Thanks for the comments BobH. (your thread is one I am subscribed to and check it every day, cheers to you).

What looks like a room around the AC unit is only temporary support for when I was putting the beam up. The shed is about 35x30 (slightly less inside the walls).

I appreciate the info about the insulation as I am nearing the point to buy some and I was debating whether I needed to put R38 up top. Expensive stuff. Glad to hear I can scale it back some. Thank you for that.

Your last paragraph I'm sure is at least half true and I hope you are right about the other half. Stress-free sounds WONDERFUL.

As far as the other thing (money), most of my income will be from SSI but I do have somewhat of a safety net in the form of a 401K. My ambitions are not of a grand scale however, and with the house and vehicles paid for I am hoping your assessment bears fruit.

I haven't commented much on these forums but enjoy your thread and admire your spirit and accomplishments. Thanks again.

BobL.

P.S. Hope this little thread hijack is ok, now back to our regularly scheduled woodworking fun :willy_nil
 
OP
J

jimreed2160

Well-known member
Joined
Aug 7, 2016
Messages
3,589
Location
Tallahassee FL
Bob--Thanks for the pictures. Your shop is impressive and our expectations of your future projects have been raised accordingly.

As for woodworking, I ventured into my shop this morning to start the great handplane migration. I have some cabinets on order and the old shop furniture book shelf is in the way. The history is that I needed five bookcases for the house and built six because the materials came out that way. The oddball has been my user plane house for over ten years. Most of my user handplanes are in toolboxes just inside the house (a rust free zone). But these brave souls live in the garage for immediate use.

Here are some before photos of the planes in their natural habitat.
 

Attachments

  • DSCN6686.jpg
    DSCN6686.jpg
    151.4 KB · Views: 67
  • DSCN6685.jpg
    DSCN6685.jpg
    153.2 KB · Views: 70
  • DSCN6689.jpg
    DSCN6689.jpg
    129.3 KB · Views: 71
  • DSCN6690.jpg
    DSCN6690.jpg
    116.1 KB · Views: 64
OP
J

jimreed2160

Well-known member
Joined
Aug 7, 2016
Messages
3,589
Location
Tallahassee FL
New handplane house

New new location for my user planes is a new toolbox. Here is my tip for box setup. I like to line the drawers to protect the paint and prevent rust. That shelf liner can get expensive and sometimes it leaves condensation marks at contact points. I carefully cut up the shipping box and then cut pieces of cardboard from it to line the drawer bottoms. The cost is great and the bonus is that it does not leave marks on your handplanes or other tools. I use a boxcutter for breakdown but then use the tablesaw or bandsaw to cut fitted bottoms that are dead straight.

Now all of the user planes are snuggled in their new home. Yes, there are TWO chamfer shaves and one chamfer plane. What can I say? I like chamfers.

The lower drawers are full of wood that needs a new home. Once they get freed up I can move in some of the larger bench planes (6, 7 & 8s). Right now they are on the bottom of workbench #2. It works but having them on the rolling tool box would be a little more convenient and make for one stop shopping.
 

Attachments

  • DSCN6687.jpg
    DSCN6687.jpg
    146.7 KB · Views: 55
  • DSCN6688.jpg
    DSCN6688.jpg
    155.6 KB · Views: 51
  • DSCN6691.jpg
    DSCN6691.jpg
    155.8 KB · Views: 54
  • DSCN6692.jpg
    DSCN6692.jpg
    152.3 KB · Views: 59
  • DSCN6693.jpg
    DSCN6693.jpg
    146.1 KB · Views: 55
  • DSCN6694.jpg
    DSCN6694.jpg
    151.7 KB · Views: 57
  • DSCN6695.jpg
    DSCN6695.jpg
    151.5 KB · Views: 68

drivesitfar

Well-known member
Joined
Oct 23, 2013
Messages
36,006
Location
Pacific Northwest
Jim: I hope you get to the point where a lot of your cool old planes and tools are more on display and ready to use than tucked away, but as you say the RUST FREE ZONE is important if you have more than a few.

speaking of RUST FREE would maybe a dehumidifier be helpful in your shop or is there just too much humidity?

keep up the great work!!

BOB: nice to have you aboard and looking forward to a few of you projects being posted whether simple or large or just tips work too.

ALL: I broke my baby toe last Tuesday so my little Woodshop move to my parent's garage has slowed for the moment. NOTE TO SELF: don't throw away your only steel toe pair of shoes until you own another pair hence the broken toe in my tennis shoes.

my mom is really getting on board and starting to move her stuff she hasn't seen in 20 or 50+ years to give me more space.

hopefully I'll get a shop built in my backyard in 2019, but until then setting up one in my parent's garage and seeing how space and stuff is laid out will be helpful.

have a great day everybody!!
 
OP
J

jimreed2160

Well-known member
Joined
Aug 7, 2016
Messages
3,589
Location
Tallahassee FL
Drives--I hope you are sitting in the shade sipping lemonade while your toe mends.

I added a dehumidifier to the shop years ago and it has keep the major rust at bay. But planes can still get a little staining if they are left unused. ESPECIALLY when I SWEAT ON THEM! That salty brew will cause pits in days! Even on really nice Lie Nielsens!!!! :willy_nil

It is only May and I am sweating a lot in the shop. So today I have been online browsing window AC units. Now that the windows are unobstructed one of them should house a cooler. Until then I will ratchet down the humidity and see if that helps. Maybe 59 is too high.
 

rrich1

Well-known member
Joined
Oct 7, 2015
Messages
793
Just call me clamp champ! First piece of veneer is in glue up. I should have probably done a pair at a time but oh well. Not like I have been rushing this build by any means. I would like to finish here soon though.

Took out the back piece and sanded it. Will put on a few coats of shellac possibly after work tonight. While the veneers are in glue up I'll sand the door cases and fill in the voids like I did the carcass. IMG_20180509_121643.jpg

Sent from my Pixel XL using Tapatalk
 

rrich1

Well-known member
Joined
Oct 7, 2015
Messages
793
1--you need some short clamps.

ak--nice work.
I do. I have some 12" Jorgensen but the bars are bent and wouldn't get as much clamp pressure with them. I'd like to get some more 12" and 24" parallel clamps.

Got the first piece out of clamps today. I think it turned out pretty well. Second one is in clamps. Really don't want to wait a full 24 hrs for these last three but I think I will wait. I want the glue to dry thoroughly.

I sanded the plane til and got a seal coat on that as well. IMG_20180510_075821.jpg

Sent from my Pixel XL using Tapatalk
 
OP
J

jimreed2160

Well-known member
Joined
Aug 7, 2016
Messages
3,589
Location
Tallahassee FL
Shop lumber organization

More organization today. I am working like a dervish because I need to make space for the two cabinets on order. Yesterday I moved the planes and today I moved the plane cabinet over to a junk area in the front of the garage. I cleaned it up, moved in the cabinet, and used bungee cords to secure the lumber storage. It worked so well, I used more bungees on my other stack of lumber.

Sorry that I have only a partial "before" shot of the area but you can get an idea of the mess.
 

Attachments

  • DSCN6625.jpg
    DSCN6625.jpg
    150 KB · Views: 69
  • DSCN6698.jpg
    DSCN6698.jpg
    148.8 KB · Views: 59
  • DSCN6699.jpg
    DSCN6699.jpg
    130.1 KB · Views: 64

cheechi

Well-known member
Joined
Feb 29, 2012
Messages
4,384
Location
Triad, NC
i like your box fan air cleaner. I have one too, genuinely surprised how good of a job it does. And for the moment my miter saw is right underneath it.
 

ez-duzit

Well-known member
Joined
Jun 24, 2013
Messages
5,095
Location
Marina del Rey
1--my 6" Jorgenson Pony clamps get the most use.

Photo of my clamp wall in background. Have added a few since then. :)

 
Last edited:
OP
J

jimreed2160

Well-known member
Joined
Aug 7, 2016
Messages
3,589
Location
Tallahassee FL
i like your box fan air cleaner. I have one too, genuinely surprised how good of a job it does. And for the moment my miter saw is right underneath it.

True that. My shop sessions these days are less than a few hours and involve very few cuts. This contraption has kept up with me and fine dust is scrubbed out of the air quickly. :thumbup:

I sprung for the really good filter and it cost more than the fan. :lol_hitti
 

ez-duzit

Well-known member
Joined
Jun 24, 2013
Messages
5,095
Location
Marina del Rey
Just finished the fabrication and installation of a cockpit cabinet which mounts a sink, faucet, hand-held shower and voltmeter, and which houses a water tank and water heater. I'll try to get photos.
 
OP
J

jimreed2160

Well-known member
Joined
Aug 7, 2016
Messages
3,589
Location
Tallahassee FL
Shop cabinet

Seeing as how the server dog ate my last post, I will make this one brief. Woodworking is at a halt while the shop is under renovation. I removed a shelf yesterday (two to go) and the task today is to hang another cabinet. The last ones conveniently fit amongst the wall studs but this one by the door was a no go and I had to order some Gladiator track. It came in yesterday and consisted of two 48" pieces. The wall space is about 36" so I trimmed them to length and hung them on the joists using six 2" sheetrock screws in each.

I had to remove the doors because the cabinet was heavy and bulky and it was certainly much lighter without them. After hanging, I lined the shelves using the cut up shipping box.

Amazon says the final cabinet, a 24x24, should arrive Monday. I think it is not spaced properly for stud hanging but I should be able to use the track cut offs for it. Storage locker #1 is scheduled for the 21st and #2 is scheduled for the 28th. So it looks like the shop will be back together just in time for hurricane season.
 

Attachments

  • DSCN6700.jpg
    DSCN6700.jpg
    130 KB · Views: 39
  • DSCN6701.jpg
    DSCN6701.jpg
    142.9 KB · Views: 41
  • DSCN6702.jpg
    DSCN6702.jpg
    151.5 KB · Views: 42
  • DSCN6703.jpg
    DSCN6703.jpg
    153.2 KB · Views: 38
To avoid these ads, REGISTER NOW!

ez-duzit

Well-known member
Joined
Jun 24, 2013
Messages
5,095
Location
Marina del Rey
Having trouble finding my picture files on this really crappy Windows 10! Would appreciate any help with how to go directly to "my pictures".

Photo #1 shows the cockpit of a custom 29' sportfisher built in New Zealand. On the left, behind the passenger seat, is a cabinet I built a few years ago. On the right is one I just completed. The owner supplied the equipment,on this project, and also did the paint and varnish. One might notice how dark the new teak is when compared to the golden color of the sun-bleached teak.


Photo #2 shows the old cabinet on the port side, which contains storage space plus a small DC refrigerator. Construction is of 18mm okoume marine plywood with mahogany corner cleats, screwed with stainless sheet metal screws and glued with WEST epoxy. The custom door and sea rails are teak. Hinges and latches are stainless. After scribing to precisely fit the existing boat shape it was bedded in 3M 5200. Inboard cabinet corners have a 1" radius routed on mahogany corner piece.


Photo #3 shows the newly completed cabinet on the starboard side. Construction is identical to the old one, except that sliding doors of 1/4" black acrylic have been installed in teak tracks. The top of this cabinet mounts a sink and faucet plus (hidden by the seat, which pivots up) a fill fitting for the enclosed water tank. The tank vent is on its inboard side. On the aft face, outboard of the sliding doors, are mounted a voltmeter (for battery monitoring) and handheld shower (behind the white plastic drop-down door).


Photo #4 Within this new cabinet, on the inboard side, is mounted a plastic auxiliary water tank, which gravity feeds the vessel's main below-decks tank via a ball valve. Next to the ball valve can be seen the hose supplying pressure water to the water heater and handheld shower.


Photo #5 Within the new cabinet, on the outboard side, is mounted a 12-volt water heater, which is attached to the sink cutout plywood to keep it out of any deck water. Here we see the sink drain hose, which exits the vessel through a new thru-hull fitting well above the waterline.


Photo #6 shows the relocated (moved aft for easier access) battery switch and new fuse holder and circuit breaker panel. Below this, between the water tank and water heater, is storage space and access to the batteries, which are located just forward of this new cabinet.


Most of the jobs I do involve much more than simple woodwork, such as the installation of the related equipment, including plumbing, wiring, etc, shown here because it is such an integral part of this otherwise woodworking project.
 
Last edited:
OP
J

jimreed2160

Well-known member
Joined
Aug 7, 2016
Messages
3,589
Location
Tallahassee FL
EZ--Outstanding work. Thanks for the pictures. BTW, I just click on the folder icon on the bottom of my Win 10 screen and the pictures pop up. And they are sorted by month.
 

Bob Heine

ALLIANCE MEMBER
Joined
Oct 24, 2009
Messages
10,703
Location
Boca Raton, Florida
jr--thank you. But I want to find my picture folders, not the photos by month (different).
EZ, it isn't too hard to find but you can make it easier.

As suggested, open File Explorer and you should see a list like this. If you
click on the Pictures folder, you can
click on Pin to Quick access and the Pictures folder will appear there (just open that first item in the list with the blue star).
attachment.php


From the Quick access list you can
click on the Pictures item. That menu lets you
click Create shortcut. It only lets you create one on the desktop but you can drag the shortcut to the taskbar (should be at the bottom of your screen.
attachment.php


If you like, you can make any of the sub-folders in Pictures Quick access folders (and make shortcuts to the desktop or taskbar). Having your most frequently used Pictures folder on Quick access means you have to open or find the File Explorer -- having them on the task bar means they are one click away. It's up to you.​
 

Attachments

  • Picture Access 2.jpg
    Picture Access 2.jpg
    66.9 KB · Views: 253
  • Picture Access 0.jpg
    Picture Access 0.jpg
    100.1 KB · Views: 253

ez-duzit

Well-known member
Joined
Jun 24, 2013
Messages
5,095
Location
Marina del Rey
BH--thank you! That did it, created a shortcut on the desktop. I know it is pathetic that I couldn't figure out file explorer. Windows 7 was so much more user friendly.
 

CRSINMICH

Well-known member
Joined
Aug 15, 2015
Messages
2,397
Location
Southeastern Michigan
ez: You'll be pleased to know that there are no plans for a Windows 11. Windows 10 will continuously update itself - like it or not. Mine has done that countless times and most of the time the update is not noticeable. Most of the time! Sometimes it changes things that you'll just have to get used to - like it or not. I'm not particularly computer savvy so maybe some other members would like to correct or amplify my post.
 

Bob Heine

ALLIANCE MEMBER
Joined
Oct 24, 2009
Messages
10,703
Location
Boca Raton, Florida
BH--thank you! That did it, created a shortcut on the desktop. I know it is pathetic that I couldn't figure out file explorer. Windows 7 was so much more user friendly.
EZ, Not pathetic at all. Just when I get comfortable with a version of Windows, they come out with a new version that has a "better" idea. I call B.S. -- it's just different, not better. I liked Windows XP because I could shut it down with three taps on the keyboard: 1) Windows key, 2) U and 3) U. Windows 10 forces you to use a mouse. I can't find a way to shut it down with just the keyboard.
 

CRSINMICH

Well-known member
Joined
Aug 15, 2015
Messages
2,397
Location
Southeastern Michigan
EZ Windows 10 forces you to use a mouse. I can't find a way to shut it down with just the keyboard.

Does your keyboard have a touchpad? If it does, just press the Windows logo button then click on the Power icon. A menu will pop up and you just have to click on "Shut Down". Of course, you could always just hold down the separate Power button on the keyboard for a few seconds. It's a crude but effective way to power off.
 
Last edited:

Bob Heine

ALLIANCE MEMBER
Joined
Oct 24, 2009
Messages
10,703
Location
Boca Raton, Florida
ez: You'll be pleased to know that there are no plans for a Windows 11. Windows 10 will continuously update itself - like it or not. Mine has done that countless times and most of the time the update is not noticeable. Most of the time! Sometimes it changes things that you'll just have to get used to - like it or not. I'm not particularly computer savvy so maybe some other members would like to correct or amplify my post.
CRS, I think the paradigm has shifted from the Personal Computer to the Smart Phone so that's where everyone is putting their effort. I hate the idea of having my PC hacked but I have the option to disconnect it from the rest of the world and use it stand-alone. The smart phone world thinks its hackability is a feature, not a bug. Why was anyone surprised that Facebook tracked all their calls?

There's a damn nosy lady living in my 2011 Cadillac that tells me when to get off the highway. I'd call her a ***** but I'm sure she's listening. At least she only repeats her advice when I don't make the turn and tell her to F^ck Off. I ran into another nosy lady (Alexa?) in my friend's house and told her the same thing. Apparently my friend paid for her to move in.

My smart phone sits on the wall connected to the outlet for charging. I am keeping my '87 Corvette because the electronics are deaf and dumb. I hope to upgrade to my '72 Corvette because it only has an electronic bit in the distributor and even that can be swapped back to points. I'm not real worried about my privacy (note my GJ handle) but I hate making it easy for greedy-*** companies to violate.
 

CRSINMICH

Well-known member
Joined
Aug 15, 2015
Messages
2,397
Location
Southeastern Michigan
Bob: I keep forgetting that nearly everyone else wants to be able to do everything from their Smart Phones. I only recently updated my Dumb *** Phone to a Semi-Smart Phone (it can make AND receive calls and texts!). My son has to keep reminding me that I am the one who is out of step. I seem to remember providing that same service to my father.
 

Bob Heine

ALLIANCE MEMBER
Joined
Oct 24, 2009
Messages
10,703
Location
Boca Raton, Florida
Does your keyboard have a touchpad? If it does, just press the Windows logo button then click on the Power icon. A menu will pop up and you just have to click on "Shut Down". Of course, you could always just hold down the separate Power button on the keyboard for a few seconds. It's a crude but effective way to power off.
Ah CRS, you must be using a laptop. I have three but rarely use them because the key spacing is weird (I touch-type with one hand). I have a two-screen desktop setup with three desktop computers connected to the monitors, keyboard and mouse through a switch. No camera and no microphone but I do have speakers.

Microsoft doesn't like it when I use the power button but at least they stopped telling me I didn't shut down properly last time (only my Canon Printer does that now).

I've been working with computers since 1964 so I shouldn't be down on them. I probably shouldn't have read 1984 either.
 

CRSINMICH

Well-known member
Joined
Aug 15, 2015
Messages
2,397
Location
Southeastern Michigan
Bob: You're correct about the laptop but it's about to be added to my Old Medium Museum. It has an MP3 player, a couple of cassettes, a few 78's and even some Cylinder Recordings and a 3-D viewer with hundreds of cards.
 
OP
J

jimreed2160

Well-known member
Joined
Aug 7, 2016
Messages
3,589
Location
Tallahassee FL
Bob--We have both worked in IT long enough to understand the frustration of these devices. I used to have a nice time messing with my early GPS by taking short cuts. It would protest and then go spinning and recalculating. Now they are fast and not near as entertaining, so I set all of my speech devices to use British English. The voices sound like very proper schoolmarms and I expect to be punished any minute for my misdeeds. :bounce::bounce::bounce:
 
OP
J

jimreed2160

Well-known member
Joined
Aug 7, 2016
Messages
3,589
Location
Tallahassee FL
Old tools PSA

I am surrounded by old tools, many of which are older than I am. And I enjoy using them. But they can fail and this little story is a PSA to be careful with your old tools.

When I hung the last cabinet, I reached in the plane closet and grabbed the first level I could find. It was a beautiful cherry 16" Stanley #104. I used it to mark off the wall and to hang the batten. I noticed at the time that the batten seemed to be off a bit but I checked it with the level and then pushed on through the heat.

It bothered me so I checked the level today when I was in the shop. Levels are easy enough to check. Just shoot a level and then turn the level 180 degrees in the same spot. Each should be equal. Bonus is that any out of level error is doubled and thus easy to spot. And sure enough, this level was out just a touch. Across the 39" batten it would amount to about 3/16".

Some levels are adjustable so I opened this one up. Ugh. The vial is sunk in hard putty and will not budge. It appears that some old tools are merely eye candy. Lesson learned.
 

Attachments

  • DSCN6737.jpg
    DSCN6737.jpg
    149.7 KB · Views: 76

CRSINMICH

Well-known member
Joined
Aug 15, 2015
Messages
2,397
Location
Southeastern Michigan
jimreed: I just found these pages in a 1949 Stanley catalog. I underlined the part of a Level Q&A section that may explain why your cherry level is out of whack. The other page shows their wooden levels for that year. Your model is there. I hope you didn't pay more than $2.20.
 

Attachments

  • 1949 Stanley level Q&A underlined.jpg
    1949 Stanley level Q&A underlined.jpg
    156.1 KB · Views: 56
  • 1949 Stanley levels.jpg
    1949 Stanley levels.jpg
    103.7 KB · Views: 41
Last edited:
OP
J

jimreed2160

Well-known member
Joined
Aug 7, 2016
Messages
3,589
Location
Tallahassee FL
Tool box

Since I already have a few of these Kobalt tool boxes, I decided to take advantage of Lowes clearance and get another. My local store had three that were waaaaay up in the air. The drawers were stuck on the first one and I had to return it. Grrrr. Second was a charm.

I will enjoy the flat surface and may trim it out so it can double as outfeed for the TS. As for the drawers, they may turn into cutoff storage so I can get rid of those floor space sucking buckets.
 

Attachments

  • DSCN6739.jpg
    DSCN6739.jpg
    156.6 KB · Views: 59
  • DSCN6740.jpg
    DSCN6740.jpg
    157 KB · Views: 56
  • DSCN6741.jpg
    DSCN6741.jpg
    155.7 KB · Views: 58
To avoid these ads, REGISTER NOW!
Top Bottom