To avoid these ads, REGISTER NOW!

Woodworking 101--Tools and Tips

OP
J

jimreed2160

Well-known member
Joined
Aug 7, 2016
Messages
3,589
Location
Tallahassee FL
More wand work

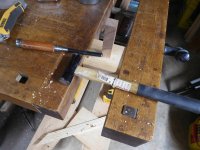
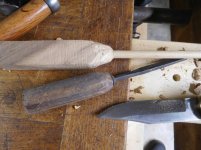
Time to move along the wand project. I want the handle to be quirky and handmade looking. The first task is to narrow the junction when the rod meets the handle. Good thing I have lots of scrap. I drilled a hole in a piece of 2x4 and used a gouge chisel to get started. Later I got out a knife and whittled on it.

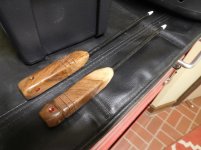
The final end was a treat. I have seen that whittled end before--on my grandfather's chisel. It conjured up a picture in my mind of him sitting in his little woodshop shed, smoking a cigar and whittling away with a pocketknife. Little did he know that 70 years later I would be sitting in my workshop doing the same thing. I like to think that he would understand this project and smile.
 

Attachments

  • DSCN6830.jpg
    DSCN6830.jpg
    149.9 KB · Views: 61
  • DSCN6831.jpg
    DSCN6831.jpg
    151.2 KB · Views: 61
  • DSCN6832.jpg
    DSCN6832.jpg
    120.5 KB · Views: 62
  • DSCN6833.jpg
    DSCN6833.jpg
    150.3 KB · Views: 66
To avoid these ads, REGISTER NOW!

rrich1

Well-known member
Joined
Oct 7, 2015
Messages
793
Before work I was able to get the shelf and the hinge part of the doors made above the plane til. I mortised out for the hinges but they are not closing fully. The hinges sit flush with the wood so not really sure what I should do. I think chamfering the edge might help reduce the bulk and fix the issue.

The shelf is dadoed into cleats screwed to the sides. The hinge part of the door is then screwed into that. I will replace the screws with brass screws to match the hinges.

Up next is to make the playwood doors and attach them to the hinge section. IMG_20180523_131237.jpeg

Sent from my Pixel XL using Tapatalk
 
OP
J

jimreed2160

Well-known member
Joined
Aug 7, 2016
Messages
3,589
Location
Tallahassee FL
rrich--I always cross my fingers when I install hinges and doors. It seems to magnify 1/64" into a foot. Just keep tweaking and I am sure you will get it right.
 

rrich1

Well-known member
Joined
Oct 7, 2015
Messages
793
rrich--I always cross my fingers when I install hinges and doors. It seems to magnify 1/64" into a foot. Just keep tweaking and I am sure you will get it right.
They are being a gigantic pain in the **** right now. I've got one fitted at the moment. The left door is giving me headaches.

Sent from my Pixel XL using Tapatalk
 
OP
J

jimreed2160

Well-known member
Joined
Aug 7, 2016
Messages
3,589
Location
Tallahassee FL
Solving fit issues on hinges can be a bear. Sometimes I just dig the mortice deeper. Sometimes I shim the hinge with wood shavings. Whatever works. Sooner or later they almost always fit right. Good luck.
 

ez-duzit

Well-known member
Joined
Jun 24, 2013
Messages
5,095
Location
Marina del Rey
Fitting hinges requires patience and planning. Layout the mortises carefully and sneak up on the fit, rather than having to pack it out later. Do the trial installation using smaller screws, in case you have to drift the holes into a new location.
 

rlitman

Well-known member
Joined
Oct 18, 2010
Messages
24,591
Location
Long Island
Fitting hinges requires patience and planning. Layout the mortises carefully and sneak up on the fit, rather than having to pack it out later. Do the trial installation using smaller screws, in case you have to drift the holes into a new location.

All good suggestions. Another trick is to slip an allen key into the hinge gap and close the hinge onto it, to bend the hinge plates a tiny bit. Those imperceptible adjustments magnify to real results when installing hinges.
 

rrich1

Well-known member
Joined
Oct 7, 2015
Messages
793
I mortised the hinges on the table saw and they were all friction fit tight. Placement was dead on as well. In order to get them to close I needed to plane down the edge so the hinge was sticking above the edge and not flush. The actual door hinges didn't need that and they sit flush

I got the doors made and fitted. The left door was a pain and still wants to pop open where the right side doesn't. In the pic I had them slightly open. These will be held down with magnets so I think they will be ok.

Up next I am going to do the plane til dividers. This will at least get my planes off of the work bench and into the cabinet.

For some reason it won't let me upload any pics.

Sent from my Pixel XL using Tapatalk
 
Last edited:
OP
J

jimreed2160

Well-known member
Joined
Aug 7, 2016
Messages
3,589
Location
Tallahassee FL
Light

Today was spent cleaning up the shop and waiting for my cabinets to arrive. I called Lowes and found out the cabinets were delayed again but now are on their way to the stores. I say stores because they are sending one to each of their stores here in town. :confused:

I guess that is to supersize my customer experience. Anyway, I should have them any day now. In the meantime I have renamed that dead corner of the shop the "North Annex". Today I installed a 4 ft Costco LED light fixture over there.
 

Attachments

  • DSCN6835.jpg
    DSCN6835.jpg
    154.3 KB · Views: 63
  • DSCN6834.jpg
    DSCN6834.jpg
    149.1 KB · Views: 65

rrich1

Well-known member
Joined
Oct 7, 2015
Messages
793
Finally got the upper doors done. A few coats of shellac and buffed with paste was. I replaced the hardware on the sides with brass domed screws. Flat head unfortunately. But it ties it all together. I used two magnets super glued in with screws to keep the doors from opening. They aren't rare earth magnets so hopefully they will be strong enough. IMG_20180526_020217.jpegIMG_20180526_020226.jpegIMG_20180526_020251.jpeg

Sent from my Pixel XL using Tapatalk
 

rrich1

Well-known member
Joined
Oct 7, 2015
Messages
793
Compliments are much appreciated guys.

Well this is annoying [emoji849]. Measure twice cut once. I resawed some mahagony to get the stock for the plane til dividers. I marked out my screw hole lines on the first one and found out I needed a few more long ones. I transferred the screw lines but not the length line. Ugh. IMG_20180527_170041_308.jpeg

Sent from my Pixel XL using Tapatalk
 

Bob Heine

ALLIANCE MEMBER
Joined
Oct 24, 2009
Messages
10,705
Location
Boca Raton, Florida
Compliments are much appreciated guys.

Well this is annoying [emoji849]. Measure twice cut once. I resawed some mahagony to get the stock for the plane til dividers. I marked out my screw hole lines on the first one and found out I needed a few more long ones. I transferred the screw lines but not the length line. Ugh. IMG_20180527_170041_308.jpeg

Sent from my Pixel XL using Tapatalk
Rrich1, I know I shouldn't but I do feel better. I knew I wasn't alone but I didn't expect to be in such good company.
 

rrich1

Well-known member
Joined
Oct 7, 2015
Messages
793
Rrich1, I know I shouldn't but I do feel better. I knew I wasn't alone but I didn't expect to be in such good company.
Glad I could make you feel better. I think I have a scrap board that is long enough to get the pieces that I need but not positive. Very annoying. Oh well. Now comes the issue with trying to decide a layout. I don't have planes I want so I borrowed a few from a friend to help with a layout. I might just copy what huy the Alabama woodworker (Instagram and YouTube) did on his. Pretty much what I have/want in tools.

Sent from my Pixel XL using Tapatalk
 
To avoid these ads, REGISTER NOW!

rrich1

Well-known member
Joined
Oct 7, 2015
Messages
793
Ez- Everything is just screwed down and will allow me to move things around if I need to. Making new dividers is easy. I borrowed what I plan to get so it should be fine. I borrowed a large and medium shoulder plane and a 4 1/2 smoothing plane. I plan to get another block plane which I can use the spacing for the ones I already have. I forgot to borrow a router plane but i won't need it as there will be plenty of space left up top.

Sent from my Pixel XL using Tapatalk
 

rrich1

Well-known member
Joined
Oct 7, 2015
Messages
793
A lot of progress between last night and this morning so far. I got the plane til all but finished. I didn't order enough of the screws I was using so I will have to get more.

This morning I started to work on the interior door doors. I got the cleats cut to fit and mortised the hinges. I had planned to go to the gym but forgot they closed at noon so i will work on cutting the plywood for the door and putting a dad in the cleat to accept the door. IMG_20180528_124108.jpegIMG_20180528_124147.jpegIMG_20180528_124137.jpg

Sent from my Pixel XL using Tapatalk
 

06malibu

Active member
Joined
Apr 2, 2018
Messages
25
Hi, relativity new to the forum here and I had a quick question. Figured it would be better to ask here rather than to make a new thread.

Anyway I've decided to try and take-up/learn more about wood working. I was wondering where everyone looked for older/antique tools. Looking to start my collection with some chisels and a planner or too, also a crosscut saw and or rip saw. Thank You
 

ez-duzit

Well-known member
Joined
Jun 24, 2013
Messages
5,095
Location
Marina del Rey
6--if you're interested in woodworking don't begin an antique tool collection. Instead, watch for deals on quality used tools that you can immediately press into service.
 

rrich1

Well-known member
Joined
Oct 7, 2015
Messages
793
06- I mostly agree with EZ. It's hard to rehab an old tool if you don't know how it so supposed to function. If you find any deals on old planes that can be rehabbed I wouldn't pass them up either though.

What is it that you want to do? Are you wanting to do hand tools only? Hybrid of power and hand tools! What tools do you have now?

Chris- Tetris pieces look good.
Sent from my Pixel XL using Tapatalk
 

06malibu

Active member
Joined
Apr 2, 2018
Messages
25
That makes sense. I guess it wouldn’t hurt to collect for future use.

What tools do you suggest I pick up first? I’d like to use mostly hand tools. I really only have a mitre saw, drills, and a jig saw. I have access to table saw and band saw.

I’m 24 and just starting to acquire tools and such.


Sent from my iPhone using The Garage Journal mobile app
 
OP
J

jimreed2160

Well-known member
Joined
Aug 7, 2016
Messages
3,589
Location
Tallahassee FL
Malibu--Welcome to the group. I hope you get lots of enjoyment from woodworking. Starting with a few tools is OK. I grew up with access to my dad's workshop but I went out on my own with only a sharping stone and a square. I added a coping saw and a 3/8" **** chisel and a friend gave me a hammer. I started picking up tools in antique shops but very few of them were worthwhile. Ebay is a good source of tools if you know what you are looking for. So are the box stores and of course, our favorite, Harbor Freight.

If you let your projects dictate your tool purchases, you will probably build a more coherent collection. Handplanes are my passion, but you really need a workbench to use a handplane properly. Along those lines, a workbench would be a good starter project.

Good luck making shavings.
 
OP
J

jimreed2160

Well-known member
Joined
Aug 7, 2016
Messages
3,589
Location
Tallahassee FL
rrich--Those planes really dress it up well.

chris--Interesting project.

I am working on the Harry Potter wands for my granddaughters. They are almost ready to ship. AND my Gladiator cabinets finally came in today. The North Annex to the shop never looked better.
 

Attachments

  • DSCN6895.jpg
    DSCN6895.jpg
    146.7 KB · Views: 77
  • DSCN6897.jpg
    DSCN6897.jpg
    155.6 KB · Views: 77

ez-duzit

Well-known member
Joined
Jun 24, 2013
Messages
5,095
Location
Marina del Rey
Pictured is my principle portable kit I use for working on boats. It is for much more than woodworking, and it is supplemented by many other kits. But you will find some indispensable woodworking tools in this kit.

I copied and pasted the following from a post I made on another forum:
Across the top row are: dust mask, small adjustable wrench, nail clippers, long #1,2 & 3 Phillips driver bits (accessories for my drill kit), screw starter, slotted screw driver bit, Japanese marking knife, felt marker, (3) putty knives, razor scraper, Exacto knife, mini Mag light, diamond hone, scissors, slender flat blade screwdriver, inspection mirror, (3) small flat blade screwdrivers.

Next row: bench brush, work light, engineers scribe, small and medium rat-tail file, pattern-makers file, Channellock pliers, medium adjustable wrench, dial calipers, needle-nosed pliers, garden shears (for cutting doorskin strips for patterns), hex key set, 6-way screwdriver, ratcheting offset Phillips and flat blade screwdrivers, stubby combo flat blade/Phillips screwdriver.

Next row: claw hammer, Japanese razor saw, chisel, blue tape, small framing square, adjustable square, protractor, adjustable T-bevel, 80-grit sanding block, Tef-Gel.

Bottom row: shoulder plane, low angle block plane, plastic bags (containing razor razor blades, utility knife blades, brads and shims), tweezers, small and medium punches, nail set, small cold chisel, small file, Japanese keyhole saw, sandpaper, pencils, compass, standard and mini utility knives, diagonal cutting pliers, small Vise-Grip, Krazy Glue, Loctite, 3M 4000 (white) with spare nozzles, Leak Lock thread sealant, clear silicone sealer.

Additionally there is a rolled up pad that I set tools on to protect the work area. Everything in the photo fits into the 18" Husky tool bag shown.


rrich1

Well-known member
Joined
Oct 7, 2015
Messages
793
Finished one of the doors today. I had to fix an issue with the other door so I didn't glue it up until today. Having hinges with the rod that is removable is super handy when you are finessing the size of a door. IMG_20180529_121018.jpgIMG_20180529_121029.jpg

Sent from my Pixel XL using Tapatalk
 

dwasifar

Well-known member
Joined
May 28, 2017
Messages
2,088
Picking the brains of you more-experienced guys.

I have a buttload of scrap jatoba wood ("Brazilian cherry") lying around that I've been using for small projects.

I've also got a 24oz ball-peen hammer that needs a new handle.

Any reason I shouldn't make a hammer handle out of jatoba?
 
OP
J

jimreed2160

Well-known member
Joined
Aug 7, 2016
Messages
3,589
Location
Tallahassee FL
rrich--Ditto on the removable hinge pins. I used those on the secretary desk I built. It came in handy when I needed glass for the doors because I did not have to haul the heavy top over to the glass place.

dwas--I think the jatoba would make a handsome handle for your hammer.
 

06malibu

Active member
Joined
Apr 2, 2018
Messages
25
Pictured is my principle portable kit I use for working on boats. It is for much more than woodworking, and it is supplemented by many other kits. But you will find some indispensable woodworking tools in this kit.

I copied and pasted the following from a post I made on another forum:
Across the top row are: dust mask, small adjustable wrench, nail clippers, long #1,2 & 3 Phillips driver bits (accessories for my drill kit), screw starter, slotted screw driver bit, Japanese marking knife, felt marker, (3) putty knives, razor scraper, Exacto knife, mini Mag light, diamond hone, scissors, slender flat blade screwdriver, inspection mirror, (3) small flat blade screwdrivers.

Next row: bench brush, work light, engineers scribe, small and medium rat-tail file, pattern-makers file, Channellock pliers, medium adjustable wrench, dial calipers, needle-nosed pliers, garden shears (for cutting doorskin strips for patterns), hex key set, 6-way screwdriver, ratcheting offset Phillips and flat blade screwdrivers, stubby combo flat blade/Phillips screwdriver.

Next row: claw hammer, Japanese razor saw, chisel, blue tape, small framing square, adjustable square, protractor, adjustable T-bevel, 80-grit sanding block, Tef-Gel.

Bottom row: shoulder plane, low angle block plane, plastic bags (containing razor razor blades, utility knife blades, brads and shims), tweezers, small and medium punches, nail set, small cold chisel, small file, Japanese keyhole saw, sandpaper, pencils, compass, standard and mini utility knives, diagonal cutting pliers, small Vise-Grip, Krazy Glue, Loctite, 3M 4000 (white) with spare nozzles, Leak Lock thread sealant, clear silicone sealer.

Additionally there is a rolled up pad that I set tools on to protect the work area. Everything in the photo fits into the 18" Husky tool bag shown.


Noted! Thank you sir. Luckily I have a fair amount of tools with automotive/dirtbikes so Im not starting from scratch but still am sorta.

Any forums you recommend? Anything you recommend getting first? Looking to spend around $200 to start up
 

ez-duzit

Well-known member
Joined
Jun 24, 2013
Messages
5,095
Location
Marina del Rey
What you buy first will depend on what deals show up first, so you can stretch that $200. Watch eBay, Craigslist, yard sales, forum classifieds, etc.
 

Autonomous

Well-known member
Joined
Dec 26, 2015
Messages
66
That makes sense. I guess it wouldn’t hurt to collect for future use.

What tools do you suggest I pick up first? I’d like to use mostly hand tools. I really only have a mitre saw, drills, and a jig saw. I have access to table saw and band saw.

I’m 24 and just starting to acquire tools and such.


Sent from my iPhone using The Garage Journal mobile app
Hop on the Google and see if there is a "WOODCRAFT" near you. Ours holds classes and you get to see what is needed to make similar projects.

Get yourself some chisels and fall down the rabbit hole of sharpening. A razor sharp chisel is just plain satisfying.

If you have the space one of your first projects should be a study workbench. It doesn't have to be a piece of art, just rigid. Then look into an affordable used vice or two on Craigslist. When your projects aren't bouncing around a table you'll be surprised how much nicer it is to work on things.

Sent from my Pixel XL using Tapatalk
 

lafester

Well-known member
Joined
Mar 1, 2017
Messages
2,191
Location
Northern CO
These pieces came in a box of lathe / woodworking pieces I picked up today.
Wondering if anybody knows what these are for.

4mjkXX-3IvMbjfrpC926FdwP0uDljYahYimrZcz0OkPlM1x2kD_1WgK6ypJPq4UM5BTwqK9OSIZIDfjYq7JQC0tUp4Uwv4oQn1iRBjdRmfuuh8MAC5Hly3VEC20sHtaSq263RzHL_1PgbkKl2A5SLUQkaMs3qzXlI6M_AVW2VHwV-MnW2Oy_A_y4ARCnLRnEreOVjrf26PwgHjztVqK45A47q7qWiK9QBPaYi7I3rzYzgfn9EEbqvgm9Z6nrTCsw0ApR4YIZVbWq55BqTK_kjZ_WZZpqTIypPYps9tmGrw1gzRI3AUMuMtULhEMzVqdBR86nDJ7jx6Xm1Eg4LNola7utz-6j_qKy39q_PF3V68OpHXJTj-AkI_hFppsu4_7kwz5LeIRGG0OqcgJqLQmfsQOXaUHR6N4L9eE-r9hXnbyi-snrImKEb4R6hHAL5UrulDT3KMsM8p54ou5iOdiJ0It8dSzzQMDymc6tQ7gFg9UbZ_-WS_IIbYHEkmnQeBmIlB4b2KIEI6cQzQ0zQVrHrdQSDtyKuu2IIEGUqRdpzGlbPoxjZ1XFBtnw-vhRobyd3Hmr4EHu0BsfcLGgBFjf5hFauVT3wqpY=w1848-h1283-no
 
To avoid these ads, REGISTER NOW!
Top Bottom