lafester
Well-known member
Just heard back from the PO. She thinks they went with a duplicator she once had.
I'll come up with a use for the parts someday.
I'll come up with a use for the parts someday.

Hi, relativity new to the forum here and I had a quick question. Figured it would be better to ask here rather than to make a new thread.
Anyway I've decided to try and take-up/learn more about wood working. I was wondering where everyone looked for older/antique tools. Looking to start my collection with some chisels and a planner or too, also a crosscut saw and or rip saw. Thank You


What do you want to make?
What do you want to make it with?
Where do you have to do it?
Bill
I’d like to use hand tools as much as possible. I’d also like to make basic furniture like maybe bedside tables and what not. Nothing super extravagant. Some boxes of all sorts and things.
I have a single car garage that I’ve set up for working on my dirtbikes but I should have more than enough room to make another bench and have some room to work
Sent from my iPhone using The Garage Journal mobile app
To me, hand tools are a complement to power tools.
Yes, you can work wood completely with hand tools, but it is really labor intensive and physically demanding. Even small projects, like decorative boxes, are more easily done with the aid of some power tools.
I started out making small racks and holders for bits and tools, out of pine, to be screwed to the wall. Even there, a drill press made it easier to drill holes. And while I did cut off small pieces of lumber with a circular saw and straight edge, it had a 40 tooth carbide blade for smooth cuts. I did use a block plane to chamfer edges and a hand drill to pre-drill screw holes. And this is all with pine lumber that was already surfaced four sides.
Unless you see yourself taking rough green logs and splitting them and then using a scrub plane to flatten boards, then you are limited to buying boards and cutting and milling and shaping them.
Even then, with rough sawn lumber, it is way easier to joint and plane them with power equipment.
Making furniture? Then my purchases in order would be, jointer, table saw, band saw, drill press, planer and lathe. Actually you need all of these basic tools. Then you need the hand power tools and then the array of non power hand tools.
You need a bigger garage!
Bill
PS: Don't let this stop you from using a few planes, hand saws, miter box, chisels, etc. etc. Buy some Japanese type pull saws, an inexpensive new chisel set, sharpening stones, etc. And then start thinking about finishing!!!
YouTube videos are your friend.
6--you don't need a set of chisels yet. You don't need 2 diamond stones. You'll soon be through your $200 budget and won't be equipped to make anything.
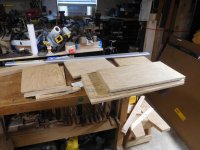
The back is split in two pieces and create French cleat. The break is behind the shelf. Both sections are screwed to the wall. The back is screwed to the carcass only right now. I might take it off and glue and Brad nail it along with the screws.rrich--Looks nice. That cabinet will get pretty heavy. How is it attached? French cleats?
Malibu: You've already gotten a lot of good information but, speaking as a former teacher, you probably won't fully know what to make of it until you start working on some projects. As you do, I'd be willing to bet you'll find yourself thinking, "Oh, that's what they meant!" Start small and see where it leads you. Try to enjoy it.
Okay, here's my 2 cents. I am now completing a project using only hand tools. I learned quite a bit about hand tools and I enjoyed the process. However, I probably won't do that again. Some things are just too much work, like re-sawing. Even Paul Sellers uses a thickness planer. You'll have to decide for yourself where to draw the line.
By the way, a Stanley No.4 would be a good place to start for bench planes. They were well made and can be found under nearly every rock. They're surprisingly versatile. The numbers on bench planes generally relate to size and 4's are a good compromise. The reason for the wide fluctuation in prices is that Stanley manufactured them for a very long time and collectors gotta collect. Learn how to tune it up and how to sharpen the cutting iron. Oh man, are you gonna get opinions on that.


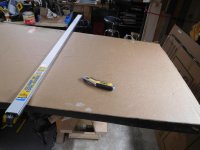
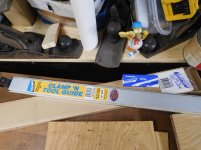
...The 50" saw guide turned my little cordless Porter Cable saw into a Festool...


Woodworkers, does anyone know of a source for gloss varnish? (not poly, not spar varnish, not water based/fast drying varnish, not any "fake" varnish)
My last varnish purchase was at Ace and they no longer stock it. (only spar)
I mix it with equal parts BLO and Turpentine and it makes a wonderful, rich, close to the surface finish. (Sam Maloof's formula)
Now I can't find it any place.

ALL: while you guys are mentioning varnish and stains is there a shelf life for them cause i have gallons of the stuff I just brought home from my parent's home that I bet is over 30 years old?
I was going to take to dump or put kitty litter in most of it, but if some is still ok I don't mind putting it on a shelf and maybe giving it a try.
what say you?
thanks in advance
Unless they're dried up, I bet they'd be just fine. Even if there's a small skin just puncture it and strain the contents into a new can. You can always test them on a piece of scrap.
I'm discovering some of the older products are actually better then what we can get today. Modern products all seem to be water based, low VOC, lower end ingredients, etc.
If I were refinishing a floor, I'd probably opt for new polyurethane based products but for restoring old cabinets, furniture, etc the older finishes should be just fine as long as you're careful with them.
One example is old Watco oil which was based on an asphaltum pigment. They changed the forumula and it's no longer as nice looking.