To avoid these ads, REGISTER NOW!

Woodworking 101--Tools and Tips

jar944

Well-known member
Joined
Jul 26, 2010
Messages
5,908
Location
Northern VA
funny that was my first thought too. for the longest time i refused to believe some of those PC tools were really available for sale.

Cheech,
I think I have only seen two "in the wild". I have seen their list price though. I suspect Jar may deserve a "you ****" but I will reserve that since we haven't heard what he paid. Regardless, great tool and will serve him well.

Rick
Ha That's funny I didn't even remember Norm having one. Though I also didn't remember him having the delta bench top biscuit joiner or williams and hussey molder until I ended up with a couple of each myself.

The pocket hole machines are more common (really common) in cabinet shops. The Porter Cable is actually a re-badged castle tsm-10 machine. Castle makes a few different models. This used to be the cheapest @ $1250. The fully automatic 3 phase version is about $6500.

I paid the average at $450. Not great but they don't come up used locally that often. The bandsaw was a better deal in that I got it for $700 less than the normal street price.

I'm actually converting the pocket hole machine to a automated pneumatic setup
 

Attachments

  • 20180725_205345.jpg
    20180725_205345.jpg
    138.6 KB · Views: 74
To avoid these ads, REGISTER NOW!

madison069

Well-known member
Joined
Nov 5, 2010
Messages
4,151
Location
Monroeville, PA
One of the things I hate about the wood room was the carpeted floor. It's a low cut firm commercial carpet, but it makes cleaning wood dust from the floor difficult. So when I saw these engineered flooring on the side of the road for trash day I thought , what do I have to loose? It's free so not much can go wrong!

So I loaded it all up and brought it home, but didn't install it til tonight. After a few hours of cleaning and installing the floor I was rewarded with a nice smooth floor! I need to trim it out now but overall I'm happy with it!
 

Attachments

  • IMG_20180729_175707134.jpg
    IMG_20180729_175707134.jpg
    75.3 KB · Views: 71
  • IMG_20180802_201851672.jpg
    IMG_20180802_201851672.jpg
    150.5 KB · Views: 72
  • IMG_20180803_181323156.jpg
    IMG_20180803_181323156.jpg
    116.6 KB · Views: 77
  • IMG_20180803_192412704.jpg
    IMG_20180803_192412704.jpg
    51.4 KB · Views: 65

CRSINMICH

Well-known member
Joined
Aug 15, 2015
Messages
2,397
Location
Southeastern Michigan
madison: Nice score on the flooring. I'm sure you'll be happy with the new surface. It will be easy to clean and it will have some give to it which will make standing on it for hours easier on your back. I'm a bit of a worrywart so one word of caution: If you ever have water problems like a leaky roof or a burst pipe, the carpeting under the flooring may develop mold. What kind of sub-floor is under the carpet?

EDIT: Never mind about the sub-floor. I just read your garage thread. Your back will really be happy with a soft layer between the wood flooring and the concrete. I'm seriously jealous. My entire woodshop is smaller than the open area of your shop and that is before putting in two benches and a drill press. Realtors would call it a "Step Saver". Yeah, that's what it is.
 
Last edited:

cheechi

Well-known member
Joined
Feb 29, 2012
Messages
4,384
Location
Triad, NC
I bought a few file cabinets from a local shop that salvaged them from cubicle assemblies. As such they have no top to them, but the metal is bent and there are holes pre drilled where you are meant to attach the mdf cubicle top. I put several of them all in a row below my wood rack in essentially dead floor space and now it houses sanders and such. Thought I had a photo but maybe not. That top is just resting on them.

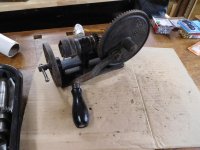
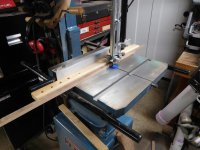
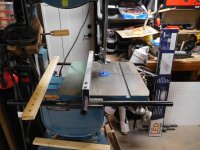
I have one cabinet left to do, currently it's at the bottom of a clutter pile but its day is coming. I got the jointer dialed in after much tinkering and it's so much better than previous glue ups I've done before I had one. Using a planer sled for flattening is nice but it's not a real jointer.

I bought a bunch of cherry stain since HD is changing brands it was cheap. Means most of my shop stuff that gets stained will probably be cherry. Good thing I like it! So this is the first coat using the minwax pre-stain about 10 mins prior, my basement is bare concrete floor so its basically whatever humidity is outside +/- 5%
20180714_204329.jpg

And a second coat. I really liked the contrast here
20180715_140418.jpg

Third coat. I had decided at this point I was done...
20180720_213555.jpg

When I looked at the sides, I decided the nicer looking one was what I had originally wanted to be the back, which meant filling in the knot that was originally going to be at the back. So this photo is actually after a coat of poly, epoxy in the biggest knots, and then some spot sanding. I decided I liked the lighter patterns and where the poly wasn't sanded off, so I decided to do another coat of stain to see if I could get an uneven 'antiqued' look. So this is a photo after the fourth application of stain was no longer tacky but still drying.
20180803_114820.jpg

It's now drying from a fifth coat, I decided on this coat not to wipe off the excess as it's (wet) a really dark rich red unlike my scrap of relatively dark brown cherry floor I have been comparing, and different from mahogany or other red woods. Granted it's still got to dry but think of a dark red dyed guitar body where you can still see the grain clearly. If it stays this way it's going to be amazing. I'll get a photo of it later.

Once this cabinet goes in place, nobody including me will ever see the top again it's getting a pretty tall computer to sit right on top of it. This was more just an exercise in building skill and getting back into having nice tools to do real work instead of 'good enough' like a lot of my pre-jointer projects have been.

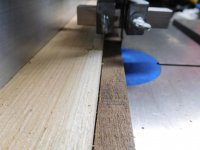
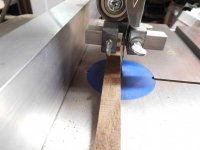
Next up is a 12ft maple butcher block counter top I need to put on top of my general purpose workbench. It's getting cherry also because I have gallons of it; Probably not 5 coats though. Maple and pine are often listed together as woods that spotch when stained, should I expect about the same results as the pine here or is maple even more difficult? This isn't furniture grade work but I don't want to make it look like garbage either.

So the idea is buy one of these and sand (what grit would you start sanding, I don't have much experience with butcher block or this company) up to 320 then stain, then (how many?) coats of poly. This bench might get used for general purpose 'stuff' be overflow storage for heavy stuff like my planer that still doesn't have a permanent home, might be used to maintain & take apart lawn tools or any manner of other things.
 

cheechi

Well-known member
Joined
Feb 29, 2012
Messages
4,384
Location
Triad, NC
You're right but it's a 'gift' in the sense that my wife also likes it so she's 'letting' me buy it. She's got a discount something or other for it. I've got some maple 1/4" ply that's going to go on the wall behind and to the sides.
 

cheechi

Well-known member
Joined
Feb 29, 2012
Messages
4,384
Location
Triad, NC
Oh yeah. She's great. I get where you're coming from with the 2x6's otherwise, if she didn't like the maple that's what I'd be doing.

Maybe it's different for you but all the 2x6's just like all the 2x4's are center cuts, nearly every one of them you can see the actual center of the tree. Sometimes I luck out and see 4x4's with a decently flat-ish grain radius. I like the idea of that better, once I get a resaw fence I want to do a project with 4x4's to find out if I really do like them better.
 

cheechi

Well-known member
Joined
Feb 29, 2012
Messages
4,384
Location
Triad, NC
Actually no. I contacted Porter Cable about it and even found the part # for them from the instruction book, they said they don't ship the bandsaw with a fence anymore.

I haven't decided between the Kreg and the magfence. For the amount the bandsaw currently gets used, it hasn't been a high priority.
 
OP
J

jimreed2160

Well-known member
Joined
Aug 7, 2016
Messages
3,589
Location
Tallahassee FL
I acquired a bandsaw when I was 12 and grew up using it fenceless. When I was finally able to upgrade, I bought a 14" Jet with riser for resawing and also added a fence. After many years of using it, I am now addicted to the fence and rarely make a cut without it.

My fence is only about 2 1/2 or 3 inches high but has been fine for resawing. To me, the key to good resawing is a square board with a flat bottom. Thin stuff is what gives me problems because the blade guides keep the fence a few inches from the blade. That's why I keep 1x2 sticks on the BS table. They make great fence "extensions". I will post some pictures later.
 

madison069

Well-known member
Joined
Nov 5, 2010
Messages
4,151
Location
Monroeville, PA
madison: Nice score on the flooring. I'm sure you'll be happy with the new surface. It will be easy to clean and it will have some give to it which will make standing on it for hours easier on your back. I'm a bit of a worrywart so one word of caution: If you ever have water problems like a leaky roof or a burst pipe, the carpeting under the flooring may develop mold. What kind of sub-floor is under the carpet?

EDIT: Never mind about the sub-floor. I just read your garage thread. Your back will really be happy with a soft layer between the wood flooring and the concrete. I'm seriously jealous. My entire woodshop is smaller than the open area of your shop and that is before putting in two benches and a drill press. Realtors would call it a "Step Saver". Yeah, that's what it is.

Thanks! It's been a lot nicer to sweep stuff up off this floor for sure. If the carpet was something that's thick and soft I'd ripped it up. But this is that commercial flooring carpet that's glued down to the concrete and this particular floor is wood. But it's very solid so I'm not concerned.

If it ever gets wet I suspect the flooring will start getting soft and damaged so I'm sure I'd have to rip it all up if it gets to the point of moldy carpet
 
OP
J

jimreed2160

Well-known member
Joined
Aug 7, 2016
Messages
3,589
Location
Tallahassee FL
Bandsaw fence
It is 2" tall and has been fine for my resawing as long as the stock edge is squared up. But it has been a problem for smaller stuff. I use the BS to rip small stock and I keep a 1x2 stick handy to use as a fence extension.

I know that I could keep the blade guides raised 2" to clear the fence, but that is not an option. My experience is that cuts with this saw are much more accurate if the top guide is close--about 1/8" to 1/4" above the stock.
 

Attachments

  • DSCN7576.jpg
    DSCN7576.jpg
    143.7 KB · Views: 66
  • DSCN7575.jpg
    DSCN7575.jpg
    106 KB · Views: 67
  • DSCN7574.jpg
    DSCN7574.jpg
    102.2 KB · Views: 67
  • DSCN7573.jpg
    DSCN7573.jpg
    150.7 KB · Views: 74

ez-duzit

Well-known member
Joined
Jun 24, 2013
Messages
5,096
Location
Marina del Rey
jr--can't tell what blade you're running for resaw (though that is not the operation in the photos) but it should be the widest the machine will properly tension. Should easily then be able to run it with the guide clearing that fence. There should never be a reason for a setup like you've shown, especially for slicing thin material like that. Has to be a problem in the machine setup.
 
OP
J

jimreed2160

Well-known member
Joined
Aug 7, 2016
Messages
3,589
Location
Tallahassee FL
Thanks for your observations, EZ. I use a half inch blade for everything because resawing is an infrequent task for me. I think it is 3 ppi or something like that so it clears pretty quickly.

As for the setup, it is proper for this saw. I do use bandrollers and they do stick out a little bit more than regular blocks. But you will notice that the rear support would hit the fence next. The rear support is offset so I could get closer to the blade if I moved the fence to the right. But I like it on the left so I can see cutting better.

You are correct that the fence works without help for resawing. But check out the stock. I often rip 1/2" stock for my dowel maker and any drift makes a big difference. For that reason, I keep the top guide very close to the stock. My guess is that drift is not that big of an issue on your large machine.
 

ez-duzit

Well-known member
Joined
Jun 24, 2013
Messages
5,096
Location
Marina del Rey
The drift can be corrected by adjusting the alignment of the fence; it doesn't matter if it winds up being out of square to the table. What you do is push the workpiece through the blade without the fence, cutting to a pencil line, while noting the angle the workpiece forms to the edge of the table. Adjust the alignment of the upper guide to minimize this angle. Then adjust the fence to this angle. If the fence is not adjustable, add a tapered overlay to it.

You may have to adjust again if you change or dull the blade.
 
To avoid these ads, REGISTER NOW!
OP
J

jimreed2160

Well-known member
Joined
Aug 7, 2016
Messages
3,589
Location
Tallahassee FL
Another handle

When it rains it pours. I just made a handle for a #77 dowel machine and here comes another in need of same. Seems like the second time around should be easier, right? NOT! It seems you need to be paying attention to measurements. This handle was damaged and repaired with a weld. At the time it looks like they shortened the rod. When I finished turning my perfect handle replacement, I was surprised to discover that I had neglected to use a story stick and the handle was a tad too long. Actually, the handle is just right and does not need to be shorter. The shaft is the real problem.

I found a suitable six inch long 3/8" hex bolt at HD. The first task was to dome it over. With no metalworking lathe in sight, I used a drill and grinder. Then I polished it on 220 AO sandpaper.
 

Attachments

  • DSCN7577.jpg
    DSCN7577.jpg
    149.2 KB · Views: 47
  • DSCN7580.jpg
    DSCN7580.jpg
    149.5 KB · Views: 45
  • DSCN7581.jpg
    DSCN7581.jpg
    107.4 KB · Views: 43
  • DSCN7583.jpg
    DSCN7583.jpg
    89.8 KB · Views: 45
  • DSCN7584.jpg
    DSCN7584.jpg
    148 KB · Views: 47
OP
J

jimreed2160

Well-known member
Joined
Aug 7, 2016
Messages
3,589
Location
Tallahassee FL
Handle
So the dome polished up nicely and I moved on to the ferrule. I like to turn a tad oversized because it is easier to remove excess than deal with a loose ferrule. For this task, I used my LN shoulder plane. I (CAREFULLY) clamped it in a vise and went to town. Then I touched it up with the chisel and sandpaper. Paint came last.

And while I was in the spray booth, a bird flew by and tagged my forehead. Nasty!!! BIRDS ARE RUDE! That is why I like to stay inside as much as I can.

Next task is to wait a few days for the paint to get hard. I will attach the ferrule, measure the rod, cut it to length, and peen it into place.

Seems like my passion for woodworking has led me into metalsmithing.
 

Attachments

  • DSCN7591.jpg
    DSCN7591.jpg
    146.6 KB · Views: 56
  • DSCN7590.jpg
    DSCN7590.jpg
    146.7 KB · Views: 54
  • DSCN7589.jpg
    DSCN7589.jpg
    116.6 KB · Views: 57
  • DSCN7588.jpg
    DSCN7588.jpg
    149.3 KB · Views: 55
  • DSCN7587.jpg
    DSCN7587.jpg
    121.1 KB · Views: 55
OP
J

jimreed2160

Well-known member
Joined
Aug 7, 2016
Messages
3,589
Location
Tallahassee FL
New project
A dear friend dropped off this cuckoo clock shortly after dropping it to the floor. One of the trim pieces broke and she used Gorilla glue before thinking that she needed some more help. Sorry that I do not have a true before picture but the lower arch was broken into three pieces. I glued that piece back and trimmed the previous mis-aligned repairs.

After the glue dries the next step is to touch up the carvings with sharp chisels. Then I will use my shellac hot knife to burn in filler. Last step is to add stain and a little poly. My goal is to make it look good at ten feet.
 

Attachments

  • DSCN7578.jpg
    DSCN7578.jpg
    158.1 KB · Views: 56
  • DSCN7579.jpg
    DSCN7579.jpg
    150.2 KB · Views: 57

TerryH

Well-known member
Joined
Dec 8, 2012
Messages
2,248
Location
Springdale, AR
New project
A dear friend dropped off this cuckoo clock shortly after dropping it to the floor. One of the trim pieces broke and she used Gorilla glue before thinking that she needed some more help. Sorry that I do not have a true before picture but the lower arch was broken into three pieces. I glued that piece back and trimmed the previous mis-aligned repairs.

After the glue dries the next step is to touch up the carvings with sharp chisels. Then I will use my shellac hot knife to burn in filler. Last step is to add stain and a little poly. My goal is to make it look good at ten feet.

Whew. Better you than me Jim! That sort of thing just gives me a headache.
 
OP
J

jimreed2160

Well-known member
Joined
Aug 7, 2016
Messages
3,589
Location
Tallahassee FL
Terry--Thanks for stopping by. The clock was fun. The hardest part was removing the Gorilla glue overspill and cleaning up the previously glued edges that were off.

I used Minwax Special Walnut stain on the wood and used a black sharpie to color some of the darker spots. Then I used a burn in knife to fill in the big crack. I am not very good with the knife and it was hard to get into the small spaces. But I got enough goo around to make it look better. Then I sanded and used more Minwax. I finished the spot with Semi gloss poly. It looked a little too shiny so I rubbed it down with a cloth.

My objective was to make it look right at ten feet. I think I did that, even if it does look a little rough up close. I hope she will be happy with it.


Poppie's Furniture Repair
"You break it--we fix it"
 

Attachments

  • DSCN7595.jpg
    DSCN7595.jpg
    159.3 KB · Views: 48
  • DSCN7593.jpg
    DSCN7593.jpg
    159.9 KB · Views: 50

TerryH

Well-known member
Joined
Dec 8, 2012
Messages
2,248
Location
Springdale, AR
Terry--Thanks for stopping by. The clock was fun. The hardest part was removing the Gorilla glue overspill and cleaning up the previously glued edges that were off.

I used Minwax Special Walnut stain on the wood and used a black sharpie to color some of the darker spots. Then I used a burn in knife to fill in the big crack. I am not very good with the knife and it was hard to get into the small spaces. But I got enough goo around to make it look better. Then I sanded and used more Minwax. I finished the spot with Semi gloss poly. It looked a little too shiny so I rubbed it down with a cloth.

My objective was to make it look right at ten feet. I think I did that, even if it does look a little rough up close. I hope she will be happy with it.


Poppie's Furniture Repair
"You break it--we fix it"

I have a sign in my office that's meant to be funny that says we charge more if you worked on first. lol.. Which I do. :lol_hitti

Beautiful repair Jim.
 
OP
J

jimreed2160

Well-known member
Joined
Aug 7, 2016
Messages
3,589
Location
Tallahassee FL
Terry--Thanks for your kind words. It is true that amateur repairs are double the work. And I HATE Gorilla glue. It swells up and does not like stain. The only way I have found to deal with it is cut it with sharp chisels and then use filler.
 

rlitman

Well-known member
Joined
Oct 18, 2010
Messages
24,591
Location
Long Island
...And I HATE Gorilla glue. It swells up and does not like stain...

I started using Gorilla glue for under the waterline scarf joint repairs on wooden boats. But ever since Titebond III has come out, I see no continued use for Gorilla glue on wood. I totally agree that it causes more harm than good.

It does have a better grip on stuff like ceramic to metal, and other weird applications.
 

ez-duzit

Well-known member
Joined
Jun 24, 2013
Messages
5,096
Location
Marina del Rey
I started using Gorilla glue for under the waterline scarf joint repairs on wooden boats. But ever since Titebond III has come out, I see no continued use for Gorilla glue on wood...

I would never trust Gorilla glue below the waterline, but would use resorcinal or WEST epoxy.
 

Ainsley

Well-known member
Joined
Jun 12, 2014
Messages
557
Location
Ontario, Canada
Resawing some ~6" hard maple on my 15" general

IMG_2675_zpskvvcxce1.jpg
 

rlitman

Well-known member
Joined
Oct 18, 2010
Messages
24,591
Location
Long Island
I would never trust Gorilla glue below the waterline, but would use resorcinal or WEST epoxy.

They all have their uses, but polyurethane glue has better under the waterline test data than epoxy, and that's saying something. Resorcinal is such a pain in the **** to work with, and is so darned toxic that I won't touch it any more. But my days of having a hole in the water to throw money into are long gone.
 

Ainsley

Well-known member
Joined
Jun 12, 2014
Messages
557
Location
Ontario, Canada
I've been on a bowl kick since I got the lathe up and running

This is the biggest I can go on my Beaver 3400
FB9D457C-CEDE-4EB8-B407-07B902E4F53D_zpsjvggzaig.jpg


Live edge walnut:
IMG_3801_zps4t0c3luq.jpg


One of my nicer live edge Cherry Pieces
IMG_3838_zpscmvo5fmd.jpg


I loved the grain in the wanut crotch:
IMG_3853_zpsgpkscost.jpg


Messing around with a walnut bowtie to stabilize a crack in a cherry piece
IMG_3952_zpsfbwwxgvw.jpg
 

Ainsley

Well-known member
Joined
Jun 12, 2014
Messages
557
Location
Ontario, Canada
It has been a while since i posted in here so I'm playing a bit of catchup...

Some spalted maple slab shelves I did for my wife
IMG_3207_zpsewi2oifd.jpg


Maple and purpleheart (also did some walnut) Tic-Tac-Toe boards for all the kids of family and friends for Christmas. Did 13 of the things and still have enough pieces to be assembled for another 4 or 5
IMG_2750_zpsmzjectcc.jpg


Bookcase I made for a customer. 3/4" oak veneer ply and solid red oak edging
IMG_3162_zpslndrk10b.jpg


Walnut live edge slab with a birdseye maple bowtie that I did for a friend
16941C0A-B279-418D-8B0D-03F29506F732_zpsiuw5rlpg.jpg
 

rlitman

Well-known member
Joined
Oct 18, 2010
Messages
24,591
Location
Long Island
That's only saying something, unless you have a link. ;)

The only place I use Gorilla glue is on model airplanes (it's lighter).

Most of the links I can find at the moment are from people just testing ultimate glue strength (where polyurethane is not a winner in long-grain configurations), or are marketing (not to be trusted) sources.

For under the waterline performance, the only standard test I am aware of is the "ANSI/HPVA Type I water-resistance specification". Since Titebond III passes this, I feel that foaming polyurethane adhesives are now obsolete. But step back 20 years, and read some Wooden Boat, and Gorilla was the best choice around.

You yourself are a fan of 5200. That's the same moisture curing polyurethane, and has the same water resistance as Gorilla glue for under the waterline uses.
 
OP
J

jimreed2160

Well-known member
Joined
Aug 7, 2016
Messages
3,589
Location
Tallahassee FL
Ainsley--Wow! Nice wood and a great workover from you. Thanks for the pictures. As for the resaw, it looks perfect. All I can say is that must be one really sharp blade.
 

ez-duzit

Well-known member
Joined
Jun 24, 2013
Messages
5,096
Location
Marina del Rey
Most of the links I can find at the moment are from people just testing ultimate glue strength (where polyurethane is not a winner in long-grain configurations), or are marketing (not to be trusted) sources.

For under the waterline performance, the only standard test I am aware of is the "ANSI/HPVA Type I water-resistance specification". Since Titebond III passes this, I feel that foaming polyurethane adhesives are now obsolete. But step back 20 years, and read some Wooden Boat, and Gorilla was the best choice around.

You yourself are a fan of 5200. That's the same moisture curing polyurethane, and has the same water resistance as Gorilla glue for under the waterline uses.

5200 is very useful to me, but not as a substitute for epoxy.

I have subscribed to Wooden Boat magazine for decades (though not presently). Gorilla glue has NEVER been the "best choice around." It is weak and messy, as it expands and immediately deposits a sticky mess around glue joints which, once cured, can be laboriously removed (which is essential as its color contrasts with most wood). It is this foaming expansion that causes its weakness, as bubbles are formed. Furthermore it is wasteful, as it tends to go off in its container shortly after being opened, no matter the cap being replaced immediately after dispensing.

WEST epoxy makes very strong bonds with wood (though its proper application is more tedious and therefore time consuming), and can generally be cleaned up immediately, as it does not noticeably expand while curing. It can confidently be used below the waterline. It has a very long shelf life, though the hardener may develop a strong odor and become darker in color. Some people can develop sensitivities to its use. And so some care should be taken with regard to contact. Care should also be taken to avoid breathing its sanding dust, particularly when only partially cured.
 
OP
J

jimreed2160

Well-known member
Joined
Aug 7, 2016
Messages
3,589
Location
Tallahassee FL
Handle
The paint on the dowel machine handle was dry enough for working today so I continued. Needed to attach the ferrule and peen the rod. I tapped the ferrule in place with a wooden mallet and then marked the rod and cut it with an angle grinder. Then I made a spacer from a washer. The handle needs to spin on the shaft and the spacer leaves room for that.

I chamfered the outer end of the handle hole, hoping that the stretched metal would have a place to go.

I used another washer on the dome. It is recessed into the wooden handle and the washer gives me a solid connection with the anvil while I am pounding on the other end. I walloped away with a variety of ball peen hammers, taking time to work off the carpal tunnel cramps in my hands. The round end of the hammer dimples the metal and gets it moving while the smoother end of the hammer gives a nice finish.
 

Attachments

  • DSCN7601.jpg
    DSCN7601.jpg
    106.7 KB · Views: 46
  • DSCN7600.jpg
    DSCN7600.jpg
    130.6 KB · Views: 44
  • DSCN7599.jpg
    DSCN7599.jpg
    124.8 KB · Views: 44
  • DSCN7598.jpg
    DSCN7598.jpg
    110 KB · Views: 46
  • DSCN7597.jpg
    DSCN7597.jpg
    99.6 KB · Views: 44
  • DSCN7596.jpg
    DSCN7596.jpg
    124.7 KB · Views: 46
OP
J

jimreed2160

Well-known member
Joined
Aug 7, 2016
Messages
3,589
Location
Tallahassee FL
Handle
I kept pounding away until this thing was done. Interesting to note that the soft metal washer on the anvil side of the bolt got domed in the process. But now the handle is attached and works well. It is still wonky from its original repair but I do not have the smithing skills to bend it. And I don't dare try it cold. These old parts can be pretty brittle and break more than they bend.

So now this dowel machine is ready to release back into the wild so some woodworker can have some fun.
 

Attachments

  • DSCN7602.jpg
    DSCN7602.jpg
    115.8 KB · Views: 61
  • DSCN7603.jpg
    DSCN7603.jpg
    111.1 KB · Views: 57
  • DSCN7604.jpg
    DSCN7604.jpg
    104.9 KB · Views: 57
  • DSCN7605.jpg
    DSCN7605.jpg
    111.2 KB · Views: 51
  • DSCN7606.jpg
    DSCN7606.jpg
    146.5 KB · Views: 61
To avoid these ads, REGISTER NOW!
Top Bottom