
You are using an out of date browser. It may not display this or other websites correctly.
You should upgrade or use an alternative browser.
You should upgrade or use an alternative browser.
Woodworking 101--Tools and Tips
- Thread starter jimreed2160
- Start date
txlonghorn1989
Well-known member
- Joined
- Feb 27, 2017
- Messages
- 2,786

Looks fantastic. I can't wait to see it finished.
OP
jimreed2160
Well-known member
rrich--Outstanding work. Very artistic. I like your matched woods and your matched grain. You have a real eye for beauty.
drivesitfar
Well-known member
RR: I agree that dresser is a piece of ART. I (we) certainly don't blame you for being a bit nervous about drilling holes in for your cool handles and happy everything worked out ok. WELL DONE!!
ALL: I'm leaning towards SIKKENS stain for my new cedar fence and wondered if any of you have another favorite to make your outdoor cedar and wood projects look good and last for years. with the Sikkens the can says to only put on one coat, but I did that 7 years ago on my Pergola and after a couple years it turned a pretty dark brown and lost it's reddish color. after sanding and restaining and putting on 2-3 coats it's still looking good a few years later and my mailbox stand seems to be holding up too.
ALL: I'm leaning towards SIKKENS stain for my new cedar fence and wondered if any of you have another favorite to make your outdoor cedar and wood projects look good and last for years. with the Sikkens the can says to only put on one coat, but I did that 7 years ago on my Pergola and after a couple years it turned a pretty dark brown and lost it's reddish color. after sanding and restaining and putting on 2-3 coats it's still looking good a few years later and my mailbox stand seems to be holding up too.
Attachments


DeaconSteve
Active member
rrich, that is indeed very impressive. I have had a stack of walnut for quite some time that I have been waiting to decide on a project to use on. I have decided to use some of it to replace a table top, but this has given me pause to wonder. Nah, guess I will go with plan A. Thanks for taking the time to share this project though.
Thanks everyone. I enjoy documenting the builds that I do. If you happen to have Instagram (great platform for information and ideas) I post more often there @r2_woodworking.
I got all of the drawer tops planed down which helped in sliding of the drawers in and out. I then attacked the gaping and got them pretty even. The sides have more of a gap than the tops and bottoms of the drawers. I've done this on a few other pieces and find that it looks just fine. Lastly I was able to quickly freak the edges. Up next is to steam any small dents that I have, sand everything to 220 or 320, then apply finish. Almost there!
Sent from my Pixel XL using Tapatalk
1Garageman
Well-known member
Awesome job rrich1!!!!

I loving seeing hand built furniture that will be in the family forever!
I loving seeing hand built furniture that will be in the family forever!
drivesitfar
Well-known member
ALL: anybody glue up shortish 2 by's or 4 by's and make a structural beam?
reason being i just picked up 300 4x4x3's and after I use 30-40 to make a couple tables on each end of my Dewalt planer i'll have a few left over.
hope you all have a great weekend
reason being i just picked up 300 4x4x3's and after I use 30-40 to make a couple tables on each end of my Dewalt planer i'll have a few left over.
hope you all have a great weekend
Attachments
-
 trailer full of 4x4x3's now.jpg154.5 KB · Views: 73
 -
 about 400 3 footers to get 300 from.jpg104.1 KB · Views: 82
 -
 left these 4x4x3's for the next guy or i'll pick up later for firewood.jpg150.1 KB · Views: 66
 -
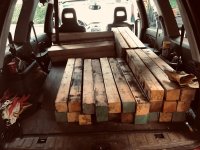 this is all I wanted to load in Honda so I could see all of trailer that is packed.jpg151.6 KB · Views: 69
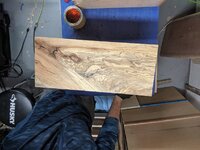
Well got a little shop time in this weekend. Made two bird houses with my four year old son and primed with BIN shellac. We bought some acrylic paint from the craft store so he will be painting these later this week for gifts to the grandparents. And I worked on a couple Wood Whisperer inspired Glue Caddy’s. Got the dove tail fit almost perfect out the gate. Between the Whiteside Machine bits and the Incra table it almost feels like cheating. Just have to finish making the router templates when I get them in next week from Rockler. Then nothing a carbide up cut / down cut flush trim router bit won’t make quick work of.


Sent from my iPhone using The Garage Journal mobile app
Sent from my iPhone using The Garage Journal mobile app
Attachments


turbowoodworker
Well-known member
Nice work. Aren’t sliding dovetails fun?
Nice work. Aren’t sliding dovetails fun?
They are fun and easy! I remember looking at projects and watching videos thinking “man that looks difficult but it sure does look nice”. But after using locking drawer joints and dove tails I dunno if I want to do any projects without again! Very little is more frustrating than lining up joints without a locking feature or dado/rabbit. Once I started using them I then starting adjusting project plans that did not have them to use them! Also - having the right equipment helps a lot. I couldn’t imagine not having my cabinet saw or Incra Router with lift.
Sent from my iPhone using The Garage Journal mobile app

And look what was waiting for me when I got home from work! A new Incra 5000 miter sled and a Whiteside 1/2 carbide uncut router bit (not pictured). Looking forward to having a good sled finally to help batch out some upcoming projects.
Sent from my iPhone using The Garage Journal mobile app
rlitman
Well-known member
And look what was waiting for me when I got home from work! A new Incra 5000 miter sled and a Whiteside 1/2 carbide uncut router bit (not pictured). Looking forward to having a good sled finally to help batch out some upcoming projects.
Sent from my iPhone using The Garage Journal mobile app
I’ve got that sled and love it. Just look carefully at the instructions. For left tilt saws, the sled goes on the right side and everything needs to get reversed.
Also, I made an off-cut table to go with mine. When I have a chance, I guess I should put that up.
I’ve got that sled and love it. Just look carefully at the instructions. For left tilt saws, the sled goes on the right side and everything needs to get reversed.
Also, I made an off-cut table to go with mine. When I have a chance, I guess I should put that up.
Yea I read that about reversing the table. I can’t say I intend to use this to cut bevels but I do know I like using my left hand to hold stock and my right hand to push material through. I may play with it more but it will take some getting used to if I swap sides. I dunno, I will consider it some more.
Sent from my iPhone using The Garage Journal mobile app
rlitman
Well-known member
Yea I read that about reversing the table. I can’t say I intend to use this to cut bevels but I do know I like using my left hand to hold stock and my right hand to push material through. I may play with it more but it will take some getting used to if I swap sides. I dunno, I will consider it some more.
Sent from my iPhone using The Garage Journal mobile app
Yeah, I had the same reservations when I flipped mine. Just remember that you cut it to fit the blade, so it’s really meant to be it only once. Still, I bought mine used and reversed it, so if you change your mind, it’s not the end of the world.
As for holding stock, I’ve trained myself to only hold the handle. It has an excellent hold down.
Yea, a replacement drop panel is only $39.95 so i wouldn’t be out much. I’m gonna go mess around with it more and see if I can convince myself. [emoji23]
Sent from my iPhone using The Garage Journal mobile app
rlitman
Well-known member
Yea, a replacement drop panel is only $39.95 so i wouldn’t be out much. I’m gonna go mess around with it more and see if I can convince myself. [emoji23]
Sent from my iPhone using The Garage Journal mobile app
You won’t need to spend anything. That panel is drilled on both sides, so you just mount the cutoff on the other side of the extrusion and cut it there. And use the cutoff, even if you don’t flip the sled. It makes the table a few inches wider.
You won’t need to spend anything. That panel is drilled on both sides, so you just mount the cutoff on the other side of the extrusion and cut it there. And use the cutoff, even if you don’t flip the sled. It makes the table a few inches wider.

Flipped it. I will try it some more but it will take getting used to. The biggest positive - it will keep me from using the right side of my TS as storage. The biggest negative - it will keep me from using the right side of my TS as storage. [emoji23]
Sent from my iPhone using The Garage Journal mobile app
Picked up a new dado stack for a good price. My local hardwood dealer was clearancing Everlast saw blades at 60% off. I needed a dado stack and it's made in America. From what I hear they are more of an industrial saw blade and not well known on the consumer market. Anyone heard or used them before? $80 for 30tooth set isn't bad either way.
Also picked up the katz-moses stop block. I love his dovetail jig and the stop block is really nice. There is no flip to deflect like the kreg stop block. Excited to use it. It is adjustable up and down and left and right. No place for a measuring device though.


Sent from my Pixel XL using Tapatalk
Also picked up the katz-moses stop block. I love his dovetail jig and the stop block is really nice. There is no flip to deflect like the kreg stop block. Excited to use it. It is adjustable up and down and left and right. No place for a measuring device though.
Sent from my Pixel XL using Tapatalk
Attachments


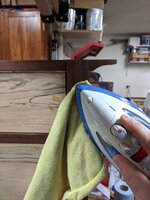
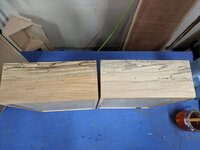
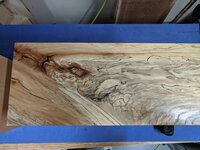
Sanded to 320 grit and then applied a wash coat of shellac on the drawers and top. I decided to try and make my own shellac with flakes this time. Overall it worked well but I feel like it was more streaky than using seal coat. Before sanding the wash coat down I will sand clean up the frame from any epoxy that seeped out from glue up and sand to 320.
I also used an iron to steam out some light scratches and dents. In the pic the horizontal dent is Midway on the pic.


Sent from my Pixel XL using Tapatalk

I also used an iron to steam out some light scratches and dents. In the pic the horizontal dent is Midway on the pic.
Sent from my Pixel XL using Tapatalk
Attachments
-
 0dedd9419578964467c7adddffe75442.jpg119 KB · Views: 2
 -
 5ea307331beac1543f48a8f0b3d38bfa.jpg76.9 KB · Views: 3
 -
 d29c913fbb05731976ae007f36a59bd9.jpg112.7 KB · Views: 3
 -
 81ff8810b6918fc1298f526c05953f07.jpg105.7 KB · Views: 3
 -
 db13766f9f54c8ca39201ea67a5730c3.jpg92.2 KB · Views: 2
 -
 cbfb415f27523f76529dcadbe5ea3f96.jpg113.4 KB · Views: 2
 -
 ac8ebd00218c31e3ce02169d4b474061.jpg98.6 KB · Views: 2
 -
 83c46fac10ad28754545c07210b5aa7b.jpg111.8 KB · Views: 2
Last edited:
drivesitfar
Well-known member
Rich & All: does that steaming work to take out dents in oak hardwood floors?
rlitman
Well-known member
Rich & All: does that steaming work to take out dents in oak hardwood floors?
It sure can. I start by wetting the dent, and place a wet rag over it for at least a few minutes. Then the iron. Heating the wood not only softens the fibers, allowing them to return to their original shape, but boiling the water inside the wood causes it to puff up. The combination of these can bring up all sorts of dents where the fibers haven’t been broken.
drivesitfar
Well-known member
RL: thanks and i'll give it a try cause my bride has been complaining for years about me making a few dents in our oak hardwood floors with me bringing in stuff out of my garage so i could try to get organized.
cheers!!
ALL: anybody do a swedish finish on their oak hardwood floors or is that a job best left to the guys that do it all the time?
cheers!!
ALL: anybody do a swedish finish on their oak hardwood floors or is that a job best left to the guys that do it all the time?
wrenchguy
Well-known member
I was steaming out dents when redoing mahogany speedboats 45 years ago. The results may range from perfect to slight distortion of grain. Of course the material can't be sealed.
Toolfool
Well-known member
Drives : Not many people do Swedish finish anymore. Best product is Bona Traffic.
rlitman
Well-known member
RL: thanks and i'll give it a try cause my bride has been complaining for years about me making a few dents in our oak hardwood floors with me bringing in stuff out of my garage so i could try to get organized...
Good luck. Just remember that the heat will soften the finish, so be gentle on it when it's hot. If you have an inconspicuous area you can practice, you know the drill.
The last time I used this technique was on a hammer dented pine bed with a water based urethane over an alkyd semi-transparent "stain". In that case, the urethane blistered, wrinkled and peeled. It initially looked awful (like boiled chicken skin), but I was able to refinish it with a spot touchup in a way that now only I can find the damage. Don't be too discouraged if the dent pops out but the finish is damaged. Urethane may be hard to spot treat perfectly, but if you're careful, the results can be less visible than the dent was initially. If you do damage the finish, just be very careful removing any damage. Remember that any oil based stain will not be affected by the heat (since it resides under the surface of the grain), and if you don't disturb the stain, you should be able to retouch the clear finish on top without a visible disaster. With my alkyd stain, I did have to touch up the stain first, before I brushed on more satin urethane.
Before that, I used it on a linseed oil finished walnut rifle stock that was dented on metal on a bench. That came back flawlessly after it was rubbed down with some more oil.
Last edited:
I recently moved my father's old table saw over to my house. I'd like to start using it, but it has no safety features whatsoever. No splitter, blade guard, featherboards, etc. He always used it that way and demonstrated safe practices when I was growing up, but it still has me a little nervous. I'm human and even being vigilant, mistakes can still happen.
I think adding a splitter would go a long way in reducing kickback risk. Any tips on how to add one? The saw is a Rockwell Model 10 contractor's saw. Did Rockwell or Delta ever make a splitter for this saw? It looks like there's a mount for one under the throat plate. Any idea where I might find one that would fit?
I think adding a splitter would go a long way in reducing kickback risk. Any tips on how to add one? The saw is a Rockwell Model 10 contractor's saw. Did Rockwell or Delta ever make a splitter for this saw? It looks like there's a mount for one under the throat plate. Any idea where I might find one that would fit?
fartymarty
Well-known member
I recently moved my father's old table saw over to my house. I'd like to start using it, but it has no safety features whatsoever. No splitter, blade guard, featherboards, etc. He always used it that way and demonstrated safe practices when I was growing up, but it still has me a little nervous. I'm human and even being vigilant, mistakes can still happen.
I think adding a splitter would go a long way in reducing kickback risk. Any tips on how to add one? The saw is a Rockwell Model 10 contractor's saw. Did Rockwell or Delta ever make a splitter for this saw? It looks like there's a mount for one under the throat plate. Any idea where I might find one that would fit?
I'm no expert woodworker by any means, so take other's advice with more weight than mine.
Although better than nothing most saws came equipped with marginal safety features at best, and the quality was so so. I had the same problem (no splitter or guard) with my old Craftsman saw. I went with some zero clearance inserts and the the MJ Splitter rather than try to find a used splitter for the saw on Ebay. You can make your own feather boards if you have a way to clamp them to the table. I do not use a blade guard but I'll have a homemade one in the future with a dust vacuum. Right now I use push sticks for everything even including simple cuts that most do by hand. Exception being when I use the miter guide. I also have some anti kickback rollers attached to my fence that I try to use when ever they will fit the situation. Mine are old and the old design is kind of clunky but it's about half the money of the newer sleaker looking ones and they are safe...if you use them.
So I think that the MJ Splitter and a zero clearance insert along with generous use of push sticks would be the quickest and most economical way to get going safely. The best safety device you have will be your brain (and what your father taught you), as long as you listen to it.

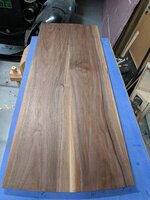
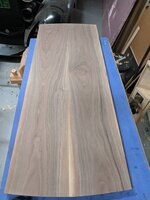
Today was a good day. I got the first coat of tried and true oil/varnish on all of the drawers and the carcass. I did not get to the top a d the drawer pulls yet. I ran out of room to apply the finish. The oil/varnish really bring the air dried walnut to life. 


Sent from my Pixel XL using Tapatalk
Sent from my Pixel XL using Tapatalk
Attachments


My Old Tools
Well-known member
A splitter can be as simple as 1/8" or 3/16" piece of drill rod set into the throat plate an inch or so behind the blade. It's only purpose is to keep you from twisting the material and binding the kerf.
drivesitfar
Well-known member
Spacey: from what I hear, read and see I think having a straight blade and fence and feather board and push tools are much more important that covering up the blade. that said I might own 4 small table saws that are all sitting in storage cause I use my Dewalt 12 inch compound miter, Makita 10 inch miters, and circular saws that all pretty much have different blades on them.
good luck!!
RR: OMG that is PURDY!!
nice work as always
RL and all thanks for the comments on steaming the small dents out of my oak swedish finish hardwood floor and it's due for a new finish after surviving raising 5 kids on it the last 20 years so i'm not worried about the finish.
Tool: I watched a video on the new finish you mentioned and guessing it's the latest and greatest and swedish finish has run it's course?
ALL: so anybody want to chime in and let me know your secrets on planing a lot of cedar 6x6's and 1x6's for my fence and i've got beams and 2x6's for a deck to do next spring/summer so i'm setting up a planing station alongside my home with a 12.5 inch 734 dewalt planer. tips, tricks or must haves?
i'm planning on building a temp (well it will be there a year maybe) 8 foot workbench on each end of my planer for starts that the plywood tops are laminated so they should be pretty slick. also i saw one guy using his planer to build a good workbench on Youtube and he shoved in scrap 2x6's when planing his 2x6 bench top boards to keep the boards going thru halfway straight. is that necessary or does that just help make it a bit quicker?
Attachments


turbowoodworker
Well-known member
Spacey, you are right to be concerned about TS safety. A splitter is a must and can be made easy enough. There is also a simple kit that makes it easy. Rocker has it. Search “MicroJig MJ table saw splitter”. I can say the kit is easy to apply and does a good job of lowering the risk of kickback.
OP
jimreed2160
Well-known member
Space--My favorite ts accessory is a bird's beak push stick. I also think the blade guard is misunderstood. If your body parts are close enough to touch the guard and need that kind of protection then you need to review and revise your technique. In my opinion the guard is there to keep the wood from riding up. The initial cut forces the wood to the table but once the wood passes it gets Upward force from the back side of the blade. Even slight binding can raise the wood enough to cause serious issues. A well adjusted guard can prevent elevation.
So make your saw safe and use safe techniques. Ts accidents happen quickly and are rarely minor. Good luck making sawdust.
So make your saw safe and use safe techniques. Ts accidents happen quickly and are rarely minor. Good luck making sawdust.
First coat of finish was put on the top today. The rest of the carcass is already done. I will apply the last coat of finish for the top tomorrow and it will officially be done! [emoji16]


Sent from my Pixel XL using Tapatalk
Sent from my Pixel XL using Tapatalk
Attachments


Toolfool
Well-known member
Beautiful piece rrich1.
drivesitfar
Well-known member
RR: wow!! Very nice work!!
madison069
Well-known member
Just wanted to chime in and tell ya rrich1, that dresser came out excellent! Been watching your build and I say you do some great work!