To avoid these ads, REGISTER NOW!

Woodworking 101--Tools and Tips

Spacey_G

Well-known member
Joined
Dec 31, 2015
Messages
492
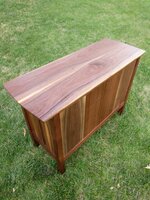
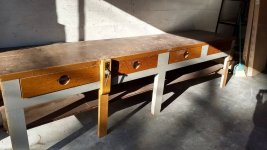
rrich1 - Beautiful work! The grain continuity across drawers is a really nice touch.

Thanks for the tips re:safety devices, all. I have a couple of zero clearance inserts and the Microjig splitter and push block arriving today. Just need to do a bit of a tune-up and alignment on the saw and then I'll be getting those set up.
 
To avoid these ads, REGISTER NOW!

rrich1

Well-known member
Joined
Oct 7, 2015
Messages
793
Thanks everyone! Tried to get some outside pics today. Put the second coat on the top yesterday. Won't bring it inside until Monday to allow a few more days to cure. 435229a511ee66d275b9b436fa47f24f.jpgfb9940a4e7781652043a5316e3f14722.jpg1be005d84a2fa932e4a6e9738da68a0a.jpg9652e8cb3280593f20df95c7605d4232.jpg451d0e85af30e7285512a07b7d6a27b6.jpg7936bfe4855f72f10cb10b8e8dab3f26.jpgf1f87b7d8dd4c4b2d239939d3b8dcc62.jpg0ad60ba596cd843b815f3e68acec37ca.jpg

Sent from my Pixel XL using Tapatalk
 

Attachments

  • f1f87b7d8dd4c4b2d239939d3b8dcc62.jpg
    f1f87b7d8dd4c4b2d239939d3b8dcc62.jpg
    129 KB · Views: 1
  • 7936bfe4855f72f10cb10b8e8dab3f26.jpg
    7936bfe4855f72f10cb10b8e8dab3f26.jpg
    116.1 KB · Views: 1
  • 451d0e85af30e7285512a07b7d6a27b6.jpg
    451d0e85af30e7285512a07b7d6a27b6.jpg
    161.7 KB · Views: 0
  • 9652e8cb3280593f20df95c7605d4232.jpg
    9652e8cb3280593f20df95c7605d4232.jpg
    168.5 KB · Views: 0
  • 1be005d84a2fa932e4a6e9738da68a0a.jpg
    1be005d84a2fa932e4a6e9738da68a0a.jpg
    165.7 KB · Views: 0
  • fb9940a4e7781652043a5316e3f14722.jpg
    fb9940a4e7781652043a5316e3f14722.jpg
    163.6 KB · Views: 0
  • 435229a511ee66d275b9b436fa47f24f.jpg
    435229a511ee66d275b9b436fa47f24f.jpg
    168.1 KB · Views: 1
  • 0ad60ba596cd843b815f3e68acec37ca.jpg
    0ad60ba596cd843b815f3e68acec37ca.jpg
    181.1 KB · Views: 6

rayh

Well-known member
Joined
Apr 23, 2014
Messages
45
That turned out beautiful, I really liked the way you walked us thru the build. Thanks for sharing.
 
OP
J

jimreed2160

Well-known member
Joined
Aug 7, 2016
Messages
3,589
Location
Tallahassee FL
Bathroom vanity top
I am still inside working on projects while trying to avoid the heat. Today's high is expected to be 98 and that has caused a general work stoppage. So it seemed like a good time to post some pictures.

We moved into this house in 2005. It was built in 1978 but was a little tired on the inside and I have been chipping away at it. My bathroom has been updated with new tile floor, lighting, paint, and fixtures. The laminated vanity surface has been bugging me for awhile but granite seemed too cold and too $$$. But I was walking thru Lowes one day and spied a butcherblock countertop that sparked some ideas--why not replace the nasty plastic with REAL WOOD! I searched for countertops and found one in ash from HD. At 72' x 30" it was perfect. I ordered some raw 8/4 ash from Wall Lumber for the backsplash.

To date, I have trimmed the top to width and coated it with poly. I squared up one end (no, neither end was square) and will soon cut it to length. The raw ash backsplash is a real chore as I am reducing it to 6/8 because I like the manly look of a thick backsplash and the ledge is handy for small items.

Step one is to flatten the boards with handplanes and step two is to resaw on the bandsaw.
 

Attachments

  • DSCN9173.jpg
    DSCN9173.jpg
    149.8 KB · Views: 94
  • DSCN9170.jpg
    DSCN9170.jpg
    102.6 KB · Views: 103
  • DSCN9169.jpg
    DSCN9169.jpg
    117.5 KB · Views: 108
  • DSCN9172.jpg
    DSCN9172.jpg
    152.8 KB · Views: 99
  • DSCN9174.jpg
    DSCN9174.jpg
    148.9 KB · Views: 98
  • DSCN9171.jpg
    DSCN9171.jpg
    151.7 KB · Views: 102

rrich1

Well-known member
Joined
Oct 7, 2015
Messages
793
Thanks everyone for the kind words. My wife and daughter both love it. Will be bringing it in tomorrow. A night stand is up next also from fine woodworking, but that will have to wait as I start on a sunroom remodel.

Sent from my Pixel XL using Tapatalk
 
OP
J

jimreed2160

Well-known member
Joined
Aug 7, 2016
Messages
3,589
Location
Tallahassee FL
Vanity top continued
Flush with my quick success with the wings, I eagerly tackled the centerpiece. It began as a big heavy 9/4 piece of ash that was 6" wide and 75 inches long. There were a few minor twists and bows. Well, I did not do enough to flatten it and the resaw went bad. Halfway through, I blew the breaker. Apparently resawing and AC cause an overload. Pretty scarey but at least there is natural light in the shop. Unfortunately the defects caused a 1/4" dip in the middle of the board. I tried to save it but gave up. Lucky for me that I had extra stock to start over with. This one got extra special treatment to flatten. I even bought a Craftsman belt sander to gnaw on it.

I also ran the board through my jointer to square up the edges. My jointer is set for a thin 1/32 cut and one side of the board took about two dozen trips before the cup vanished. Bright spot is that I now have arms like Popeye from jointing that heavy sucker.

My redneck Workmate/roller fixture worked well on the outfeed end and the resaw of piece #2 went well. It is a little uneven but handplanes will take care of that.

So the project is moving along well. Hope to finish it up in the next two weeks.
 

Attachments

  • DSCN9178.jpg
    DSCN9178.jpg
    149.6 KB · Views: 96
  • DSCN9175.jpg
    DSCN9175.jpg
    152.9 KB · Views: 97
  • DSCN9176.jpg
    DSCN9176.jpg
    149.7 KB · Views: 93
  • DSCN9177.jpg
    DSCN9177.jpg
    128.7 KB · Views: 94
  • DSCN9179.jpg
    DSCN9179.jpg
    141.3 KB · Views: 92
  • DSCN9180.jpg
    DSCN9180.jpg
    119.2 KB · Views: 96

drivesitfar

Well-known member
Joined
Oct 23, 2013
Messages
35,999
Location
Pacific Northwest
Jim: sorry to read that your power went out in the middle of that long cut on the bandsaw. just curious since you own so many planes do you actually own a power planer?

ALL: i'm setting up a couple long workbenches to plane a few thousand feet of cedar fencing and decking and found a couple for FREE so I don't have to build as many. this 10 footer had a bootlegged (just short of RED GREEN duct taped) back leg and i was going to just use the top, but I like the drawers even if just holding scrap wood and cheap tools so I put a little stronger 2x6 leg on it.

I know i'm more of a wood butcher, but I don't have room for a table saw so I screwed the 2x6 I needed to rip a 1/2 inch off and my old circular saw did a nice job.

anyway now i've got a nice big workbench in front of my garage to organize stuff on and work on when needed until i finish some of my outdoor projects. if water happens to get inside the drawers when it's not tarped I think i'll drill a few holes in the bottom of the drawers unless somebody else had a better idea.

I thought the handles for the drawers was a simple nice one cause the maker just drilled a hole, put a piece of metal across the front and put a 1/4 inch piece of plywood over the back of the hole. i'll post more pictures of the drawer if anybody asks.

hope you all have a great weekend!!!
 

Attachments

  • 10 foot workbench needed a new back leg.jpg
    10 foot workbench needed a new back leg.jpg
    148 KB · Views: 81
  • needed to trim one 2x6 so screwed it down and used old milwaukee saw 1.jpg
    needed to trim one 2x6 so screwed it down and used old milwaukee saw 1.jpg
    143.2 KB · Views: 93
  • added a couple 2x4's at the corners of workbench 2x6's leg.jpg
    added a couple 2x4's at the corners of workbench 2x6's leg.jpg
    146.1 KB · Views: 87
  • added a couple 2x4's at the corners of workbench 2x6's leg 1.jpg
    added a couple 2x4's at the corners of workbench 2x6's leg 1.jpg
    146.7 KB · Views: 84
  • put a huge box full of nuts and bolts in these big metal organizers.jpg
    put a huge box full of nuts and bolts in these big metal organizers.jpg
    152.6 KB · Views: 98
  • 10 foot wood bench with 2 vises.jpg
    10 foot wood bench with 2 vises.jpg
    89.6 KB · Views: 89

Spacey_G

Well-known member
Joined
Dec 31, 2015
Messages
492
Brief update on the table saw - I got it set up and "tuned up" with the blade square to the table, parallel to the miter slots and rip fence. I put in a zero clearance insert with a new Freud 24t thin kerf ripping blade and raised it up to make the cut. Everything went fine, but the zero clearance slot is noticeably wider than the blade, and much more so in the middle. The slot measures about .125" at the ends and closer to .150"-.160" in the middle. Not the result I was expecting.

I measured the arbor runout (.001") and the blade runout just inside the teeth (.005"). Seems reasonable, and wouldn't account for the too-wide kerf.

I do notice some vibration in the blade. If I look straight on with the saw running, I can see the blade fluttering ever so slightly. Could this account for the zero clearance cut turning out much wider than the blade?

What might be causing the vibration? I do notice that the v-belt has taken a set from sitting unused under tension for several years. It's gotten a little better the more I've used it, but maybe I ought to replace the belt?
 

fartymarty

Well-known member
Joined
Nov 9, 2012
Messages
1,348
Location
Fort Worth
Spacey', you might want to try a link belt*, you might also check run out of your drive pulleys, sometimes cast pulleys have more run out than turned pulleys.and if that doesn't take care of the blade wobble then perhaps some blade stabilizers for the thin kerf blade will be needed. I like thin kerf blades because they really help these older under powered saws get through the wood, but if accuracy can't be had you may have to go back to an one eighth inch thick blade and just deal with it by pushing the wood slower and making bigger sawdust. :(

*Harbor freight has some that are cheaper and green instead of red, but I don't know about it's quality, you might check on the HF pass/fail thread.

Again, I'm not the most experienced woodworker here so take what I say with less gravity than what others here might recommend.
 

Spacey_G

Well-known member
Joined
Dec 31, 2015
Messages
492
I think the old belt may have been the problem. I picked up a new one at Napa (just a regular belt, not a link belt) and the vibration is noticeably better. Kerfs are tighter, especially at the start of a cut.

I will say the old belt is getting better the more I run it. It was definitely a mistake trying to cut the first zero clearance insert without letting the belt warm up for a while to work out the set it had taken.

I'll try cutting another insert tomorrow. Hopefully this one will turn out better. They're $30 a pop!
 
To avoid these ads, REGISTER NOW!

manwithtools

ALLIANCE MEMBER
Joined
Aug 24, 2015
Messages
13,684
Location
Lebanon, TN
f39c09e91f05000d1f655fa4ca2be1d9.jpg

First test burn with my gearhart iron

Pretty neat Chris, I do question the C-Clamp as part of the logo however. Usually that type of clamp is used in metal work, there are many other types of clamps more readily associated with woodworking.

I intend no insult, just curious.
 

topcok88

Well-known member
Joined
Jun 3, 2013
Messages
660
Pretty neat Chris, I do question the C-Clamp as part of the logo however. Usually that type of clamp is used in metal work, there are many other types of clamps more readily associated with woodworking.


I intend no insult, just curious.


I dunno. His name is Chris... It’s a “C” clamp. I guess if his name was Frank he could use a “F” clamp...


Sent from my iPhone using The Garage Journal mobile app
 

topcok88

Well-known member
Joined
Jun 3, 2013
Messages
660
F clamp is still metal related :), sorry to all the Franks out there.....


F clamps are almost entirely marketed and designed for woodworking. Even so much the parallel face bar clamp is just an improvement on the original F clamp.

Irwin Quick Grip - Easy to use F Clamp.

Bessey LM Clamps - Made for woodworking F clamps.

Jorgensen 3700 Series - Woodworking F clamps.


Sent from my iPhone using The Garage Journal mobile app

Edit: Technically all bar clamps. But it still stands - still can’t think of a more heavily marketed clamp than the F style clamp for woodworking. In fact Bessey has the BTB30A that is a 30 pc set of F clamps for WW. And they just work good for almost everything in a wood shop.
 
Last edited:

topcok88

Well-known member
Joined
Jun 3, 2013
Messages
660

HenryAZ

MEMBER EMERITUS
Joined
Sep 18, 2012
Messages
1,054
Location
South Congress AZ
One of the best text books is Cabinetmaking and Millwork, by John Feirer. The original is outdated in some respects (there were no router tables back the, e.g.), but it is a thorough text on all aspects of the subject. It was used as a text book in many "shop classes" when first published in 1970. The pictures of older cabinets (kitchens, e.g.) are archaic and sometime amusing, but the techniques taught are fundamental. Later editions have included references to the metric system.
 
Last edited:

MaineGuide

Well-known member
Joined
May 26, 2014
Messages
225
Location
Maine
I went with a c clamp cause i am not changing my name.

I like your logo quite a bit, and I've used C-Clamps in plenty of woodworking and carpentry applications. If you ever felt like making a second or alternative logo, you could adapt a wooden hand screw style clamp into a C.
 

fartymarty

Well-known member
Joined
Nov 9, 2012
Messages
1,348
Location
Fort Worth

from manwithtools' google search box said:
heavy duty f clamps welding

Well yeah, if you put "Welding" in the search, try it again with "woodworking" in the search.

Can't we just all get along and share the F clamp?:lol_hitti

f39c09e91f05000d1f655fa4ca2be1d9.jpg

Regardless a "C" clamp is great for using as a "C" in the name Chris, Chris. Perhaps you could flip it over so that those not familiar with a "C" clamp don't mistake it for a "G". Ghris? :confused:
Not so sure 'bout that drawn in blue tongue emoticon thingie..but then you can't please everybody. :)
 

Attachments

  • f39c09e91f05000d1f655fa4ca2be1d9.jpg
    f39c09e91f05000d1f655fa4ca2be1d9.jpg
    144.8 KB · Views: 5

topcok88

Well-known member
Joined
Jun 3, 2013
Messages
660
IMG_4188.jpg

Feeling slightly more accomplished after sanding and gluing up a couple of these Wood Whisperer inspired Glue Caddy’s. Just gotta get some more wipe on finish and wax them. One will be staying with me and the other will be going to my dad as a part of his Christmas gift.


Sent from my iPhone using The Garage Journal mobile app
 

Craptain

Well-known member
Joined
Apr 18, 2013
Messages
4,027
Location
Tampa Bay FL
IMG_4188.jpg

Feeling slightly more accomplished after sanding and gluing up a couple of these Wood Whisperer inspired Glue Caddy’s. Just gotta get some more wipe on finish and wax them. One will be staying with me and the other will be going to my dad as a part of his Christmas gift.


Sent from my iPhone using The Garage Journal mobile app
That looks really nice. But I have to wonder just how much glue do you use?

Sent from my SM-G930T using Tapatalk
 

topcok88

Well-known member
Joined
Jun 3, 2013
Messages
660
That looks really nice. But I have to wonder just how much glue do you use?

Sent from my SM-G930T using Tapatalk


Not enough! ;) It is a novelty item just like everything else in my shop. I buy the tools and spend money on my garage because I want to. Although I have followed the forum and love all things garage and woodworking I don’t spend near enough time in the garage/shop. I assure you all most everyone of you would use these tools better than me and probably deserve them! And the answer is still very little glue. I’m too busy working.


Sent from my iPhone using The Garage Journal mobile app
 
OP
J

jimreed2160

Well-known member
Joined
Aug 7, 2016
Messages
3,589
Location
Tallahassee FL
IMG_4188.jpg

Feeling slightly more accomplished after sanding and gluing up a couple of these Wood Whisperer inspired Glue Caddy’s. Just gotta get some more wipe on finish and wax them. One will be staying with me and the other will be going to my dad as a part of his Christmas gift.


Sent from my iPhone using The Garage Journal mobile app

Nice project. Helps organize shop by storing all glue in one spot. Bonus is that glue can be effortlessly moved inside to keep it from freezing. Of course that is not on problem list this week in Florida.
 

topcok88

Well-known member
Joined
Jun 3, 2013
Messages
660
Nice project. Helps organize shop by storing all glue in one spot. Bonus is that glue can be effortlessly moved inside to keep it from freezing. Of course that is not on problem list this week in Florida.


Thank you Jim. Luckily for me my wood shop is fully climate controlled and in my basement. The garage is reserved for the parking of our vehicles and a relatively small work bench. I live in central Virginia and I loathe the Florida weather! I wish I lived down there!


Sent from my iPhone using The Garage Journal mobile app
 

Spacey_G

Well-known member
Joined
Dec 31, 2015
Messages
492
I think the old belt may have been the problem. I picked up a new one at Napa (just a regular belt, not a link belt) and the vibration is noticeably better. Kerfs are tighter, especially at the start of a cut.

I will say the old belt is getting better the more I run it. It was definitely a mistake trying to cut the first zero clearance insert without letting the belt warm up for a while to work out the set it had taken.

I'll try cutting another insert tomorrow. Hopefully this one will turn out better. They're $30 a pop!

I decided to try out the Harbor Freight link belt (thanks, fartymarty) and I was pleasantly surprised to find it runs significantly smoother than even the new v-belt. It's really a dramatic difference. So much so that I picked up another length to make new belts for my drill press, which would rattle the pulley cover in kind of a nasty way. With the link belts, there's basically no rattle at all. I set the belts for 3600 rpm and it purrs pretty nicely (for an old, inexpensive machine).

My only concern running these belts is that they're supposedly harder on pulleys, especially aluminum ones. On my table saw, the motor pulley is cast iron but the arbor pulley appears to be aluminum. And the drill press pulleys are aluminum.

How much of a concern is wear on aluminum pulleys with link belts, really?
 
To avoid these ads, REGISTER NOW!
Top Bottom