To avoid these ads, REGISTER NOW!

Woodworking 101--Tools and Tips

drivesitfar

Well-known member
Joined
Oct 23, 2013
Messages
35,997
Location
Pacific Northwest
unfortunately yes the only DP I have set up is on the end of a bench with cabinets up against it on both sides so it's really only for small projects at the minute. most of my stuff is worked on with hand tools.

I still remember buying my first vise for this house we moved in to 34 years ago at a HOME SHOW (trade show) and I still own that Zyliss that you can mount just about anywhere.

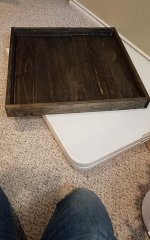
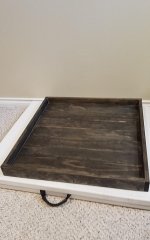
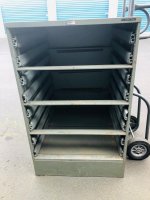
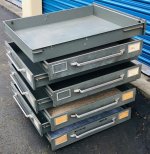
ALL: any of you make wood base carts with casters on them for your heavy cabinets or machines? i'm making one today for this old General Fireproofing cabinet that probably will be my main tool box. I picked up some nice casters from a guy that bought a couple big HF toolboxes and he put them under his workbench and didn't need them. so maybe not the highest quality, but i'll have a couple that can lock and I think they'll do the job.

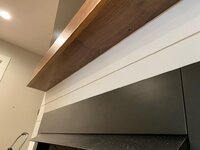
here's me cutting up the plywood with my little Ryobi 18v skill saw that with a sharp blade is cutting 1.125 inch thick plywood nicely. I do have more than a few wormsaws and other saws, but this is easy to use and light.

if any of you have pictures on how you mounted the casters or made the cart please post them.

one question I have is that i'm putting 1x6's on sides of the almost 3 inches of plywood base. in case I need to move the cabinet off the base later i'm only going to put glue on 3 sides. my questions is should I pre drill and use 2 or 3 inch screws or nail them with 2 inch nails out of my Dewalt nail gun?
 

Attachments

  • CUTTIN~2.jpg
    CUTTIN~2.jpg
    107.4 KB · Views: 59
  • IMG_0371.jpg
    IMG_0371.jpg
    98.3 KB · Views: 53
  • General Fireproofing 8 drawer cabinet.jpg
    General Fireproofing 8 drawer cabinet.jpg
    92.5 KB · Views: 50
  • General Fireproofing 8 drawer cabinet drawers.jpg
    General Fireproofing 8 drawer cabinet drawers.jpg
    148.6 KB · Views: 51
To avoid these ads, REGISTER NOW!

topcok88

Well-known member
Joined
Jun 3, 2013
Messages
660
Drives - elevator bolts so they don’t crush the wood fibers as much and won’t pull through/get loose over time. They also are awesome because they are super low profile and when I put drawers or stuff inside it doesn’t get hung up on big bolt heads. Some people like carriage bolts but the heads are too intrusive and crush the wood fibers a lot.
e725690fde41d3114da31b43261e2607.jpg

548c888602087e2635b9f385c3bd71ae.jpg

d9fe2db7d7e871c32ec5c8e9d3677c4e.jpg

Sent from my iPhone using Tapatalk
 

Attachments

  • d9fe2db7d7e871c32ec5c8e9d3677c4e.jpg
    d9fe2db7d7e871c32ec5c8e9d3677c4e.jpg
    50.8 KB · Views: 7
  • 548c888602087e2635b9f385c3bd71ae.jpg
    548c888602087e2635b9f385c3bd71ae.jpg
    56.9 KB · Views: 8
  • e725690fde41d3114da31b43261e2607.jpg
    e725690fde41d3114da31b43261e2607.jpg
    59.8 KB · Views: 4
Last edited:

drivesitfar

Well-known member
Joined
Oct 23, 2013
Messages
35,997
Location
Pacific Northwest
TC: great idea and i've never heard of elevator bolts. that said I'm actually building mine with 2 thicknesses of 1.125 inch plywood and a 3/4 inch piece. 2 are full pieces and the top one is made of two pieces. i'm going to screw and glue all 3 together and use hex bolts with washers and since my cabinet has a false bottom I don't need to inset the heads of the bolts.

ALL: I'm still curious since my base is about 3 inches thick and i'm using 6.5 inch 1 by pine for the sides if I should glue and screw 3 sides (i'm only going to screw one side for easy access and possible future exits if i need to move this cabinet without the cart. and should I alternate levels of screws and nails since i have 3 pieces in my base which is my thinking? I'm also thinking of pre drilling and putting screws in the corners/sides of the 1 by's to mate them a bit more together at their top.

my thoughts on the 3 sides is to glue nail and still screw unless you guys think i'm actually compromising the plywood and not making this stronger? since each of the 8 drawers can hold up to about 100-150 pounds i'd like the sides to give a bit more support than a little when i go over the little bumps in my garage floor that is 3/4 inch 4x6 mats currently.


thanks for the help.
 

drivesitfar

Well-known member
Joined
Oct 23, 2013
Messages
35,997
Location
Pacific Northwest
Originally I was planning on insetting the heads of my hex bolts to attach the casters so using a 1.125 inch thick piece of plywood made sense for that. now that I realized I can just move the casters in a few inches and be under the hollow part of my cabinets stand I've got another idea.

I think i'll use the 1.125 piece of plywood as a top cover piece that I can bolt 3 grinders to with 6 different wheels. yes it will be a bit high and probably close to my chest level so I may need to make a chair tall enough if I want to sit there. I don't have much lip on top of my cabinet to catch an edge from the plywood so I might drill a few holes in the top of my cabinet and screw that 1.125 piece from below to give it some stability even though I don't like drilling in the top of a metal cabinet (any other options?).

so I think i'll know sandwich 2x12's in between the pieces of plywood so with the glue the screws will hold better in the side of 2 by's and i'll just throw in a few 2 inch molding nails out of my Dewalt 18v nailgun to give it a bit extra support on each side of the 2 by's.

make sense?

also I've seen those screw in bolts you guys use to put in wood to screw bolts into and curious what they are called in case I can't find the ones I own that are in a drawer or jar someplace?

thanks
 

turbowoodworker

Well-known member
Joined
Mar 18, 2012
Messages
3,519
Location
Apex NC
I also thought of your question in reference to "T nuts". They would have to be placed from the back so as to draw the T nut into the wood. Once again, they don't do well with the stress of casters beneath a heavy tool cabinet.
 

drivesitfar

Well-known member
Joined
Oct 23, 2013
Messages
35,997
Location
Pacific Northwest
Turbo: I'm all set with hex bolts for my casters cause i'll put washer on top of plywood and heads of bolts hopefully will be in void of base of cabinet cause it only has an inch of steel around it's edge and one or two in the middle.

I hear you on the T nuts or inserts maybe not doing well with a 3500 rpm grinder and me occasionally pushing a bit on it so maybe a bolt thru on the top might be best, but still open to ideas.

should I put 2 by's to fill in between 2 3/4 inch pieces of plywood on the base so I can screw 1 by sides into 2 bys instead of plywood for better support cause this cabinet might have 1000-2000 pounds in it?
 

drivesitfar

Well-known member
Joined
Oct 23, 2013
Messages
35,997
Location
Pacific Northwest
Turbo: I might not max each drawer with it's limit especially if I put grinders on top that might make it a bit more top heavy so still looking for yours and others thoughts on this if you have any. I do like you bowing out, but I need you here so stick around.

ALL: after talking to another member that owns an identical cabinet and his doesn't have the 4-6 inch base/riser and he's got casters bolted to his cabinet I am removing the base. i'm still making a cart with casters and not bolting casters directly to my cabinet cause there really isn't much there and i'm not that good at welding (yet).

thoughts on strengthening up the wood base and it's sides or attaching the top with small lip please post.

another member posted on my thread about putting earth magnets under the top piece of plywood and i think that adding 10 or so might keep that in place so the small lip keeps it on.
 

pkpk

Well-known member
Joined
Aug 29, 2020
Messages
64
Location
Midwest
pkpk: Your shelves came out looking good. There is a nice airy quality to them. I can see why you question the strength of those floating shelves. I do too. Floating shelves seem to be popular right now. I think there are other ways of hanging them but I've never done a shelf that way.

Your choice of plants is good too. I have had that same variety of sanseveria since 1974. They aren't called cast iron plants for nothing.
Hey thanks!! Yup, airy was what I was looking for in the shelves, just something that would fit in and show off the plants. If you have any other ideas for shelves feel free to share! If it's not obvious I could use more shelving heh. And agreed about the sanseveria being really hardy - I've grown a bunch, mostly propagated off one big floor-standing "mama snake", and have not had any die on me yet. I love my plants, actually my first attempt at woodworking was making small plant stands with legs made from two notched 1x6 or 1x8 boards.

Been working on my own floating shelf idea, and thinking I'll use corner brackets on the wall block/cleat like this design, to better support the shelf. The plan is 20" wide, ~9" deep, and 1.5" or 2" thick overall, with 1/4" plywood skin around a frame of 1" or 1.5"-square solid wood (I got plenty of pine and fir scraps for this), then some of this walnut I have for edging. I figure after initial planing I'll have some walnut stock less than 3/4" thick, so I might resaw and plane again to 1/4" for the edging. Hoping to get to this in the next few days!

PKPK - floating shelves really are that easy. My mantle is boxed out and mitered. The box slides over a block mounted on the wall and two screws from the top and bottom hold it on the wall. The ones on either side of the fireplace slide over blocks and are attached the same way. The shelves are 3/4” walnut on both faces and about 3” thick: the mantle is 4.5” thick. You’ll be fine, the are incredibly strong and I can’t imagine you are going to be storing engine blocks on them.

Your whole setup looks really impressive! How did you make your wall blocks? Curious to know what type/how big your fasteners are for shelves of that size. Yup, no engine blocks for me lol, but still I wonder if #8 3-1/8" cabinet screws will work for a light-moderate load, since it'd just be one screw in each stud.
 

topcok88

Well-known member
Joined
Jun 3, 2013
Messages
660
Your whole setup looks really impressive! How did you make your wall blocks? Curious to know what type/how big your fasteners are for shelves of that size. Yup, no engine blocks for me lol, but still I wonder if #8 3-1/8" cabinet screws will work for a light-moderate load, since it'd just be one screw in each stud.

The wall blocking for the mantle is just a 2x4 ripped down to a snug fit and secured with 3 1/2” screws into studs/solid framing. And then the mantle slides over that and two 1 1/4” screws from the top and two from the bottom secure the mantle.

3384f05119e06ca5a1464cb99a5cdfee.jpg

The shelves slide over 3/4” finger jointed pine strips secured with 1 1/2” screws. Made a jig to measure and transfer the size and fit. Cut the shelves on my mitersaw to length.

ac1847e3da998072d391666b37361a30.jpg

d0b43ca94793fbb9c80a6d5dda29e204.jpg

01158d9f594917ed9c12f8437731f2d0.jpg

You can see the two screws here. The shelves and mantle are all secured with the same method.

861087e8d19aa679393a6817f5d1c087.jpg


Sent from my iPhone using Tapatalk
 

Attachments

  • 3384f05119e06ca5a1464cb99a5cdfee.jpg
    3384f05119e06ca5a1464cb99a5cdfee.jpg
    68.5 KB · Views: 4
  • ac1847e3da998072d391666b37361a30.jpg
    ac1847e3da998072d391666b37361a30.jpg
    45.1 KB · Views: 3
  • d0b43ca94793fbb9c80a6d5dda29e204.jpg
    d0b43ca94793fbb9c80a6d5dda29e204.jpg
    101.6 KB · Views: 3
  • 01158d9f594917ed9c12f8437731f2d0.jpg
    01158d9f594917ed9c12f8437731f2d0.jpg
    88.6 KB · Views: 3
  • 861087e8d19aa679393a6817f5d1c087.jpg
    861087e8d19aa679393a6817f5d1c087.jpg
    52.7 KB · Views: 12

drivesitfar

Well-known member
Joined
Oct 23, 2013
Messages
35,997
Location
Pacific Northwest
TC: looks great and thanks for all the blow by blow and pics to follow!!

ALL: so I scratched the idea of putting 2-3 grinders on top of my big cabinet cause I have a smaller old military cabinet next to it that already has a butcher block (or wood pieces side by side glued up) and it's not as tall. since I can just swap out where they sit and they will still squeeze in behind my bride's car I think i'm good.

I'm back to just making a cart and now since i've decided to take off the cabinet's stand i need to inset the bolts. I have hex stainless bolts or I have some that are angled that use an allen key. would it make any difference with the support using one versus the other so I can have a flat top?
 

pkpk

Well-known member
Joined
Aug 29, 2020
Messages
64
Location
Midwest
The wall blocking for the mantle is just a 2x4 ripped down to a snug fit and secured with 3 1/2” screws into studs/solid framing. And then the mantle slides over that and two 1 1/4” screws from the top and two from the bottom secure the mantle.
Nice.... thank you for sharing all this including photos!
 

turbowoodworker

Well-known member
Joined
Mar 18, 2012
Messages
3,519
Location
Apex NC
Thanks all for posting such nice work.

Here is my latest ww project; builtin to cove to replace credenza TV was sitting on. Barn wood from the farm, grey color paint, LED lighting.
 

Attachments

  • 20210225_121317.jpg
    20210225_121317.jpg
    148.7 KB · Views: 124

drivesitfar

Well-known member
Joined
Oct 23, 2013
Messages
35,997
Location
Pacific Northwest
Turbo: remember the days when a 19 inch COLORED TV was the next best thing?

nice work on the entertainment center!! :bowdown:

how did you manage to hid all the wires?

oops I guess you built a room next to this with all the wires and machines to run everything?

SWEET!!
 

turbowoodworker

Well-known member
Joined
Mar 18, 2012
Messages
3,519
Location
Apex NC
HDMI cables, opticals, power are in the wall. Put them there when I built house.
The cabibnets and backsplash (decorative barn wood) stands off with furring strips so anything I forgot runs behind that to Amp, cable box etc. Subwoofer is wireless.
Rick
 

turbowoodworker

Well-known member
Joined
Mar 18, 2012
Messages
3,519
Location
Apex NC
Drives, funny story.
"Turbo: remember the days when a 19 inch COLORED TV was the next best thing?"

Remember when "The Wizard of Oz" was shown on TV around the holidays? None of this On Demand stuff. As a kid waiting all year to see it? We got our first color TV in anticipation of the WofOz, guessing 1965ish. The first ten minutes in Kansas are not colorized. The whole family was beating on the sides of this giant box with a 15" screen thinking we got ripped off. Then , well you know the story.
Boy did the family feel dumb that day.:dunno:
 

drivesitfar

Well-known member
Joined
Oct 23, 2013
Messages
35,997
Location
Pacific Northwest
Turbo: great planning on the entertainment and wiring fitting that SMALL TV in that little hole in the middle.

yes I do remember those Christmas days when "Wizard of Oz" was on the tube and about a 100 of us (maybe a few less :D) kids (all the cousins and even the parents and grand and great grand parents) would all sit down watching it. I recall it always being real cold and maybe snow out side and we'd all plan our play around seeing the Wizard give the scarecrow a brain.

now are kids are telling us we don't even need cable. who knew?

just curious how long did it take you from start to finish and about how many hours?
 

pkpk

Well-known member
Joined
Aug 29, 2020
Messages
64
Location
Midwest
Thanks all for posting such nice work.

Here is my latest ww project; builtin to cove to replace credenza TV was sitting on. Barn wood from the farm, grey color paint, LED lighting.

Wow, nicely done! I also really like how you did the shelf lighting, and those sliding doors look great too.
 
To avoid these ads, REGISTER NOW!

turbowoodworker

Well-known member
Joined
Mar 18, 2012
Messages
3,519
Location
Apex NC
Drives, built in was surprisingly quick.
Built cabinets as separate units as eight pieces. Four on the sides were first, then top spanning shelf, then three center units.
These were all built quickly, rabets , dados, screws. Preprinted then moved into place. Then backsplash of barn wood, face frames which were repainted in shop then filled nail holes and gaps, repainted and mounted TV.
All told, about three weekends, maybe a little late night after work when the cabinets were being cut and assembled.

I find that when working alone, as most of us do, you have to plan moving and placing units like heavy cabinets.

Thanks for looking,
Rick
 

drivesitfar

Well-known member
Joined
Oct 23, 2013
Messages
35,997
Location
Pacific Northwest
Turbo: pretty impressive if you did it that quick. WELL DONE!!

ALL: I'm hoping to see all of you maybe post up some small or large project here cause we all like seeing and hearing how you did them.

speaking of a project I'm wondering how some of you would finish off this BUTCHER (or wood on it's side) top of my old military cabinet? I'm planning on installing a 3/4 baldor buffer maybe at a 45 on one corner and a 1/2 hp commercial block grinder on the other side at a 45 so the top probably won't get eaten on.

simple green and clean up gunk and then sand and wax or blo? OR ????
 

Attachments

  • IMG_1131.jpg
    IMG_1131.jpg
    145.3 KB · Views: 86
  • Military cabinet with wood top on casters STOUT 8.jpg
    Military cabinet with wood top on casters STOUT 8.jpg
    116.9 KB · Views: 78

turbowoodworker

Well-known member
Joined
Mar 18, 2012
Messages
3,519
Location
Apex NC
Drives, generally not a fan of polyurethane on butcher block, or whatever the proper term is this week, but for the shop, grinder or buffer detritus will stain and damage unprotected wood. Poly can be slick, especially gloss, but a satin poly will protect that wood the best.
Let us know how it turns out.
 

drivesitfar

Well-known member
Joined
Oct 23, 2013
Messages
35,997
Location
Pacific Northwest
Turbo: thanks for your thoughts. i'll probably clean it with Simple green, lightly sand it and then break out the yellow can of Johnson & Johnson wax and put a couple coats on it before I install a couple grinders at 45 degree angles on opposite corners.

anybody use rouge or something else on their buffer pads want to mention which ones so I can maybe shine up old wood as well as old cast iron and steel?
 

Attachments

  • 00n0n_lzZSZJ1XC7a_600x450.jpg
    00n0n_lzZSZJ1XC7a_600x450.jpg
    29.8 KB · Views: 62

Woody1320

Well-known member
Joined
Sep 27, 2017
Messages
164
Location
Southeast Michigan
Well, the ottoman tray is finally done. The wife stained it yesterday. Came out a bit darker than we expected, but still looks awesome. However, I'm not a fan of the fit and finish. It DID teach me a ton (and what NOT to do). I still enjoyed the process, and I have been devising other plans for future projects. I'm definitely hooked!
 

Attachments

  • 20210301_160053.jpg
    20210301_160053.jpg
    121.5 KB · Views: 72
  • 20210301_160041.jpg
    20210301_160041.jpg
    64.7 KB · Views: 84

Woody1320

Well-known member
Joined
Sep 27, 2017
Messages
164
Location
Southeast Michigan
Couple of updates:

First, I tried my hand at freehand sharpening. I prepped the backs of a set of Harbor Freight chisels on a 400/1000 diamond stone setup and a strop (Amazon deals on both). I also sharpened the one inch chisel, and I'd like to think it turned out okay. I also sharpened my Japanese block plane blade, and it definitely made a difference. It has definitely helped my confidence.

On a related note, I ordered a bunch of clamps from Harbor Freight and decided I should probably find a way to organize them. I googled a simple clamp rack, and ended up with a simple concept based on a couple YouTube videos. The darker wood is scraps (can't remember from where), and the pine are small scraps from the ottoman tray. All three are the same width, so they worked well for the middle parts of the wooden "frame". It isn't exactly pretty, but it works. It also took about an hour to put it together and install it. I fit the longer front piece and basically removed it to hang it on the wall (then reinstalled). The pipe clamps aren't up yet (need the pipe for those) but they'll fit just fine. I may add reinforcement if necessary.
 

Attachments

  • 20210308_213512.jpg
    20210308_213512.jpg
    113.1 KB · Views: 94
  • 20210308_213343.jpg
    20210308_213343.jpg
    112.2 KB · Views: 84
  • 20210308_213249.jpg
    20210308_213249.jpg
    93.7 KB · Views: 76

CRSINMICH

Well-known member
Joined
Aug 15, 2015
Messages
2,394
Location
Southeastern Michigan
Woody 1320: Congratulations on learning to sharpen by hand and for building your clamp rack. Remember, "You can never have too many clamps".

EVERYBODY: I spent a few hours over the last 2 mornings rehabbing this PARRY of Old St. mortise gage. Parry were tool sellers in London. This particular mortise gage had one pin that had been worn to a nub so, like it or not, it could only have been used as a marking gage. I made two new pins out of piano wire. I cut two 3/8" long blanks then chucked them (one at a time) in a drill press then used a file to bring each to a point. Of course nothing is simple so I had to take the gage almost completely apart to get at the old pins to punch them out. I didn't do much to the finish on the rosewood but I did brighten some of the brass a bit.
 

Attachments

  • Parry mortise gauge (1).jpg
    Parry mortise gauge (1).jpg
    91.6 KB · Views: 54
  • Parry mortise gauge (4).jpg
    Parry mortise gauge (4).jpg
    102.3 KB · Views: 57
  • Parry mortise gauge (2).jpg
    Parry mortise gauge (2).jpg
    135.1 KB · Views: 57

Woody1320

Well-known member
Joined
Sep 27, 2017
Messages
164
Location
Southeast Michigan
CRSINMICH: That marking gauge is really nice. I'm really digging the wooden gauges. They seem to work really well versus the newer wheel types (those work well, too, just the look isn't as nice).
 

jar944

Well-known member
Joined
Jul 26, 2010
Messages
5,898
Location
Northern VA
Fitting inset doors...

This topic came up on a industry forum the other day and it was interesting to hear the differences in methodology.

For me, I oversize doors slightly, scribe, cut with a track saw, then finish on the jointer.

Door tight to one corner, mark the 3 corners.
View media item 110905
Split the difference and scribe all 4 corners
View media item 110906
Connect the lines and cut
View media item 110907
At this point I'll check the fit, if its a bit tight ill run the tight edge over the jointer with a .010" depth of cut.

When all doors are fit, I reset the jointer for .070" DOC and run all 4 edges (doluble doors get .035 off the center stiles rather than .070)

View media item 110908
 

HenryAZ

MEMBER EMERITUS
Joined
Sep 18, 2012
Messages
1,054
Location
South Congress AZ
I would make them oversized by ripping the stiles/rails about 1/8" wider than they were supposed to finish (usually finish 2 3/8", ripped 2 1/2"). Rough size on the jointer to about 1/16" under the opening size, then just eyeball further jointer cuts, making taper cuts where necessary. In my former millwork job, I probably made and hung over a thousand (maybe two thousand) cabinet doors.
 

pkpk

Well-known member
Joined
Aug 29, 2020
Messages
64
Location
Midwest
Happy Saturday everyone, just curious if you guys have a brand preference when it comes to router bits?

I've used CMT—both their "orange" and "contractor" lines—Craftsman and Freud. I'm just a hobbyist/weekend-woodworker type and don't really notice a difference in quality, so I usually go with CMT because I can get them easily and quickly enough at Menards.
 

pkpk

Well-known member
Joined
Aug 29, 2020
Messages
64
Location
Midwest
Shopping at a big box store will likely result in cheapest quality. Look for a store which specializes in supplying professionals.
Hit me with some recommendations/links please! Depending on price difference, I'm open to different brands especially when it comes to better quality and if US-made...
 
To avoid these ads, REGISTER NOW!
Top Bottom