To avoid these ads, REGISTER NOW!

Between 265 & 485 SQ/FT Woody's Works Garage

Workspaces sized between 265 and 485 squarefeet.
OP
D

Denwood

Well-known member
Joined
Sep 22, 2014
Messages
4,216
Location
Thunder Bay, Ontario, Canada
Boiler, the penetrating stain has held up quite well..it's not cheap, but super easy to touch up after if you severely abuse some concrete.

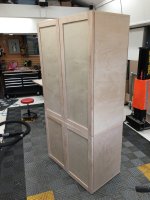
Bret, aside from the fact that the self feeding planer is almost fun to use, choosing dimensions that work and being 100% consistent with stock is rather liberating. I'm a convert on the rough lumber work flow for the balance of my working life :)

Water base Varathane and the Flexio 590 (inexpensive) gun compressed an hour or more chore to about 5 minutes. Almost silly how quick this goes spraying..

basecab14.jpg
 
To avoid these ads, REGISTER NOW!

BoilermakerFan

Well-known member
Joined
Apr 17, 2006
Messages
2,188
Location
Indianapolis, Indiana
Here are the promised pics:

This kit works out to $8 per fixture. I'm not using the halo bulbs.

gu10_1.jpg


The fixture is super compact. You removed the junction box, install the clamp, make the connections, button up and essentially pop the fixture into the 3 1/2 hole punched in the drywall.

OK Dennis, I'm now to page 65 and I've picked up several more ideas for my future house/garage/barn shop build like the DIY duct silencers and the single motion detector for lights in the garage (I have a stand alone detector that I just never installed)...

But this was brilliant! Why I never thought to look for replacement LED bulbs for halogen bulbs, well, I don't know... but several of the light fixtures I have liked were halogen and I skipped over them because of the power use and inefficiency (heat) since almost all of our lighting is now LED.

We're in the process of refinishing our basement and I'm going to install a true acoustic tile ceiling with insulation in the ceiling since our bedroom is right above the TV in the basement. The basement is the kids area when their friends are over or we have parties... but I wanted some different sized can lights down there. Now I can add these small ones to list and replace the bulbs. Thanks!

I tried the home automation thing in 2000-2001. I actually have a Cutler-Hammer loadcenter that has the provision to add a built-in power usage monitor and X10 control for 10 circuits. I had the controller installed until 2 years ago when we listed our house for sale and I pulled it out because I will take it with me. All of the CTs are still in the panel for now... but I will be pulling them and taking all of it with me for my future shop when we move. Unfortunately C-H discontinued the product line in early 2001 and only developed the X10 and another obsolete home automation protocol that I now forget. I had the RF X10 remote. I loved it, the wife hated it.

I still have 16 pages to go in the thread, but have you changed any of your automation components? I know things have changed since 2001 and even 2015. Heck, my Asus 802AC WiFi router has an app now where we can put things into our own local cloud... My local computer shop owner recommended the ASUS about 2 years ago when I upgraded to 60Mbs broadband. Just upgraded again to 500Mbs service and I average 250-290Mbs through the Asus with the latest firmware update. The built in 802AC 5G on the cable modem does about 40Mbs less, but it's on one side of the house close to my garage so I use the modem's 5G in the garage and my Asus 5G in the house. I pulled ethernet out to the garage in 2000, but now I don't use it...
 

BoilermakerFan

Well-known member
Joined
Apr 17, 2006
Messages
2,188
Location
Indianapolis, Indiana
And now I'm caught up! :thumbup:

Did you ever decide on the acoustic baffles for the home theater?

If not, since you love woodworking:

http://www.decware.com/p1312.htm

http://www.decware.com/p1324.htm

They would look killer in maple to match the rest of the planned wall treatments and the rest of your trim/desk.

I haven't built mine yet, but I have the plans and I will be adding them to my basement in time... He even specifically mentions placing a few of the panels on the ceiling in basements.

I know you have the speakers for the basement theater already, but Steve also has some great improved vintage DIY speaker plans on his site too. I have all his DIY plans including his Zen Open Baffle speakers and I already have my drivers for them so they will be built this winter. I'd love to build his improved Jensen horns, but my little basement can't handle them, I'd blow out my basement windows if I turned them up even just a little too loud. But someday when I have a big loft in a big barn shop... :lol:

http://www.decware.com/newsite/decwarediy.html
 

drivesitfar

Well-known member
Joined
Oct 23, 2013
Messages
36,071
Location
Pacific Northwest
Woody: great job on the cabinets and i too like the idea of getting RAW wood so to speak and planing my own. i can see a woodworking bench build in your future and there are several on the WOODWORKING 101 thread if you find you want to build one and have room for it.

with the girls using your garage for their BDay parties i know you are crammed for space, but maybe you can put your woodworking bench on casters and roll it out of the way when not in use.

for a guy that is on CRUISE CONTROL making cabinets from scratch and having Bday parties for his daughter and her friends sounds and looks like you are very busy. WELL DONE AGAIN!!
 
OP
D

Denwood

Well-known member
Joined
Sep 22, 2014
Messages
4,216
Location
Thunder Bay, Ontario, Canada
Boiler, congrats on making it through. That's an impressive achievement :)

The LED pot lights have worked out great..so glad you can take something away from that information. I've stuck with SmartThings at home, and VeraPlus at the office. SmartThings has improved steadily, but the I'd still give the reliability award to Vera.

Logitech's Harmony integration with SmartThings is quite handy so you can have the same lights controlled by your SmartThings hub, also controlled by any Harmony remote supporting automation. This is good.

If you just want to control lighting, the Philips Hue system (which I also use) is rock solid, and can stand alone if again, you just want to have lights working with motion sensors. I've had zero issues with any of the Hue products. They're a bit more expensive, but with zero hassles, work as automation should. Once set up, you forget them.

On the sound panels, I've only ordered the Roxul Soundboard 60..nothing else is done. Those diffuser kits you linked to are very cool. I may just design a few more for aesthetics than anything else. For my small space, absorption will be key. Your idea of integrating some absorption into the ceiling is a good one..and part of the plan.

The good news is that the cabinet I just finished is the last bit to allow the existing theatre space to be emptied...so finally onward to the theatre project.

Drives, thanks for the props :) The idea I have right now for an assembly/work table is to redo my sheet storage cart so it's more compact along the side wall, then build a torsion box that will be stored there along with the sheet and cut-off material. I may sneak that one in next as it will help a lot going forward. This fellow has a great system hinged to the garage wall so it can't fall over..but can swing out. https://www.woodtalkonline.com/topic/4293-my-tww-lumber-rack/

LumberRack2.jpg
 
Last edited:

BoilermakerFan

Well-known member
Joined
Apr 17, 2006
Messages
2,188
Location
Indianapolis, Indiana
Boiler, congrats on making it through. That's an impressive achievement :)

The LED pot lights have worked out great..so glad you can take something away from that information. I've stuck with SmartThings at home, and VeraPlus at the office. SmartThings has improved steadily, but the I'd still give the reliability award to Vera.

Logitech's Harmony integration with SmartThings is quite handy so you can have the same lights controlled by your SmartThings hub, also controlled by any Harmony remote supporting automation. This is good.

If you just want to control lighting, the Philips Hue system (which I also use) is rock solid, and can stand alone if again, you just want to have lights working with motion sensors. I've had zero issues with any of the Hue products. They're a bit more expensive, but with zero hassles, work as automation should. Once set up, you forget them.

On the sound panels, I've only ordered the Roxul Soundboard 60..nothing else is done. Those diffuser kits you linked to are very cool. I may just design a few more for aesthetics than anything else. For my small space, absorption will be key. Your idea of integrating some absorption into the ceiling is a good one..and part of the plan.

The good news is that the cabinet I just finished is the last bit to allow the existing theatre space to be emptied...so finally onward to the theatre project.

<snip>

Ha, thanks. We went to the Y to exercise later last night so I was wired when we got home... stayed up and went through the thread.

Appreciate the automation information. I used to a SoftWire plug in for VB that made X10 programming really cool and easy. I probably still have the plug in but it's not compatible with modern PCs. :sad:

I'll definitely be incorporating some lighting automation; zoned HVAC with air exchanger & silencers; Solar PV, solar hot water, & residential wind turbines; and security cameras discovered in Geek's thread in our next house and shop.

The sound panel is actually a DIY plan now. US$10 to download. The second link had more information but it was for the older, larger panel design that they sold in kits. The new design is half the size so you can build multiples of them and have 90degree phase between them for better performance. You could always wrap them in acoustic cloth to stealth them too. But I though you would appreciate the look of the natural wood.
 

dlcwent

Member Emeritus
Joined
Feb 24, 2014
Messages
8,427
Location
coastal maine
Wow Dennis, a lot of you guys here on the GJ are real good. Outstanding job on the cabinet. Maybe when I retire I'll get into woodworking a little more. Right now all I seem to be good at is making sawdust.

basecab13.jpg
 
OP
D

Denwood

Well-known member
Joined
Sep 22, 2014
Messages
4,216
Location
Thunder Bay, Ontario, Canada
Boiler, thanks for those links. Your plan for an off the grid house is very much in line with the Passivhaus standard that is becoming more popular here.

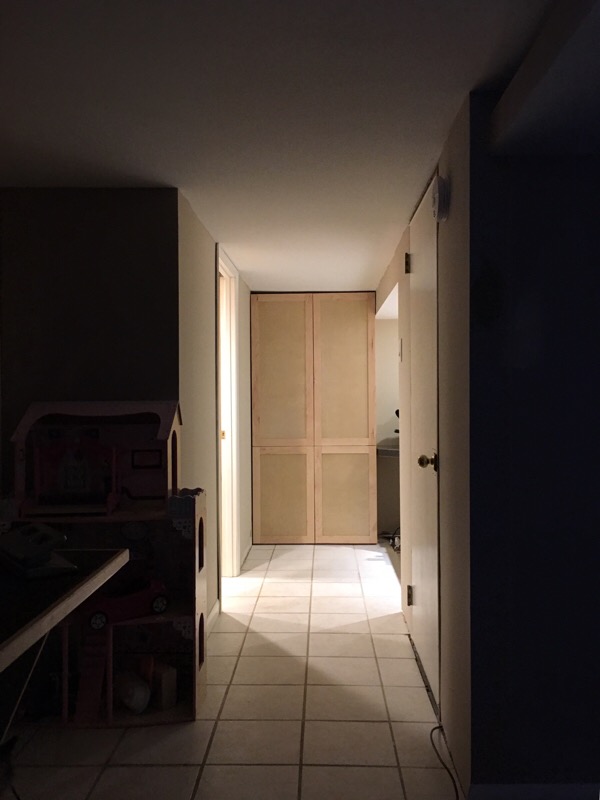
Dlc, this was my first cabinet with doors so I'm pretty much learning :) One mistake I made was not incorporating a 3" kick. This would have allowed baseboard without interfering with door operation which are only 1/2" off the floor. The cabinet is installed at the end of a hallway as of last night. The new computer nook is to the right beside the cabinet. I was trying to maximize space as our 100yr old house basement ceiling is under 7'. You can see it's a tight fit :)

Moving the computer nook to this area is the final project freeing up the theater area.

basecab15.jpg
 
Last edited:

drivesitfar

Well-known member
Joined
Oct 23, 2013
Messages
36,071
Location
Pacific Northwest
Woody: for your first try at making a cabinet and also from RAW wood so to speak you did a great job. the kick plates and leaving room at the top for molding is a minor detail that most of us wouldn't have know about either and still a great project completed.

important thing is the MISSUS is HAPPY and i bet you are too.

best of luck with the home theater and not that you'll have any questions but you have more than a few followers so ask if you might need a little help.

cheers and have another great day. (BTW it's 75 here and no wind or bugs so another day in PARADISE for so i can ORGANIZE DRIVE'S HOME HARDWARE.
 
OP
D

Denwood

Well-known member
Joined
Sep 22, 2014
Messages
4,216
Location
Thunder Bay, Ontario, Canada
Thanks Drives :) There'll be quite a few more cabinets for the theatre area, so lessons learned. Stellar weather here too. Shop time with the doors open and breeze flowing at 22C is about perfect.

One of my sailing pals here Dave has just completed an epic home theatre..far beyond what I'm doing so I've got an experienced audio consultant here at my disposal. I'd agree though that the journal has a lot of experience to draw from and I will!
 
OP
D

Denwood

Well-known member
Joined
Sep 22, 2014
Messages
4,216
Location
Thunder Bay, Ontario, Canada
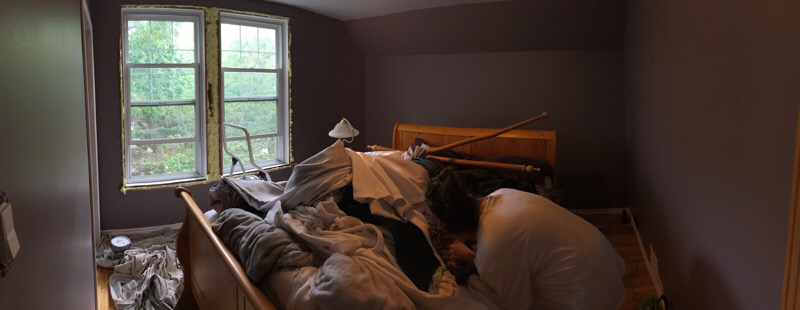
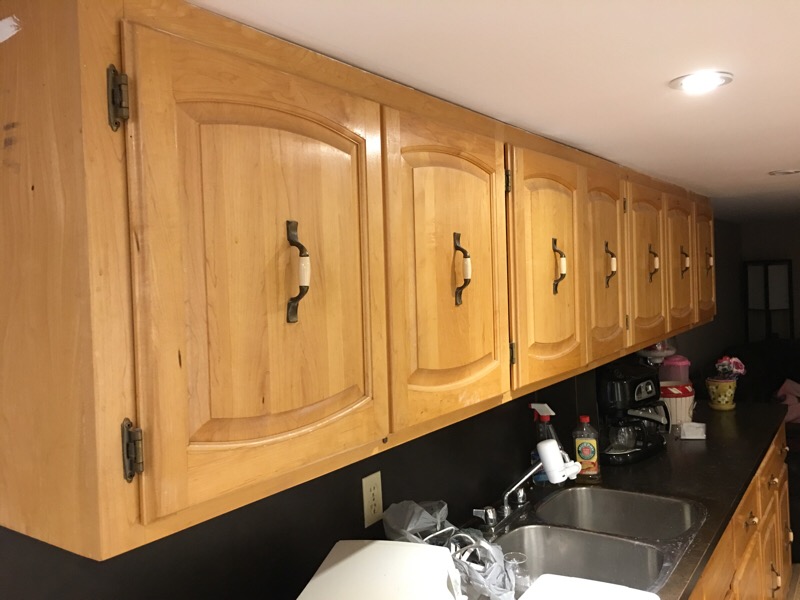
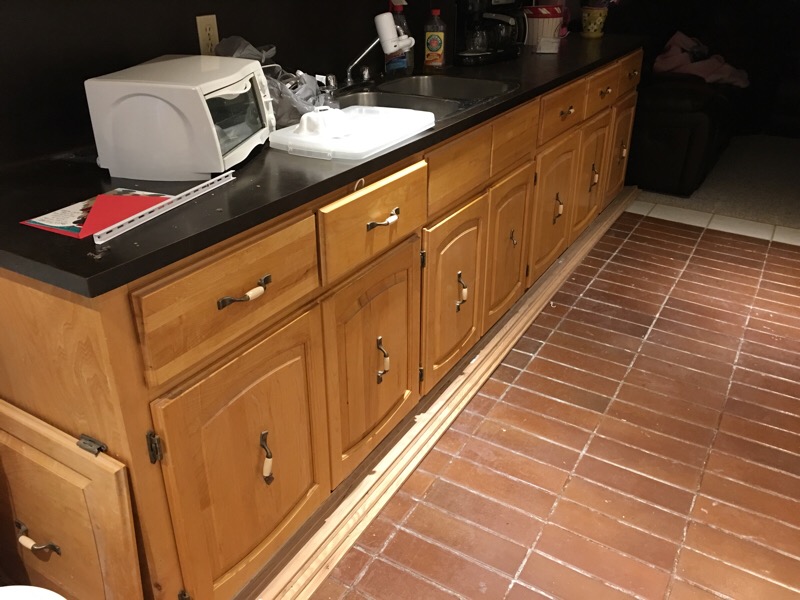
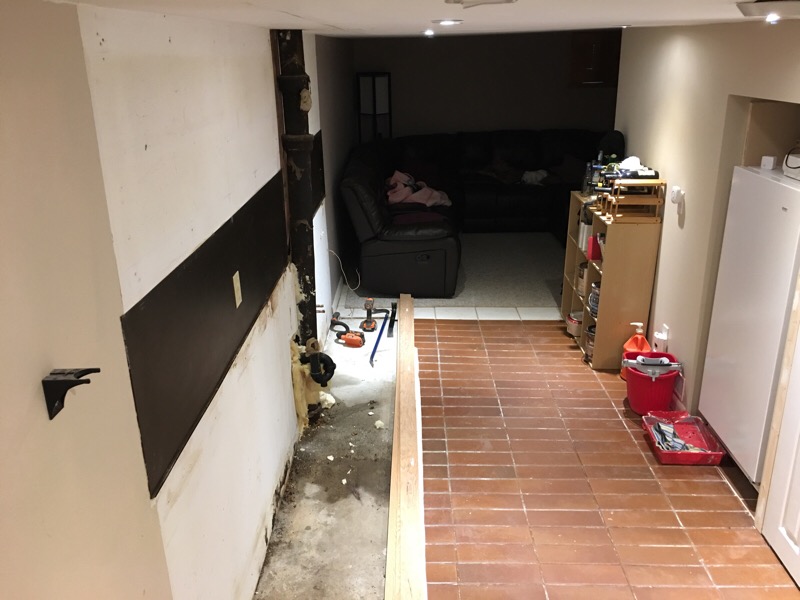
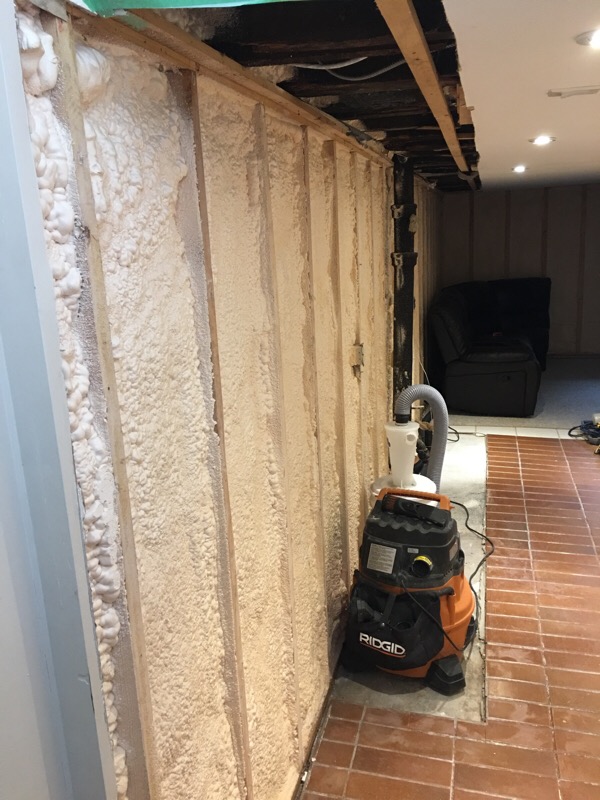
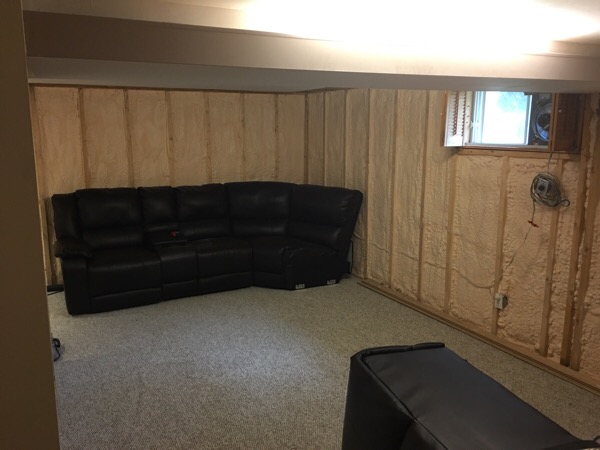
Phase 2 (or is it three?) of the basement reno is in swing. We started the meal with a bedroom re-paint and window spray foam appetizer on the 2nd floor, then concluded today with a cabinet give-away to a young Burmese couple. Most of the basement exterior walls, including the theater area are getting sprayfoam sealing, and new drywall. This will make theater wiring a snap.

Once again we have a large bin in the driveway, so between that, the local Restore, and Goodwill, a lot of clean up is happening. If the house was a ship, it's floating a lot higher these days after a lot of clean up and de clutter. LEAN is awesome :)

basegut2017_1.jpg


basegut2017_2.jpg


basegut2017_3.jpg


basegut2017_4.jpg
 
Last edited:
OP
D

Denwood

Well-known member
Joined
Sep 22, 2014
Messages
4,216
Location
Thunder Bay, Ontario, Canada
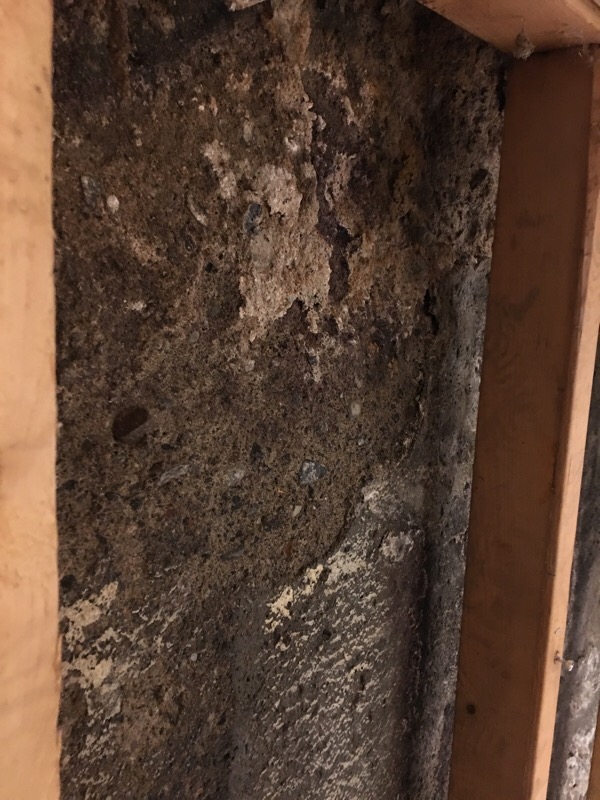
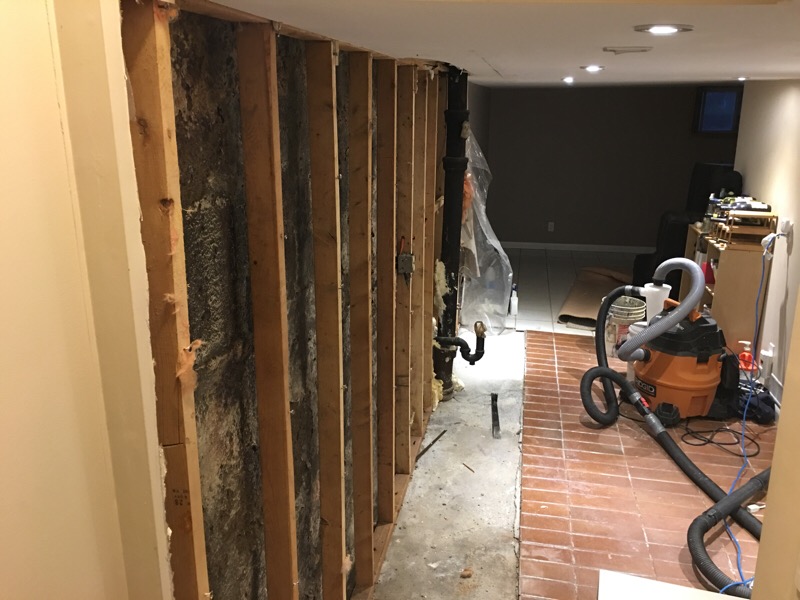
Today confirmed the wisdom of gutting the basement exterior walls. The concrete is in decent shape considering its age, and the mold incidence less then expected. That said, the concrete walls were uniformly wet, and nearly every piece of fiberglass insulation felt damp or wet on the back side. The poly vapor barrier was in place, however this likely prevented drying to the inside, and did host mold on the lower 6" in a few areas.

The latest building science suggests Fiberglas and poly have no place in a basement...and what I found today is totally consistent with this recommendation. Rigid foam sealed to the wall, or closed cell spray foam applied directly to the concrete with no poly vapor barrier under the drywall is what is currently recommended for those of us in cold climates.

The 2x3 studs are in good shape, and spaced about 1 1/2" off the concrete, so will not need to be replaced. There is lots of room to get spray foam behind them to prevent thermal bridging.

basegut201720.jpg


basegut201721.jpg


During this work, I've been wearing a mask, the furnace is off and I'm negatively pressurizing the basement using my old shop exhaust fan in a window. The walls were vacuumed with a Hepa filter in the shop vac, as well as dust deputy to keep all the loose concrete out of the vacuum. Finally, I found my paint sprayer the perfect tool to spray the walls with Vital Oxide sourced form a local commercial supplier which kills mold,fungus, deodorizes etc and prevents recurrence. It's slow going as I've been carefully cleaning up as each stud cavity is exposed.
 
Last edited:

BoilermakerFan

Well-known member
Joined
Apr 17, 2006
Messages
2,188
Location
Indianapolis, Indiana
Ah man, that's gnarly looking. Glad your being safe, though I've been told a bleach water solution will kill the mold to make it safer to remove.

I wasn't as careful as you... I just sprayed mine with bleach, let it dry, then wire brushed it while wearing a mask. After that I just painted sealing paint over it. Mine was just a small spot on a wall by the floor.

I haven't removed my drywall and insulation to see how bad it is though. The basement doesn't smell musty or stale so I think it's ok, or at least it's not bad.
 
OP
D

Denwood

Well-known member
Joined
Sep 22, 2014
Messages
4,216
Location
Thunder Bay, Ontario, Canada
Boiler, , bleach works, however products like Vital Oxide (oxidizer), or Concrobian (desicant), offer some extended protection after application.

The VitalOxide product actually has some good testing behind it, and can be used on fabrics etc. : https://www.vitaloxide.com/images/stories/downloads/Introduction to Vital_rev3.pdf

Part of the wall farther along was treated in the past with some kind of waterproofing paint/coating. The wall itself isn't so bad there (clean and looks dry) however the insulation in that area was just as damp as everywhere else. This tells me that moisture that condensed on that surface had no where to go. It was trapped between below grade concrete, insulation and the poly. Applying spray foam (closed cell) to that surface means there is no place for condensation to occur..as no air can get to the concrete from the inside. Because our foundation is not waterproofed from the outside, that concrete will do what it always has, maintain moisture levels as dictated by the soil outside.

Building code here still requires the layer of poly if you're insulating with glass. My thinking is that this is not so smart and will guarantee mold issues. The Nation Research Council in Canada has updated it's recommendations: https://www.nrcan.gc.ca/energy/effi...ng-the-heat-in/basement-insulation/15639#a6-2
and suggested not using poly vapour barrier underneath drywall for my application...this would fail code here though. Go figure.
 

BoilermakerFan

Well-known member
Joined
Apr 17, 2006
Messages
2,188
Location
Indianapolis, Indiana
Boiler, , bleach works, however products like Vital Oxide (oxidizer), or Concrobian (desicant), offer some extended protection after application.

The VitalOxide product actually has some good testing behind it, and can be used on fabrics etc. : https://www.vitaloxide.com/images/stories/downloads/Introduction to Vital_rev3.pdf

Part of the wall farther along was treated in the past with some kind of waterproofing paint/coating. The wall itself isn't so bad there (clean and looks dry) however the insulation in that area was just as damp as everywhere else. This tells me that moisture that condensed on that surface had no where to go. It was trapped between below grade concrete, insulation and the poly. Applying spray foam (closed cell) to that surface means there is no place for condensation to occur..as no air can get to the concrete from the inside. Because our foundation is not waterproofed from the outside, that concrete will do what it always has, maintain moisture levels as dictated by the soil outside.

Building code here still requires the layer of poly if you're insulating with glass. My thinking is that this is not so smart and will guarantee mold issues. The Nation Research Council in Canada has updated it's recommendations: https://www.nrcan.gc.ca/energy/effi...ng-the-heat-in/basement-insulation/15639#a6-2
and suggested not using poly vapour barrier underneath drywall for my application...this would fail code here though. Go figure.

Thanks for the info. I will keep that in mind when we finally move and I build our next house. I'm planning to finish the basement but divide into a den/audio room and then a hobby shop / utility / storage area. The home theater will be above the attached garage which will be connected to the house via an 8'x12' mud room so it's more isolated when we crank up the sound.
 
OP
D

Denwood

Well-known member
Joined
Sep 22, 2014
Messages
4,216
Location
Thunder Bay, Ontario, Canada
Thanks 1/2 :) Finished the demo work last night, and was pleased to see that for once at least, no expensive surprises were hiding behind the walls :)

[/B]Boiler[/B], it's been a long time coming, but finally getting to the theater area is gratifying. We don't have the option of isolating like you're planning, so I've been careful to build and install duct mufflers on everything leaving the basement, and will soon also acoustically line the main house returns, now that I can get to them. The ceiling of the theater area will be removed, insulated and reinstalled with resilient channel. We also have a ton of mass in the floors, so sound transmitted up won't be too bad.

I need to make some wiring decisions quickly as spray foam is next..as soon as Tuesday. There is some older wiring exposed running to the 2nd floor so makes sense to replace it now...
 

BoilermakerFan

Well-known member
Joined
Apr 17, 2006
Messages
2,188
Location
Indianapolis, Indiana
Thanks 1/2 :) Finished the demo work last night, and was pleased to see that for once at least, no expensive surprises were hiding behind the walls :)

[/B]Boiler[/B], it's been a long time coming, but finally getting to the theater area is gratifying. We don't have the option of isolating like you're planning, so I've been careful to build and install duct mufflers on everything leaving the basement, and will soon also acoustically line the main house returns, now that I can get to them. The ceiling of the theater area will be removed, insulated and reinstalled with resilient channel. We also have a ton of mass in the floors, so sound transmitted up won't be too bad.

I need to make some wiring decisions quickly as spray foam is next..as soon as Tuesday. There is some older wiring exposed running to the 2nd floor so makes sense to replace it now...

There is a ton of info on several other sites regarding noise isolation for home theaters. I suspect you're already aware of them. But I know the heavy vinyl sheeting between double layers of drywall that has been installed to the resilient channel goes a long way. I'm guessing you will be pulling new dedicated circuits for the home theater?
 

tjpavlov

Well-known member
Joined
May 18, 2012
Messages
1,280
Location
Providence, RI
Hi Dennis,

I was just wondering what sort of resilient channel you are going to be using. I'm in the midst of a basement renovation of my own and am stuck on this topic. The big box stores around me sell this sort of one legged resilient channel:

http://www.clarkdietrich.com/produc.../introduction/rc-1-pro-resilient-channel-rcur

This type was recommended in a recent issue of Finehomebuilding. However, it seems that most of the online forums recommend going with a system of clips and hat channel like this:

http://www.soundproofingcompany.com/product/ib-1-clip/

I'm not sure what is the better system for me. I really don't like working on anything that can fall down on me! I'd rather a cabinet crack then a ceiling come down.
 
OP
D

Denwood

Well-known member
Joined
Sep 22, 2014
Messages
4,216
Location
Thunder Bay, Ontario, Canada
Boiler, yes, part of the electrical work will be retasking existing power (basement previous had electric heat) and running a new circuit for the audio rack.

Tjp, I spec'd our studio build (approx STC 70) using a double wall system and the z profile single leg (not the hat) resilient channel as in your first link. The room is 28x28 and about 11 ft high on the 2nd floor. The room is as quiet as we were hoping and works perfectly for our video shoots. We have 3 tenants on the same floor so noise attenuation was critical there. The room has it's own air handler, HRV, and acoustically treated ducts.

I have a drum set in there that really tests the room. For sure, low frequency bass hits travel a bit, but otherwise the system contains pretty loud drumming. The studio floor (is on 2nd floor) has about 19" of dense pack cellulose underneath, but is otherwise not decoupled from structure. That was beyond our already heady budget for the 9000 sq/ft renovation.

My audio expert buddy Dave just did a "room within a room" in his basement for theater, doing an amazing job. My low ceiling won't allow this, but we do have a ton of old house mass, and about 3" of solid wood floor above as good starting point. In this house, like many, HVAC is the biggest issue..however we already have 8" and 10" duct mufflers installed during phase one of the renovation. The air return for the basement is done with acoustic lining as a hybrid "dead vent"..so much of this work is already done.
 
Last edited:
To avoid these ads, REGISTER NOW!

BoilermakerFan

Well-known member
Joined
Apr 17, 2006
Messages
2,188
Location
Indianapolis, Indiana
When we visited Frank Lloyd Wright's Taliesin West years ago I remember that according to the tour guide, his music room had no right angles. Every wall angle was either slightly obtuse or slightly acute and the ceiling sloped. The acoustics in the room were amazing. I've always kind of wanted to try to recreate that... having an old house helps, I don't think any of our walls are perfectly 90 degree!
 
OP
D

Denwood

Well-known member
Joined
Sep 22, 2014
Messages
4,216
Location
Thunder Bay, Ontario, Canada
Boiler, acoustics in this space will be a challenge for sure. It's about 11' x 25', and 7' high. I'm at a bit of a standstill right now as the media equipment rack location needs to be finalized before running any wire. This in turn will hold up spray foam. 4" (R25) of closed cell sprayed on 60' of wall was quoted at $1700.
 
OP
D

Denwood

Well-known member
Joined
Sep 22, 2014
Messages
4,216
Location
Thunder Bay, Ontario, Canada
The media room location is decided, and I'm doing hidden soffit for the wiring combined with a false up front. Foam was done today. The last demo chore required pulling the theater area ceiling down so we can wire, insulate and hang resilient channel. The big green demo bin in the drive can head out tomorrow as we start building :)

basesprayfoam1.jpg


Taken before the ceiling demo...

basesprayfoam2.jpg
 
Last edited:

quietsailor

Active member
Joined
May 22, 2012
Messages
34
Location
Cork, Ireland
]

track3.jpg


The instructions really don't explain how to square the base plate to the blade, or adjust the 90 degree setting for cuts. If you remove the base plate, you can figure this out..but these pics should help.

track4.jpg


track5.jpg


After some tweaking the base is pretty much perfectly flat.

track11.jpg


track6.jpg


track7.jpg


track8.jpg


track9.jpg


track10.jpg


Dust collection is excellent. Trying a cut without a hose connected filled the area with a surprising amount of dust in a few seconds of use. With the hose connected, there is virtually zero dust :)


Hi Dennis,

I haven't been on the site in months and as this is one of my favourite threads I was happily catching up. It's a mad coincidence but I ordered one of these saws last week and had agonised over
Makita
DeWalt (have their router already)
Bosch (real heavy duty professional tools and can trim doors in situ)
Fextool (very expensive but user friendly - a bit like Apple products)

I ended up buying the Makita as I got a great deal but in all my research I never came across anyone, trade review, amateur review or even woodworker forum post who explained how to check and set up the saw so well.

Thank you!! :rocker:
 
OP
D

Denwood

Well-known member
Joined
Sep 22, 2014
Messages
4,216
Location
Thunder Bay, Ontario, Canada
Quietsailor, those are kind words indeed :) I posted up my adjustment procedure as like you, I couldn't find a procedure online..and the manual doesn't cover this. I'm glad you found the pics and information useful. I've been using the saw a lot, with zero issues to date.
 
OP
D

Denwood

Well-known member
Joined
Sep 22, 2014
Messages
4,216
Location
Thunder Bay, Ontario, Canada
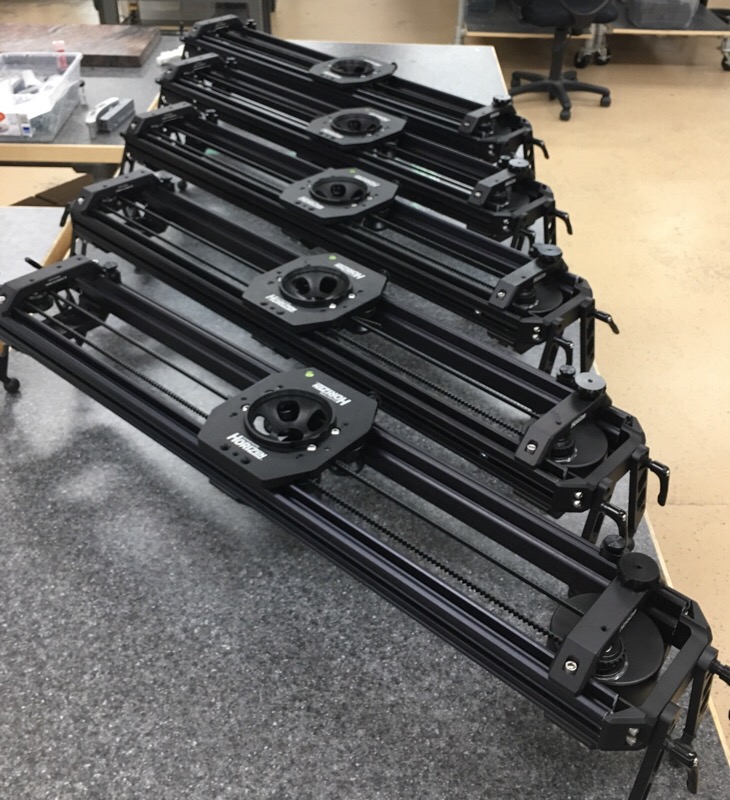
One of the projects that we've been busy with at the business is a new product launch, HoriZen. This is a product that supports cameras for super precise dolly shots. It will take 150lbs all day long, but only weighs 15lbs. It uses onboard inertial dampening and some very cool fluidic adjustable tension control to make slow, precise camera movements super easy to execute.

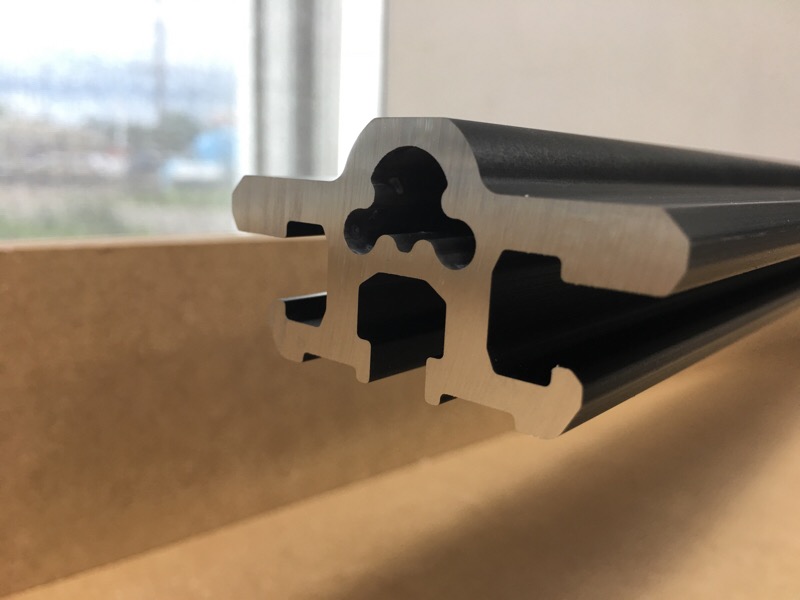
We needed to cut custom aluminium extrusions to length in-house, accurately, safely and cleanly for this product. The 12ft anodized extrusions need zero machining beyond cutting, and are part of a self-aligning system when combined with our machined bits. Everything attaches using 1/4"/20 square nuts which slide into the extrusion. This is our most technically advanced product ever, but using the simplest assembly method to date.

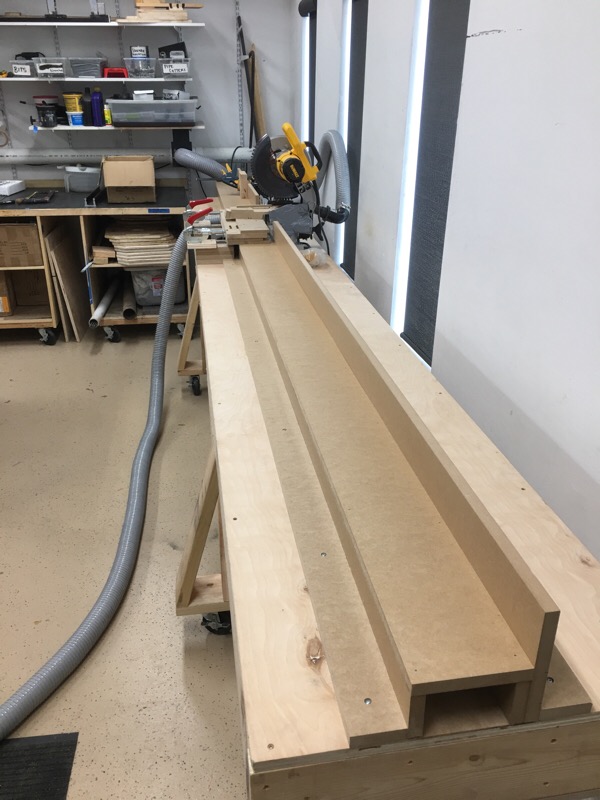
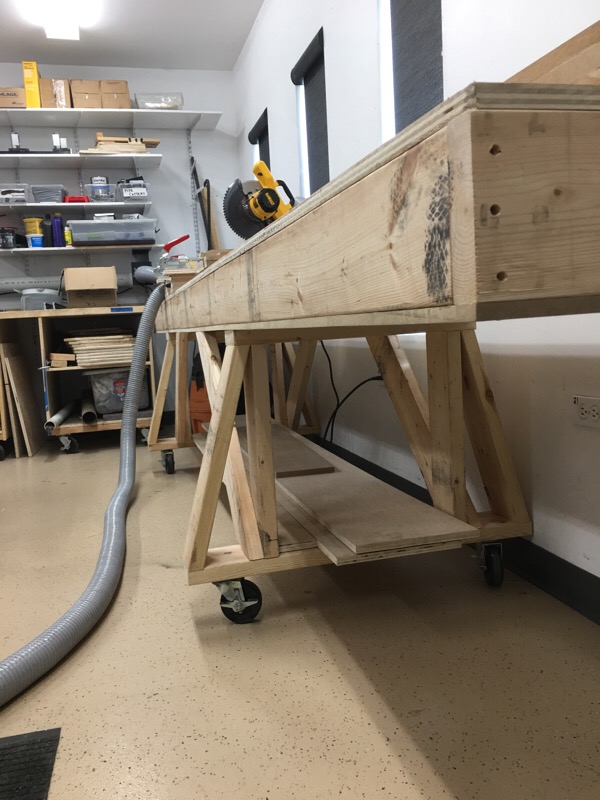
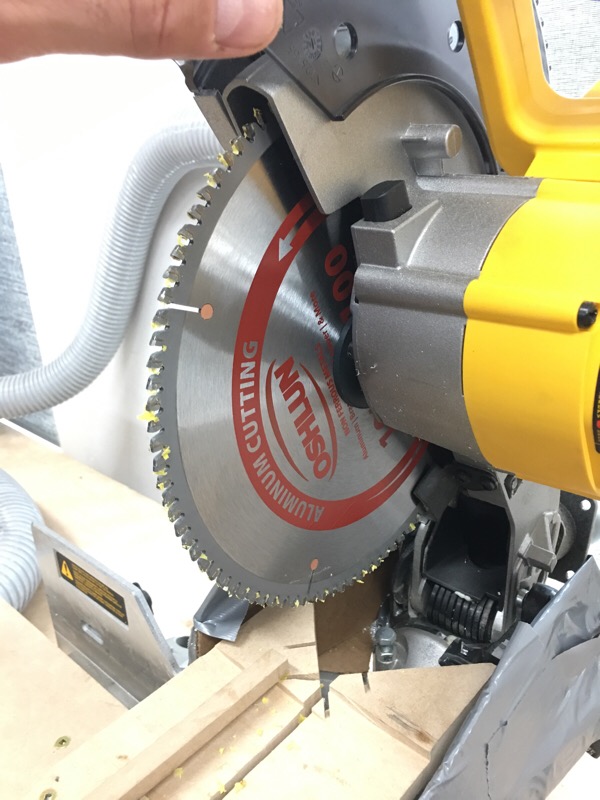
The workbench is based on a torsion box, with 3/4" birch top skin, four 2x6 stringers with blocking, and a 1/2" MDF bottom skin. It's crazy rigid...and heavy at 14' long. We demo'd a "proper" metal cut off saw (about $1000) and were not crazy about the cut quality with obvious steps in the cut up to 1/32". I decided to try a basic Dewalt chop saw, (about $250) and picked up a few Oshlun non-ferrous blades for about $50 each from Amazon.

This bench is on wheels so we can move it around as needed. The torsion box is so stiff that even a slight permutation in the floor is obvious as one or two of the wheels will be in the air. Construction is basic glue and screw.

horizenbnch1.jpg


horizenbnch2.jpg


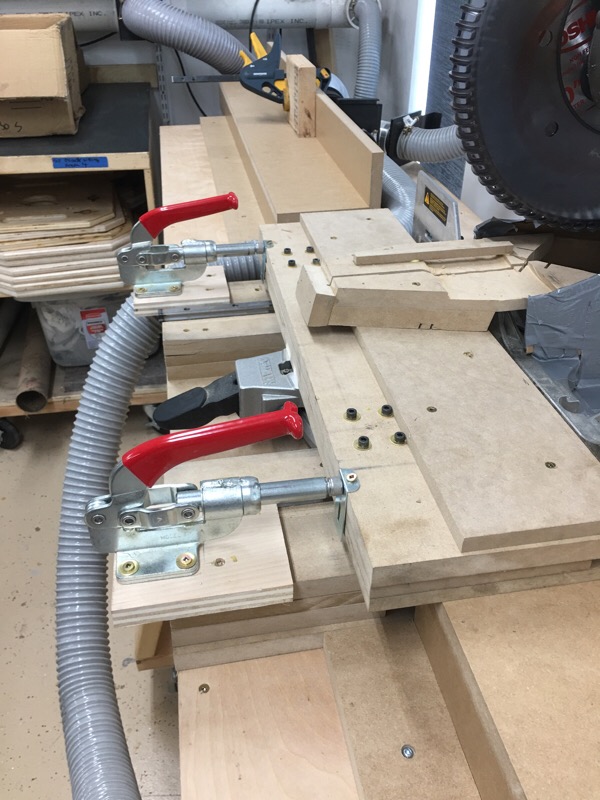
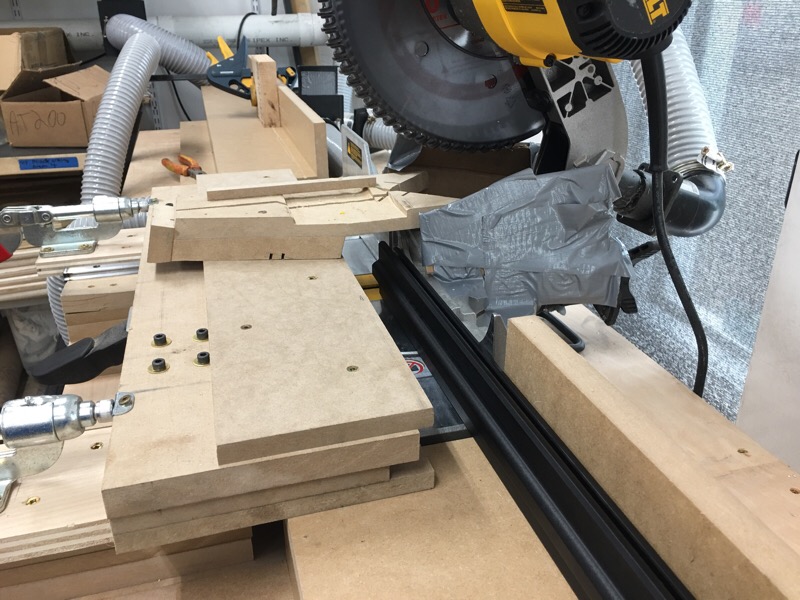
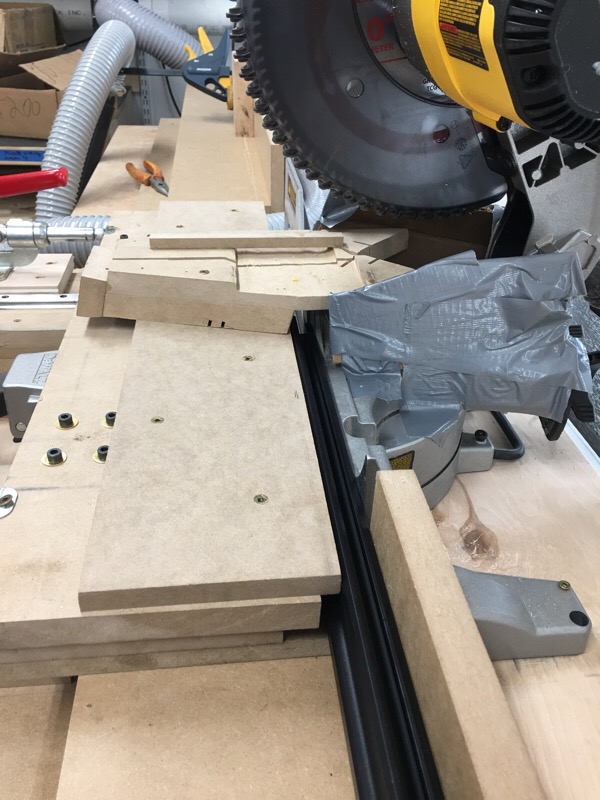
This clamping bed is built up from MDF and some clamps we sourced from McMaster Carr. Controlling chips was important, so I designed a zero clearance hood. Combined with side shrouds (just cardboard/duct tape) the chip collection is nearly perfect using the saw's dust port. Once slid to the cut stop, the extrusion can be clamped in 2-3 seconds. The cut stop is just a block right now..but will need a better system to ensure repeatably at the 3 lengths we'll be using.

horizenbnch3.jpg


This is the clamp in relaxed position.

horizenbnch4.jpg


This shows the extrusion secured for a cut. The aluminium is clamped over about 24" making this process very safe. Cosmetics are important so the MDF sacrificial material ensures we don't scratch or otherwise mar the anodised aluminium rails.

horizenbnch5.jpg


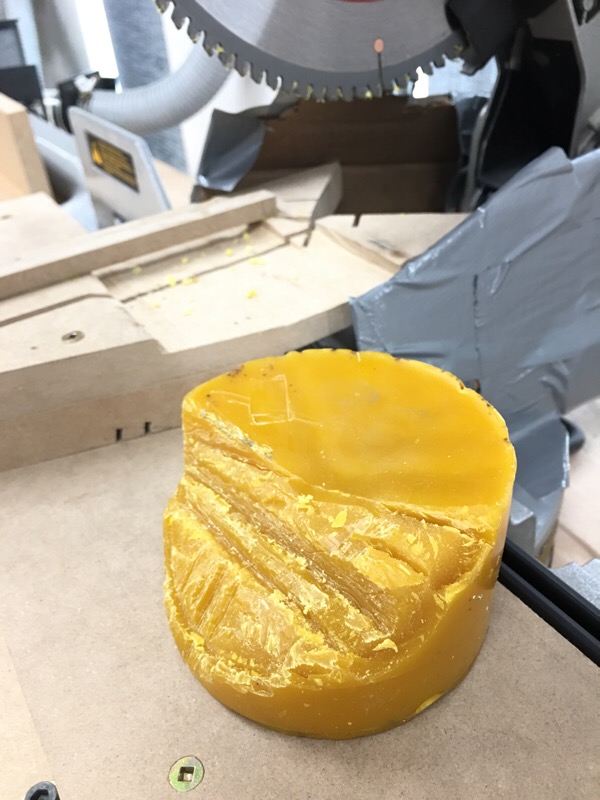
We had issues with aluminum plugging up the blade. Beeswax about every 8-10 cuts works nicely for blade lube that is zero mess. We've also ordered up some "Boelube" to give that a try.

horizenbnch6.jpg


One thing I've learned about dry cutting aluminium is that the tooth profile is usually "triple chip" which is a grind pattern repeating every 3 teeth. I also found that cutting aluminium over 1/4" thick works better with a 60 tooth blade, and under 1/4", this Oshlun is providing good results. We chipped a tooth on a 2nd Oshlun 100 tooth blade testing thicker aluminium with a lot of tooth plugs, smeared cuts etc.

horizenbnch7.jpg


These cuts are nearly perfect. After quite a bit of messing around, we've found a working formula. Using the right teeth count non-ferrous blade, solid clamping, dry lube (beeswax) and efficient chip collection was key to clean cuts.

horizenbnch8.jpg


Sneak peak...launch is next week. We've been working in this for at least 18 months now. Today was a special day :)

horizenbnch9.jpg
 
Last edited:
OP
D

Denwood

Well-known member
Joined
Sep 22, 2014
Messages
4,216
Location
Thunder Bay, Ontario, Canada
Sub, thanks :) It's been nearly two years in development so we're pretty stoked here to finally be building production versions.
Goldcar I see you're from France...so I apologise for the complete lack of French here. Both of my daughters are fully bilingual and will be coming to visit soon :) I hope you can find some useful information in the thread.
 
OP
D

Denwood

Well-known member
Joined
Sep 22, 2014
Messages
4,216
Location
Thunder Bay, Ontario, Canada
Boiler, thanks. I more or less consolidated many hours of messing around to get "perfect" cuts into that post. Hopefully others will come across it and find some use there.

We received a few tubes of "Boelube", so will report how well it works for tapping, and aluminum cutting.
 

drivesitfar

Well-known member
Joined
Oct 23, 2013
Messages
36,071
Location
Pacific Northwest
Woody: i'm sure i'll have a ton of questions once I get time to catch up on my reading of your thread, but i have to ask you one about your deck supports.

did you use composite or real wood and what is that material you put over the top of the beams before you put on your composite decking.

i hope your summer has had some fun in it like mine has and I bet you've been busy so i'll read more about that when i have more time to.

cheers
 
OP
D

Denwood

Well-known member
Joined
Sep 22, 2014
Messages
4,216
Location
Thunder Bay, Ontario, Canada
Drives, yes, been busy of late with work, and the basement theater project. I just finished removing a major 13"x8" old growth fir support beam, and replacing it with a flush version using engineered material. Pics to come.

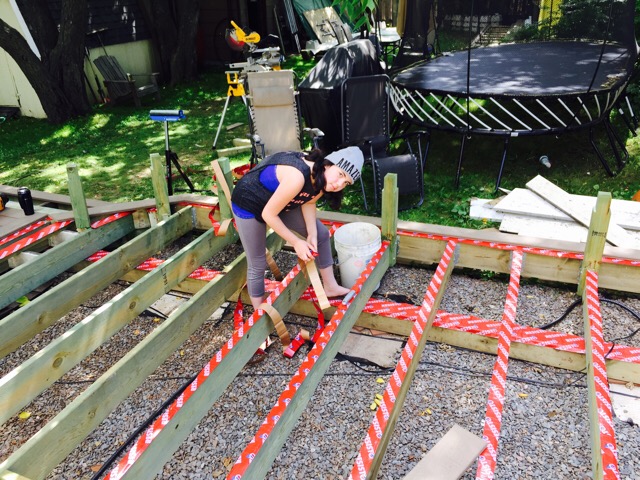
All of the deck's support material was pressure treated wood. The flashing material on the top surfaces prevents water and wet organic material from contacting the pressure treated wood. The self adhesive flashing tape I used is a self sealing elastomeric butyl based product: http://www.resisto.ca/product/redzone-25/

Pic during construction:
deckprog1.jpg
 
Last edited:

tapered-pin

Well-known member
Joined
Sep 12, 2017
Messages
277
Location
Alpharetta, GA
I realize you started this thread a couple years ago.. but I love watching the progress. I've been looking at unistrut supported storage in my garage as well, great idea on the simple sliding doors.

I have a smaller space (but not by much) you've inspired me to figure the storage out for my scenario.
 
OP
D

Denwood

Well-known member
Joined
Sep 22, 2014
Messages
4,216
Location
Thunder Bay, Ontario, Canada
Tapered, the garage has turned out to an amazingly efficient workspace, which in turn makes every other project a lot easier. It's great that you were able to borrow some inspiration :)
 

drivesitfar

Well-known member
Joined
Oct 23, 2013
Messages
36,071
Location
Pacific Northwest
Woody: thanks for digging up the picture and for the link. i'm hoping to have all the supplies and tools ready so i can start next June when the rain stops again cause I didn't get that project started this summer.

I bet more than a few GJ members and just the public in general take a look at your garage re do and admire all that you've done and put in that fairly small space.

best of luck on the basement re do and looking forward to seeing more pictures and progress as you have time.

cheers
 
To avoid these ads, REGISTER NOW!
Top Bottom