To avoid these ads, REGISTER NOW!

Between 265 & 485 SQ/FT Woody's Works Garage

Workspaces sized between 265 and 485 squarefeet.
OP
D

Denwood

Well-known member
Joined
Sep 22, 2014
Messages
4,224
Location
Thunder Bay, Ontario, Canada
Matias, not sure how much salt they use in Finland, but here it is a lot :)

I sold my 1984 Scirocco and 1990 Westfalia (in very nice condition) after owning both them for 25 and 16 years respectively..a testament to regular attention to corrosion management in the salt belt.

Drive's when I see pics of older vehicles chassis that live in Arizona I still do a double take :)

My order of Noxudol 300 and 700 should be here any day now.
 
To avoid these ads, REGISTER NOW!

drivesitfar

Well-known member
Joined
Oct 23, 2013
Messages
36,077
Location
Pacific Northwest
I'm really enjoying your posts over on the new EV (electric vehicle) thread and wondering if you are learning anything other than it's a bit of an uphill battle discussing this topic with guys that love their gas vehicles?

thanks for the links and sharing what you know and have learned!!

I hope your new rust preventative works better than you think it should.

good luck!!
 
OP
D

Denwood

Well-known member
Joined
Sep 22, 2014
Messages
4,224
Location
Thunder Bay, Ontario, Canada
Drives, you are a prince among men :)

I totally get the questions/resistance on the EV concept as in some respects I was there too a year ago. The videos at https://www.youtube.com/user/WeberAuto really helped me to understand what is going on under the hood, and really tip me over the edge to purchase one. It's the mechanical simplicity that is so compelling, combined with my usual need to push forward on lowering our carbon footprint. Win win.

I've been gathering some bits, even cleaning up the shop today in preparation for the winter/summer tire swaps etc. I will for sure put up a bunch of pics here on the corrosion work on the Leaf, covering the car, and tools in hand. It should be fun.
 
Last edited:
OP
D

Denwood

Well-known member
Joined
Sep 22, 2014
Messages
4,224
Location
Thunder Bay, Ontario, Canada
A repost from the Free Parking thread, but jeez, this video had me literally rewinding, watching and being amazed for about an hour last night:

Toyota's new hybrid drive system uses a 2nd motor/generator and a ring gear to replace the starter, alternator, and uses the same mechanical bits to effect a completely "new" CVT. There are no transmission gears! This is simply brilliant as they can run the Atkinsion cycle (2.5L gas) engine at pretty much any RPM (keeping it at an "very impressive for an ICE" 38% efficiency) while the car is moving.

I was glued to my monitor for 40 minutes:


It's just a great example of how current innovation is upsetting some industry "norms". I've been wrenching on my vehicles for 30 years, and honestly this is some of the best mechanical ingenuity (made possible by EV integration) I've seen in a long time.
 
OP
D

Denwood

Well-known member
Joined
Sep 22, 2014
Messages
4,224
Location
Thunder Bay, Ontario, Canada
With warmer weather comes a new round of shop activity.

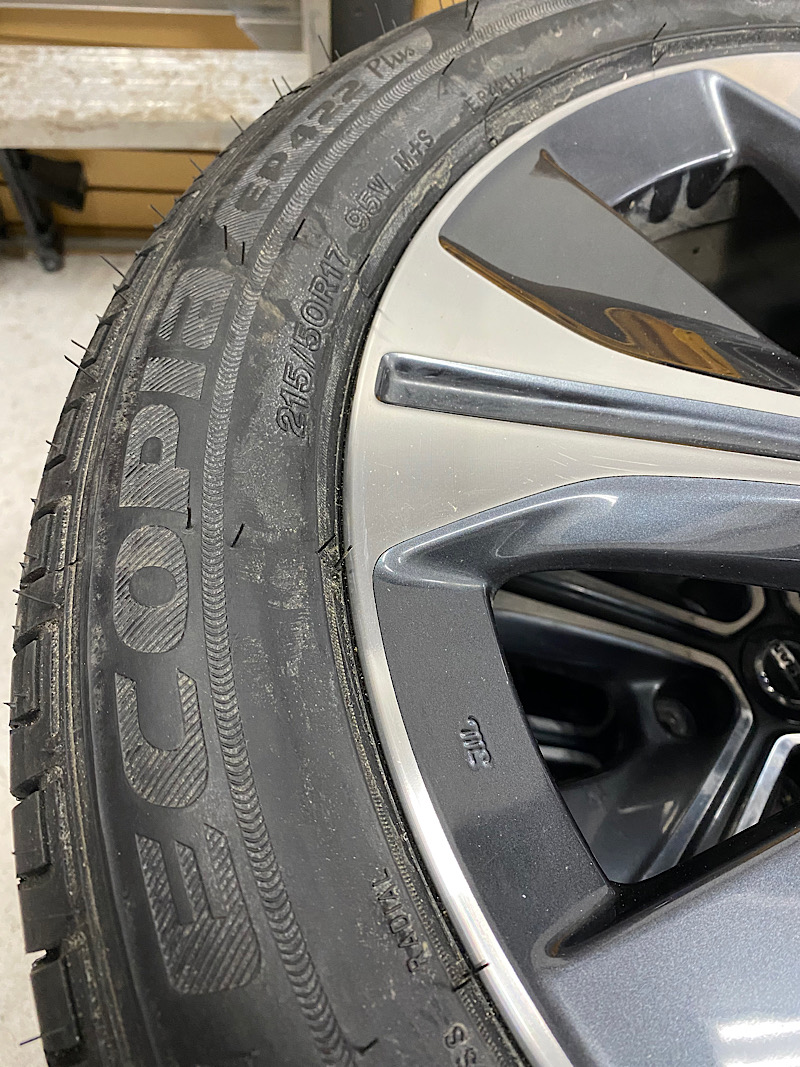
The 2018 Leaf came with studded winter tires in great shape (on 16" alloys, with TPMS), but the summers were done. I ended up researching and sourcing a set of 215/50 17" Bridgestone Ecopia 422 Plus for the OEM rims. They have a much stiffer sidewall than the OEM Michelins, higher load rating, and have much better tread wear numbers , 680 vs 420 OEM. Ready to mount up..

mar820121_2.jpg


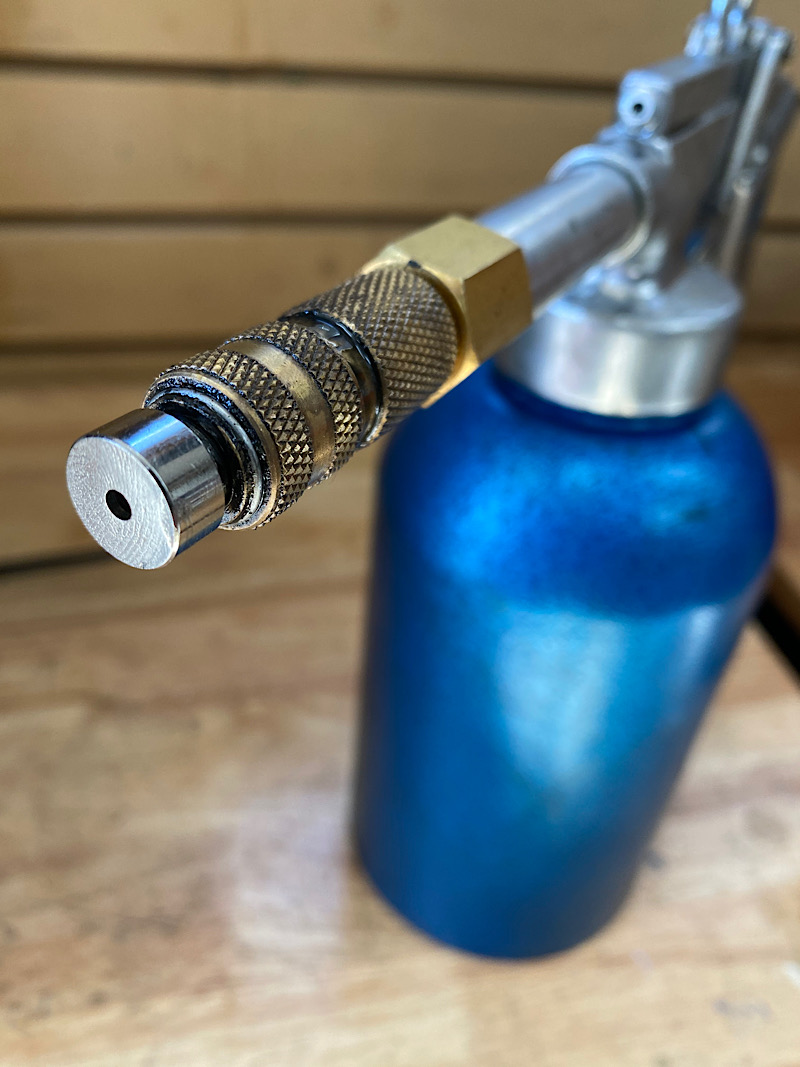
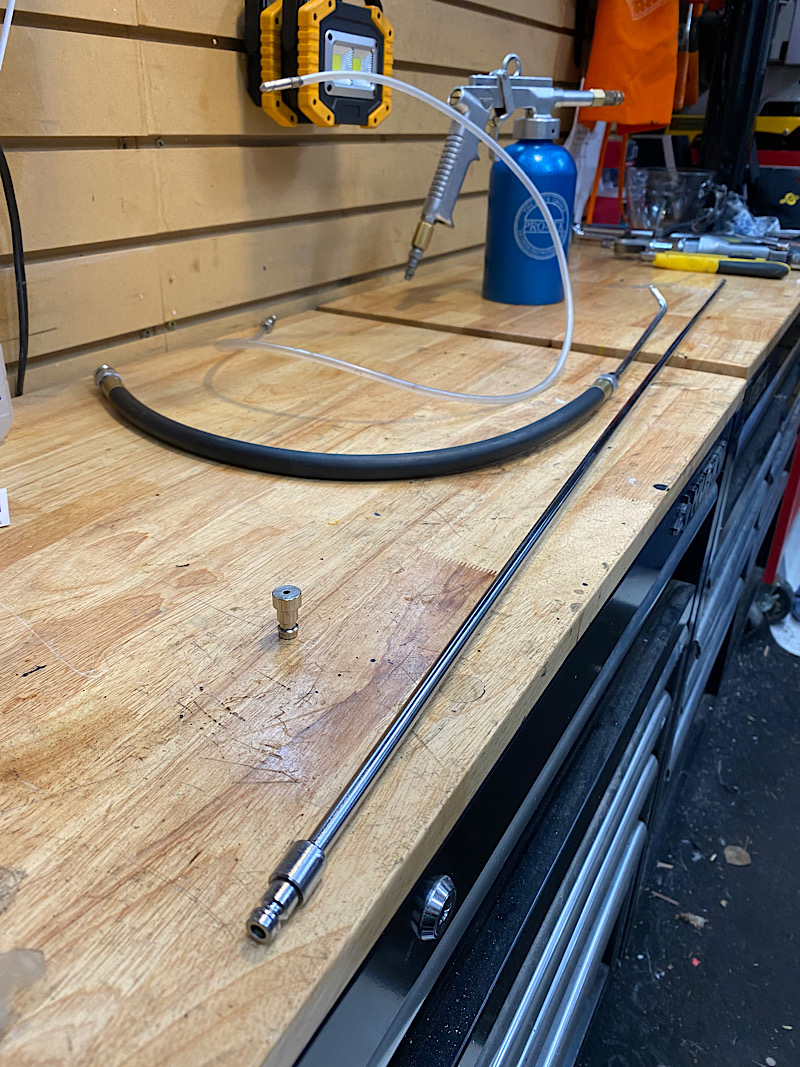
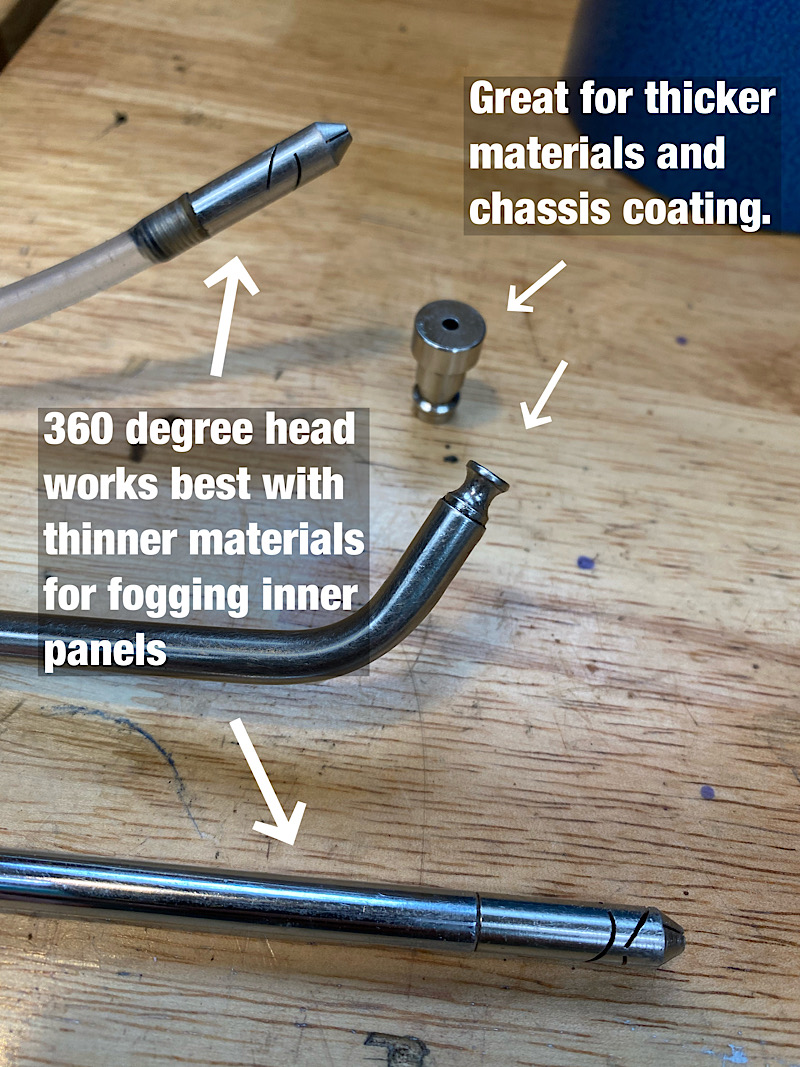
This little spray tip (ordered three actually) came in as well today. I lost the original as it accidentally ejected itself into a frame rail while spraying. This quick releases from the cavity gun which also has various wands/tubes etc. for getting into difficult spots when doing corrosion proofing work. I have a variety of attachments but this little one is easily my favourite for most spraying as the over spray is low and material application is about perfect.

mar820121_3.jpg


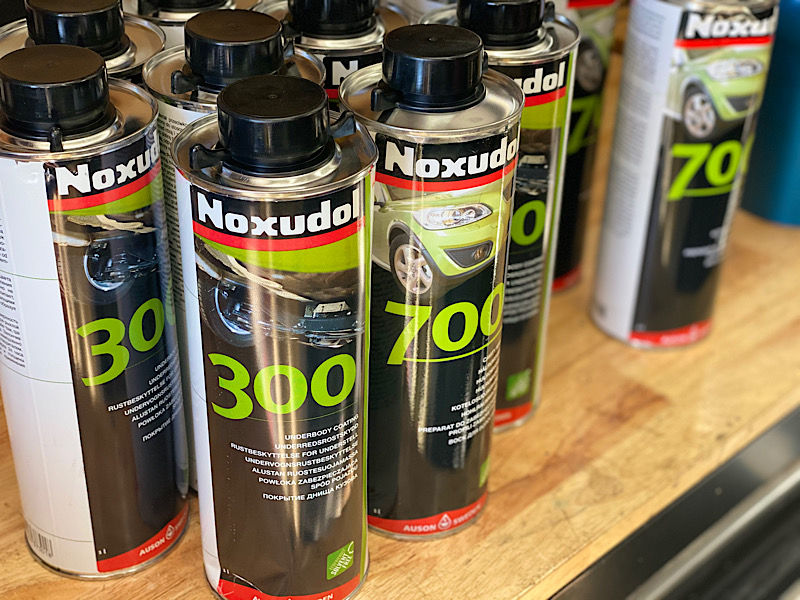
..and to go with the gun, a King's ransom worth of Noxudol 300 and 700 arrived via a border/broker outfit in town from the US. It was a bit of a pain to get here, but worth the effort...it's a great product.

mar820121_4.jpg


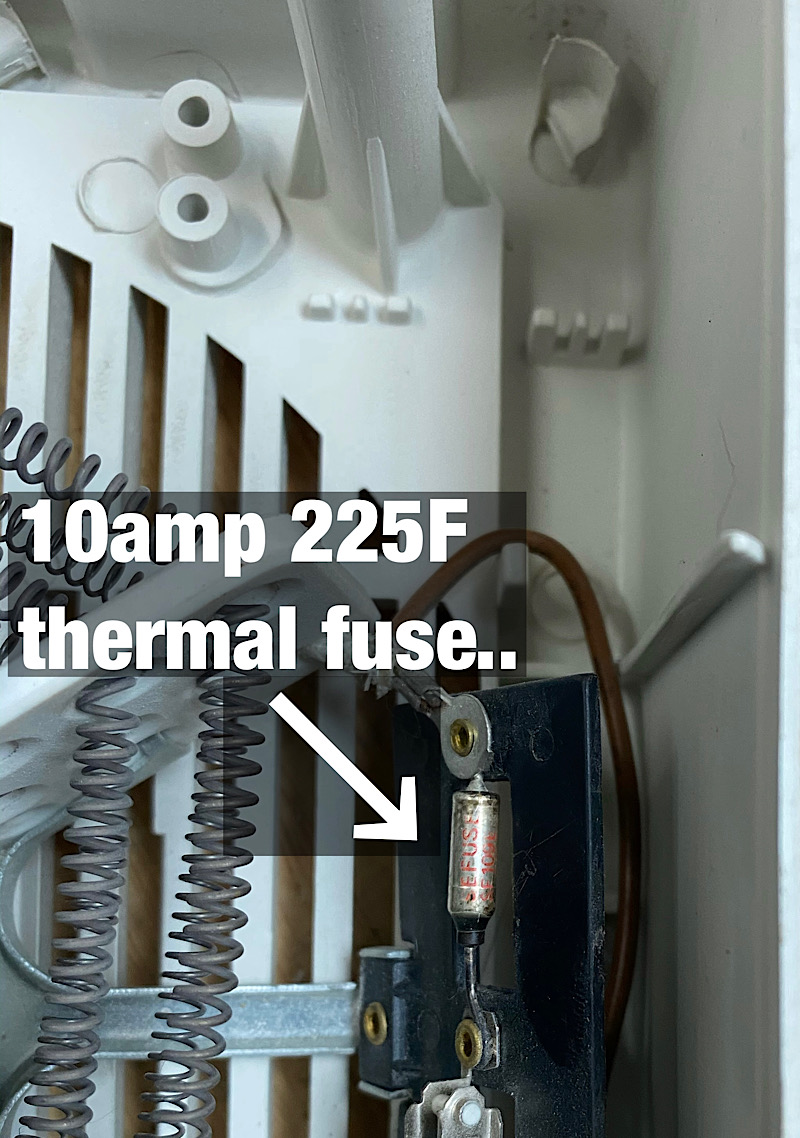
Last but not least, while cleaning the shop up I had a quick look at a small electric heater that had "died" after many years of service. Rather than tossing it, I had a quick look under the hood and found the culprit, a temperature fuse. I did not know these existed but evidently they prevent an overheat condition. This one is rated at 10 amps and 225 F. Amazon and $6 provided a replacement :)

mar820121_1.jpg
 

drivesitfar

Well-known member
Joined
Oct 23, 2013
Messages
36,077
Location
Pacific Northwest
I know that there is more than a few of us waiting to see how your undercoating went. did it happen and what does the MAN say about this product?

i'm also enjoying your comments and posts over on the WHEN WILL THE ELECTRIC CAR "how soon" thread

https://www.garagejournal.com/forum/showthread.php?t=476581

hope all is well in the frozen world you live in and guessing it's warming up a bit.
 
OP
D

Denwood

Well-known member
Joined
Sep 22, 2014
Messages
4,224
Location
Thunder Bay, Ontario, Canada
Ambient temps out are still below zero at night (and snow may or may not be on the ground), so I'd like to do everything in one go for the LEAF so it's only up on the hoist once.

1. Remove all chassis panels (there are three of them) to expose the entire chassis.
2. Perform the Noxudol application (700 "primer").
3. Install a 2" receiver hitch from etrailer.com (for bike racks).
4. Service the brakes.
5. Change out the final drive oil with Redline D6 synthetic.
6. Swap out the 16" winter tires/rims for 17" OEM alloys with new Ecopia tires.

Should be starting in about 10 days :) My cheap thermal fuse fix (my last post) worked great on the small electric heater so I guess we saved a bit of landfill this week.

That EV thread is proving quite a monster. Great discussion there.
 

drivesitfar

Well-known member
Joined
Oct 23, 2013
Messages
36,077
Location
Pacific Northwest
I hear you and great plan!!

it's also nice to hear that some of the new electric cars can be charged off of 120v.

hope you had a great weekend and STAY WARM!!
 
OP
D

Denwood

Well-known member
Joined
Sep 22, 2014
Messages
4,224
Location
Thunder Bay, Ontario, Canada
Now for a few days of shop time. First up is touching up the Noxudol 300 treatment on the missus-mobile, a 2016 Highlander. It’s holding up extremely well, taking about a liter to touch up a few of the chassis areas that have high exposure in the wheel well areas. This is very impressive as I first applied the product in the summer of 2018.

I used the cavity gun from the post a few back at 60 psi and prewarmed the Noxudol 300 before spraying it. Zero fumes and very little overspray :). I have a drop sheet under, however drips are actually very minimal with this product. After three years the original application is still waxy, and pliable.

With the rims off, I’ve gotten in the habit on all the vehicles of pulling the brake caliper pins, lubing them up, and hitting the caliper contact points with a small hit of brake lube. This combined with fluid flushes every 3 yrs or so has brought brake issues to zero.

2016 Toyota Highlander service at 126 247 kms:

1. summer tire rotation.
2. Noxudol 300 touch up.
3. Brake inspection, caliper pins lubed.
4. Cabin air filter changed

highlander0421_1.jpg


highlander0421_2.jpg


highlander0421_3.jpg


I should have grabbed a final pic as the Highlander is still looking like new.
 
Last edited:
OP
D

Denwood

Well-known member
Joined
Sep 22, 2014
Messages
4,224
Location
Thunder Bay, Ontario, Canada
Corrosion Management - Rust Proofing a 2018 Nissan LEAF SL

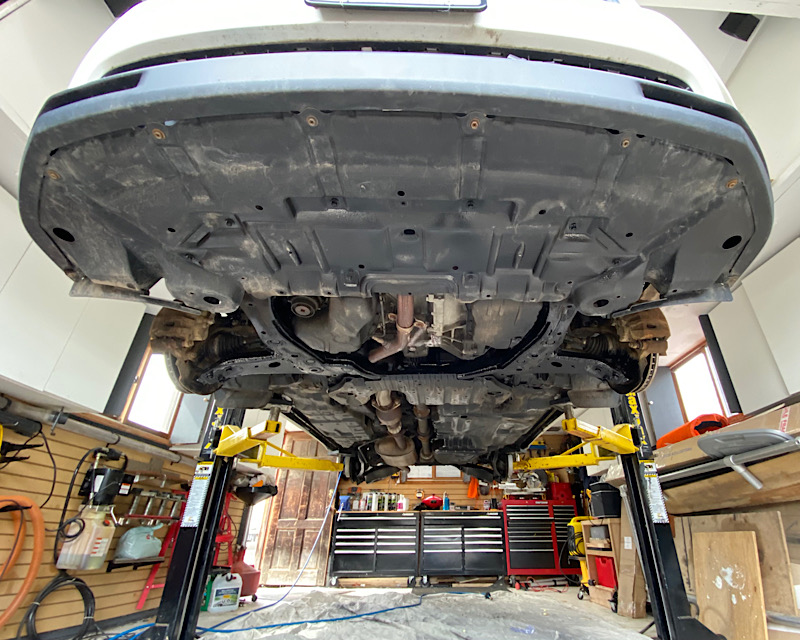
On the agenda is a the winter to summer tire swap, final drive oil change (no other oil in an EV!), brake service, corrosion management, and trailer hitch install. This is the first hoist for the new to me 2018 LEAF SL, shown here with some rather pedestrian studded winter rims and tires/TPMS sensors that came included as an extra with the car. I'm not a fan of these alloys, but hey, they are fine for winter use.

leaf0421_1.jpg


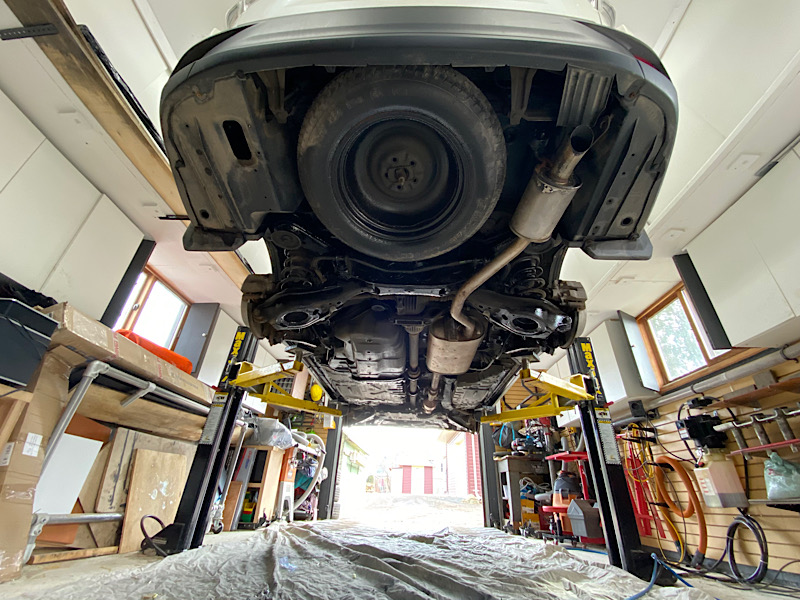
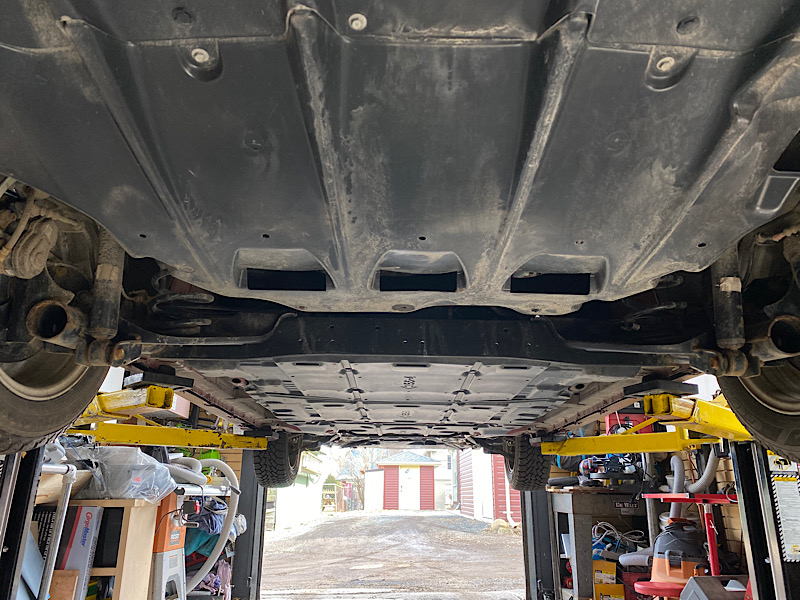
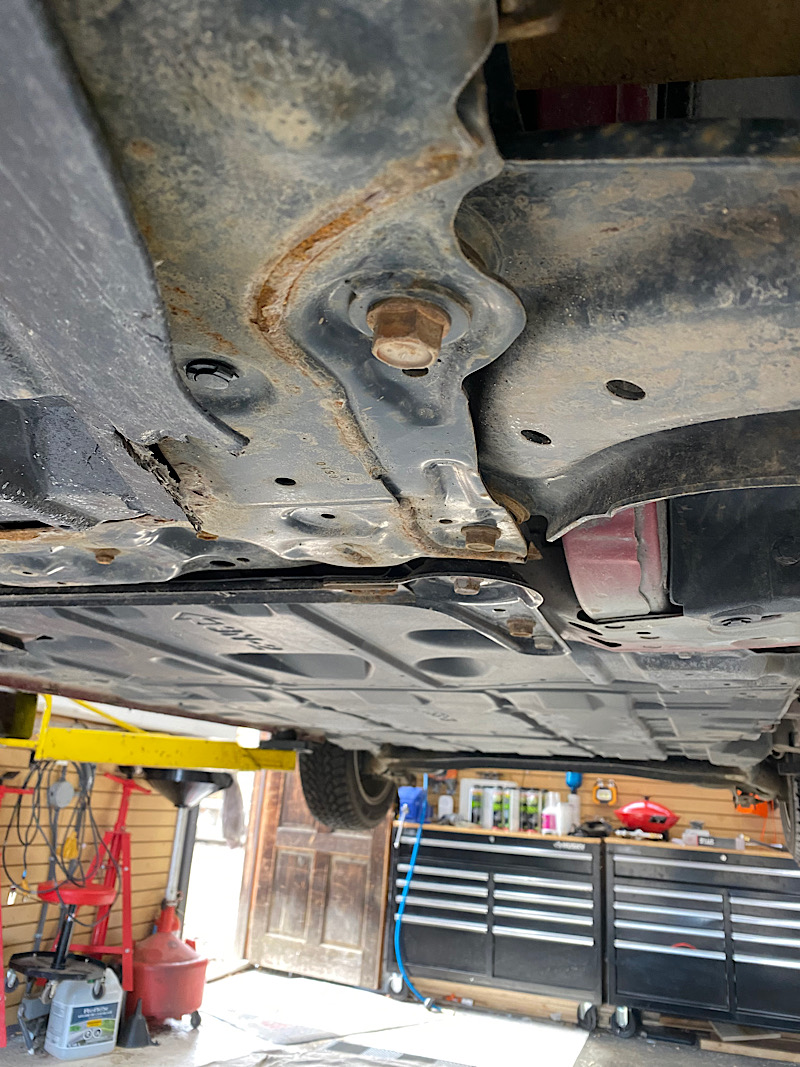
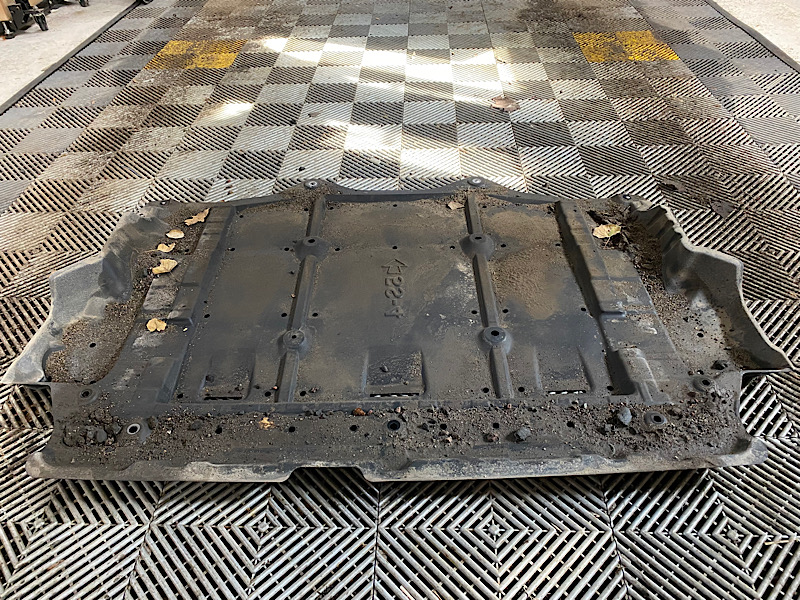
You can see there's not much looking underneath as most of it is enclosed in three plastic belly pans. The front shield has taken a few hits, and one corner will need some repair.

leaf0421_3.jpg


leaf0421_2.jpg


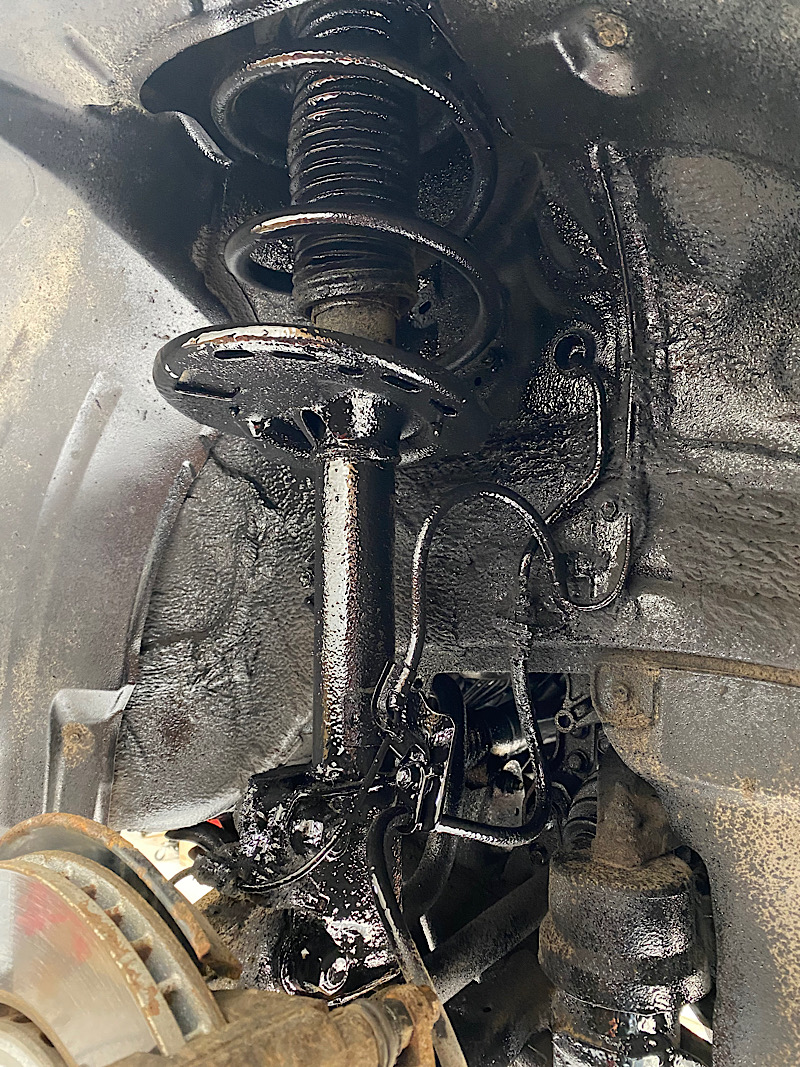
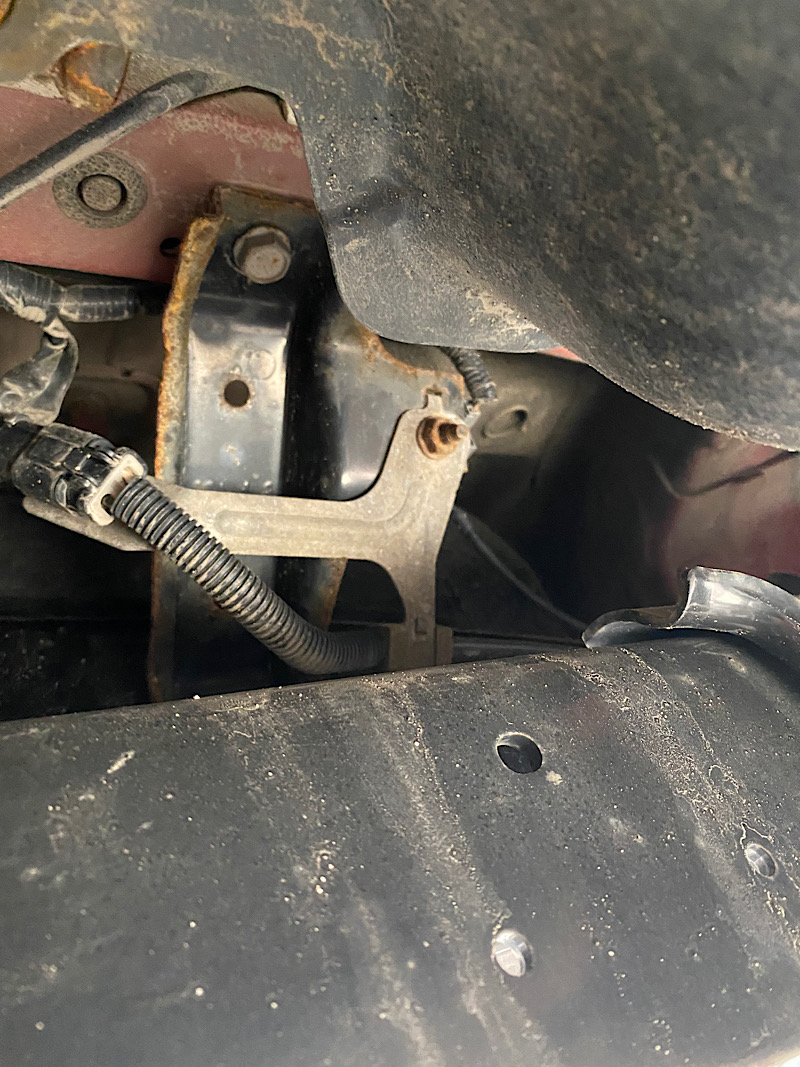
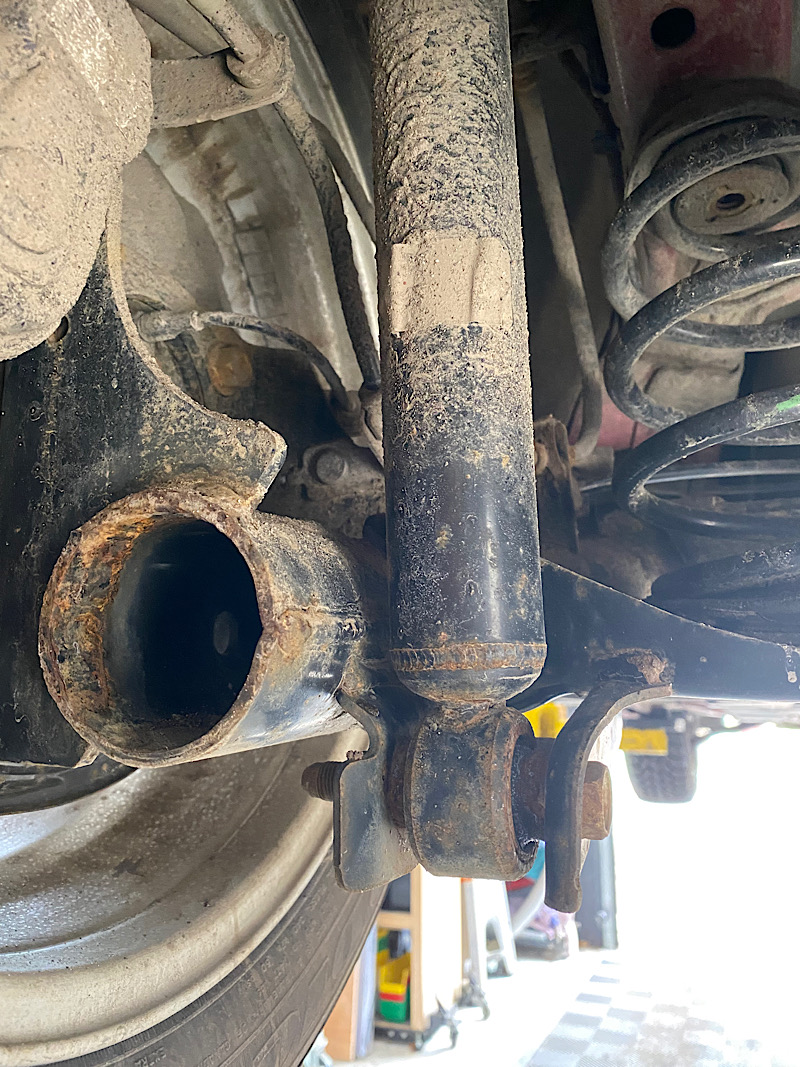
This vehicle has 58 000 kms (36 000 miles), and is already showing corrosion at the typical areas. More pics later on that. The first two pics are at the front A arm and main motor support sub frame.

leaf0421_4.jpg


leaf0421_5.jpg

These pics are from the rear suspension area:

leaf0421_6.jpg


leaf0421_7.jpg


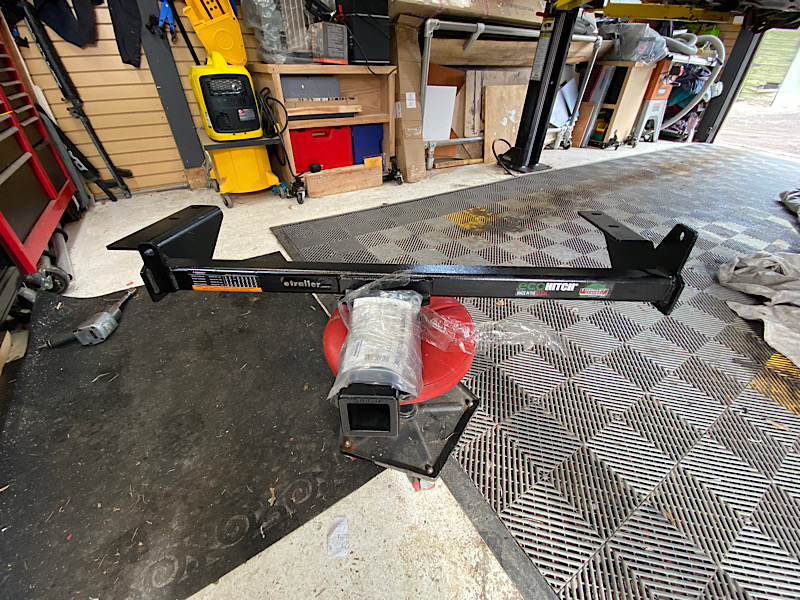
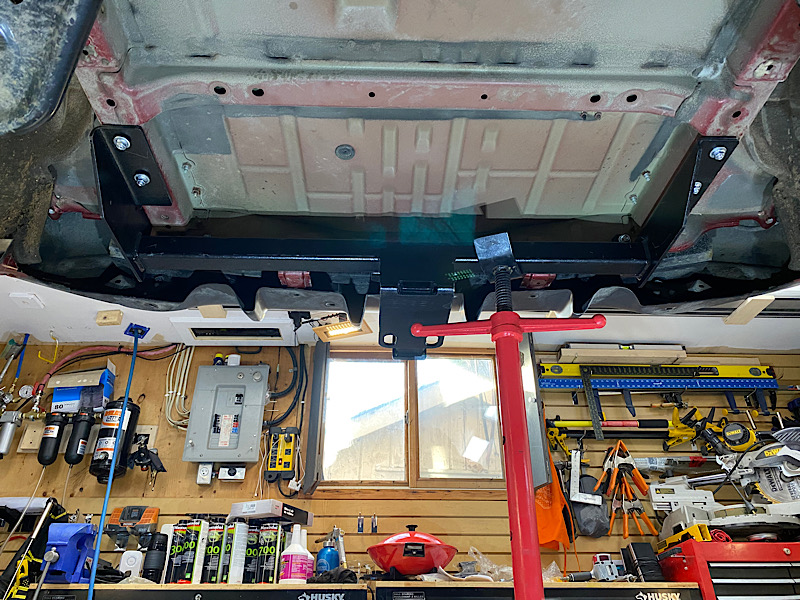
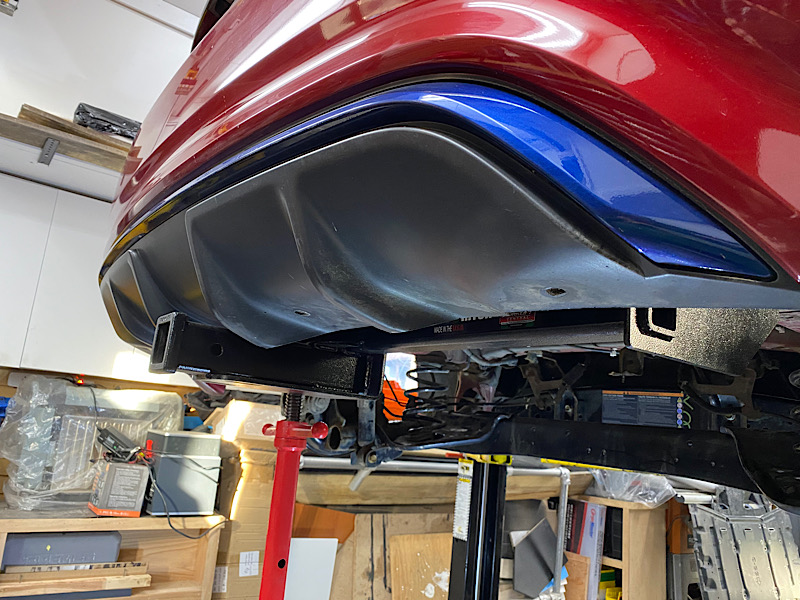
This rather beefy "Ehitch" is one of the only hitches out there for the later model LEAF with a 2" receiver. It will be used mainly for carrying our mountain bikes, but I also will tow a small trailer occasionally. The hitch is rated to 2000lbs, and 300lbs tongue. I'll run separate power for the tail light kit (also from etrailer) from the 12volt battery up front while the belly pans are removed.

leaf0421_8.jpg


This pressurised "ProTek" cavity gun has interchangeable tips so I use a collection of wands, and flexible 360 sprayer hoses etc. to cover the hard to access areas. I run it at 60 PSI and with Noxudol there is very little over spray and zero fumes.

mar820121_3.jpg


I'll be using Noxudol 300 (black, heavier body for chassis) and 700 (clear, penetrates seams etc. for inner panels, or non exposed areas). This material has zero solvents so no fumes, but it does contain a number of chemicals that actively react with rust. It stays flexible, like a wax, and never hardens. After 3 years on our Highlander, it only required a few touch ups on high exposure areas on the chassis, so does not wash off in a few minutes of water exposure, like Rust Check or Krown.

mar820121_4.jpg
 
Last edited:
OP
D

Denwood

Well-known member
Joined
Sep 22, 2014
Messages
4,224
Location
Thunder Bay, Ontario, Canada
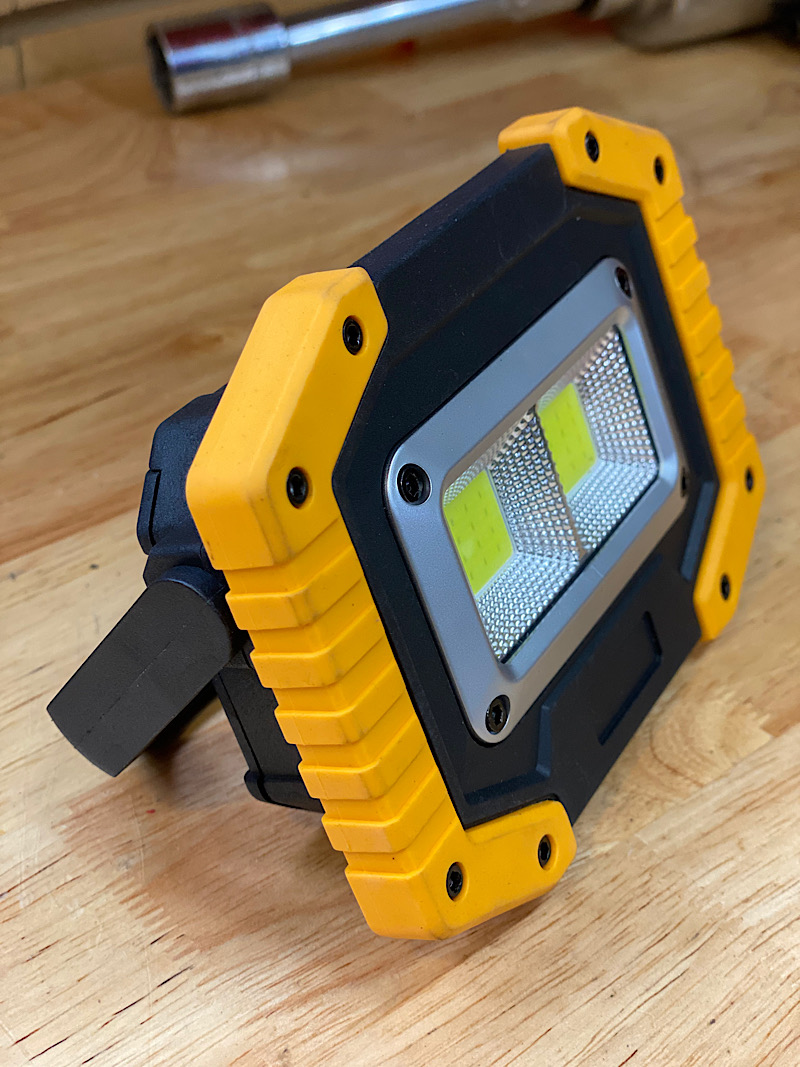
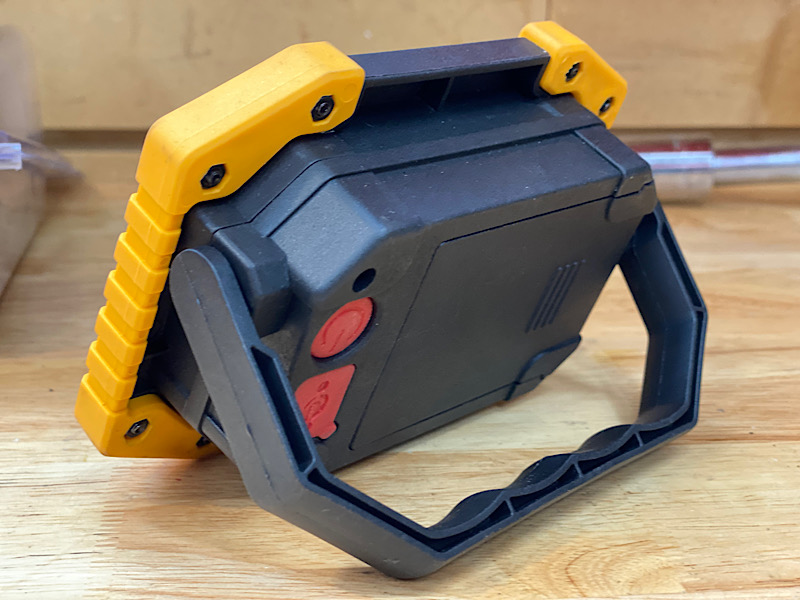
I've been looking for some small, wireless, bright, LED worklights that I could use for under chassis inspection, work etc. I have a corded LED light, but the cord is always a PITA on the shop floor with respect to the roller cart. I figured a few small LED lights would also be perfect to add some fill light for photos.

0421tools_1.jpg


0421tools_2.jpg


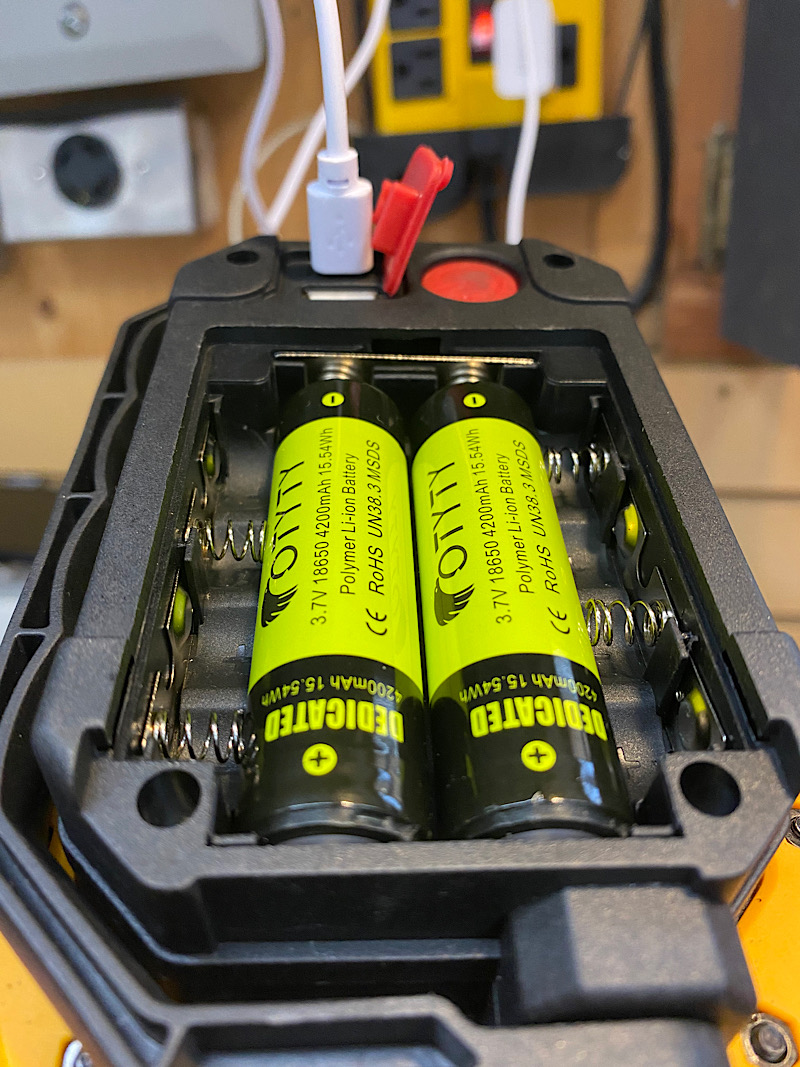
These charge via USB and have replaceable lithium 3.7V cells, so should last a long time. These were only $37 for a 2 pack on special. They are 1500 Lumens, so presumably the equivalent of a 200 watt halo bulb. They are indeed very bright. Having replaceable cells is a big one for me as I'm not a fan of disposable tools.

0421tools_3.jpg


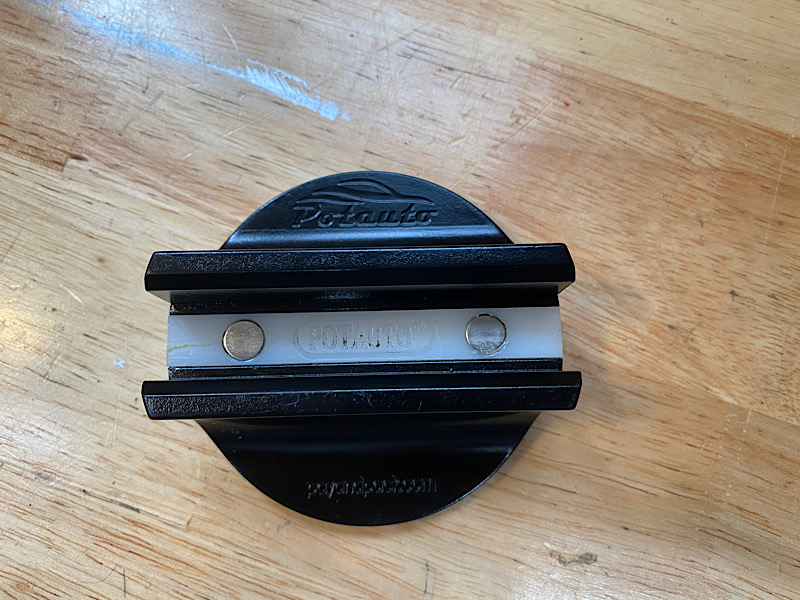
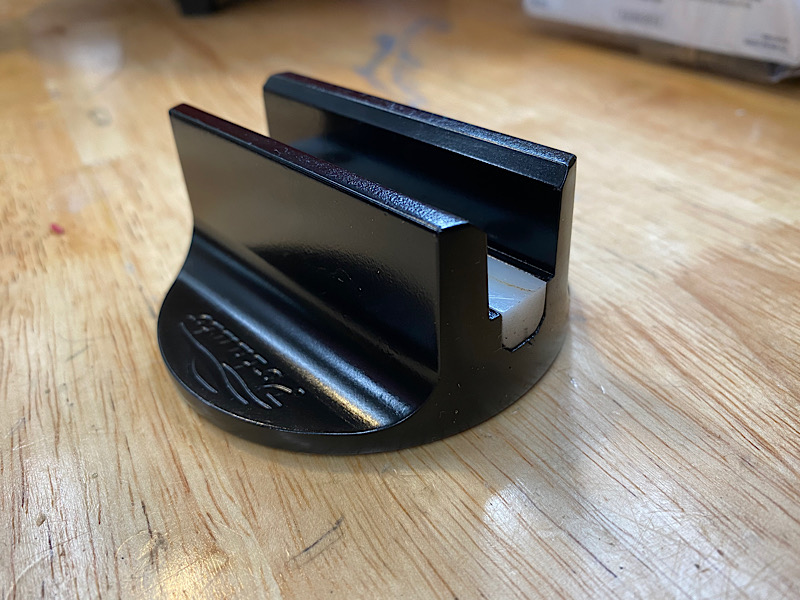
While we're on the topic of useful tools, I used these bits for the first time yesterday and can highly recommend them. They go on the pinch welds when lifting a car to avoid damaging the metal. The coolio feature are the magnets which hold them in place so you don't need to check that you're in alignment as you raise hoist or jack pads. They are well designed and a very nice time saver for $17 CAD each.

0421tools_4.jpg


0421tools_5.jpg
 

drivesitfar

Well-known member
Joined
Oct 23, 2013
Messages
36,077
Location
Pacific Northwest
great work on the cars as per usual and thanks for detailing all your work in words too. :thumbup:

there is a Youtube guy in Oregon i've been watching mill wood and he loves these little clip on lights that clip on his baseball cap that he's always talking like they are simple to charge and have a million lumins (slight mis spelling and exaggeration). if you want a link to his videos just ask and i'll post a link.

looks like you are ready for spring and another great summer of fun.
 
OP
D

Denwood

Well-known member
Joined
Sep 22, 2014
Messages
4,224
Location
Thunder Bay, Ontario, Canada
Good tip on the light Drives. I wear a cap rotated backwards whenever under the hoist as it helps with head hits :). It will be a summer of building decks and gazebos..

This is a bit surprising due to the quantity and size Of the sand and gravel caught. There are five underbody panels, and this is the fourth, just in front of the rear axle. It is also shielding the back of the battery pack so eventually this area will be packed with sand/gravel in direct contact with the battery casing. The gravel is likely ending up there as a result of openings to the rear wheel wells. I always take note of areas like these as they point to future problems as wet sand stays in contact with body panels. I had to replace a fuel filler neck precisely for this reason on our CRV.

leaf0421_09.jpg


Some mud/splash is evident on the driver side, rear battery case, entire corner, via a gap in the chassis shield. It’s not a lot, but was obvious in that one area. Rocks in an exhaust shield close to the body were the cause of a weird rattle that drove me bit batty on our CRV. I would not be surprised if a few LEAF owners are seeing the same from this shield area.

Aside from the battery mount bolts, most of the fasteners on the chassis seem to be be non-plated and are showing signs of rust. The rear bumper to shield fastener was seized already :-(. This is typical of what I’ve seen under more recent cars, and the trend does not bode well for future repairs, with no corrosion management. Recent Toyota, Audi, and now the LEAF are showing signs that manufacturers are cutting costs by not using plated fasteners on the chassis. To have a few seized clips after only 3 winters is not cool.
 

Arclitgold

Well-known member
Joined
Dec 20, 2017
Messages
317
Re: Woody's Works Garage - rebirth!

Yay more posts! Glad you’re still at it


Sent from my iPhone using Tapatalk
 
OP
D

Denwood

Well-known member
Joined
Sep 22, 2014
Messages
4,224
Location
Thunder Bay, Ontario, Canada
B]Arclit,[/B] I found some energy for posting :) These particular items have an internet vacuum around them, so I figure this is the time to give a bit of content back.

On the hitch project, it's a pretty simple install. No drilling, grinding or mods required.

img_aa09-eca3.jpg

img_8405-969f.jpg


I ran the 12 gauge power wire for the trailer harness (requires it's own power supply) on the drivers side, over the high voltage pack in plastic looming which allows it to route to the 12V battery completely under the belly panels. I just used a wire fish to pull it through. I figure this is much easier than routing via the cabin. I'll post a pic or two on this project later.

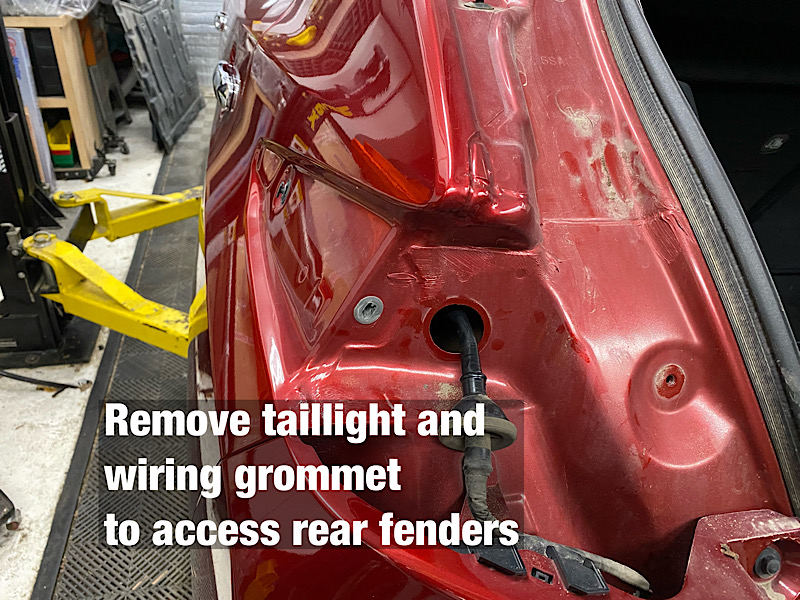
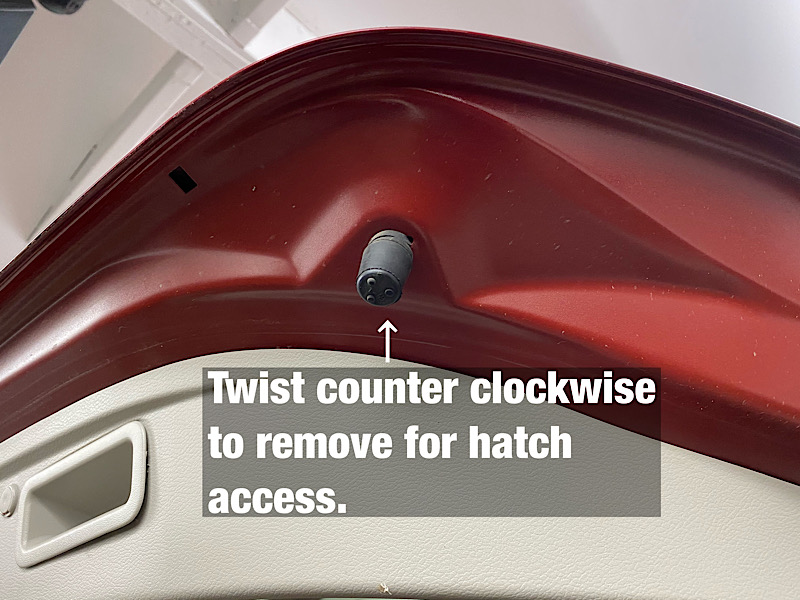
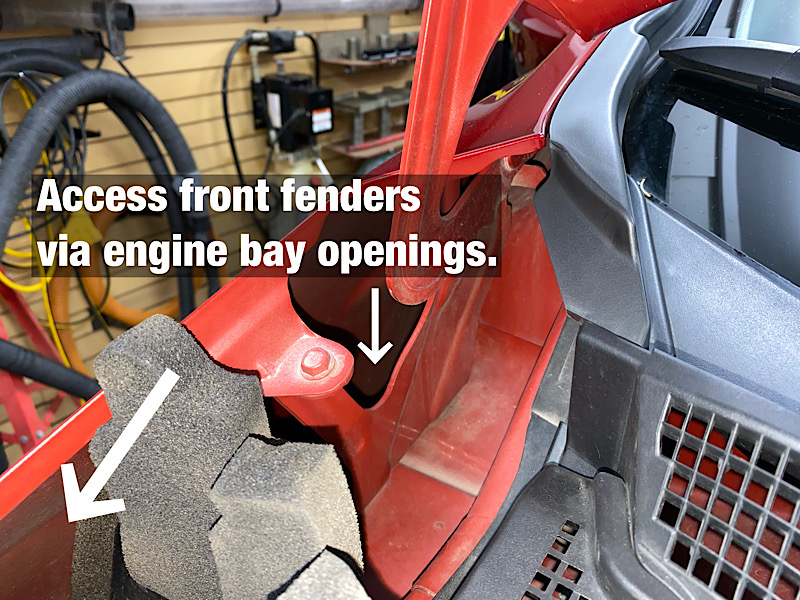
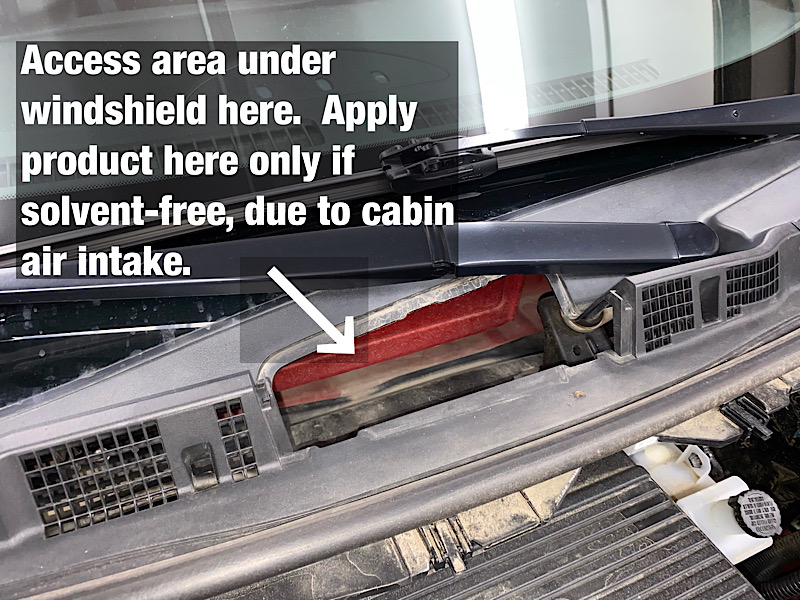
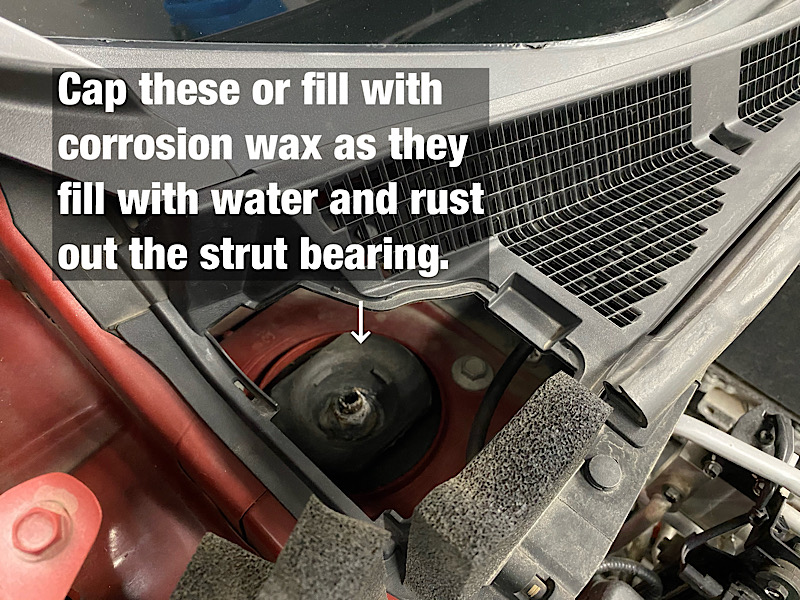
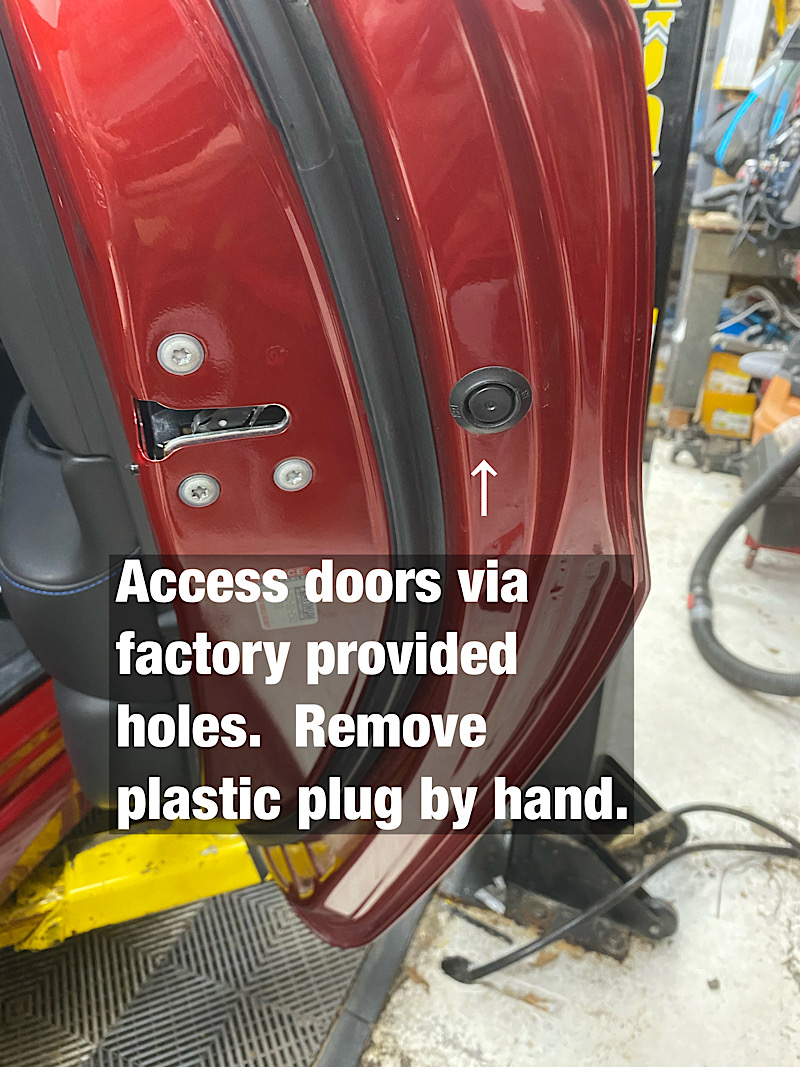
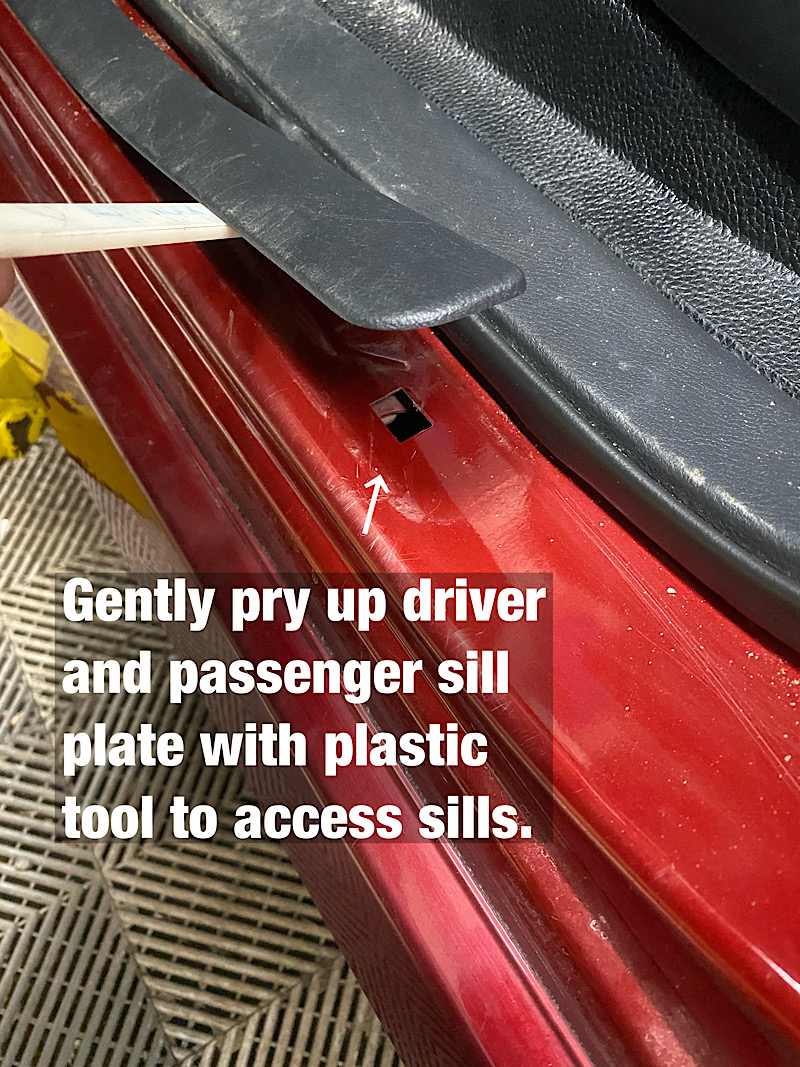
On the corrosion side of things, these images are pretty much a guide to accessing the inner fenders, door cavities, sills, hatch, and cowling. To remove the tail lights, remove the 2 10mm bolts (in the hatch opening) and give the lenses a gentle shove directly backwards. They have sliding clips, so do not try to pry the light out at all!! I have an assortment of flexible and solid rod attachments for the cavity gun with 360 spray heads to cover the inner panels. Your typical Krown or Rust Check "tech" will do none of this, and therefore miss these areas completely. They do not remove chassis shields either. This is why I gave up and bought my own gun/tools. It's paid for itself many times over.

As with most vehicles, there is zero need to drill any access holes. You just need to be a bit more observant.

img_66a3-0b37.jpg


img_3a0c-6893.jpg


img_3423-d05a.jpg


img_2036-2a6e.jpg


img_570b-e347.jpg


img_f88c-5851.jpg


img_3c39-1510.jpg
 

dla

Well-known member
Joined
Aug 21, 2014
Messages
66
Location
NB, Canada
Hey Dennis, your automotive posts are always interesting! I too put a lot of effort into thoroughly undercoating/rustproofing vehicles. Your methods of accessing different areas of the car are excellent. I've never heard of the products you're using but I'm going to look them up. Around here, Fluid Film is pretty much the go-to.

Interesting that you brought up the declining build quality of cars lately. Back in the 90's, my neighbour remarked that an old Toyota or Honda could be totally disassembled without breaking a fastener. Of course we were always working on GMs and Fords and having a miserable time of it. I hung around a friend's import shop in the 2000's and can't recall them having many broken or stuck fasteners.

Great to see some DIY on an EV. I'm sure there's folks out there getting into it but like you said, it's not a common thing to come across yet. They're quite rare in this area so far but the charging infrastructure is getting there.
 
OP
D

Denwood

Well-known member
Joined
Sep 22, 2014
Messages
4,224
Location
Thunder Bay, Ontario, Canada
Dan, thanks for the kind words :)

I was quite hesitant originally to even purchase an EV, much less "get under the hood" but after watching some of the videos over at WeberAuto's channel:
I realized the EV was actually a lot simpler in many respects than an ICE car. I find that simplicity very compelling.

On the fasteners, yep, it's a recurring trend I'm seeing with stuff on my hoist. With respect to the LEAF itself, I'm not a huge fan of aesthetic, but the car itself is an excellent runabout in the city :) 249 ft/lbs of torque available instantly is pretty fun to drive with. Range at 250 kms is fine for our use case...and like most, I charge it at home overnight when needed. It hasn't been plugged in for a week.

Fluid film is strangely about the same price as Noxudol (maybe more), but washes off very easily, and does not play nice with rubber seals. Noxudol on the other hand has zero odor (at least the 300 and 700 that I use), is solvent free, does not wash off, and is basically a one time application. You just touch it up yearly on exposed chassis bits. Noxudol also has a few active chemicals that react with rust, making it quite unique in the market. I have posted a bit about it here, so you can likely just google that :) I would not use it on a show car though.

Noxudol 700 cavity wax "won" the
Classic Monthly 3 year test
, and Noxudol 300 is used in safety recalls issued by both Toyota (frame rust recall) and Isuzu (rear suspension sub-frame recall) to treat structural failure issues due to rust (links below).

A bit of research on the product yields this: http://www.google.com/patents/WO2011120646A1?cl=en
Quote:

According to one embodiment, a composition containing sulfonic acids, petroleum, overbased calcium salts in an amount of 10 to 30% by weight; fatty acids, tall-oil, polymers with isophthalic acid, pentaerythritol and tall-oil in an amount of 10 to 20% by weight; paraffin waxes and hydrocarbon waxes in an amount of less than 10%; base oil, distillates (petroleum), solvent- refined heavy paraffinic materials in an amount of 40 to 60% by weight, each percentage being based on the total weight of the wax component, may be used. This material is available as the commercial product Noxudol 700 from Auson AB, Kungsbacka, Sweden. This material is of waxy appearance and includes a liquid paraffin component.

A bit more research:

Sulphonic acids - rust cleaner
overbased calcium salts - oil additive to prevent rust
pentaerythritol - referenced in several corrosion inhibition papers.
polymers with isophthalic acid - referenced in corrosion resistance material
tall oils - used as a base for corrosion inhibitor products

I used the 300/700 on our latest ride, a 2014 Highlander and can confirm that it has not washed off after many pressure washes..and can support the manufacturers suggestion of quick yearly touch ups vs full reapplication. I can also see surface rust under the amber 700 wax is slowly turning black, which makes sense given the active anti-rust chemicals they incorporate. Initial costs are more, but factor in the savings in subsequent years.

Honda spec’d Noxudol 300 and 700 for a frame rust recall.
https://static.nhtsa.gov/odi/rcl/2010/RCRIT-10V436-1234.pdf

Toyota also spec’d Noxudol 700 and in some cases 300 on multiple truck frame rust related recalls: https://static.nhtsa.gov/odi/rcl/2009/RCRIT-09V444-6633.pdf
 
Last edited:

dla

Well-known member
Joined
Aug 21, 2014
Messages
66
Location
NB, Canada
I appreciate the info! Interesting that you linked to Toyota's TSB as I picked up a '19 Tacoma based on Toyota's reputation for reliability and have been soaking it in fluid film to hopefully avoid the frame issues they've been suffering. There is a boxed section of frame that was very heavily coated internally with a creamy tan goo right from new, not sure if it was done at the dealer or during manufacture. Everybody just refers to it as CRC or "Corrosion-Resistant Compound", looks like it is probably the Parker 712AM. I've saved that document for future reference, lots of great info in it.
The EVs are almost where I could live with one. Certainly for the daily commute they would have their advantages. I'm keeping an eye on the industry to see when the next advancement in battery tech is going to land, I think that will be the point where most people buy in. Hyundai is selling a few EVs now too, eh? Heard the local dealer is moving a few of them.

I watched a couple videos by WeberAuto a while back regarding how the hybrid systems work and interface with the engine and drivetrain. Interesting stuff for sure and well presented.
 
To avoid these ads, REGISTER NOW!
OP
D

Denwood

Well-known member
Joined
Sep 22, 2014
Messages
4,224
Location
Thunder Bay, Ontario, Canada
Dan, yes, the creamy stuff is Parker 712AM...if you find a link to actually buy that product, I'd be interested. It's the only other product I've found after a lot of research that looks to have at least a few rust management additives. I found the Parker 712AM reference via the footnotes in a Toyota TSB and then did a lot of digging on the product.

The latest hybrid video from Weber on the Rav4 was one of the most interesting I've seen in a long time. Toyota using an extra electric motor with a spider/planetary to server as CVT, alternator and drive motor is pretty brilliant.

It sounds like you are staying on top of the frame issue, which is smart. If you're doing application of FF yourself yearly, then you are already 99.9 % of the way there :) What I saw from Krown and Rust Check shops was pretty awful with respect to missed areas. I use FF for applications like summer storage of my snowblower as the whole wash off "weakness" is not an issue. Woolwax is a product I've not tried but takes the FF/lanolin thing up a notch by being more wash resistant, and zero odour. That said, I paid $100 CAD for a gallon of FF, and pretty much the same price for 4 litres of Noxudol (via the US).
 
Last edited:

drivesitfar

Well-known member
Joined
Oct 23, 2013
Messages
36,077
Location
Pacific Northwest
with your weather conditions i bet all these small holes, leaks and flaws in a car's supposedly weather tight areas really does get multiplied.

nice work taking off and improving almost every flaw you saw before putting on the treatment and putting everything back together. it's a joy watching you work and getting your pics with your good words.

did you ever put a trailer hitch on your old CRV cause i think i'm going to put one on our 2005 CRV SE now that we are getting close to buying new car? AND this CRV doesn't seem to want to die anytime soon with 192,000 miles on it so i'll use it for short commutes and hauling my little trailer.
 
OP
D

Denwood

Well-known member
Joined
Sep 22, 2014
Messages
4,224
Location
Thunder Bay, Ontario, Canada
Drives, every time I pull a few panels on any car, the "problem" areas become evident. On the LEAF, each rear tail light is rubbing on on spot on the side of the car, with paint almost to the metal. It's a very small spot, but I guarantee every newer leaf will see rust creeping under that light in 3-4 years, starting in that spot. Same thing with "gravel" traps in the under chassis cladding. The strut bearings up front filling up with water (they are right underneath the windshield cowl drains is another known issue. Easy to fix with two caps, but it's hidden, so no one sees it and I'm guessing the engineer types don't care. Given the cost of new cars, and fixing them, I can see a lot of issues with newer tech if not carefully maintained. Heck, there's two computers behind the boot hatch panels that are complete mysteries to me. There's even a receiver (one of many hidden on push button start cars) hiding back there for the key-less entry system.

Our 03 CRV has a had a hitch with 2" receiver on it since I can remember :) It's super handy for towing our small trailer, 18' catamaran and bikes out to camp. I've never pushed it over 1500lbs, and the car has never complained. It's an easy install.

Doing a proper install on the LEAF trailer hitch wiring is likely a 2-3 hour job or more if you're running a dedicated 12V power lead up to the battery for an isolated trailer harness.

On another note, I'm gathering materials to build a few 10x12 gazebos...the price of pressure treated lumber right now is not so cool :-(
 

drivesitfar

Well-known member
Joined
Oct 23, 2013
Messages
36,077
Location
Pacific Northwest
i've seen a few videos on installing the 2005 CRV trailer hitch and looks like it's doable, but since i don't have a lift I'll probably take it to a friend's and pay him while I help him.

speaking of pushing the CRV's weight limit when I had my 98 Honda CRV manual a few years ago I drove 5 hours to pick up 1500 pounds of expensive gym weight plates cause they were a deal and high quality. I thought no biggie cause i'd load up the passenger seat and the rest in the back with the seats down.

when I arrived the seller said he had another 2000 pounds for 1/3 of the price of the 1500 pounds I was buying cause he had to move out of the building that day or pay another month's rent. SOOOO I loaded up 3500 pounds of weight plates in my little CRV and it made it home (I had to move it around a few times before leaving his parking lot to make sure I didn't hear any rubbing/scraping noises.

anyway these CRV's were built to last cause I ended up selling that one with 225,000 miles on it for more than I paid for it with 100,000 cause it still ran great. I do miss the manual though.

keep up the great work and i'm guessing you are almost above freezing and planning all your fun projects and adventures.

cheers
 
OP
D

Denwood

Well-known member
Joined
Sep 22, 2014
Messages
4,224
Location
Thunder Bay, Ontario, Canada
Drives, there are still a lot of older CRVs on the road here...so I'd agree that the older ones at least were built pretty well. Our 03 still burns a lot of oil on hot weather highway runs, but remains reliable. It will serve my daughter well for school.

I still recall that amazing thread as everyone helped you out with your daughter's wedding dance rig! How is she doing?

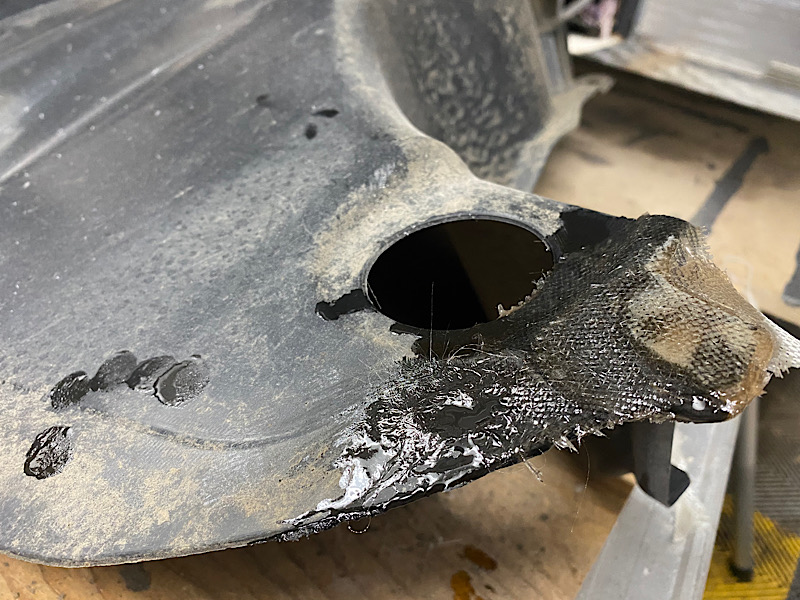
The LEAF is still on the hoist a week later as work has been busy this week. I have managed to repair the chassis underbody shields that took some abuse from driving over frozen snow bits (among other things I'm sure) and are getting ready to apply the Noxudol. The trailer hitch and wiring harness is in, so we're close to getting done.

On reassembly of anything automotive, I use anti-seize compound on pretty much everything. It definitely pays off down the line. I had to buy a new supply today and was curious on long term tests, or any tests on how it performs in real world testing. Of course Project Farm on Youtube shot a video and it is quite good:

I could summarise the video by saying that anti-seize definitely protects threads from heat/corrosion..and I'll keep using it liberally on every automotive fastener that I pull. Any newer vehicle I've encountered has little to no plating on fasteners and at least two of my LEAF under body fasteners (10mm bolts on the bumper, and rear shield) were already rusted and seized at only 3 years old.
 
OP
D

Denwood

Well-known member
Joined
Sep 22, 2014
Messages
4,224
Location
Thunder Bay, Ontario, Canada
More work on the LeAF today, including servicing the brakes (one caliper pin stuck after just 3 yrs!), changing the final drive oil, finalizing the trailer hitch wiring, and removing the rear fender liners.

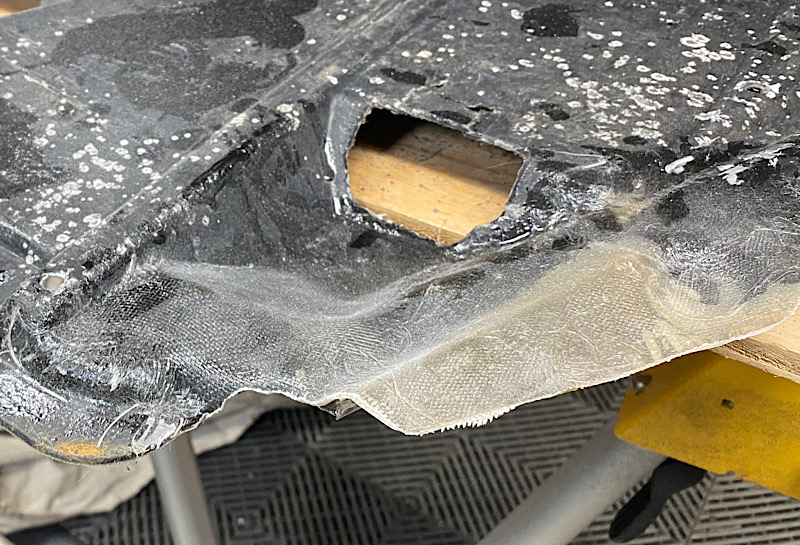
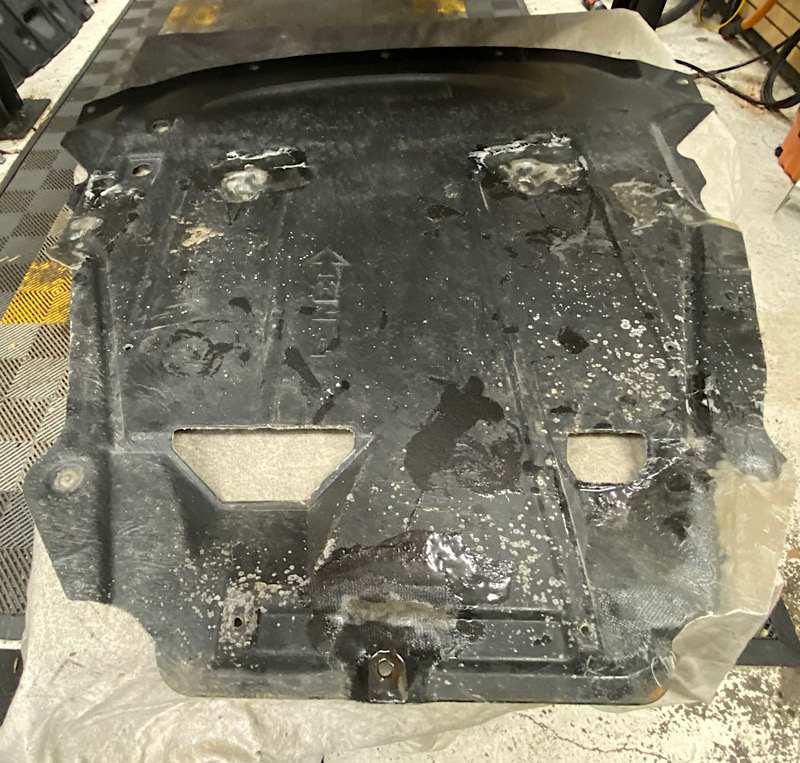
The front chassis shield needed some repair so I did this with some 6oz glass cloth and West System Epoxy

The rear shield corner needed fixing up. This is before grinding to shape after curing.
040921_1.jpg


The front shield needed 5 small repairs.
040921_2.jpg


Rebuilt the entire (missing) corner on the engine chassis shield.
040921_3.jpg


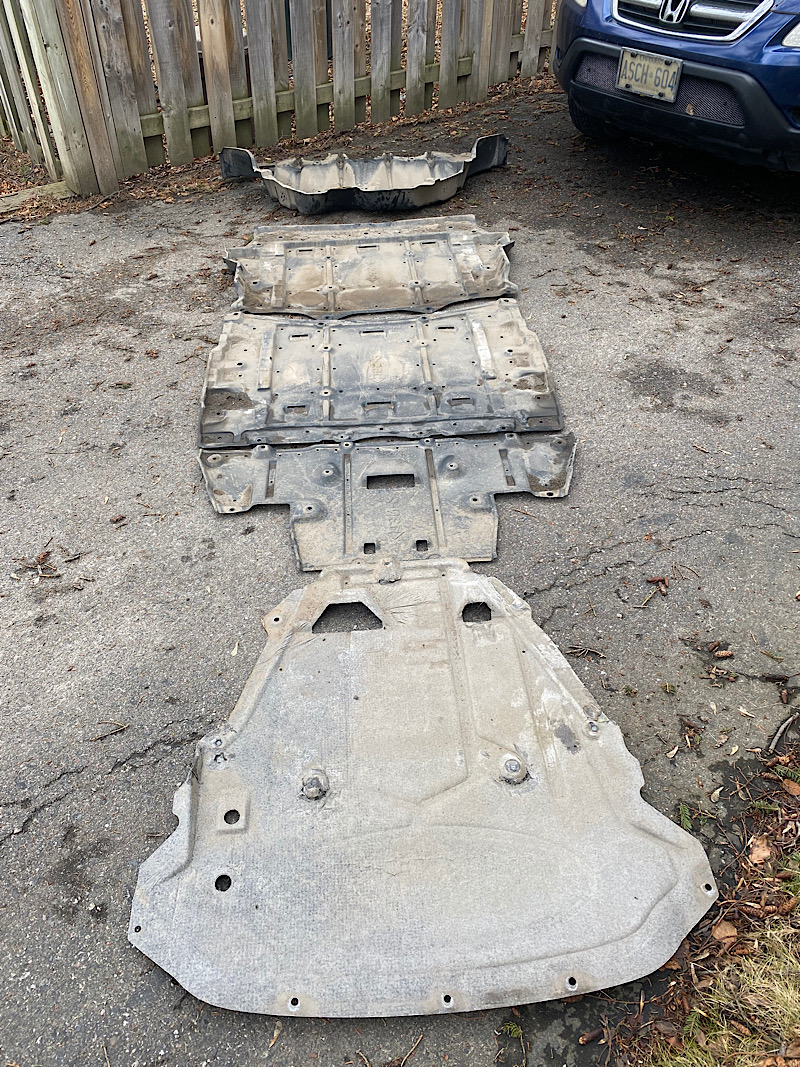
The LEAF has all of 5 shields to protect the underbody and improve aerodynamics. I gave them a quick wash..
040921_4.jpg


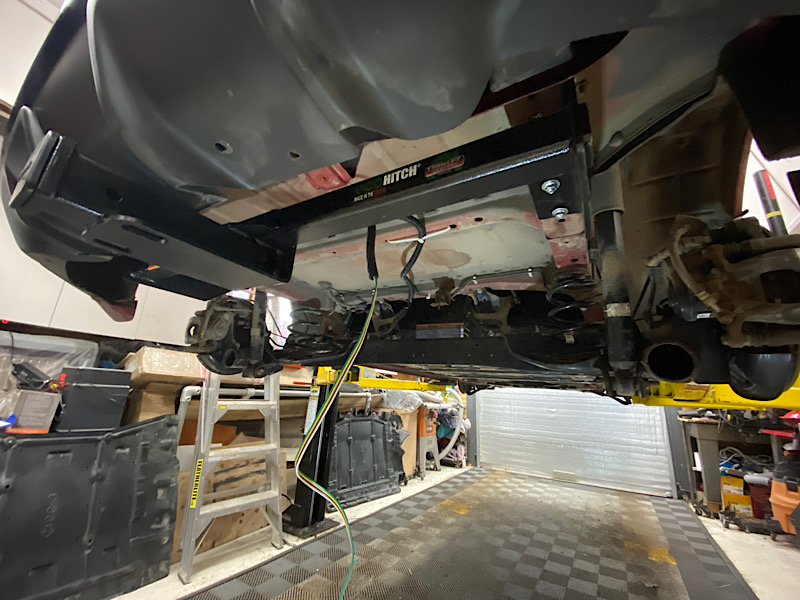
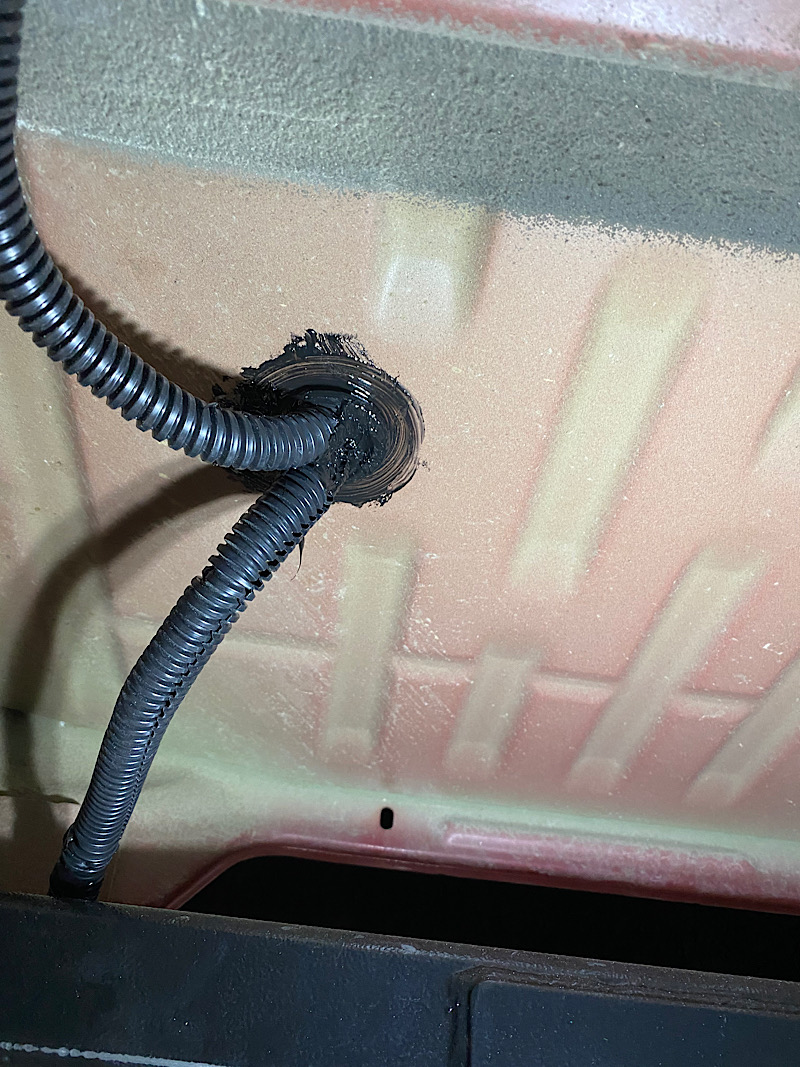
I used a drain port in the hatch floor to run power to the trailer harness, and run the trailer wiring out to the hitch. A fused 12V power lead had to be run all the way up to the 12V battery in the engine bay.
040921_5.jpg


This stuff is super handy for sealing up grommets among other things...
040921_6.jpg


040921_8.jpg


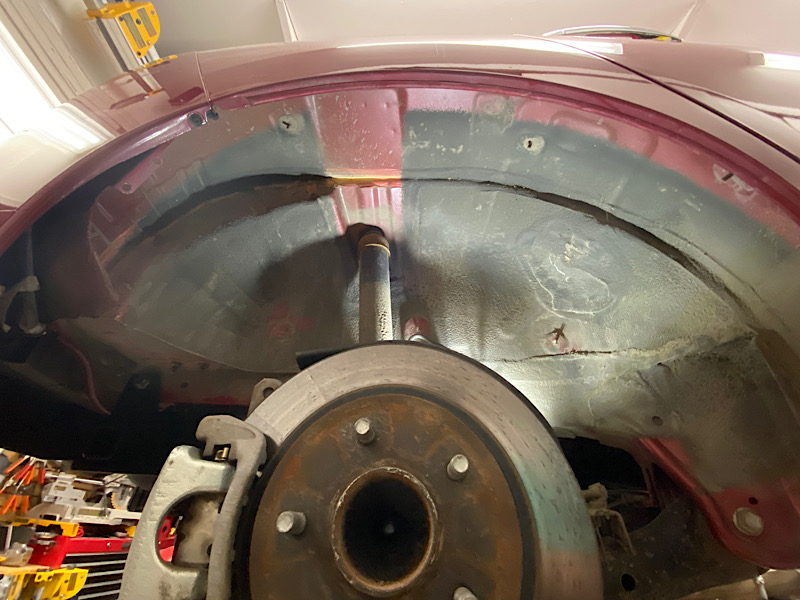
Looking up in the rear fender with the liner removed:
040921_7.jpg
 
Last edited:
OP
D

Denwood

Well-known member
Joined
Sep 22, 2014
Messages
4,224
Location
Thunder Bay, Ontario, Canada
All done spraying the Noxudol 300 and 700.

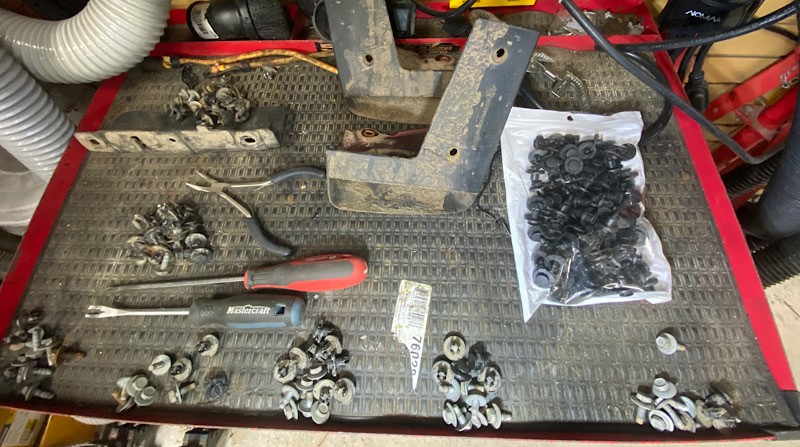
This is the collection of clips and 10mm bolts from the four fender liners and five underbody panels. You can see the new bag (which you will need) as the OEM clips snap easily.

042111_1.jpg


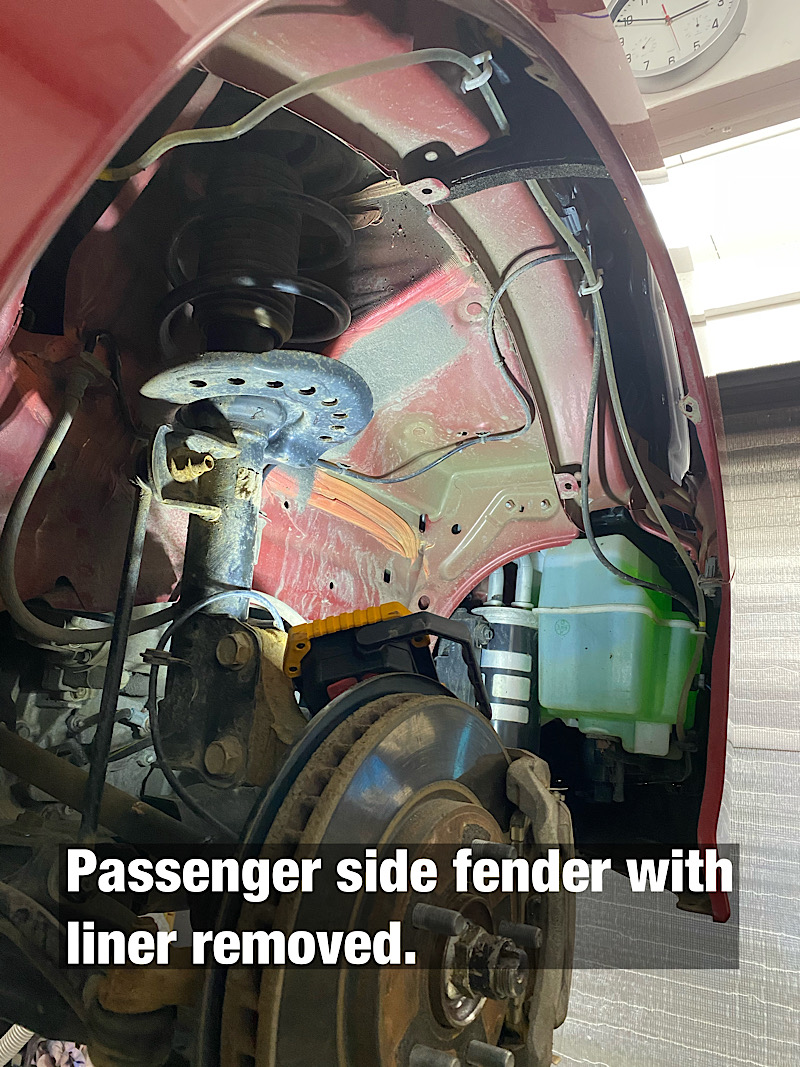
This looks like the AC dryer, and windshield washer bottle tucked into the passenger side fender. The liner completely protects these bits.

042111_2.jpg


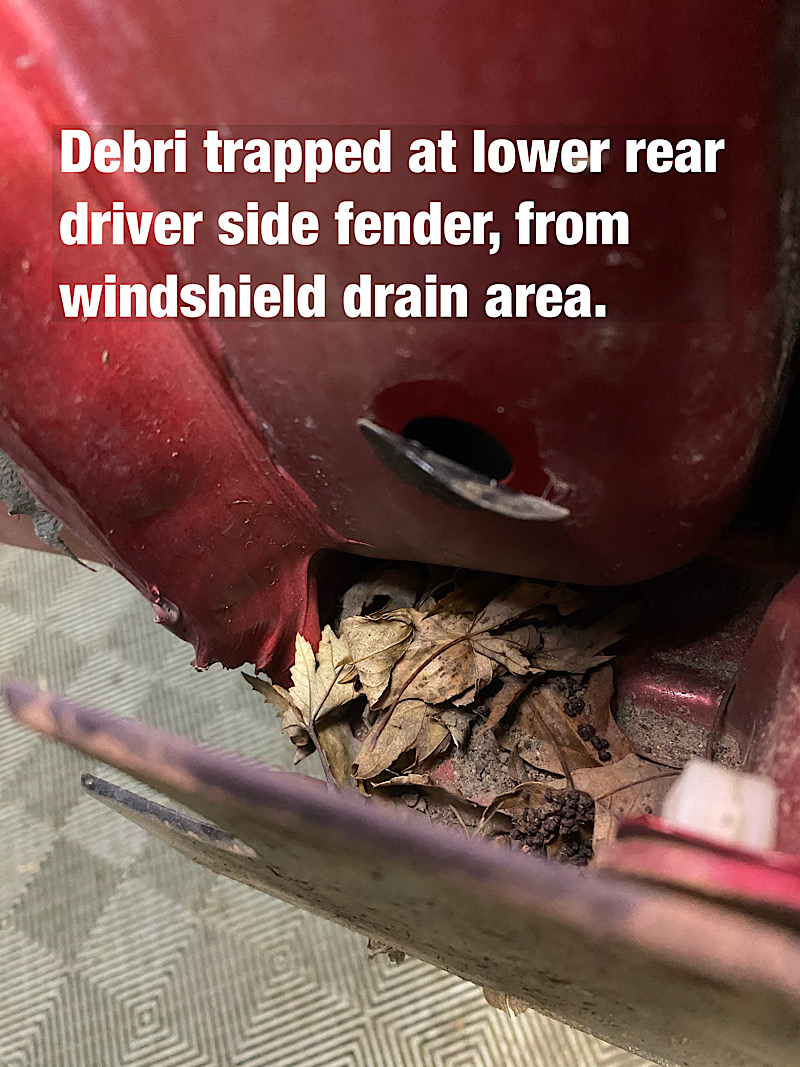
I've seen on this on most vehicles. Eventually this area will fill up with debris which stays wet, and then usually causes rust in this area. Needless to say, you should keep leaves from washing down the inner fenders. It would be super awesome if manufacturers put a little clean out "hatch" in the fender liner to access these areas. My Audi A3 was very bad in this area. The LEAF has a larger drain slot, but you can see leaves still pile up in this area.

042111_3.jpg


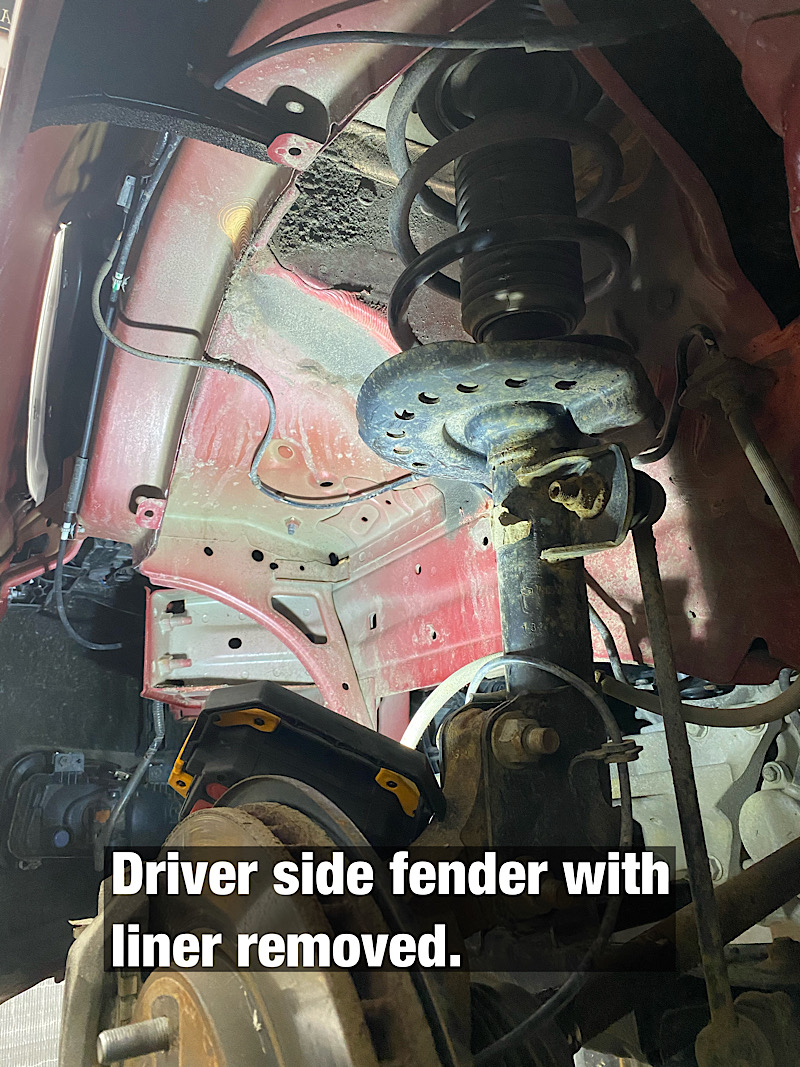
Not much hiding in the driver side fender.

042111_4.jpg


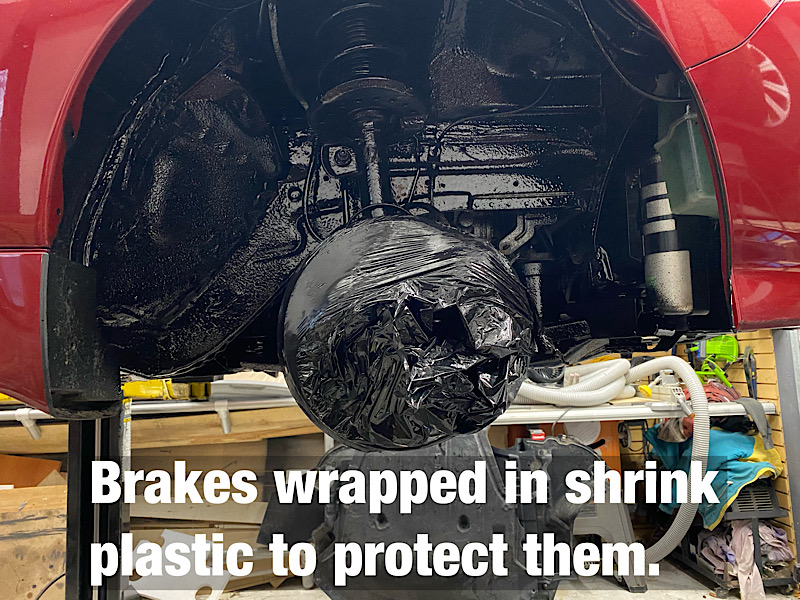
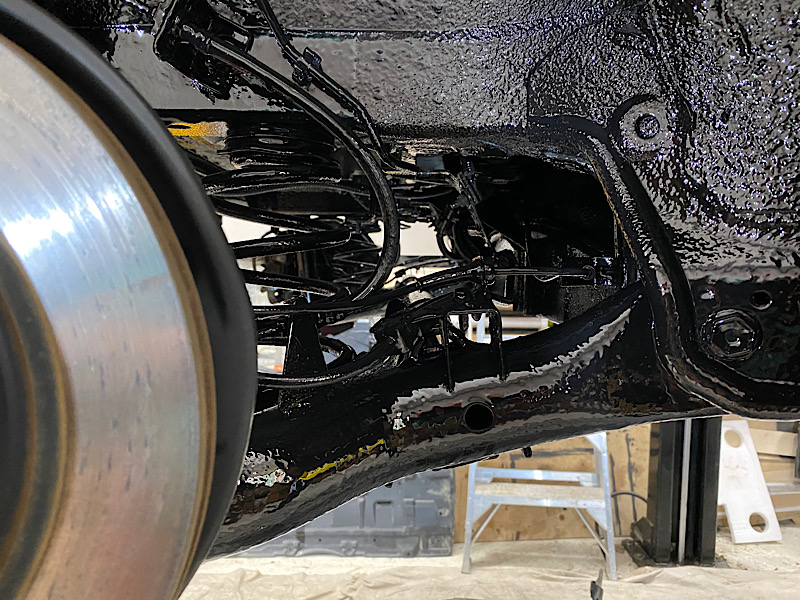
This is the Noxudol 300 which is heavier for exposed chassis bits. It took about 5 litres. I used the Noxudol 300 in inside panels as it is clear, thinner, and has a higher creep rate than the 300.

042111_5.jpg


It should take around 3 days for the Noxudol to "dry" to its final waxy texture. It never really dries, but stays pliable and waxy like a proper cavity wax should. I'll start reassembly in a few days. Needless to say, the prep to do this job properly, and spray is easily an 8-10 hour proposition. On the upside, this car is going a last a lot longer with the Noxudol application and will only require minor touch ups yearly.
 
Last edited:

drivesitfar

Well-known member
Joined
Oct 23, 2013
Messages
36,077
Location
Pacific Northwest
WOW: that is a thorough job not only spraying on all the protectant, but also doing a lot of preventative work the manufacture and engineers should have done when they designed and built your LEAF.

thanks for sharing all the pics and putting your thoughts down cause even though I might be one of the few posting to say thank you I be there are a lot others that are enjoying your posts.

my daughter still uses that WEDDING CHAIR I (we) built her. nothing really stops that kid and while her husband is out of the country serving our country the past 2 years she's bought a home and been taking care of it (except the lawn which is my job).

take care and hope you are warming up.
 
OP
D

Denwood

Well-known member
Joined
Sep 22, 2014
Messages
4,224
Location
Thunder Bay, Ontario, Canada
Drives, I'm glad to hear your daughter is doing well. She's got a great Dad to support her while her husband is off being a hero :)

It's nice having a 3rd "backup" vehicle so I can practice my favorite Zen philosophy of taking time on the LEAF, focusing, and not taking any shortcuts. It's been on the hoist for over a week now, and will stay for a few more days until the Noxudol cures a bit before reassembly. It was a pretty decent list:

1. Remove all fender liners and chassis panels.
2. Clean all the running gear with a wire brush, compressed air and vacuum.
3. Install a trailer hitch.
4. Run a power wire under the chassis for 12V power and wired in an isolated trailer harness.
5. Service the brakes.
6. Replace the final drive oil.
7. Apply the Noxudol 300 and 700 to chassis, fenders, and all inner panels.
8. Finally, I'll swap in the new Ecopia "super low rolling resistance" tires on the summer rims.
 

Lyndon

Well-known member
Joined
Aug 11, 2014
Messages
2,535
Location
Sydney, Australia
Dennis

Been a while since I posted here, but I have been following along.

Your posts are always detailed and interesting. Fortunately out here we don't have to put up with the climate changes you guys go through...... Mind you, it can get ****** hot, but that doesn't cause car deterioration problems like you have. I just tried to see if that Noxudol product was available in Australia, but it's not. Thankfully we don't need it.

My cars (aged 8, 15, 21 and 38) are cleaned regularly and assiduously, even taking all the wheels off once every couple of years and doing inside the wheel wells, but we don't have to rust proof like that. And none of my cars have an ounce of rust on them, even my 15 year old daily driver.

Keep up the great work.

Lyndon

Edit: PS - I tried buying one of those sill protectors (4 left), but Amazon won't ship it to Australia, and Amazon Australia doesn't stock them.......
 
Last edited:
OP
D

Denwood

Well-known member
Joined
Sep 22, 2014
Messages
4,224
Location
Thunder Bay, Ontario, Canada
Dennis
....
Lyndon

Edit: PS - I tried buying one of those sill protectors (4 left), but Amazon won't ship it to Australia, and Amazon Australia doesn't stock them.......

Lyndon, I was going to suggest hockey pucks as a substitute but I'm guessing those might be rare down under as well :) I miss my Audi A3 with it's dedicated hoist points and pads. Indeed with the increasing number of sill-only cars for lift points, controlling rust in that area is even more important.

I've seen a few pics of the engine bays of 30 year old Westfalias from Arizona, and they look pretty much new, so I'm guessing your situation is quite similar in Australia's arid climate zones. Rust however is a sad reality here unless one takes steps to manage it.
 
OP
D

Denwood

Well-known member
Joined
Sep 22, 2014
Messages
4,224
Location
Thunder Bay, Ontario, Canada
Lyndon, I use both.. a cross cut urethane puck, and now the magnetic seam bit, so other than the convenience of the magnet (which does save time on the hoist) you're likely just fine :) The LEAF has a reinforced bump right behind the seam which actually works better with the puck style pads.

Bruce, thanks. This is definitely one of my more thorough corrosion management undertakings so far.
 

drivesitfar

Well-known member
Joined
Oct 23, 2013
Messages
36,077
Location
Pacific Northwest
nice that you can keep the Leaf on the lift while it dries. also nice work on how thorough you are diving into this. speaking of your Max Jax lift any regrets on buying it over another brand and does it lose any height on a car when sitting on it for days?

keep up the great work!!
 
OP
D

Denwood

Well-known member
Joined
Sep 22, 2014
Messages
4,224
Location
Thunder Bay, Ontario, Canada
Drives, my one wish for the MaxJax is that it had locks all the way up like the new ones. I'm pretty sure they are now ALI certified as that auto locking feature was missing from the older ones like mine. Mine has two steel bars that go through the column at two heights. I let it rest on those steel bar locks, and back off the pressure on the hydraulics..so it can't drop down at all. Overall though the hoist has been simply awesome to have in the shop.
 
OP
D

Denwood

Well-known member
Joined
Sep 22, 2014
Messages
4,224
Location
Thunder Bay, Ontario, Canada
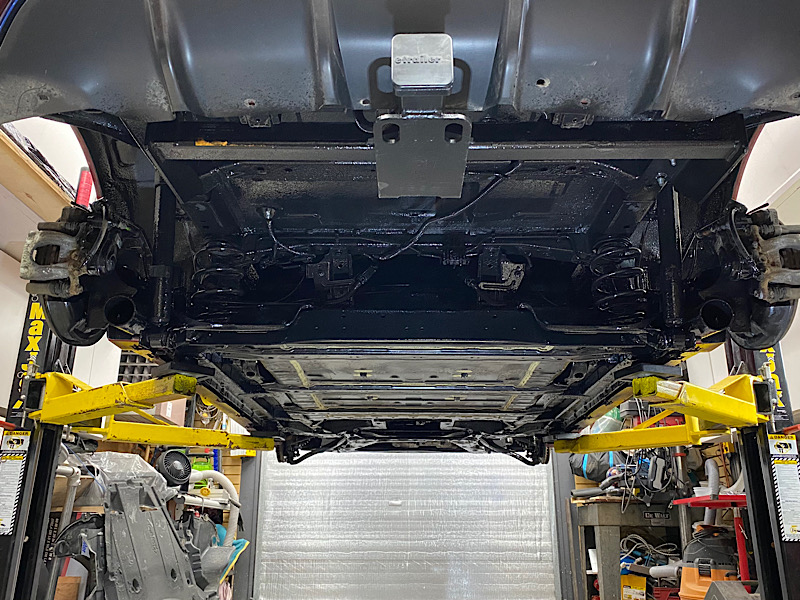
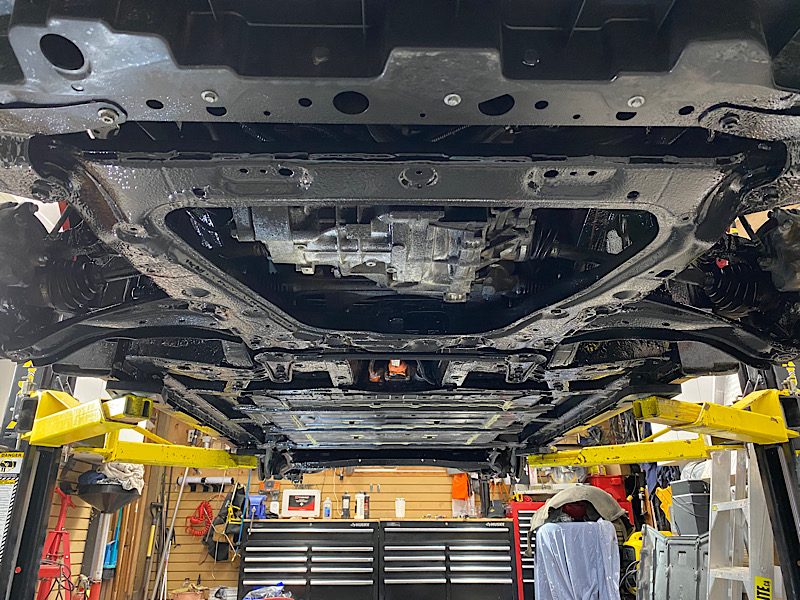
2 days later and the Noxudol 300 and 700 is still quite wet, which is a good thing. It has no solvents..so the upside is a lot of seam penetration as it slowly cures.

042113_1.jpg


042113_2.jpg


You might notice there is no exhaust, no coolant lines etc. The uncoated metal plate in the middle of the car is the battery pack which can be dropped with just a few bolts removed. As you might expect, it's a bit hefty at over 400 lbs for this 40kWh unit.

042113_3.jpg


This is the assortment of cavity gun tools that I use. The small tip is used the most as the largest surface is typically exposed chassis. That longer rod is handy for rear quarters, doors, and truck bed sides via the tail lights.

042113_4.jpg


042113_5.jpg


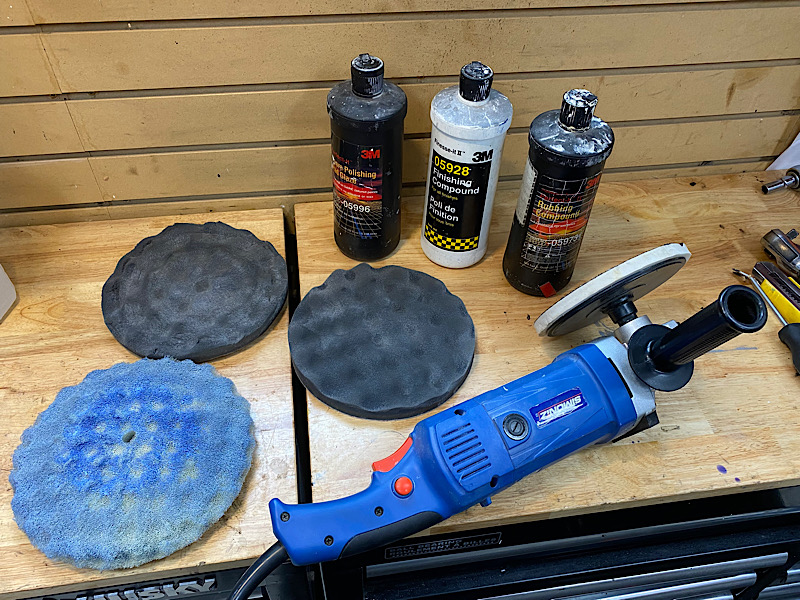
While the car is sitting on the hoist, I figured I'd tackle the job of addressing any rock chips, scratches etc. The variable speed polisher, 3M pads and a few different grades of compound come in very handy for this work. I have painted a few cars in the shop, so this gear is the last step in color sanding new paint to make it perfect :) I still have some 1200/1500/2000 grit paper in my stash to address the paint repair.

042113_7.jpg


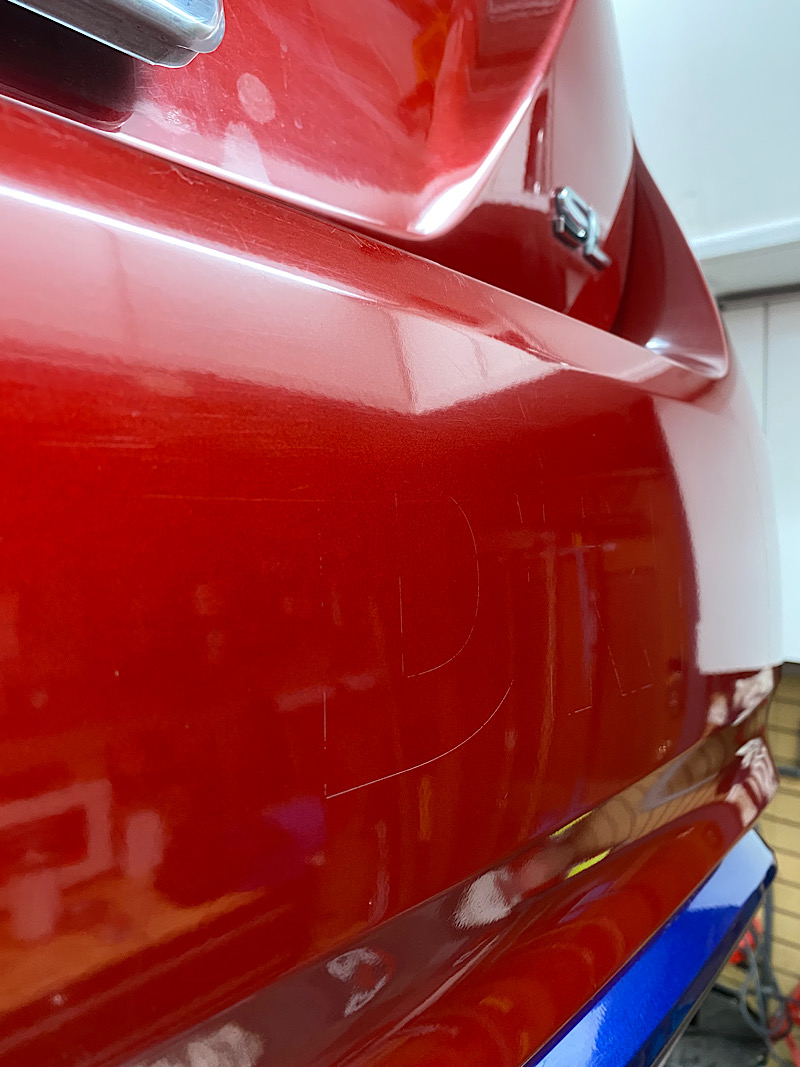
Some remnants of the previous owner (driving school) decals. This is addressed in about 20 seconds with the polisher :) You can see a bit of "D".

042113_6.jpg


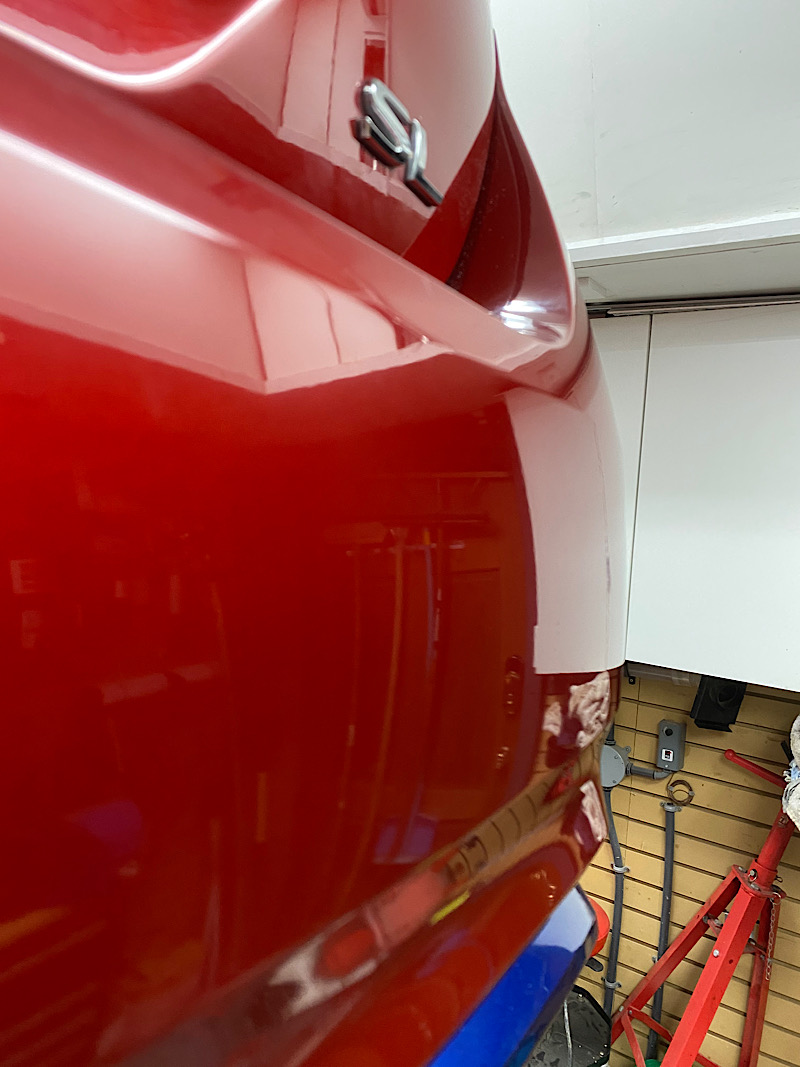
Along with the decal remnants, you can see that the factory paint "orange peel" in the clear coat is also taken to near zero with careful selection of the pad, pressure, rpm, and compound. I would normally wet sand with 1200, then 1500 and 2000 grit paper before buffing if doing a complete color sand. The end result is a true mirror finish. What you see below is clean..no wax. Just the compound removed with a dry cloth.

042113_8.jpg


I've filled some chips with touch up paint and will wet sand them with 1500/2000 and buff them out. Stay tuned :) Inspecting the car once or twice a year and addressing any paint chips is part of keeping rust at bay. Even a small chip near the window trim etc. can introduce corrosion that creeps under the paint and cause issues later.
 
Last edited:

G20-Budo

Well-known member
Joined
May 31, 2013
Messages
987
Location
Chandler, AZ
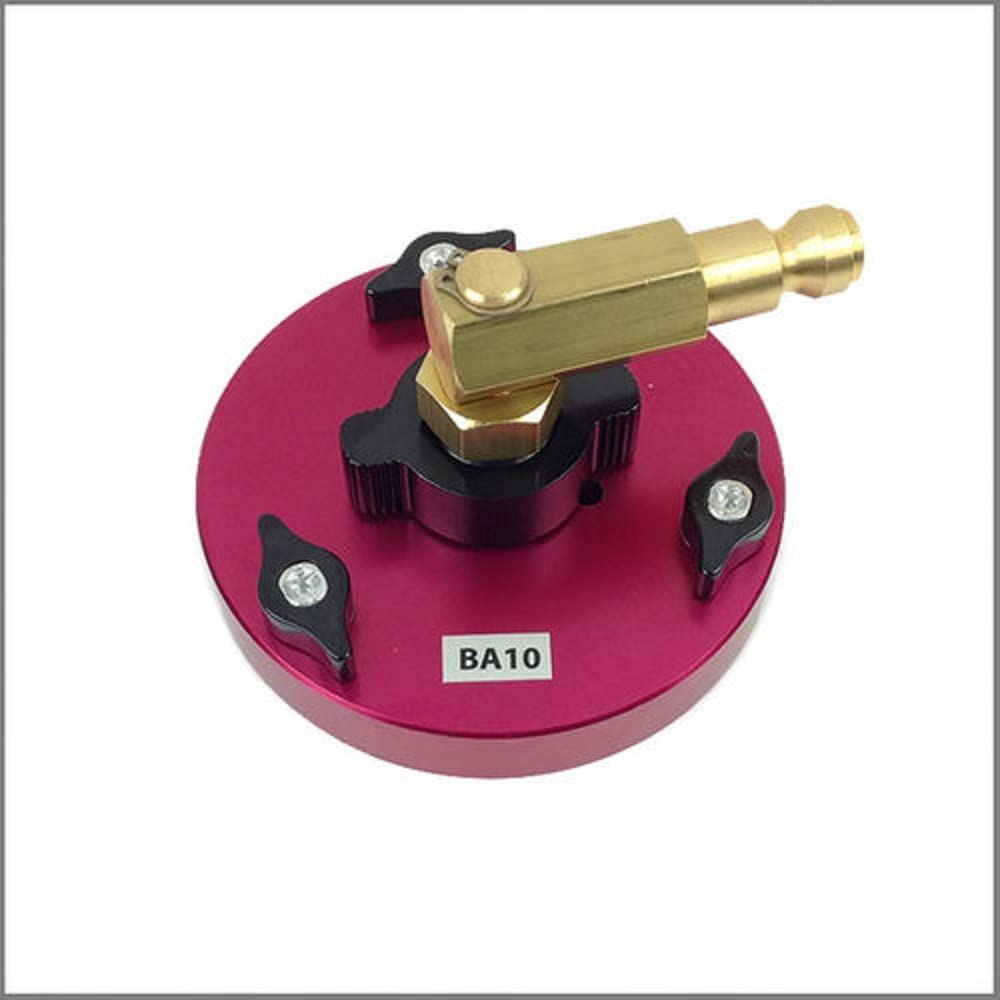
On another note, I purchased a cap for use with my Motive bleeder system that would fit our 2014 Highlander. At $83 CAD, it was definitely not cheap. That said, it was worth every penny as a very well designed tool done with CNC aluminum, anodized parts etc. The Motive bleeder has a generic cap which is basically useless as it leaks everywhere, and cannot really establish a good seal.

I purchased the Motive system with a custom cap for my Audi A3, and now have added the amazon part for the Toyota...both work flawlessly and make for really easy brake fluid flushes.

The Motive system allows you to pressurize the brake system at the reservoir. It's not as good IMHO as the two person pump and bleed if you've opened up the brake system, but it is the shizzel for doing brake fluid flushes. I made the mistake of running air into the ABS system of my Audi a few years back which required about 3 hours of bleeding over several hoist sessions using a laptop to energize the ABS system. This time on the Toyota, I back lit the motive container with a light so I could make sure the reservoir did not run dry!! At the end of the process, I did allow the Motive reservoir run dry, and then kept the system pressurized with a slow bleed until the fluid level in the car's reservoir was exactly at the correct fill line.

crv2019service3.jpg


Here's the cap in question...a very nice part. Not only does it clamp securely, but the o-ring'd projection under the cap is adjustable from the top (wing nut looking thing).

motive_toy.jpg


Since I've been following a schedule of brake fluid flushes every 2-3 years, and lubing the caliper pins etc. once a year, any brake issues related to caliper seizing etc. have gone away. Rust in the caliper and seized pins have been behind many of the issues I've encountered historically...solved by adhering to the above. I'm also a bit of stickler when it comes to having solid pedal feel which also get's addressed with fluid change, assuming your flex lines are ok.

Woody,

I'm using a similar tool to this as well. It works great for me as well, but I don't have a fancy CNC'd/anodized cap like you. :)

I've used this on 3 of our cars already, and it's really made bleeding brakes much easier. Especially when replacing calipers and having to push fluid through the entire system.

I sold my 1984 Scirocco and 1990 Westfalia (in very nice condition) after owning both them for 25 and 16 years respectively..a testament to regular attention to corrosion management in the salt belt.

Drive's when I see pics of older vehicles chassis that live in Arizona I still do a double take :)

Woody, Yeah it would probably make you sick to see the chassis of my 1996 Infiniti G20.. I live here in the Phoenix, AZ area. :)

I see you're spending more time in the garage there.. doing all kinds of fun car work!
 
OP
D

Denwood

Well-known member
Joined
Sep 22, 2014
Messages
4,224
Location
Thunder Bay, Ontario, Canada
Kyle, yes it would be nice to see a car with no rust...ha. The 3-4 schedule of fluid flushes along with yearly brake service has taken my brake issues down to about zero. Just don't let the bleeder run dry on an ABS system. That was a huge PITA on my A3 Audi...took about 2 hours of bleeding to get the air out.
 

drivesitfar

Well-known member
Joined
Oct 23, 2013
Messages
36,077
Location
Pacific Northwest
great posts about detailing. you seem to chase rust like I chase weeds out of our front yard. it's almost never ending, but if you keep up with it then it's a few manageable smallish jobs instead of a complete re do.

just curious after using this treatment can you clean your nozzles or do you have to toss them?

sorry to hear lumber prices might halt your plans for new decks and gazebos. maybe you can find a guy with a small saw mill that has a bunch of logs or trees and he's ok with taking a fair price?
 
To avoid these ads, REGISTER NOW!
Top Bottom