To avoid these ads, REGISTER NOW!

work benches... from scratch

28HopUp

Well-known member
Joined
Mar 16, 2010
Messages
295
Location
Lowcountry SC
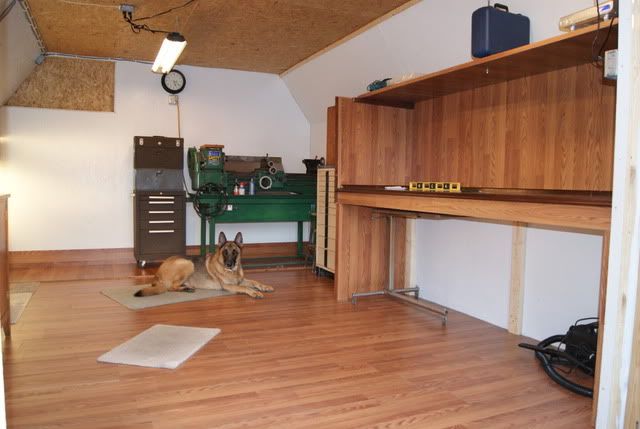
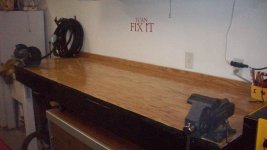
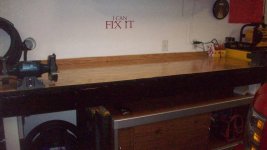
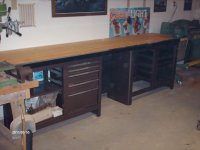
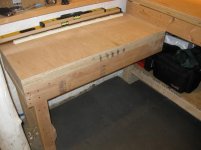
Beautiful workbench, HopUp, Have you seen any warpage with the masonite doors?

I built the Family Handyman wall cabinets and used 1/8" plywood (door skin) and even fully painted, the doors are warping. I love your workbench and those doors may just solve my problem.

Nothing yet, but I just built them. I figure if I see any flex that I will glue a diagonal backer strip to the sliding doors to keep them true.

I appreciate the tip on Johnson's wax. I tested some scrap with Rem Oil, and the stuff just soaked in without any color change.

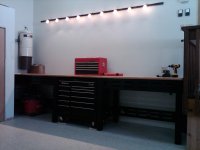
Also, I have a steel bench bolted to the wall in the opposite corner with a stainless top. That bench will be used harder than the new bench. I would have changed my design to a stainless top if I wanted the bench surface to be more durable. It's all about having a flexible design to meet your expected needs.
 
To avoid these ads, REGISTER NOW!

GreenGooey

Active member
Joined
May 25, 2010
Messages
36
Well I guess I better throw my hat in the ring. The table is 2" square tubing and the top is 3/4" MDF. The chair is from a 1st gen Rx-7.

table1.JPG


table2.JPG


chair.jpg
 
Last edited:

scott_one

Well-known member
Joined
May 3, 2010
Messages
106
Location
Lapeer, MI
Here's mine built last summer. :beer:
 

Attachments

  • DSCF5486.jpg
    DSCF5486.jpg
    136.6 KB · Views: 386
  • DSCF5487.jpg
    DSCF5487.jpg
    143.5 KB · Views: 339
  • DSCF5488.jpg
    DSCF5488.jpg
    143.4 KB · Views: 384

thomfr

Well-known member
Joined
Sep 16, 2010
Messages
408
Location
The Netherlands
After several months of cleaning, pitching, organizing, and building, I am now at a point where I can contribute to this thread and show you some pictures of the bench I just built in my basement workshop. Before I get to the bench itself, here is the entrance to my basement workshop, through the Scooby-Doo door I built -

View media item 7857View media item 7858

Interesting feature this Scooby Doo door. Never heard of it. How is it castored etc.?

Thom
 

28HopUp

Well-known member
Joined
Mar 16, 2010
Messages
295
Location
Lowcountry SC
Interesting feature this Scooby Doo door. Never heard of it. How is it castored etc.?

Thom

Hi Thom!

I found some "hidden doors" listed on the internet, but the prices were high, so I made my own door. I would have preferred that the door/shelves swivel like a revolving door, but that would have made the opening too small. So I built the shelves and used an industrial piano hinge rated for 600# after framing out the wall for the opening.

Here is a lousy, blurred picture where you can see the fasteners inside the shelve, with the door closed -

View media item 7936


And here is a shot of the hinge -

View media item 7937

The door locks from outside the shop by putting a 1" dowel through the left edge of the shelf, and into the jam. You can see the dowel in the above picture, and the hole under the bottom shelf in the picture. It is designed so you can push the dowel out from inside the shop to prevent yourself from being locked inside the room.
 
Last edited:

chief ben

Well-known member
Joined
Sep 7, 2010
Messages
618
Location
Hot Springs, Arkansas
This is Jerry & I new small Maching shop, the big 26 X 50 shop is to big to cool and heat, so Jerry & I are building a new smaller shop, and we mean Small, 11.5 X 15.5 inside, we can cool it and heat it easy,
Jerry Calls it A Big Dog House, I Call it The Chiefs Quarters,
Anyway it is looking Good,
Shoptoolboxs003.jpg
 

mp23

Well-known member
Joined
Apr 13, 2010
Messages
315
Just finished it. 8 foot long 30 inches wide. 100 dollars.
 

Attachments

  • tool box 164.jpg
    tool box 164.jpg
    140.8 KB · Views: 362
  • tool box 165.jpg
    tool box 165.jpg
    138.8 KB · Views: 339
  • tool box 162.jpg
    tool box 162.jpg
    139.1 KB · Views: 271

DvlDgSoldier

Member
Joined
Oct 16, 2009
Messages
6
Built a rolling project/work bench this weekend.
It is 3x6x3, made of 2x4s, with 1/2" MDF shelf and 3/4" MDF top (for now).
Took about six hours of labor, and cost about $160.

IMAG0213.jpg

IMAG0210.jpg

IMAG0212.jpg
 

bczygan

Well-known member
Joined
Nov 4, 2009
Messages
22,002
Location
DETROIT! Arsenal of Scrappers
I would bypass the glue for the hardboard layer and screw that down. If you glue it- its NOT coming off. Ever.

Afterward, apply several coats of Johnsons paste wax to the hardboard. It will give it a nice sheen and keep stuff from soaking in. The first couple coats will soak in and look like nothing happened, but keep adding a couple more and it will look really nice, as well as very functional, and cheap, and easy.

Instead of hardboard how would MDF work for a disposable top? Thicker for screwing down...or hardboard glued to MDF and screwed down.....the whole assembly disposable???
 

Vicegrip

Well-known member
Joined
Mar 9, 2007
Messages
1,187
Location
NoVA.
Came into some free scrap 1/8 thick rectangle tubing already had some EWT that is no longer legal for roll bars so I figured it was time to retire the old rolling work platform. Free pile O scrap metal, fabrication gland spazzing and a plausible “need” = new rolling table. The old one was slapped together from a Delta table saw base and some scrap plywood for a particular project over 20 years ago. Like a bad houseguest it came for a weekend but never left. Unlike a bad guest it has proved to be useful time and again. Extra F.S.A., saw horse, motor and transmission platform, rolling tool pile, you name it. It was a bit too short and not quite large enough in one axis for Porsche motor and trans assemblies for my comfort but worked when pressed into service.
For the new table I chose to bond rather than weld the stainless top. I used some uber strong 3M 2 part automotive panel adhesive. I wanted the top to be flat and smooth so it can be use for small part Tig work and also easily and completely cleaned for a clean zone during motor builds. I set the top, weighted it down until the adhesive was almost set and then took a straight edge to it checking for flatness. I had to slightly jack up one small low spot before the adhesive hardened. Added a handle and it is ready to get dirty and chipped up.
 

Attachments

  • table6.jpg
    table6.jpg
    47.2 KB · Views: 630
  • table5.jpg
    table5.jpg
    56.2 KB · Views: 665
  • table4.jpg
    table4.jpg
    53.4 KB · Views: 451
  • table3.jpg
    table3.jpg
    62.8 KB · Views: 421
  • table2.jpg
    table2.jpg
    73 KB · Views: 407
  • table1.jpg
    table1.jpg
    60.8 KB · Views: 453

heathkiks

Active member
Joined
Aug 26, 2009
Messages
25
Location
Alaska
Came into some free scrap 1/8 thick rectangle tubing already had some EWT that is no longer legal for roll bars so I figured it was time to retire the old rolling work platform. Free pile O scrap metal, fabrication gland spazzing and a plausible “need” = new rolling table. The old one was slapped together from a Delta table saw base and some scrap plywood for a particular project over 20 years ago. Like a bad houseguest it came for a weekend but never left. Unlike a bad guest it has proved to be useful time and again. Extra F.S.A., saw horse, motor and transmission platform, rolling tool pile, you name it. It was a bit too short and not quite large enough in one axis for Porsche motor and trans assemblies for my comfort but worked when pressed into service.
For the new table I chose to bond rather than weld the stainless top. I used some uber strong 3M 2 part automotive panel adhesive. I wanted the top to be flat and smooth so it can be use for small part Tig work and also easily and completely cleaned for a clean zone during motor builds. I set the top, weighted it down until the adhesive was almost set and then took a straight edge to it checking for flatness. I had to slightly jack up one small low spot before the adhesive hardened. Added a handle and it is ready to get dirty and chipped up.


Fantastic!
 

ZRX61

Well-known member
Joined
Aug 15, 2006
Messages
28,716
Location
Solar Blight Valley, SoCal
I need to beef up & brace the bench I built out of an old WWII Hamilton Standard propellor stand. Might try to get that done next week when it stops raining. I'll take pics.
 

Scuderia-F1

Well-known member
Joined
Feb 9, 2011
Messages
1,195
Location
Stockholm, Sweden
Came into some free scrap 1/8 thick rectangle tubing already had some EWT that is no longer legal for roll bars so I figured it was time to retire the old rolling work platform. Free pile O scrap metal, fabrication gland spazzing and a plausible “need” = new rolling table. The old one was slapped together from a Delta table saw base and some scrap plywood for a particular project over 20 years ago. Like a bad houseguest it came for a weekend but never left. Unlike a bad guest it has proved to be useful time and again. Extra F.S.A., saw horse, motor and transmission platform, rolling tool pile, you name it. It was a bit too short and not quite large enough in one axis for Porsche motor and trans assemblies for my comfort but worked when pressed into service.
For the new table I chose to bond rather than weld the stainless top. I used some uber strong 3M 2 part automotive panel adhesive. I wanted the top to be flat and smooth so it can be use for small part Tig work and also easily and completely cleaned for a clean zone during motor builds. I set the top, weighted it down until the adhesive was almost set and then took a straight edge to it checking for flatness. I had to slightly jack up one small low spot before the adhesive hardened. Added a handle and it is ready to get dirty and chipped up.

That´s a very nice table you fabricated!:bowdown:
 
To avoid these ads, REGISTER NOW!

peelman

Well-known member
Joined
Jan 13, 2011
Messages
198
Location
Seymour, Indiana
Instead of hardboard how would MDF work for a disposable top? Thicker for screwing down...or hardboard glued to MDF and screwed down.....the whole assembly disposable???

I just view MDF as too soft, dense though it may be. Once you chip it, or a hole starts to form, that's the ballgame, like rust on a crappy piece of steel.

I found some 6'x30"x1" (i think that's right at least) laminated oak bench tops in Menards the other day on sale for $72ea. Talk about stout and gorgeous. They'd be too pretty to do any work on :) If i had room for the ****** thing I probably would have picked up one, along with a couple of 4x4s and 2x6s...
 

kms254

Member
Joined
Mar 7, 2010
Messages
24
Location
Madison Ms
I built one in an alcove in my garage. 2x4 frame screwed to the studs in the wall with a 2x6 going across the front. Its all attached with 3.5" screws. I then used 2x6's and a 2x4 as a top and I finished off the top shelf with a 1/2 piece of plywood.

25163_667536105396_26501048_36767241_2556026_n.jpg


180606_751272806376_26501048_38668006_5993560_n.jpg
 

peelman

Well-known member
Joined
Jan 13, 2011
Messages
198
Location
Seymour, Indiana
I would want at least a single drop leg to the floor, (2x4, 2x6, 4x4, whatever) under that vise at least, to take some of the sheer stress off those fasteners...then again, not everybody beats on stuff in their vise...
 

kms254

Member
Joined
Mar 7, 2010
Messages
24
Location
Madison Ms
I would want at least a single drop leg to the floor, (2x4, 2x6, 4x4, whatever) under that vise at least, to take some of the sheer stress off those fasteners...then again, not everybody beats on stuff in their vise...

That vise is not attached yet. I have had it sitting there as a test to see if that is where I want it. It was my grandfathers. I do think your idea of a support leg under the vice is a good idea. I know right now the bench can hold a 6'2" 200lb person standing on it :).

Nice alcove bench!
Add a couple of wall shelves around the clock and pegboard on the side walls - then put that bottle opener to use.

In that picture you can see the upper shelf I am working on. I just put some plywood up this weekend to finish it off. I might frame it in and put doors on it as well. It just a place to store coolers and seasonal items. I was thinking pegboard on the back wall where the clock is. and run the wires for the speakers and light behind it.

I am thinking of getting some small pvc sections for drill holders.
 

peelman

Well-known member
Joined
Jan 13, 2011
Messages
198
Location
Seymour, Indiana
Good to know :) Re-reading that, my comment sounded kinda ****-ish; my apologies, was only trying to help :) Its a sweet build and a great use of the space. I just have a tendency to over-think/over-engineer things quite a bit...

Oh, and are those Gladiator bins stacked up back there?
 

kms254

Member
Joined
Mar 7, 2010
Messages
24
Location
Madison Ms
Yes they are, Good Eye. I got them + some slat wall at a "Couples Bridal Shower" from my parents. My mother did not realize the slat wall was 8 feet long and would not fit in the car so I am going to pick it up next time I am down there.
 

peelman

Well-known member
Joined
Jan 13, 2011
Messages
198
Location
Seymour, Indiana
lol, nice. I've spent many moons studying that stuff at the local Lowes and Menards. I just put a bunch of their hangers up on some custom rails (1x3 pine, with a 3/8" groove cut on the top with a circular saw). ~$1/ft instead of $3/ft for the gladiator rail. "Couples Bridal Shower" eh? I need to float that idea past my parents and future in-laws, be nice if i could get some tools out of this deal...
 

muddy8jeep8

New member
Joined
Jan 17, 2011
Messages
3
Just finished this one. Not sure what I want to do with the bottom shelf so that board is temporary. Trying to make the most out of my one car garage.
mail

One I built a little while ago
mail
 
Last edited:

peelman

Well-known member
Joined
Jan 13, 2011
Messages
198
Location
Seymour, Indiana
Put together a small bench the other night that I can tuck away when not in use. Since i'm stuck in a two car garage, and we keep our cars in there, I can't get too crazy.

Measures 2' by just under 4', 2x4's for the base and frame, 1/2" allthread for the adjustable feet on the front. The top is a piece of 1/2" OSB, a piece of 3/4" OSB, topped with 1/4" hardboard. All told there's all of $40 in materials since both Menards and Home Depot were having big lumber sales. Props to wbrian63 for posting his awesome shop and the adjustable leg idea. I never would have gotten it square enough to not wobble otherwise.

Under Construction (click for (much) bigger copies):


In this one you can kind of see the nook in the Gorllia rack where i'll be stuffing this thing when not needed.


Hopefully in the next few months we'll be moving and I'll be able to have a bigger space to tinker in. Then I'll build the "real" version that's 8' by 30" with notched 4x4 legs and 2x6 main beams :)
 

ramtuff

Well-known member
Joined
Dec 20, 2010
Messages
238
Location
Southeast PA
Since there's no such thing as having too much work space, I decided to make a new workbench. It's not quite done yet, but here's the gist of it...

The two base units are old Craftsman work stations. They were in pretty sad shape, so I stripped them down, fixed/cleaned/greased the slides, and repainted them with brown Hammerite paint. I still have to paint the drawers for the one base yet, so that's why they're not installed. The top is made from 3/4" MDF topped by three 2x10x10s with a coat of tung oil (need to apply a second coat tomorrow). I installed a piece of 2x2x1/4" steel angle across the front, and stuck a vise at the end.
 

Attachments

  • HPIM2174.jpg
    HPIM2174.jpg
    152.2 KB · Views: 452

bgblue

New member
Joined
Nov 5, 2010
Messages
1
Just finished my work bench this past weekend. I ordered the metal brackets from diybench.com and followed the instructions on the website.

The trailer floor decking is very strong and looks nice too.
 

Attachments

  • work benches.jpg
    work benches.jpg
    142.4 KB · Views: 788

billcole

Well-known member
Joined
Jan 9, 2011
Messages
158
Location
Northern Michigan
Figured I would contribute a 3' by 4' roll around with a butcher block top I built this weekend. Still need to coat it with urethane.
2011-03-06_11-53-15_550.jpg
2011-03-06_11-55-28_228.jpg
 

billcole

Well-known member
Joined
Jan 9, 2011
Messages
158
Location
Northern Michigan
Thanks Ed, yeah probably is a little to nice, wife decided she needs one for a kitchen island. It did not cost a whole lot, around $70 of wood and hardware. I love creating on the fly and sometimes I get a little carried away.
 

ssathre

Well-known member
Joined
Feb 24, 2011
Messages
163
Location
Northwest Iowa
I won’t be starting work on my garage until the thaw, but here are a few pics of my corner workbench that I made this winter. It’s located in my basement under the stairs and until I got around to doing this, it was just wasted space.

The lower bench to the left will be my reloading bench sporting a Hornaday progressive press with shell and bullet feeder. The taller bench to the right is multipurpose but mainly for tinkering around with various electronic projects and working on guitars. Of course it’s not done yet... I just have to get around to wraping the face in 1x's to protect the counter top and seal it. However, like most of my projects my lack of patience takes over and I moved in prematurley. Once the garage is finished most of the tools will be moved out to the shop. The plan is to make all the shelving, benches and cabniets myself with my new Trax Saw and Kreg jig.
 

Attachments

  • IMG_0312.jpg
    IMG_0312.jpg
    42.6 KB · Views: 621
  • IMG_0313.jpg
    IMG_0313.jpg
    34.2 KB · Views: 498
  • IMG_0314.jpg
    IMG_0314.jpg
    52.2 KB · Views: 619
  • IMG_0315.jpg
    IMG_0315.jpg
    30.4 KB · Views: 504

peelman

Well-known member
Joined
Jan 13, 2011
Messages
198
Location
Seymour, Indiana
I can see from the gorilla racks and green tool chest that someone is a fan of Menards besides me. Those gorilla racks are great except for that ugly brown color. Im gonna paint mine.

Ed

Meh, I'm fine with a neutral taupe. I've heard (somewhere) that you save big money at Menards. :bounce: Plus I can look out my bedroom window and see the damned thing (I can get a wifi signal from my router sitting in their parking lot. Its that close.)

And I wouldn't trade that Masterforce chest for half a dozen Craftsman chests. China-boat or not, the quality is astounding at the prices. Can't wait to pick up the matching rollaway, then once we get a proper shop up (or buy a place that has one already) i'll be getting a 56" for Christmas; the fiance (wife in June) has already approved that.
 

milner351

Well-known member
Joined
Sep 14, 2010
Messages
205
Location
SE Michigan
A friend dropped this off last night for free - I've already spent 20 minutes grinding on the top in hopes of getting it down to nice shiney steel - so far I've knocked off the worst of the grease paint and rust - but I have a long way to go.

Any recomendations on grinding discs for this task?

sorry for the low quality cell phone pic:
weldingtable.jpg
 
Last edited:
To avoid these ads, REGISTER NOW!
Top Bottom