To avoid these ads, REGISTER NOW!

work benches... from scratch

jesse72

Well-known member
Joined
Sep 26, 2011
Messages
352
Location
California
Main workbench plus out feed table to the right. I built the top in 2006 but rebuilt the base in 2009. It is laminated plywood with tenon and mortise joints.

15387941471_750799be00_b.jpg


In the back of the photo is your miter saw station with what appears to be an out feed fence that is elevated with a pipe(right side of miter saw), what is the purpose of that? It looks kind of like it is attached to a drill press but I cant quite tell. Just curious, thanks!

Also, really awesome wood shop!
 
Last edited:
To avoid these ads, REGISTER NOW!

slo_nlo

Member
Joined
Sep 2, 2011
Messages
24
Location
Regina, Saskatchewan, Canada
Here is mine. I got the idea to do it this way from Jack Olson. Only I hinged mine the opposite way because I thought it would be a little safer to lift it up rather than lower it down to use. It is pretty heavy and I've got kids around. Otherwise I prefer his as It provides useful space for his clamps.

Anyway. Mine has 3 gate hinges lag bolted into 3 2x6 studs on the wall and welded to the frame of the table top.
The legs are steel tube and they just slide onto 2 smaller diameter pieces of tubing on the top's frame. The table is level side to side. Front to back levelling is done with the legs. There is a nut welded into each leg tube. The stud is welded to the foot. Spin for level adjustment.
Pretty basic but gets The job done in a small garage.
 

Attachments

  • uploadfromtaptalk1412107042771.jpg
    uploadfromtaptalk1412107042771.jpg
    120.8 KB · Views: 334

bj383ss

Well-known member
Joined
Sep 29, 2011
Messages
3,166
Location
TX
Main workbench plus out feed table to the right. I built the top in 2006 but rebuilt the base in 2009. It is laminated plywood with tenon and mortise joints.

In the back of the photo is your miter saw station with what appears to be an out feed fence that is elevated with a pipe(right side of miter saw), what is the purpose of that? It looks kind of like it is attached to a drill press but I cant quite tell. Just curious, thanks!

Also, really awesome wood shop!

You guessed its a drill press with a shopmade woodworking table on it. It is a 1982 Taiwan Duracraft. It had a useless 18" pole. I made a new one that is 36" and makes it more useful.

Shot of the drill press.

15219244787_96b3d903ef_b.jpg


Thank you for the comment.

Bret
 

jvitez

Well-known member
Joined
Nov 30, 2009
Messages
2,429
Location
Big Sky Country, Canada
Well, maybe not quite a workbench but a new pair of sawhorses and a plywood cutting frame.

I was tired of cutting up plywood on top of rigid insulation sheets on the floor. I found a website that has many cool woodworking plans and decided to try their plan for saw horses. The beam is made out of two laminted 2x4's, the legs are 2x3's, everything is glued and nailed. You'd think 2x3's would be flimsy but because of the dado and the gussets pushed right up against the beam these saw horses are the sturdiest I've ever built.

http://woodgears.ca/sawhorse/

The plywood cutting frame is made out of 3/4" construction grade plywood, 4" x 8 ft lengths with half lap joints. I made a 3/4" dado in the top of the saw horse to hold the outside edges of the frame.
 

Attachments

  • K800_180.JPG
    K800_180.JPG
    57 KB · Views: 322
  • K800_181.JPG
    K800_181.JPG
    63.2 KB · Views: 307
  • K800_182.JPG
    K800_182.JPG
    58 KB · Views: 308
  • K800_183.JPG
    K800_183.JPG
    47.4 KB · Views: 370

sean Buick 76

Well-known member
Joined
May 7, 2013
Messages
3,221
Location
Edmonton Alberta
Well, maybe not quite a workbench but a new pair of sawhorses and a plywood cutting frame.

I was tired of cutting up plywood on top of rigid insulation sheets on the floor. I found a website that has many cool woodworking plans and decided to try their plan for saw horses. The beam is made out of two laminted 2x4's, the legs are 2x3's, everything is glued and nailed. You'd think 2x3's would be flimsy but because of the dado and the gussets pushed right up against the beam these saw horses are the sturdiest I've ever built.

http://woodgears.ca/sawhorse/

The plywood cutting frame is made out of 3/4" construction grade plywood, 4" x 8 ft lengths with half lap joints. I made a 3/4" dado in the top of the saw horse to hold the outside edges of the frame.

Nice work, i will make some too!
 

brats.n.harleys

Well-known member
Joined
Nov 10, 2009
Messages
316
Location
Portage, IN
Just re did a few in my garage. The sink bench has a few coats of poly urethane, and the workbench is just oiled with tung oil.


was able to sneak the drain for the sink between the drawers
 
Last edited:

greenbikemike

Well-known member
Joined
Mar 24, 2014
Messages
252
Location
Twin Cities,Minnesota
Nice and clean shop ya got there.....A shovelhead guy I see.....BTW....looks like you're breaking your wrist on your shots.....low and a little left...lol....nice shop

Greenbikemike
 

jesse72

Well-known member
Joined
Sep 26, 2011
Messages
352
Location
California
You guessed its a drill press with a shopmade woodworking table on it. It is a 1982 Taiwan Duracraft. It had a useless 18" pole. I made a new one that is 36" and makes it more useful.

Shot of the drill press.

15219244787_96b3d903ef_b.jpg


Thank you for the comment.

Bret


That's a genius idea! You really planned it out right to get the drill press base counter sunk at the right height into the out feed table of the miter saw. Gonna steal this idea possibly in the future! Thanks for sharing!:beer:
 

Frank Dukes

Well-known member
Joined
Mar 23, 2014
Messages
178
wow. inspiring thread for sure. i keep bringing home free 2x4s from work and i had no idea or reason why until now. i have got to have 20 of em hanging in my rafters. I have a craftsman workbench that is just plain rickity. cracked mdf top and shaky. but its savable! 2x4 frame and plywood top here i come!
 

Rod N

Well-known member
Joined
Jul 21, 2011
Messages
835
Location
Keswick, Ontario
9 ft wide. 3" x 3" SST square tubing to keep the center clear of legs.
All welded with 3/4" veneer plus 3/4" ply for the top.
Great to store stuff under.
 

Attachments

  • image1.jpg
    image1.jpg
    138.3 KB · Views: 567
  • image2.jpg
    image2.jpg
    140.8 KB · Views: 474

OJ Bartley

Well-known member
Joined
May 18, 2009
Messages
605
Location
Toronto, ON
Rod, how do you like the black workbench? I was thinking about doing mine black, and wondered if there were any problems with visibility?
 

Rod N

Well-known member
Joined
Jul 21, 2011
Messages
835
Location
Keswick, Ontario
Rod, how do you like the black workbench? I was thinking about doing mine black, and wondered if there were any problems with visibility?

Not a problem so far OJ, but as you can see I have lots of light there.
It is also my secondary bench for grinder, drill press etc.
 

razmaspaz

Member
Joined
Feb 2, 2015
Messages
9
Been reading through this whole post, some really impressive stuff in here. Has me doing a lot of thinking, and hoping for some warmer weather to get started. I just moved to a new house with space in a 3rd car bay. I have no plans to ever fit a car in here. This will be used primarily for maintaining (and assembling) bicycles, and woodworking for projects around the house, with a slight bent towards making "stuff", but probably won't ever weld anything. Looking for some advice from the been there done that crowd. Here is my current plan from sketchup. This is my first post, so if this should be moved to another place, just let me know.

16243729507_eea114d28a_z.jpg


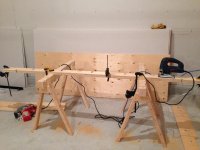
A)I already have this bench, and while I may remake it with something nicer at some point, it does the job for now.

B) I want to build a cart for the Craftsman 113 hand me down table saw I have and my plan is a ~60"x30" rolling station for the saw, whatever it is it will need to fit under the counter so I can tuck it away when working primarily on bikes or assembling said "stuff". I think that means my cart needs to be 36" and the counter closer to 42". Has anyone else had experience with the nesting and have height recommendations for it?

C) I'm thinking this is space for tools also on mobile carts (band saw, drill press, etc, but made to fit within the dimensions of the counter (18" deep). They can double as support for an outfeed table in the event I need support for the table saw station.

D)There is currently a single circuit here with a single outlet, I'll be running more and supplying way more power than I can imagine needing, because I know one day I'll need it. I've seen a lot of ideas for over peg board shelves/cabinets, and I'm not sure what I'm going to do on the wall. i have 17' of space here, so I will probably vary it a bit. I saw someone built a cabinet for a compressor, and some other ideas. Ideally I keep a straight run of counter at least long enough to do work at the CMS station with longer stock.

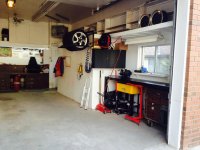
E)I am completely unsure how to best use this space. As you can see I'm partly hamstrung by a concrete sill that reaches out 40" from the wall, so I'm trying to figure out how best to use this corner as I don't think running the counter all the way to the edge makes sense. I'm planning to build storage along the whole length of the wall which spans the entire 3 car space, but I want all the workshop items down at this end. I was thinking about turning these cubbies into drawers or at the very least, slide out shelves that allow me to utilize the entire 40" depth.

I've also got to figure out space for heat and space for some dust collection of some kind, which that corner might work for. I'm thinking I'll leave space on the near end for a 30" high toolbox, that I might replace with a much bigger one at some point.
 

Kelly Burns

Active member
Joined
Apr 12, 2012
Messages
44
Location
Owensboro, KY
I think this is the place for this question.

As we look at these benches, what do you wish you would have done different or incorporated into your bench. Does not have to be something from this thread.
 

jesse72

Well-known member
Joined
Sep 26, 2011
Messages
352
Location
California
jroach321 Nice work, that is well layed out! Good use of the US General 7 drawer end cabinet too. Gotta have a bottle opener!
 
To avoid these ads, REGISTER NOW!

jgorm

Well-known member
Joined
Jan 5, 2015
Messages
463
Location
San Diego
There are some cool benches here! I needed some inspiration for some new stuff I need to build. I've built a ton out of 2x4s, 2x6s, and 3/4 ply benches and shelves. I built this, but made the mistake of making it permanent, then moving.:(
Shop%20and%20billyJoe%20and%20pictures%20in%20Lajolla%20002%20(Medium).jpg

Shop%20and%20billyJoe%20and%20pictures%20in%20Lajolla%20003%20(Medium).jpg

Solid 2x6 butcher block style.
I sunk in the chop saw into this one, and built a downdraft table for sanding on the side.
2008-12-28%20038%20(Large).jpg
 

BrokeEF

Well-known member
Joined
Dec 24, 2008
Messages
341
Location
Elgin, IL
Some beautiful benches in here! I finally was able to build a bench for my own garage! I have built a couple before, but I rarely work with wood so I actually had to go buy tools to even build this thing. Not that I am complaining about buying tools of course. Anyway I think it turned out OK. I wanted heavy and sturdy, and I think I got both of those :) I still need to glue the second layer of plywood down (got the glue today) and then put on secure the top and vice.

Dimensions are 6' long, 2' deep. The top is 12ga 430 Stainless steel, legs are 4X4 pressure treated, rest is 2X4 pressure treated, and its all 3" long #10 stainless steel wood screws. The top has a 3" lip around the front and sides (perfectly covers the two layers of plywood and the 2X4), and a 4" tall back splash. ON TO THE PICS!

No truck, NO PROBLEM!
i-xnggRcF-X2.jpg


i-v3QZz3t-X2.jpg


Since I fail, I didn't really get any pics of building the bench, but here it is before the top anyway!
i-XJGdDHb-X2.jpg


Detail of some of my not so great cuts (a bench would have really helped in the making of this bench)
i-ckLFnQt-X2.jpg


I notched the 4X4 legs so that he 2X4's were supported by the leg rather than just the screws.
i-8VFbFSS-X2.jpg


Here you can see my 12ga 430 stainless steel top I made up for the bench. Also, the cheap vice I am debating installing on it.
i-WJX4n27-X2.jpg


The legs needed some support, and I had some wood left, so I added some bracing
i-QPKb75b-X2.jpg


i-7ZhK7LT-X2.jpg


I will probably make that a shelf to better support the legs, and also to give me a bit of storage. I am slightly concerned with it being in my way if I am sitting at the bench working, but it would be 8" from the front edge because of how I built it.


Sean
 

OJ Bartley

Well-known member
Joined
May 18, 2009
Messages
605
Location
Toronto, ON
Nice benches, people! BrokeEF, if you're worried about the lower shelf getting in the way, what about cutting it in a curved arc, giving you a few more inches of clearance in the middle? Might look pretty cool, on your already cool-looking bench.
 

NoPressure

Well-known member
Joined
Jul 1, 2011
Messages
182
Location
Hazel Green, AL
Some beautiful benches in here! I finally was able to build a bench for my own garage! I have built a couple before, but I rarely work with wood so I actually had to go buy tools to even build this thing. Not that I am complaining about buying tools of course. Anyway I think it turned out OK. I wanted heavy and sturdy, and I think I got both of those :) I still need to glue the second layer of plywood down (got the glue today) and then put on secure the top and vice.

Dimensions are 6' long, 2' deep. The top is 12ga 430 Stainless steel, legs are 4X4 pressure treated, rest is 2X4 pressure treated, and its all 3" long #10 stainless steel wood screws. The top has a 3" lip around the front and sides (perfectly covers the two layers of plywood and the 2X4), and a 4" tall back splash. ON TO THE PICS!


Sean

Less working on benches

Moar working on Camaro.
 

Syberia

Well-known member
Joined
Jan 13, 2014
Messages
1,451
Location
Perris, CA
Here's mine. 4x4 legs and 2x4 everything else. The cement slab on the side surrounded by bricks is for welding.

uploadfromtaptalk1436123904870.jpg
 

Redwolf947

Well-known member
Joined
Feb 13, 2015
Messages
613
Location
South East WI
Do you have more detail pictures? Any plans you used?

Sent from my SM-N910V using Tapatalk

Sorry for the late reply didn't know the question poped up.. I only have the plans I made in my head.. here's a couple more pics

View media item 48720
View media item 52757
View media item 52755
View media item 52754
View media item 52758
2" overhang all the way around to clamp projects if needed. The top is held on using kreg jig and appropriate screws. 3/4" maple plywood from HD was cut to make bottom and top. I think it was under $75 over all I made some changes as I went along like adding the 2x6 on the back.. Should probably add a brace across the back diagonally for strength. Hope that helps.. :thumbup:
 

SouperGrover

Well-known member
Joined
Aug 12, 2015
Messages
195
Location
Chatsworth, CA
It's taken me a couple days but I've JUST finished reading through all 52 pages of this thread. SO MANY GREAT IDEAS!!! I've lost count the number of pics I've saved for when I start building my workshop.

Thanks to everyone for sharing.
 

metalmagpie

Well-known member
Joined
Nov 1, 2011
Messages
796
Location
Seattle
"I'd be lying if I said I wasn't dying to see the top taken a little further to all shiny and sparkly even if it would only last a few days."

Easy peasy. I just have to take this table down and get it Blanchard ground or planed. Only problem is it would cost me maybe $600 and like you say it wouldnt' last anyway.

metalmagpie
 
To avoid these ads, REGISTER NOW!
Top Bottom