In my opinion, you don't want less than 24" or more than 32". Not enough depth and things are always falling on your toes; too much depth and the back of the bench becomes unplanned storage space that never gets cleaned up.How wide are people making their benches? I was thinking 30" inches. too wide?


You are using an out of date browser. It may not display this or other websites correctly.
You should upgrade or use an alternative browser.
You should upgrade or use an alternative browser.
work benches... from scratch
- Thread starter R6rider
- Start date
PassnThru
Well-known member
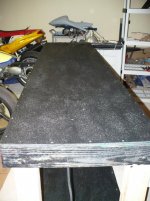
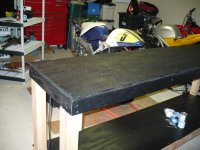
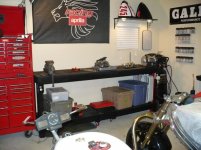
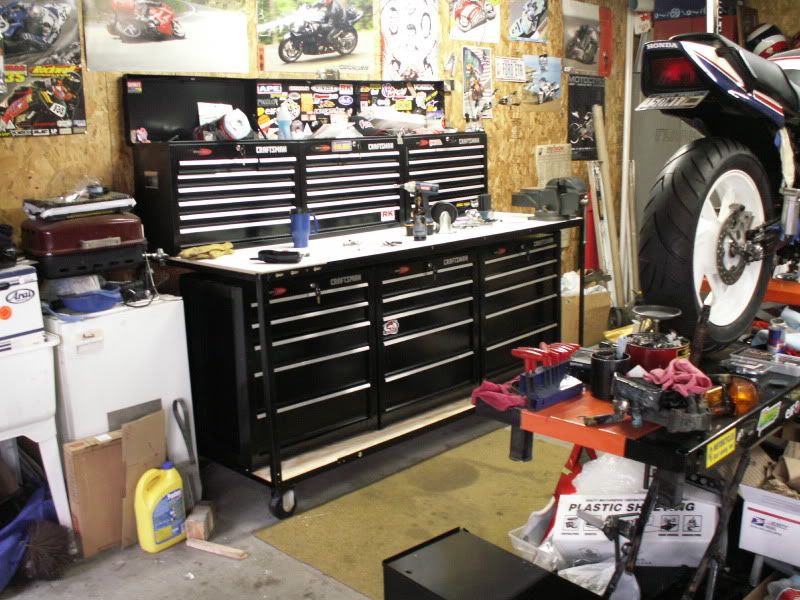
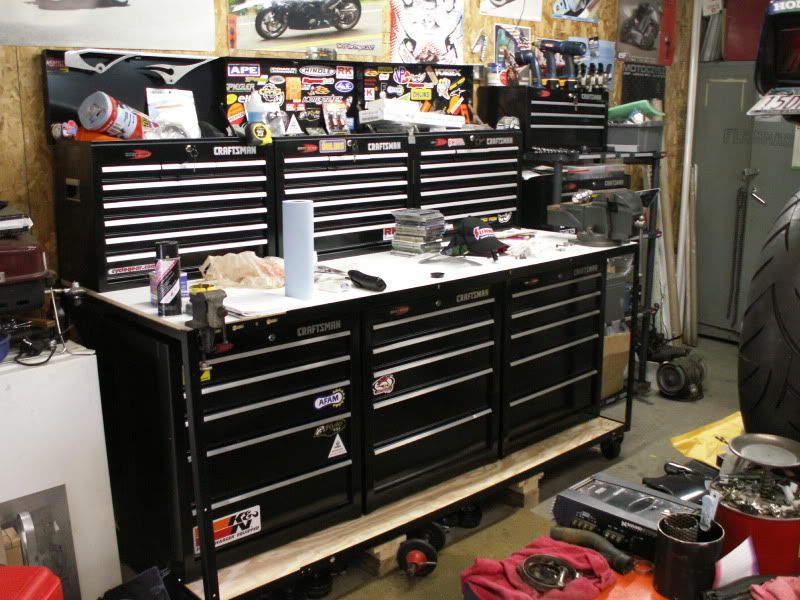
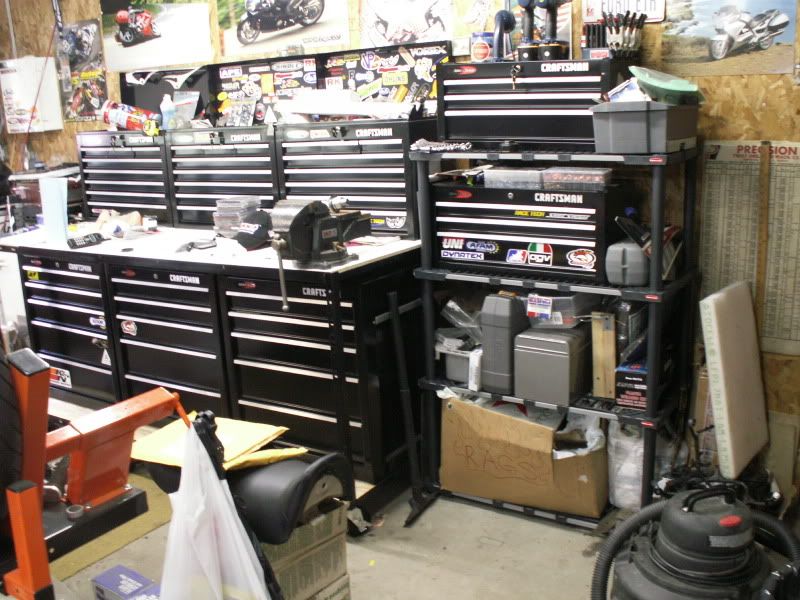
Sweet. Are you planning any doors for the top and bottom?Here are a few pics

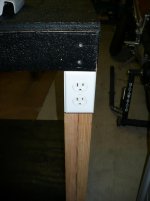
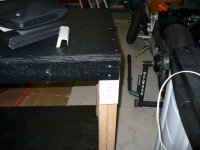
Also, I realize that you can never have too many outlets but you have me wondering if that is actually true now. Any particular reason you went with 2 duplex outlets per box spaced that closely together?
JOHNMAN
Well-known member
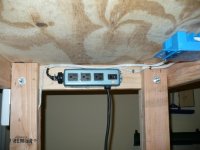
They are on 4'-0" centers. I went with duplex outlets because in my last shop I sometimes had need for more than a single duplex. This time, I made sure I wouldn't need more outlets.
I also have several 220 welder outlets spaced all around the shop.
I planned it to be able to be used by more than one person and didn't want to string cords to a workstation. It should be good for several at a time.
At this time, I have no plans for doors. While doors would keep out dust, I would rather spend the money building more shelves.
I will build more upper shelves across the back wall where the benches are deeper as well as above my really deep (36") benches in the other room.
If/when I build doors, I will construct them much like kitchen cabinet doors with a routed outer frame and a floating center section. I did construct the face frames to accept doors at some point.
I noticed that my last pic doesn't show my air drops. I should get an updated pic posted.....
larry4406
Well-known member
JohnMan - give details on the shelf construction please
JohnMan - give details on the shelf construction please
Yes Please!!! I need to build more shelves and these look some what cheap and easy. Fits me

Chris
nofir55
Member
First post:
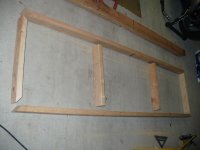
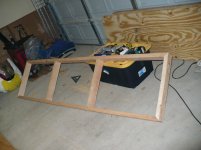
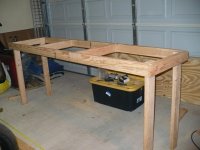
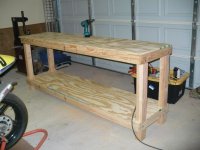
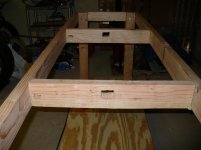
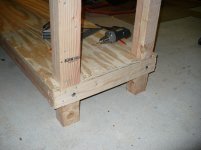
hey guys here is my work bench took few evenings to complete
started with a pile of 2x4 and 3/4" playwood
hey guys here is my work bench took few evenings to complete
started with a pile of 2x4 and 3/4" playwood
Attachments


nofir55
Member
nofir55
Member


nofir55
Member

JOHNMAN
Well-known member
Yes Please!!! I need to build more shelves and these look some what cheap and easy. Fits me
Chris
Should I start a new thread? since this was a bench thread? Here is a brief description. And I do need to make some more, but I have an engine to rebuild before I make more sawdust.
They are simple and fairly cheap. The face frames were probably the most expensive part.
I can make (4) 4'-0" wide 3-shelf "units" 4'-0" high from:
(1) 4'x8' 1/2" plywood (sides)
(2) 4'x8' 1/4" plywood (backs)
(2) 4'x8' 3/4" plywood (shelves)
The rest of the materials are for the face frames and the cleats for the inside rear top shelf and inside rear bottom shelf.
My face frames are made from clear pine
(15) 1x2x8' (3/4"x1 1/2") and
(2) 1x3x8' (3/4"x2 1/2")
For all the verticals and all but the bottom of the face frames, I used the 1X2 material, and only for the bottom of the face frames did I use the 1X3 material.
I notched the vertical members to pick up the shelves, and I rabbited the horizontals to give support to the front edges of the shelves.
They are easy to construct and go together quickly. Getting all the dimensions set was the only trick.
Basically, I looked at kitchen cabinets and improvised. The 1/4" backs add a bunch of stability to the shelf units.
Glue, brads, and screws hold them together.
If I really wanted doors, I would substitute 1x3 material where they cover the sides (it would give you a bit more room where the hinges would go).
I think I can scan in a sketch and post a PDF sometime.
These are the first (2) I put together

Last edited:
Seb
Member
Here's my latest set of benches. The shop is always changing, but right now these suit my needs.
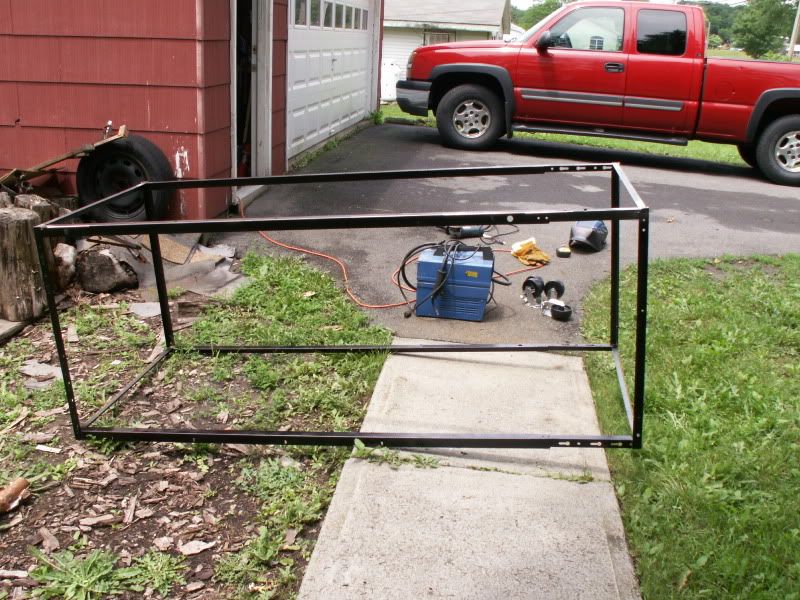
The first one here was made from 1/8" 1.5"x1.5" angle iron. The cheap toolbox lower gave up it's wheels to make the bench mobile. I put 3/4" ply in the bottom, and a piece of 1.5" laminated countertop in as the work surface.
Sorry, I don't have clear pics of it right now, I'll try and shoot a few tonight - for now, just look past the hanging bike...


I plan to paint it this summer.
This second one didn't work out exactly as I hoped, I really should have doubled up the material to make it stronger. I used old metal bed frames instead of angle iron for this one, and I ended up having to brace it underneath and in the middle to support the weight of the boxes. The cost benefit outweighs the functionality at the moment!
Here is the old one that I'm replacing:

And the new one:


Last but not least, I scored this bench from work - they were going to throw it away!! Very nice heavy bench, rated for 1000lbs. I've since added a shelf underneath and bolted the grinder to the top!

The first one here was made from 1/8" 1.5"x1.5" angle iron. The cheap toolbox lower gave up it's wheels to make the bench mobile. I put 3/4" ply in the bottom, and a piece of 1.5" laminated countertop in as the work surface.
Sorry, I don't have clear pics of it right now, I'll try and shoot a few tonight - for now, just look past the hanging bike...
I plan to paint it this summer.
This second one didn't work out exactly as I hoped, I really should have doubled up the material to make it stronger. I used old metal bed frames instead of angle iron for this one, and I ended up having to brace it underneath and in the middle to support the weight of the boxes. The cost benefit outweighs the functionality at the moment!
Here is the old one that I'm replacing:
And the new one:
Last but not least, I scored this bench from work - they were going to throw it away!! Very nice heavy bench, rated for 1000lbs. I've since added a shelf underneath and bolted the grinder to the top!
PassnThru
Well-known member
OK - my real from scratch work bench.
View media item 3367It's made from mostly 3/4 particle board with clear pine on the front. It was constructed mainly with glue and biscuits. The top is 3/4 particle board painted over 2x4s laid flat - glue and biscuits - bordered by more 2X material. It was seriously overbuilt - wouldn't do it that way again because it is a pain to move. I would literally put an engine on the top.
A cabinet with shelf on the left -
View media item 3368Drawers on the right -
View media item 3369
My portable work bench - I use this for the power miter and the portable table saw. It started life as a desk that I cut down - it was mostly like this -
http://www.bushfurniture.com/bushindustries/bushfurniture/productdetail/LargeImages/largeimages.jsp?id=WC91328-03
Made some modifications -
View media item 3370And the back -
View media item 3371
I added a base and wheels - great for pulling it outside during the summer for cutting projects.
deweybroncos
New member
- Joined
- Dec 6, 2009
- Messages
- 1
Cool stop light. Does it light up?Here's my storage setup - through several stages...
Here's my latest set of benches. The shop is always changing, but right now these suit my needs.
The first one here was made from 1/8" 1.5"x1.5" angle iron. The cheap toolbox lower gave up it's wheels to make the bench mobile. I put 3/4" ply in the bottom, and a piece of 1.5" laminated countertop in as the work surface.
Sorry, I don't have clear pics of it right now, I'll try and shoot a few tonight - for now, just look past the hanging bike...
Me likey all the VFRs. I had an 01 for a while before I went back to a Hawk GT.
Stole the angled leg idea from this board, Cobra i think,
10 feet long 41 inches high 29 inches deep.
2 x 8's are overkill but were left over bracing from my home build. The tops are butchers block from IKEA 2x $28 a couple of coats of poly and screw the tops down ..Done deal..the green stain theme of the garage is to compliment my British Racing Green Aston Martin that I am going to win in the lottery
Last edited:
If somebody's willing to put together a fund to help JOHNMAN face those beautiful cabinets, I'm in for a donation.
Skills like that are a terrible thing to waste.
Skills like that are a terrible thing to waste.
jonlb
Well-known member
These are my work surfaces. Got the drawer cabinets for free and they are great I used doubled advantec for the tops covered with masonite.

Last edited:
JOHNMAN
Well-known member
If somebody's willing to put together a fund to help JOHNMAN face those beautiful cabinets, I'm in for a donation.
Skills like that are a terrible thing to waste.
Face them with? Do you mean doors? I thought about doors, but it's not in the budget and they get in my way. They would keep dust out though.
They actually do have face frames but blend into the cabinets.
Perhaps you would donate your black car? It would go along nicely with my white one. LOL!
emeraldcoupe
Well-known member
First post:
hey guys here is my work bench took few evenings to complete
started with a pile of 2x4 and 3/4" playwood
that's exactly how i made mine but i used 4x4's for the legs. i made mine pretty big, 41"H 39"D 72"L. excuse the mess, i'm in the middle of reorganizing the garage.

Last edited:
onewaydave
Well-known member
Well I'll put my benches up for review. Yes, they all have stuff stacked on them. I clean up before the project. That way if there is anything out you're going to use you didn't have to waste time and energy putting it up and getting it out again. Ya buy that? The link below is not a picture hosting website but my website. Enjoy.
http://igfiddles.com/work_bench.html
http://igfiddles.com/work_bench.html
last12know
Active member
- Joined
- Jun 21, 2008
- Messages
- 29
hello all. just happened to put together a small woodworking bench and smoker table. yeah, i know table isn't the same but it'll get a lot of work done with it too...lol used plans from the net for the inexpensive woodworking table.. only thing is the vise that got ordered was a lite duty vise but once they had it i got it anyhow.. not something the local store carries..
as always comments welcome
the smoker table... the longer handles for the table are for a dowel rod to hold towels and help move the table as it will get wheels eventually.


the woodworking table


as always comments welcome
the smoker table... the longer handles for the table are for a dowel rod to hold towels and help move the table as it will get wheels eventually.
the woodworking table
Ed_EOD
Well-known member
Is that table for a Big Green Egg? I need to do that with mine, right now it's on the metal stand.
last12know
Active member
- Joined
- Jun 21, 2008
- Messages
- 29
well i have a big green egg in the nest same as you.. that table is made for my bothers byou classic smoker... same thing as an egg.. in fact we used the measurements off my egg for the table... it will work for either... you've got to picture wheels on the far end of the table so when the end where the dowel rod goes is picked up it will move... with that granite tile it's got some heft and it's actually very stable. made out of left over cedar from a deck project.. i'm going to make some adirondak furniture to match...
worked well as the granite tile has some green matches either smoker... maybe i should keep it? lol
worked well as the granite tile has some green matches either smoker... maybe i should keep it? lol


nfuriate
Active member

I am in the military, so we move every three or four years, and the first thing I do in a new house is build a bench. Make the top out of high-grade plywood (oak or popular) doubled up so it is 1 1/2 thick, 24" deep, length has been anywhere from 6' to 8' depending on size of garage. Put it on 4x4 legs with 2x4 bracing. Keep the height at 36" which is good for me (I'm 5'7"). Usually costs me about $100-150 and I get it put together in a day. Have set engine blocks on these with no problems.
Here's my general work area......dimensions are 4'x3'. Frame is mostly 2"x2", 3/16th walled tube steel with 14 gauge top. I didn't take any pics of the build, but real straight forward. As you can see, it's sturdy enough to stand up to the 12 ton press. The metal is soooooo much nicer than wood. I use it for everything, from pounding kingpins out of old ford axles, welding, grinding, and cutting without any bouncing or movement. i will be adding casters to the legs sooner or later.
View media item 3460
This ain't from scratch........but, it was cheap. I picked up the cabs at a second hand store for $25, then got an 8' remnant counter top from Menards for $40.
View media item 3461
View media item 3460
This ain't from scratch........but, it was cheap. I picked up the cabs at a second hand store for $25, then got an 8' remnant counter top from Menards for $40.
View media item 3461
Last edited:
Seb
Member
Seb, your table is inspirational. I'm looking at the pic with the caster in it, and trying to figure how you joined the angles. Did you cut and weld on a 45 degree?
Yes, angles were cut on a chop saw, then welded. And thanks!


rieferman
Well-known member
I'm planning some benches for my garage. One I'm looking at doing would be 24" deep, 6' long, and 3' tall. I want to attach a benchtop drillpress on one side and a vise on the other. I'm planning to have it on wheels so I can move it away from the wall for better access if I'm working long items.
I'm leary of it becoming top-heavy and tippy with that much weight up top on only 24" deep.
Can anyone chime in with experience how well that may or may not work? I'm planning to build the bench fairly heavy, but again, most of the weight is up top:
4x4 legs in the corners
legs joined front-to-back and side-to-side with a 2x4 at the top edge. Ditto for the bottom, except none on the front.
Face left open for better access sliding my shopvac & toolcart under.
2x10 layed out for the top, covered by 3/4 plywood.
sides & back 'smoothed' with plywood, either 1/2 or 3/4 to add weight.
I may stretch it to 28" as it'll work nicer with the 2x10 top base & would then be deep enough to add doors to the front. Only problem is it'll stick out from the rest of benches and that'll bug me. haha
Thanks
TheBanker
Well-known member
I'm looking for an inexpenisve workbench top about 84"w x 24" d. Just something that looks pretty good. I don't really do much work in the garage anymore but it doesn't mean I don't need a workplace to go to anyway. Any ideas on where I can find something or if I should make something? (easy) Keep in mind I no longer have a truck to carry sheets of plywood in.
TopherGreen
Member
Here are my simple yet effective DIY benchs


longboy515
Well-known member
I spy a Commando part 
TopherGreen
Member
Yep and it's all for sell. Well what I have left anyway.

I have built several, one I had to leave at last place, built it too big and heavy to move again.
First one is 2x4 with 2 layers of 3/4 inch plywood on top. Measures 2x8. Spaced shelves to fit tool boxes and saw cases I had at the time. Added small piece of OSB to the back to keep **** from rolling off the back. It is not deep enough, I wouldn't build another only 24 inches deep unless I had too, by the time I get the project on the bench no room for all the other ****.
Second is a freebee, measure 34 inches deep and 6 feet long, heavy steel legs and butcher block top with an extra shelf. Works great I use it for assembly area. One pic of another freebee, roll around media cart from a school. They sell them dirt cheap and half the time they get thrown out. I have several of these of diff heights.
Last 3 benches are all freebee wood from a neighbor(yellow pine) They measure 32-34 deep and 8 foot long. Mainly was going to use them as storage, but I like having two back to back for a large work area, think I'll put some casters on two and some latches to keep them joined.
These will be the last open storage benches I will build, I have a couple of wide bathroom vanities I'm going to beef up and put a top on. I don't mind the open storage, but after having cabinets at the last place I got spoiled.