To avoid these ads, REGISTER NOW!

Workbench build using H.F. 44 inch tool boxes

1WickedEvo

Well-known member
Joined
Dec 10, 2018
Messages
50
Location
NJ
Great thread and build Lucky13!

I am in the Dodge and Squigs camp with wood a wood framed setup.

Dodge, love the bowling ally Benchtop. I have been looking for something local-ish for about a year. No joy.

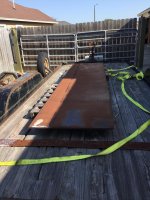
As other have noted, metal working skills are a great solution. I lack the skills :bowdown: and tools so this is the current status of my shop build:

medium800.jpg


I have the 18" deep 44s. The shallower cabinets allowed me to make 'Tool Trundles' behind them in otherwise unused space. You can see the whole build in the link in my signature.

:beer:

:bowdown: it’s official I’m totally a HF box fanboy. That said, I’ve been lurking on GJ for quite some time. Been following this thread. Thought I finally figured out my garage layout and now you post your pic. Nicely done and it’s one of the setups that I’ve drafted but recently changed. Which means, I need more time to plan my build. I’m really digging the height.
 
To avoid these ads, REGISTER NOW!
OP
L

Lucky13driver

Well-known member
Joined
Feb 15, 2014
Messages
317
Location
Corpus Christi Texas
Trapps nice build sir. I almost went with the wood route. The kicker is I'm a far better metal worker than wood. And I have more construction job site wood tools and no table saw. On the metal side I pretty much have it all. Metal or wood it's really cool to see how SteveO's original build has inspired so many of us guys on here.
 

NUTTSGT

Super Moderator
Staff member
Joined
Sep 14, 2009
Messages
50,851
Location
Northern Central Ohio
Trapps nice build sir. I almost went with the wood route. The kicker is I'm a far better metal worker than wood. And I have more construction job site wood tools and no table saw. On the metal side I pretty much have it all. Metal or wood it's really cool to see how SteveO's original build has inspired so many of us guys on here.

Steveo's build has inspired alot of people build something similar.

I contemplated when I was refurbbing my garage and planned on using some Cman boxes. They were going to be for fastener storage but after I opened the first one, I knew the cheaper line of I had picked out wasn't going to work. I took them back and quickly remedied it with some small shelves and bins.

If I were to do another build, it would have a HF box in it with dividers for fasteners.
 

cderalow

Well-known member
Joined
Nov 13, 2011
Messages
1,326
Location
Potomac, MD
Stopped by my local HF today for some measuring.

Didn’t get a chance to measure the 44” box, but measured the outside of the 26” box.

Will have to make a second trip to measure the 44 and inside drawer dimensions on the 26, the cashiers were giving me a funny look.

For the 26” bottom cabinets (box only measurements, no casters or handle)

26-½” width, 22” depth, 35” height to top of metal edge (34-½” to rubber mat)

Outside frame: 1-½” on each side, 2-½” top and bottom

Drawers:
23-¼” width
3 @ 2” height
2 @ 3” height
1 @ 4” height
2 @ 6” height

Will try to get inside drawer dimensions this week and 44” box measurements as well.

I’m looking at a 44” & 26” in a stationary steel bench if possible with a 30” cart (already owned) for at project side work.


Sent from my iPhone using Tapatalk
 
OP
L

Lucky13driver

Well-known member
Joined
Feb 15, 2014
Messages
317
Location
Corpus Christi Texas
Cderalow sounds like you have a plan. Please share the pics. I really like the idea of using the 26" box as well. Those 30" carts are sooooo cool I'm hoping find a place for one in the shop.
 

cderalow

Well-known member
Joined
Nov 13, 2011
Messages
1,326
Location
Potomac, MD
Cderalow sounds like you have a plan. Please share the pics. I really like the idea of using the 26" box as well. Those 30" carts are sooooo cool I'm hoping find a place for one in the shop.

Of course, as I'm doing the research ahead of time, I'm discovering that the 44" & 26" aren't the same height.

If the measurements are accurate that the 44" is 34-1/2" to the top of the metal edge at the top of the box, then the 26" box is 1/2" taller.

:confused:
 

ScottsGT

Well-known member
Joined
Jan 1, 2014
Messages
4,883
Location
Lake Wateree, SC
HF is consistently inconsistent on their tool box heights. I was going to just get a 56" until I found out it stands several inches higher.
So I went with a 44 and a side cabinet.
 

ScottsGT

Well-known member
Joined
Jan 1, 2014
Messages
4,883
Location
Lake Wateree, SC
Toe kick? As in a place for your toes to go when you stand next to it?

When I started my project I was throwing around this idea. But since I'm building mine to be accessible from both sides, I went a little different.

One side is all the drawers. Bench edge will only hang over 3/4". Other side will be the "working" side when using the bench. It has the vise and polisher mount. It has about a 7" overhang.
Working side (back side of 44") will be facing my tool box. Kind of like a galley kitchen.
 
OP
L

Lucky13driver

Well-known member
Joined
Feb 15, 2014
Messages
317
Location
Corpus Christi Texas
Some buddies from work asked me the materials I used for the build. So I thought I'd put together a list of the materials I used so far. However, I'm not going to give quantities because most of the builds are different. Beware, I'm known for way over building things so keep that in mind. If the other guys that built these would like to offer their 2 cents worth on materials- feel free.

-2-1/2" x 3/16" wall square tube for the uprights: 2-1/2 " will allow a 2" tube slide inside like a trailer hitch to hold benchtop tool mounts.

-2"x 1/8" wall square tube for the upright gussets and the tool mounts.

-1-1/2" X 1/8" wall for the gussets under the top tubes and below the lower framework.

-2" 3/16" angle iron for the lower supports

-1/4" x 5" smooth plate steel for under the feet (to spread out the load onto the floor). And tie plates for the lower framework.

-1-1/4" x 5" nuts and bolts for the feet. Takes a 2" wrench.

-5/8" x 4" nuts and bolts with washers, to act as receiver pins for the tool mounts.

-1-1/2" Unistrut to work as a channel to connect the top to the back-wall, as an added safety to prevent it from tipping forward if I'm really torquing on something.

-7/8" x 30" x 12' smooth steel plate for the top as the workbench top. The only reason why, I think, is I'm basically getting it for free. However, I'd probably go with 1/2" or 5/8" if I were to buy it at the steel yard.
 
Last edited:

Mr_B

Well-known member
Joined
Nov 21, 2016
Messages
5,373
Location
Reading
Yeah I kind of like a overhang on bench top over a toe kick but with drawers then you can't overhang so much and a toe kick is only way go really .
A bench accessible both sides is great in use .
 
OP
L

Lucky13driver

Well-known member
Joined
Feb 15, 2014
Messages
317
Location
Corpus Christi Texas
Yeah I kind of like a overhang on bench top over a toe kick but with drawers then you can't overhang so much and a toe kick is only way go really .
A bench accessible both sides is great in use .

Good point the top on mine will be about 3" higher than the top of the tool box. Also the drawers slide all the way out.:bounce:
 

1WickedEvo

Well-known member
Joined
Dec 10, 2018
Messages
50
Location
NJ
Today's work has me very close to the finish line. I put the tool boxes in the framework. To lift them I used an engine hoist with the goose neck mounted backwards so it wouldn't hit the lower support rails.also I then ground a flat spot on some fender washers so it would line up with the existing holes on the box so I could mount the eye bolts to hook up the chain. The final step will be to mount the top. This may take some time before the steel is available so I'll probably put a sheet of OSB on it as a temporary work surface.

very nice set up!
 
To avoid these ads, REGISTER NOW!

ScottsGT

Well-known member
Joined
Jan 1, 2014
Messages
4,883
Location
Lake Wateree, SC
Need some input from the experienced here.

About to unwrap my butcher block top I got from Global and look at how to install it. My original plan was to route out the bottom of the butcher block for the lip on the box to fit up inside. Lip sits about 1/2’ to 5/8” and I’m thinking that will weaken the 1 3/4” top significantly.
So, route the groove?
Or plywood to fill the gap?

Either way I’m layering the edge with two layers of 3/4” red oak to hide the front seam and to make the bench a little wider.
 

ScottsGT

Well-known member
Joined
Jan 1, 2014
Messages
4,883
Location
Lake Wateree, SC
ScottsGT, sounds like your bench is going to be really nicely done....more pics please!:bowdown:

Patience Grasshopper! Going to make a thread when done. Thought it would be today or tomorrow, but I pulled a muscle this morning putting on my shirt. :confused: How the hell that happened, I’ll never know. Might have been weak from slinging that counter top around in the garage yesterday. And its one of those upper back at the shoulder blade that takes your breath away when it grabs. :shocking:
 
OP
L

Lucky13driver

Well-known member
Joined
Feb 15, 2014
Messages
317
Location
Corpus Christi Texas
Bummer hope you feel better sir. I'm 48 years old and have found my self waking up saying why is my calf hurting? I was sleeping for Pete's sake. Sure gives the guys in there 60s and 70s some serious street cred. For getting out in the shop and gettin it done.
 

964haus

Well-known member
Joined
Nov 1, 2010
Messages
498
Location
Vancouver, BC
Thanks for the tip in my workbench question thread, Lucky.
Enjoyed following your work here, and once again very envious of your welding skills. I hope to get there once day...

M.
 
OP
L

Lucky13driver

Well-known member
Joined
Feb 15, 2014
Messages
317
Location
Corpus Christi Texas
I was finally able to pick up the material for the top. This was a piece of surplus 5/8" plate 144"x34" that was discounted due to the surface rust. The piece my buddy was going to give me had to be used elsewhere.
 

Attachments

  • IMG_0561.jpg
    IMG_0561.jpg
    117.8 KB · Views: 497

ScottsGT

Well-known member
Joined
Jan 1, 2014
Messages
4,883
Location
Lake Wateree, SC
Testing the limits of these low budget boxes! I would definitely make sure the top is resting on steel frame and the box is floating inside the structure!
 
To avoid these ads, REGISTER NOW!
Top Bottom