Outlawmws
Well-known member
I hate spending (wasting) time hanging my house  lights so I've pre-mounted them and I can hang them all in like 15 min.
Here is how. (at the request of someone on the "What did you do in the garage" thread...) Apologies in advance for some of the pics, having exposure issues bad lighting outside today, and the paucity of pics, I made these many many years ago (I'm actually on my third string of lights as SWMBO changes the "look" she wants...)
Pretty simple really:
Materials:
Optional:

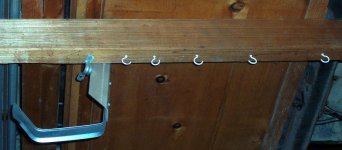
After painting the boards and while waiting for them to dry, FIRST put up cup hooks on a couple of likely garage rafters for storage:

This determines the spacing of the eye screws on the boards; if you have fascia boards you can probably use these to hang them on the house.
Make sure this fits before proceeding!
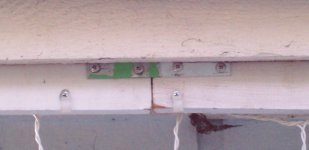
For the house, determine where the power for the light is coming from. I drilled a hole between two rafter tails near my from door. This is sort of central to the completed light string. I’ve run an extension cord through this with enough slack to allow me to pull it out and connect at the rafter.

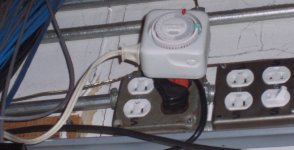
The other end extends to an outlet that is near my house to garage man door, I use a timer here so they go on and off automatically.

Start at the power and go from there. Hang the boards from the house FIRST! Mark them! Number, (R/L for direction), name place, SOMETHING! You need to be able to get them back out in the right order… (Mine are marked things like Garage Entry, Garage Right (and Left) etc…) I marked them on the top edge so it doesn’t show.
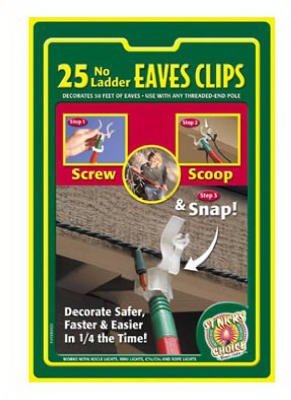
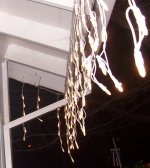
I have Icicle lights, so I use the nail on ¼” cable clamps to attach the light string. You could also use the screw dwon type for this. The light strings WON’T be the exact length for each board; don’t sweat it!
On the next board, (space them the distance they will be on the house) you will (probably) either fall short, or be too long on the light string wire, and you have to take the light spacing into consideration.
Leave the hanging string end loose, and attach some of the plastic cable clamps, but leave the clamp open! (See Pic) Screw on the bottom of the clamp and leave the second top loop loose. This allows you to snap a cable in place on the fly.

Once you have the spacing right, this should also keeps the wire taught and the spacing right. Start the next line and use the nail on clamps as much as possible.
I often add a couple of the “on the fly” cable clamps high on the board where the strings couple so I can pull the connecting plugs up out of sight.
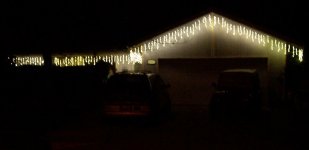
Continue until you have all the requisite lengths done. You are ready to hang the lights!
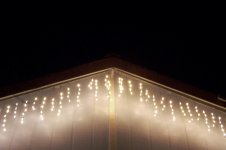
For a gable, (my garage is gabled), I can connect two boards and my son and I lift the ends together and walk to each other so we end under the gable peak. The deck screws, are an hard target, but we get them both hung from the peak all without needing a ladder! This is one place we needed extra eye screws, as the gable boards needed an eye bolt near the very end…
Then we walk each end over to the side and use either a 4 ft “safety” ladder set my mother bought all of us “kids” many years ago, or a 3 ft step ladder to hang the lower ends on another deck screw. Done with that part! One end has some extra light string and I have the “open” cable clamps mounted permanently on the house for this. Snap, snap, snap, and that end is done.
The other end has to get the extra string off the entry run board snapped under the open clamps for the purpose, and that is done. That is about ½ all my lights! The rest are a straight run to complete.
Pics of them lit later tonight…
lights so I've pre-mounted them and I can hang them all in like 15 min.Here is how. (at the request of someone on the "What did you do in the garage" thread...) Apologies in advance for some of the pics, having exposure issues bad lighting outside today, and the paucity of pics, I made these many many years ago (I'm actually on my third string of lights as SWMBO changes the "look" she wants...)
Pretty simple really:
Materials:
- 10 or 12 ft 1 X 4's sufficient for the length of the lights you want to hang. Some may need to be cut to length.
- Primer and paint (so they blend in when installed, and to keep them from warping.
- Cup hooks for garage storage; 2X as many as you have boards
- Eye screws to put in the 1 X 4s. get extras...
- Deck Screws for mounting on the house (at least this is how I did it, you could also use cup hooks on rafter tails) - this is why you need extra eye screws, in case the garage mounting spacing is different than house mounting. I prefer the galvanized screws so they don’t rust.
- Nail on 1/4" cable clamps. - To attach wires
- Plastic cable clamps - the type that screw down the smaller ones seem to work best
- “Grabber” screws ½” long - for the aboce clamps and other things…
- Lights! – Go for the LED - cheap to run and low maintenance! (does anyone LIKE to chase burned out bulbs? Also, this mounting technique makes the lights
Optional:
- Hinges in case you need a slightly longer run of mounting board. I have one that is hinged and extends for an added 4 ft.
- A straight “strap brace” - similar to corner or angle braces but straight and with 4 holes – this is to “splint” the hinge joint when extended.
After painting the boards and while waiting for them to dry, FIRST put up cup hooks on a couple of likely garage rafters for storage:
This determines the spacing of the eye screws on the boards; if you have fascia boards you can probably use these to hang them on the house.
Make sure this fits before proceeding!
For the house, determine where the power for the light is coming from. I drilled a hole between two rafter tails near my from door. This is sort of central to the completed light string. I’ve run an extension cord through this with enough slack to allow me to pull it out and connect at the rafter.
The other end extends to an outlet that is near my house to garage man door, I use a timer here so they go on and off automatically.
Start at the power and go from there. Hang the boards from the house FIRST! Mark them! Number, (R/L for direction), name place, SOMETHING! You need to be able to get them back out in the right order… (Mine are marked things like Garage Entry, Garage Right (and Left) etc…) I marked them on the top edge so it doesn’t show.
I have Icicle lights, so I use the nail on ¼” cable clamps to attach the light string. You could also use the screw dwon type for this. The light strings WON’T be the exact length for each board; don’t sweat it!
On the next board, (space them the distance they will be on the house) you will (probably) either fall short, or be too long on the light string wire, and you have to take the light spacing into consideration.
Leave the hanging string end loose, and attach some of the plastic cable clamps, but leave the clamp open! (See Pic) Screw on the bottom of the clamp and leave the second top loop loose. This allows you to snap a cable in place on the fly.
Once you have the spacing right, this should also keeps the wire taught and the spacing right. Start the next line and use the nail on clamps as much as possible.
I often add a couple of the “on the fly” cable clamps high on the board where the strings couple so I can pull the connecting plugs up out of sight.
Continue until you have all the requisite lengths done. You are ready to hang the lights!
For a gable, (my garage is gabled), I can connect two boards and my son and I lift the ends together and walk to each other so we end under the gable peak. The deck screws, are an hard target, but we get them both hung from the peak all without needing a ladder! This is one place we needed extra eye screws, as the gable boards needed an eye bolt near the very end…
Then we walk each end over to the side and use either a 4 ft “safety” ladder set my mother bought all of us “kids” many years ago, or a 3 ft step ladder to hang the lower ends on another deck screw. Done with that part! One end has some extra light string and I have the “open” cable clamps mounted permanently on the house for this. Snap, snap, snap, and that end is done.
The other end has to get the extra string off the entry run board snapped under the open clamps for the purpose, and that is done. That is about ½ all my lights! The rest are a straight run to complete.
Pics of them lit later tonight…


")