MushCreek
Well-known member
I recently installed a suspended ceiling in my basement, and didn't want to give up any more headroom than necessary. I didn't want to do drywall, as all of my plumbing, electric, and HVAC is between the floor joists, and may need service or modification.
I did a google search, and found a couple companies that offer 'zero clearance' systems. I bought track from CeilingLink. http://www.ceilinglink.com/. I have no connection with this company, other than I bought their product.
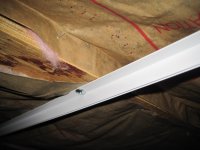
This is a pretty slick system. A T-shaped extrusion is attached directly to the joists. The vertical leg of the T is double, and shaped to snap in another piece, flipped over to form a channel. Around the edges, you use L-shaped pieces screwed to the wall. Once the grid is attached, you install the panels of regular ceiling tiles- 2X2 or 2X4 feet. The second piece of material snaps into place, securing the panel. Should you need to access the space above, you remove the bottom track by pulling it out, and remove the panel(s) that you need to.
Installation was kinda slow. I'm old, and working overhead is not my strong suit. When I did my basement, I hadn't planned for a ceiling system. By sheer dumb luck, ALL of my overhead lights and outlets had to be moved. I couldn't have planned it worse if I had tried. I had to move 6 can lights, and outlet, and a smoke detector, as they all fell on the track locations. I also got the flu, so wasn't able to put in full days.
Installing the track needs to be pretty accurate. Too far apart, and the panels aren't fully held. Too tight, and they won't fit. I used a laser to make good straight lines, and made a spacer to accurately space the rows of track. At first, I used the laser to mark lines on the studs, but found it was just easier to leave the laser on rather than making marks. Working around obstacles, such as a 6X6 post in the middle takes some planning and creativity.
Installing the panels is straightforward, until you get to the end of a run. With one hand, hold the panel, with your other hand, hold the piece of track, with your third hand, hold the cross-T.... It is possible, and easier than it sounds, but I honestly couldn't give you a written description. It's even more baffling when you get to a corner, but again. I did it, somehow. It's important to remember that the track is very flexible; the panels are NOT.
Which leads me to my next comment. The cheap panels are VERY fragile. I got a lot of damaged ones in the boxes. The big box store will give you credit for damaged ones if you have a receipt. I had to dig through piles of cases to find ones that weren't already damaged. I also found damaged panels inside of good ones, which tells me that some of them come damaged from the factory. Because I had to cut a lot of them, I was able to work around the damage, rather than having to return them. The flat white finish is also a dirt magnet, and somehow, you're hands get dirty, so keep 'em clean, or you'll have smudges on your new ceiling.
Check out their website for photos, instructions, pricing, etc. All in all, I'm very pleased with the system and results. When done, it looks like any other suspended ceiling, but I only lost 1" of headroom. I've never done a traditional suspended ceiling, so can't comment on comparative cost and ease of installation.
I did a google search, and found a couple companies that offer 'zero clearance' systems. I bought track from CeilingLink. http://www.ceilinglink.com/. I have no connection with this company, other than I bought their product.
This is a pretty slick system. A T-shaped extrusion is attached directly to the joists. The vertical leg of the T is double, and shaped to snap in another piece, flipped over to form a channel. Around the edges, you use L-shaped pieces screwed to the wall. Once the grid is attached, you install the panels of regular ceiling tiles- 2X2 or 2X4 feet. The second piece of material snaps into place, securing the panel. Should you need to access the space above, you remove the bottom track by pulling it out, and remove the panel(s) that you need to.
Installation was kinda slow. I'm old, and working overhead is not my strong suit. When I did my basement, I hadn't planned for a ceiling system. By sheer dumb luck, ALL of my overhead lights and outlets had to be moved. I couldn't have planned it worse if I had tried. I had to move 6 can lights, and outlet, and a smoke detector, as they all fell on the track locations. I also got the flu, so wasn't able to put in full days.
Installing the track needs to be pretty accurate. Too far apart, and the panels aren't fully held. Too tight, and they won't fit. I used a laser to make good straight lines, and made a spacer to accurately space the rows of track. At first, I used the laser to mark lines on the studs, but found it was just easier to leave the laser on rather than making marks. Working around obstacles, such as a 6X6 post in the middle takes some planning and creativity.
Installing the panels is straightforward, until you get to the end of a run. With one hand, hold the panel, with your other hand, hold the piece of track, with your third hand, hold the cross-T.... It is possible, and easier than it sounds, but I honestly couldn't give you a written description. It's even more baffling when you get to a corner, but again. I did it, somehow. It's important to remember that the track is very flexible; the panels are NOT.
Which leads me to my next comment. The cheap panels are VERY fragile. I got a lot of damaged ones in the boxes. The big box store will give you credit for damaged ones if you have a receipt. I had to dig through piles of cases to find ones that weren't already damaged. I also found damaged panels inside of good ones, which tells me that some of them come damaged from the factory. Because I had to cut a lot of them, I was able to work around the damage, rather than having to return them. The flat white finish is also a dirt magnet, and somehow, you're hands get dirty, so keep 'em clean, or you'll have smudges on your new ceiling.
Check out their website for photos, instructions, pricing, etc. All in all, I'm very pleased with the system and results. When done, it looks like any other suspended ceiling, but I only lost 1" of headroom. I've never done a traditional suspended ceiling, so can't comment on comparative cost and ease of installation.