To avoid these ads, REGISTER NOW!

ZMotorsports Shop Projects 2.0

Maxcustody

Well-known member
Joined
Oct 26, 2021
Messages
1,466
Location
West Virginia
Continuing on.

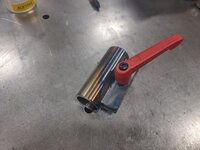
With the clamp assembly cool, it was time to install the handle and test.
fix41.jpg

I slid a length of hitch tube into the receiver and determined a length that would get it out past the workbench enough to allow easy access around whatever I was working on, yet not too far out to be a nuisance.
fix42.jpg

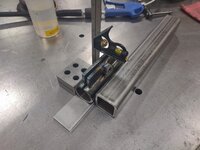
Hitch tube cut to length, wiped down and sanded with a DA in preparation for welding the clamp mechanism onto it.
fix43.jpg

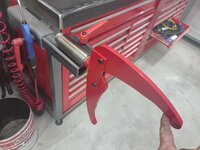
Fabrication complete and test fitting as a complete assembly.
fix44.jpg

Works great and holds the fixture firmly no matter the position. I think this will work much better than merely a pin stuck through a series of holes to secure the location.
fix45.jpg

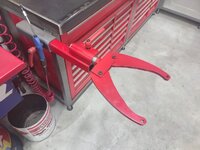
Everything painted and completed.
fix46.jpg

fix47.jpg

Then the shop was cleaned and ready for the next job coming into the shop.
fix48.jpg


Thanks for looking.
Well Mike as usual with all of your Fab products, this is OUTSTANDING! Better than anything you could have bought from Snap on. Well done Sir.

22170c0a839364416f020dd6ee78c28f.jpg
 
To avoid these ads, REGISTER NOW!
OP
Z

zmotorsports

ALLIANCE MEMBER
Joined
Oct 20, 2009
Messages
21,627
Location
Northern Utah
I was able to get a lot of work accomplished on the Super Duty last night before the wife arrived home from work.

Truck in the air and ready to start draining fluids and inspecting.
sd3.jpg

Having a plan and working through the process component by component and task by task is key to moving forward in a sequence that allows me to not be standing around waiting for somethign.

I figured I'd drain the transfer case first, then put the plug in and move the drain pan to the differentials and drain them. Once the diffs are drained to the point of just a drip, absorbent pads can be placed to catch the minor drips while I move to the transmission pan. The goal of the night was to get as much accomplished as far as fluids as possible with the main focus being to have the transmission pan dropped and determing which filter it has so I could pick it up and not be waiting.

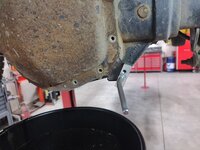
Here the transfer case fluid is drained and it looks like it needed it. Not terrible, but worse than I like to see. It was definitely due for fluid replacement. Overdo actually.
sd4.jpg

Moving to the rear axle, I removed the cover bolts and used my trusty beveled tool to break the sealant and pull the cover without any damage or nicks to the casting. This tool is great for getting under the cover and popping them loose without any scratches or gouges that have to be dealt with. Just get it at an edge and drive it under flat with a hammer.
sd5.jpg

Once it's under, then pry and it comes right loose without damage.
sd6.jpg

Rear differential fluid didn't actually look bad at all. By the looks of all of the gray sealant slathered all around it though, it was evident this fluid has at least been changed.
sd7.jpg

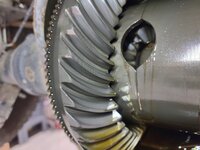
Ring gear looks good as well as side gears and spiders that I could see. No metal chunks or glitter so this will be a rather quick clean and reinstall the cover then add fluid.
sd8.jpg

Casting cleaned and ready to accept the cover.
sd9.jpg

While the rear differential was draining I filled and reinstalled the plug on the TC, then marked it off the list.
sd10.jpg

With the rear diff. now just a drip, I moved the drain pan to the front differential to remove the cover and drain the fluid.
sd11.jpg

Front differential cleaned and ready to accept the cover.
sd12.jpg


With the front now just a drip and an absorbent pad down, I could move to the transmission.

More to follow......
 
OP
Z

zmotorsports

ALLIANCE MEMBER
Joined
Oct 20, 2009
Messages
21,627
Location
Northern Utah
Continuing on with the Super Duty.

With the drain pan under the transmission, while it was draining, I worked at the solvent tank cleaning diff. covers. The transmission fluid definitely needed to be replaced. Although not burnt, it was definitely much darker and had a slight odor that I didn't care for.
sd21.jpg

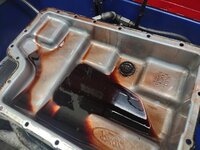
Then dropped the pan and was glad not to see glitter or too much sludge. By the looks of the fasteners, I don't think the pan has been dropped in a long, long time, if at all.
sd22.jpg

The sludge at the magnet seemed about normal, which would support the thinking that at least the fluid has been changed previously. It doesn't look like 200k mile fluid.
sd23.jpg

The valve body of the transmission didn't look terrible but I was shocked to see an OEM filter. This tells me either the transmission fluid was serviced at the dealership, the indy shop used OEM parts OR, the pan has never been off and the filter is the original. By the looks of the fluid, I doubt the fluid has never been replaced so maybe the previous owner just had them drain the fluid by means of the drainplug and replace the auxiliary external filter and never the one inside of the pan. The latter may be the case because I have seen some erroneous information on some of the super duty and ford forums over the years and many people state that there is not an internal filter and only an external filter located up behind the bumper so they just recommend draining the fluid and replacing the filter element in the external canister. This is not accurate information from my experience of working on these trucks. I have not seen one yet that doesn't have an internal filter but I have seen some that do not have the external filter as that seemed to be an option, maybe something to do with the tow package. Which kind of baffles me because wouldn't a 1-ton Super Duty automatically come with the "tow package"?:headscrat Either way, these do in fact have internal filter and many have an external canister style filter located behind the front bumper on the passenger frame rail.
sd24.jpg


Unfortunately, on these older vehicles with sometimes three or four owners we find ourselves having to play detective looking for clues of how the vehicle was cared for because the newest owner may not have any information. That is also why I feel it is my duty to bring them back to the best condition I can for the new owner as that is what they are paying me for.
sd25.jpg

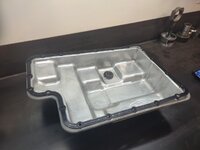
Pan cleaned and ready to be reinstalled once I obtain the correct filter.
sd26.jpg

Differential covers also cleaned and ready for reinstallation. Unfortunately, the owner doesn't want to spend the money on the time needed to bead blast and paint the covers.
sd27.jpg

Truck lowered back down and transmission allowed to drip overnight.
sd28.jpg


I'm not gonna lie, this is a hard one to work on. In conversations with the owner, I think he wants a pristine and clean ride, however, I also know he is not keen on the idea of adding up any more costs associated with the cosmetics. While I can appreciate the fact that he is at least having me get it mechanically sound as that is the most important, it is hard to not throw parts in the blasting cabinet and hit with some paint before reinstalling them.

Thanks for looking.
 
OP
Z

zmotorsports

ALLIANCE MEMBER
Joined
Oct 20, 2009
Messages
21,627
Location
Northern Utah
Well Mike as usual with all of your Fab products, this is OUTSTANDING! Better than anything you could have bought from Snap on. Well done Sir.

22170c0a839364416f020dd6ee78c28f.jpg


Thank you Scott. I appreciate that. I just added a couple of "tweaks" to the design, I didn't reinvent the wheel. Now I am kind of glad I never bought one 30 years ago. :bounce:
 

Nolift911

Well-known member
Joined
May 16, 2011
Messages
1,031
Location
Lansdowne, VA
Dig that beveled tool - could def use one of those.

Interesting they have all those wires, connectors, wiring looms etc just floating in trans fluid - or am I missing something?
 
OP
Z

zmotorsports

ALLIANCE MEMBER
Joined
Oct 20, 2009
Messages
21,627
Location
Northern Utah
Dig that beveled tool - could def use one of those.

Interesting they have all those wires, connectors, wiring looms etc just floating in trans fluid - or am I missing something?

The pneumatic deburring tool is a rather recent purchase. So far the jury is still out on my feelings about it.

As for the exposed wiring in the transmission, this is nothing new and has been around for decades. Even back into the 60's the GM TH400 had wiring for the kickdown function. No adverse effects from what I have ever seen, at least not if the transmissions remain within a normal operating range as far as temperatures go.
 

customh

Well-known member
Joined
Feb 18, 2013
Messages
564
Location
East Bethel, MN
I've been into the 6R80 in my '13 F-150 where they "upgraded" the design with the following "molded lead frame" with a bulkhead connector rather than having the wires and connectors bathed in ATF.

1731008957611.png
Plugs into all the solenoids on the valve body and has temp, input and output shaft speed sensors as well as the range selector (brown plastic section)
1731008965210.png
Guess what? If any of those sensors fail, you get to replace the whole part! Double bonus: You can't get the OEM part anymore without buying it bolted to the valve body assembly! Triple bonus: The spec is to check the Trans Fluid hot and the dipstick is a little plastic plug that must be accessed right next to the resonator of the exhaust pipe. I'll save the extended part of the story where I got a bad lead frame from NAPA and had to have the dealer put in the valve body assembly so the part would be under their 2 year warranty.

Can't complain too loud, the truck has been great for 205k miles other than this and a water pump.
 
OP
Z

zmotorsports

ALLIANCE MEMBER
Joined
Oct 20, 2009
Messages
21,627
Location
Northern Utah
Agreed Travis, many of the transmissions these days use a "module" design rather than individual sensors and/or solenoids and the only way to replace a faulty component, is the entire module assembly. Fortunately, these are relatively reliable and not what I would call problematic, but when they do fail it gets expensive.
 
OP
Z

zmotorsports

ALLIANCE MEMBER
Joined
Oct 20, 2009
Messages
21,627
Location
Northern Utah
Another well documented project. (y)

Very cool tool, did you make this Mike?

sd5.jpg

Thank you Scott. No, I didn't make this tool, I purchased it several years ago when the rear end jobs seemed to be pouring in the shop door. Previously I used a long tapered chisel but it always seemed to mar the sealing surface to some small degree. I ran across this tool about 6 or so years ago and couldn't believe what a simple design it was yet so effective in not damaging the sealing surfaces.

I can't remember who makes it but I want to say it is a Lisle tool.
 
OP
Z

zmotorsports

ALLIANCE MEMBER
Joined
Oct 20, 2009
Messages
21,627
Location
Northern Utah
That's a clean looking SD, mine has been in the shop getting the rear rebuilt 😕

I think the pictures are a bit misleading. While it isn't in terrible condition, it doesn't quite meet the definition of what I would call a "clean looking truck". It has potential but it's a bit rougher in person.

I think the owner is trying, but he's young and don't think he had the best influence of what properly caring for a vehicle is growing up so he is in the middle of a steep learning curve if he wants to keep this on the road long term. I'm trying to help him with that but all I can do is present my recommendations and whether or not he follows those are up to him.
 
OP
Z

zmotorsports

ALLIANCE MEMBER
Joined
Oct 20, 2009
Messages
21,627
Location
Northern Utah
Just ordered one of those, lol.

I am ordering one today.(y)

Hope you are pleased with it; I'm surprised the abuse it has taken over the years. I keep thinking I should probably order a replacement blade as it is interchangeable, but the original just keeps taking all of the abuse I throw at it.
 

ScepterToad

Well-known member
Joined
Nov 9, 2023
Messages
357
Nice work on the SD Mike. Having owned and run a (mostly stock) 6.0 for 300K, best advice I'd give is change the dang oil and use OEM filters for everything. That, and I swear by Archoil. Oil and fuel treatment.

Oh, and don't tune the dang thing. Just leave it alone.

Other goodies that are worth their price are a coolant filter after a VERY thorough flush, quality ELC, and a secondary (bypass) oil filter.
 
OP
Z

zmotorsports

ALLIANCE MEMBER
Joined
Oct 20, 2009
Messages
21,627
Location
Northern Utah
First order of the night was to remove the tires/wheels and orientate them for rotation when reinstalling. I mentioned the irregular wear when he was in my shop the other night and suggested a bit more attention be paid to the tires if he wants them to last.

The owner mentioned that he has not rotated the tires since he purchased the truck and the evidence is obvious.

I explained that on these larger lug, all-season and aggressive tires, the wear to the lugs can be exacerbated due to the large lugs hitting the surface in a heel-toe pattern and therefore inflation pressure is more critical just due to the nature of the tire's design. The wear will also be accelerated being on a turning axle due to scrubbing effect, but the heavily worn ball joints definitely aided in the tire's demise. However, by keeping them properly inflated and ensuring the suspension components are in proper condition and using proper rotation intervals, that even these large lug tires can be made to give decent life. I think he grew up where there was little to no thought of anything vehicle related other than put fuel in and go. He wants to take care of his vehicles, but I think he's feeling a bit overwhelmed by what it actually requires above just fueling and driving.

I walked him into my garage and showed him the wear on my 37" aggressive tires on my Jeep and how well they were wearing with 30k plus miles on them. They have a more aggressive tread pattern than his tires and are wearing true due to the rotation intervals that I stick to. I just wanted to show him it was in fact possible to stretch the tire's life by using preventive measures and keeping an eye on things between service intervals. I also explained that at this point the wear will not be reversible, but to think heavily about it on the next set of tires when the time comes. I mentioned that I will put these on the rear to try and flatten them out but not to expect much.
sd31.jpg

The rears are wearing pretty true, but that's a bit more expected on a non-turning axle due to the lack of exposure to scrubbing as well as the fact that they were at a more consistent tire pressure compared to the fronts. I also explained that he may experience some wander or what may be described as a grabbing feeling in the steering wheel for the first couple hundred miles on two-lane asphalt roads as the squared off shoulders will want to grab the ruts a bit more until they get rounded off a bit.
sd32.jpg

I applied some RTV to the differential covers and I like to allow them to "skin" or set a bit before installing.
sd35.jpg

While the RTV on the diff. covers was setting, I prepped the differential cover bolts for installation by taking them to the wire wheel and cleaning the corrosion off the threads as well as the previous RTV.
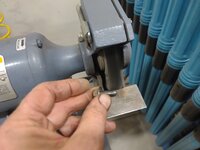
sd33.jpg

Front differential bolts cleaned and ready for installation.
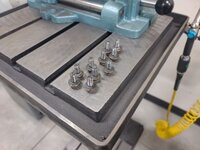
sd34.jpg

Before installing differential covers, I moved to the transmission and pulled the internal filter down from the body. The seal did not come down with the filter so when you pull the filters, look closely to ensure it didn't stick up in the case, which they generally do.
sd37.jpg

Yep, there it is, stuck up in the filter bore.
sd38.jpg

Carefully insert a prybar and grab only the seal's inside surface and give a slight pry to remove. Do not go in any further past the seal as you can easily gouge the aluminum bore and possibly create a path for air to be sucked in past the filter which can result in cavitation. Care here in seal removal is critical.
sd39.jpg

New filter with seal installed and a bit of Sil-Glyde applied to allow the filter to slide easily into the bore.
sd40.jpg

With the transmission ready to accept the pan I installed the front and rear differential covers. I like to very lightly snug them up and let sit for an hour or so before applying final torque to allow the sealant time to skin and not be completely squeezed out of the mating surface.
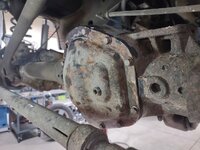
sd36.jpg

Stay tuned for more...
 
OP
Z

zmotorsports

ALLIANCE MEMBER
Joined
Oct 20, 2009
Messages
21,627
Location
Northern Utah
Continuing on.

With the filter installed in the transmission, it was time to clean the pan rails and prep for pan installation.
sd41.jpg

New gasket ready.
sd42.jpg

Pan installed and torqued to spec in a couple passes.
sd43.jpg

Transmission filter service completed.
sd44.jpg

Time to turn my attention to the external filter.
sd45.jpg

I don't know if that has ever been done either as I had a hard time breaking the canister loose from the body. I had to grab the long handled 1/2" ratchet for that one.
sd46.jpg

By the looks of the fluid and filter, this hasn't been done in a very, very long time, if at all. The sludge could be felt in the filter media.
sd47.jpg

Removing the old O-ring and cleaned the housing.
sd48.jpg

Old O-ring removed and new O-ring and filter ready to be installed. I also applied a thin layer of Sil-Glyde to the O-ring to help prevent damage during installation of the canister.
sd49.jpg

With the transmission service completed I popped the hood to move on to the brake fluid replacement/flush and noticed the heavy corrosion on the battery terminals. WOW, I just don't know where to stop on this thing and one thing just leads to another, then another and yet another.
sd50.jpg


It saddens me to see vehicles in such neglect and disrepair. However, on the plus side, I feel good about me being able to hopefully save one from the scrapyard and keep it on the road for the owner.

Stay tuned for more...
 
OP
Z

zmotorsports

ALLIANCE MEMBER
Joined
Oct 20, 2009
Messages
21,627
Location
Northern Utah
On to the last items of the night, brake fluid flush.

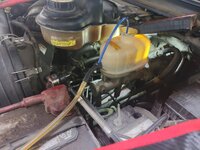
To begin, I pulled everything I could out of the reservoir. It was dark, but not quite as bad as I expected based on other fluids I have been experiencing on this truck. Maybe this was completed at some point in time.
sd51.jpg

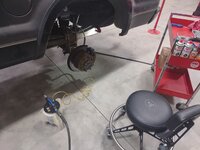
With fresh brake fluid in the reservoir, I went to each corner and pulled the fluid until nice clean fluid was coming out.
sd52.jpg

At each caliper the initial flow of brake fluid was extremely dark and then it cleared. This is why I never push the fluid back into the system when doing any brake work. When I need to push a caliper piston back into the caliper bore, I always crack the bleed screw and let the fluid from the caliper body be expelled so it doesn't get pushed back up into the ABS module and get it out of the system.
sd53.jpg


That is where I left off for the evening. I think the only thing I have remaining is to replace the front ball joints and refill the diffentials with gear oil.

Thanks for looking.
 
To avoid these ads, REGISTER NOW!
OP
Z

zmotorsports

ALLIANCE MEMBER
Joined
Oct 20, 2009
Messages
21,627
Location
Northern Utah
Nice work on the SD Mike. Having owned and run a (mostly stock) 6.0 for 300K, best advice I'd give is change the dang oil and use OEM filters for everything. That, and I swear by Archoil. Oil and fuel treatment.

Oh, and don't tune the dang thing. Just leave it alone.

Other goodies that are worth their price are a coolant filter after a VERY thorough flush, quality ELC, and a secondary (bypass) oil filter.

Thanks Keith. I agree about proper service intervals and routine maintenance being key followed by not adding a tune. Adding more power that these were designed for is a recipe for failures to show up. IF you are going to put more power to them, then you had better plan on doing everything associated with that choice because without the other upgrades, you will be in for a lot of failures.
 
OP
Z

zmotorsports

ALLIANCE MEMBER
Joined
Oct 20, 2009
Messages
21,627
Location
Northern Utah
I love the details that you give on everything. It’s better than a repair manual.
thanks !!

Thank you very much. Don't know about being better than the manual as most of it is just lessons learned over the years. I do hope the information is valuable though and it's not just me rambling. :ROFLMAO:


I don't know why manufacturers don't include drain plugs on diff covers, to save a few pennies.....

I'm not sure either. I know why they are not good on the Jeep axles. When the new JL model came out in 2018, they had installed drain plugs on the front diff's and I saw more than a few get hit and damaged or worse, knocked out and lost fluid.
 

Finallygotit

ALLIANCE MEMBER
Joined
Jul 6, 2013
Messages
4,120
Location
Tucson, AZ
Hope you are pleased with it; I'm surprised the abuse it has taken over the years. I keep thinking I should probably order a replacement blade as it is interchangeable, but the original just keeps taking all of the abuse I throw at it.
Mike, c'mon......if the blade does break, you can make a new one. Pffffftttt.....

😁

:beer:
 

PhantomEB

Well-known member
Joined
Feb 6, 2006
Messages
6,967
Location
Medicine Hat, AB, Canuckistan
Glad I not the only one who can change out diff and transmission fluid with actually caring!

can’t wait to add in a small bench top sandblaster to my assortment as I ain’t in the business to do work for others, so I will take the time to sandblast and paint covers…truck is getting one of those HD covers for extra fluid or cooling capabilities.
 
OP
Z

zmotorsports

ALLIANCE MEMBER
Joined
Oct 20, 2009
Messages
21,627
Location
Northern Utah
Glad I not the only one who can change out diff and transmission fluid with actually caring!

can’t wait to add in a small bench top sandblaster to my assortment as I ain’t in the business to do work for others, so I will take the time to sandblast and paint covers…truck is getting one of those HD covers for extra fluid or cooling capabilities.

Yeah, this is a hard vehicle to work on because I generally take the time to blast, paint/restore covers and brackets before reinstalling. However and unfortunately, what I've discovered over the past couple of years is that not everyone is willing to pay for such level of detail or workmanship. This is the first real side work I've done this year due to how busy I've been on my own stuff and my son's, but I really don't like taking on work these days where the client doesn't want the "full" treatment. I'm making an exception in this case trying to help the owner and won't be making a habit of it. I am not really willing to sacrifice the quality of the work I do, whether it be on my own assets or for someone else, however, with this truck I don't know where I'd stop once I started as it has been pretty neglected by the previous owner(s), but if I started I'd lose my *** because I wouldn't be able to stop and end up from one bumper to the other.

I do recommend a blasting cabinet because they are very useful for so many items in the shop. My bead blasting cabinet was the first large piece of shop equipment that I purchased new back in the late 80's and it has gotten the **** used out of it. I have gone through two sets of gloves, a gun and multiple nozzles over the past 3+ decades of use. I don't even know how many pounds of crushed glass media I have gone through. :unsure: It doesn't get used quite as much as it did back when I was doing street rods and restoration work, but it is still a valuable piece of equipment in the shop that sees regular use.
 

Bigblue&Goldie

Well-known member
Joined
Mar 12, 2009
Messages
10,811
Location
AZ
My F-450 rear diff cover bottom bolt acts as a drain plug. Best thing ever. I just serviced it the other day and it took minutes. There's no reason all diff covers aren't done this way.

I *might* do my CJ7 D44 diffs this weekend; I'm going to try some FelPro gaskets that get good reviews; I was gong to go with Lube Lockers, but I'm curious how these work out. My thought is if I have to peel a diff cover on the trail I can carry one tube of sealant that can serve other purposes, and the mating surface will already be clean(ish). I also don't plan on opening my diffs up for a few years, so $55 in diff gaskets didn't make sense to me.
 

XJSuperman

Well-known member
Joined
Jan 26, 2018
Messages
3,091
Location
Central Iowa
I *might* do my CJ7 D44 diffs this weekend; I'm going to try some FelPro gaskets that get good reviews; I was gong to go with Lube Lockers, but I'm curious how these work out.
LubeLockers have been awesome for me fwiw. I've got them on my XJ front and rear, the 14bolt in my GMC, and front/rear of my Yota pickup. Not having to deal with RTV was worth it by itself. I haven't checked out the FelPros though.
 

Bigblue&Goldie

Well-known member
Joined
Mar 12, 2009
Messages
10,811
Location
AZ
LubeLockers have been awesome for me fwiw. I've got them on my XJ front and rear, the 14bolt in my GMC, and front/rear of my Yota pickup. Not having to deal with RTV was worth it by itself. I haven't checked out the FelPros though.

I use them on some applications, but when service intervals are long, I usually just go with sealant because it's cheap and works.
 
OP
Z

zmotorsports

ALLIANCE MEMBER
Joined
Oct 20, 2009
Messages
21,627
Location
Northern Utah
My F-450 rear diff cover bottom bolt acts as a drain plug. Best thing ever. I just serviced it the other day and it took minutes. There's no reason all diff covers aren't done this way.

I *might* do my CJ7 D44 diffs this weekend; I'm going to try some FelPro gaskets that get good reviews; I was gong to go with Lube Lockers, but I'm curious how these work out. My thought is if I have to peel a diff cover on the trail I can carry one tube of sealant that can serve other purposes, and the mating surface will already be clean(ish). I also don't plan on opening my diffs up for a few years, so $55 in diff gaskets didn't make sense to me.

LubeLockers have been awesome for me fwiw. I've got them on my XJ front and rear, the 14bolt in my GMC, and front/rear of my Yota pickup. Not having to deal with RTV was worth it by itself. I haven't checked out the FelPros though.

I use them on some applications, but when service intervals are long, I usually just go with sealant because it's cheap and works.

I agree with all the above. From my experience with the Lube Lockers they are awesome. I've been using them and incorporating them into the quotes for my rear end builds for the past 12+ years now. Not a regret at all but I have no experience with the Fel-Pro ones.

I also agree with Ryan, that on long service intervals such as standard daily drivers, I use the sealant as it is inexpensive, reliable and just works.
 
OP
Z

zmotorsports

ALLIANCE MEMBER
Joined
Oct 20, 2009
Messages
21,627
Location
Northern Utah
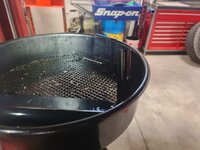
I have to stay reasonable so I been sticking with bench top units like this one gallon parts washer that I will be ****** ideas from the ’parts washer redux‘ thread here. Then i make little stands to keep them off the Bench!


Believe me, I completely understand about the space constraints and having to save valuable real estate wherever possible. For small brackets, diff covers, etc. the benchtop style will work perfect.

I "splurged" when I purchased my 24" x 36" one because I wanted something I could do exhaust manifolds, brake rotors, A-arms, etc. in and be proficient with. I have no regrets on the size cabinet I have and it has worked perfectly for the decades I've been using it. However, it seems like lately it is the smaller items that I use it for and not so much larger suspension or brake components like I used to.
 
OP
Z

zmotorsports

ALLIANCE MEMBER
Joined
Oct 20, 2009
Messages
21,627
Location
Northern Utah
Hope everyone had a nice weekend. It was a beautiful and about average weekend weather wise here along the Wasatch Front.


I arrived home Friday to find a couple of boxes of parts for the next side job I have coming in.
sah1.jpg

The discussion above pertaining to Lube Lockers made me think to post this picture as I had a Lube Locker arrive for the front and rear of a Jeep I have coming in next, along with an Eaton Truetrac for the front. I am still waiting for the rear Truetrac as well as the 5.13 gears and bearings which are being dropped shipped from the manufacturer and hopefully will arrive sometime this week so I can move right into it once the Super Duty is complete.
 
OP
Z

zmotorsports

ALLIANCE MEMBER
Joined
Oct 20, 2009
Messages
21,627
Location
Northern Utah
I then went to work on the Super Duty until the wife arrived home.

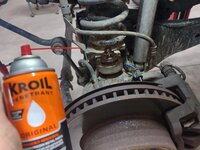
I began by hitting the ball joints with another shot of Kroil.
sd61.jpg

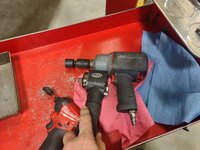
I grabbed my 1/2" IR impact gun that was already on the cart to remove the brake caliper bolts but it was too long. I grabbed my stubby 1/2", which I don't use nearly as often, but it was just the ticket to get into these tight spaces.
sd62.jpg

The stubby impact made short work of the brake caliper bolts and zipped them right out without any interference nor having to move other components out of the way.
sd63.jpg

Next was to remove the outer hub mechanism.
sd64.jpg

Then the vacuum line running to the knuckle.
sd65.jpg

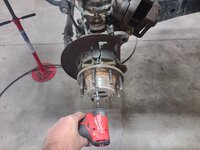
And then the stubby impact with a wobbly socket to remove the unit bearing nuts.
sd66.jpg

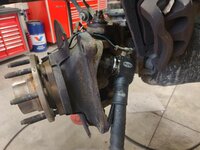
I next went to remove the tie rod from the knuckle and found both ends of the tie rod were shot, especially the passenger's side which was flopping around severely. I text a short video of my findings to the owner and then called my local NAPA to see if they had one of each in stock and had them set out on will call.
sd67.jpg

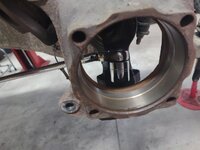
With the driver's side axle shaft and knuckle removed I stuck the vacuum up inside the axle tube and cleaned out the rust and debris.
sd76.jpg

I then drove the bushing out of the upper C and cleaned it on the wire wheel along with running a wire wheel around the mounting locations for the ball joints in the axle's C. This side is ready to accept the knuckle once the ball joints are replaced.
sd68.jpg

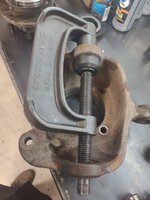
I grabbed the good ole' Snap-on ball joint press and drove the ball joints out of the knuckle.
sd69.jpg


At this point I inspected the ball joints that the owner brought me. I generally do not use parts supplied by the client, but I made an exception in this case because he said he had already purchased them. However, when he brought them to me, I questioned the age because they were all just dumped into a single box and some were not in the plastic bag.

I didn't question it too much at first, but when I got to the point of needing to press the new ball joints into the knuckle I discovered that the uppers were still in the plastic bags, but the lowers were not and were also missing the nuts, boots and snap-rings. I called the client and informed him of the missing parts for the lower ball joints and said I would need to get a couple of lowers. He said he would look around for the boots and snap-rings but I told him by the looks of the joints I would not install them. They looked like they had been bouncing around in the back of his truck for quite a while and I would not install those particular joints if I were to stand behind my work.

I called my local NAPA again and had them set out a couple of lower ball joints on will call to go along with the tie rods.

Stay tuned for more....
 
OP
Z

zmotorsports

ALLIANCE MEMBER
Joined
Oct 20, 2009
Messages
21,627
Location
Northern Utah
Continuing on with the Super Duty.

Saturday morning I hit the ground running with the objective to have the truck completed and back to the client later Saturday. That didn't happen unfortunately.

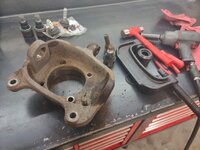
The ball joints removed from the driver's knuckle.
sd70.jpg

The knuckle cleaned up and top ball joint being pressed into place.
sd71.jpg

With no lower ball joints on hand, it was time to move on to the passenger's side for disassembly.

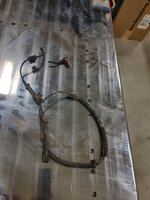
As I was removing components from the passenger's side, I found his ABS issue. During our test drive when he dropped it off, I noticed his ABS light was illuminated on the dash. I asked him about it and he said it had been on ever since he had a front wheel bearing replaced a few months ago, before I could get it into my shop. I found it odd that they replaced the unit bearing but didn't replace nor even mention the ball joints being bad. The tire shop who fixed a flat tire had been the ones who mentioned ball joints and by the condition of these ball joints, these were not a recent failure and had been going on for a while.

However, I found the ABS wire smashed between the unit bearing and the knuckle which had resulted in the wire being severed. Not only that, it prevented the unit bearing from firmly being seated into the knuckle 100%.
sd72.jpg

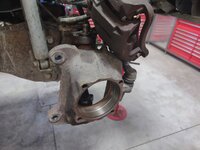
With the ABS wiring removed, axle shaft removed and unit bearing, I began to remove the knuckle.
sd73.jpg

I called my local NAPA again and they didn't show a listing for just the ABS wire, it came with a new bearing, but I hated to have to replace a $400 unit bearing that he just had replaced if I could obtain just the sensor and wiring. I was able to find an OEM part # online then cross-reference it back and NAPA was able to find me one that they could have later that afternoon.
sd74.jpg

Now to remove the knuckle from the passenger's side.
sd75.jpg

With the knuckle removed, axle tube vacuumed out and alignment bushing cleaned, the passenger's side was ready for reassembly once the knuckles were ready.
sd77.jpg

A tip when installing the boots on the ball joints, most have a grease channel so be certain that it points away from the brakes to avoid getting grease on the brake rotors.
sd78.jpg

With one side slipped onto the ball joint, then grab a pair of slip joint pliers and easily pull the boot onto the other side of the ball joint being careful not to cut or tear the boot.
sd79.jpg

I was then going to prep the axle shaft to accept the new vacuum seal when I discovered another failed part. The passenger's side outer axle U-joint was trashed. I made another short video clip and text it to the owner stating I'm sure he's getting tired of hearing from me. After getting the all clear to replace both, I called my local NAPA again to have them set a pair of u-joints out on will call as the pile of parts was now growing and my chances of having this completed by Saturday afternoon were slipping away.
sd80.jpg


Stay tuned for more.....
 
OP
Z

zmotorsports

ALLIANCE MEMBER
Joined
Oct 20, 2009
Messages
21,627
Location
Northern Utah
Last of the Super Duty for now.

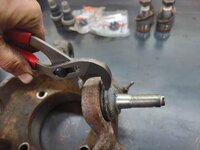
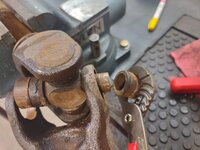
The retaining clips were corroded severely so a bit of digging around with a screwdriver to find the ends, then a shot of Kroil to creep into the rust and loosed them in their grooves.
sd81.jpg

Then the ball joint press was placed over the u-joints and tightened. Be careful here to not just hit it with a bunch of ugga duggas or you will deform and destroy the yoke. Put a little pressure on the joint and if it doesn't move at first, maybe give it one more ugga. Then hit the end of the threaded rod with a hammer with a good blow.
sd82.jpg

......and boom. The joint will generally pop loose and move a good .040" or so and allow more ugga duggas to be applied and push the bearing cups out of the yoke.
sd83.jpg

This was completely gone and the driver's side wasn't far behind.
sd84.jpg

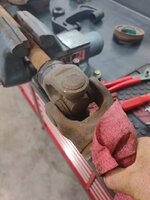
Continuing on with the u-joint removal process and now that the outer stub shaft is removed, time to remove the u-jont from the inner axle.
sd85.jpg

With the u-joint removed, it was time to clean up the yokes in preparation to accept the new u-joints once I picked them up.
sd86.jpg

I felt like I had half of my toolbox out for this job.
sd87.jpg

I ran a piece of emery paper around each of the yoke ears to remove any corrosion and it can easily accept the new bearing cups.
sd88.jpg

At that point I ran to my local NAPA and picked up all of the parts I had ordered previously. I am also starting to use the NAPA that is closer to where we now live. I have been using the one still near our old home because they are closer to my work and I can run on my lunches and pick up parts. However, over the past few years there have been more and more new faces in that particular NAPA store and I only know my good friend who is now an outside sales rep for them.

I also figured as I get nearer and nearer to retirement, I should probably begin to develop a rapport with the store that is only a couple miles from my home so I have started to use them once in a while. However, on this particular vehicle I have been using the closer one here in Ogden as my main source for parts and met the manager on Saturday.

Upon returning from picking up parts I just went through my list to make sure I had everything and called the owner to let him know I didn't think I would have his truck ready for him to pick up as we previously discussed.
sd89.jpg

About that time, my wife and DIL arrived home as they had been out shopping and went to lunch. They had just arrived and my grandson wanted to come out to "papa's shop" so I was able to see him for a little bit. As we were walking around outside, he headed for the garage saying "mo mo" as he knows right where the lawnmower is at. So we had to go inside the house garage so he could sit on and play with the riding mower.
maxmomo.jpg


Playing with him I didn't care any longer if the truck was done on Saturday or not, so it could wait.

Thanks for looking.
 
Last edited:
To avoid these ads, REGISTER NOW!
Top Bottom