To avoid these ads, REGISTER NOW!

ZMotorsports Shop Projects 2.0

To avoid these ads, REGISTER NOW!
OP
Z

zmotorsports

ALLIANCE MEMBER
Joined
Oct 20, 2009
Messages
21,495
Location
Northern Utah
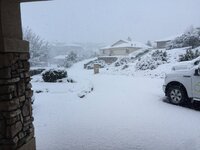
Mike your snow pile is cute. :)

IMG_4074.JPG

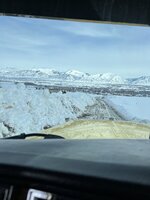
IMG_4082.JPG

Yeah Pat, but you've got a LOT more concrete than I do. Not to mention that you have the equipment to pile your **** deeper and higher. :ROFLMAO:

Although I mentioned to the wife that the pile in the backyard probably won't melt until May or June. It's only about 4' deep in the backyard but it's dense as hell from the snow being blown onto it.
 
OP
Z

zmotorsports

ALLIANCE MEMBER
Joined
Oct 20, 2009
Messages
21,495
Location
Northern Utah
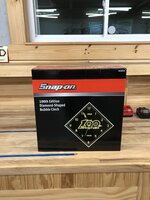
Mike you’re guilty for influencing my new shop clock and now I’m reading you have been looking at the same stool I have been thinking about. I’m sure this will have the same influence as the clock. Oh well, this is what overtime is for anyway. 138FE506-127A-4AA0-9F49-2522C269A5EF.jpeg

Congrats on the clock, or sorry, take your pick. :ROFLMAO:

I wouldn't necessarily call myself an influencer, kind of hate that terminology to be honest, but I get your gist.

Stay tuned as I will post up my thoughts once the Vyper stool arrives and if you've followed along for very long at all you'll know I will be brutally honest, good or bad, with my findings on the stool.

Thank you for continuing to follow along.
 

4 FN 27

ALLIANCE MEMBER
Joined
Oct 19, 2015
Messages
4,635
Location
Minnesnowta
Yeah Pat, but you've got a LOT more concrete than I do. Not to mention that you have the equipment to pile your **** deeper and higher. :ROFLMAO:

Although I mentioned to the wife that the pile in the backyard probably won't melt until May or June. It's only about 4' deep in the backyard but it's dense as hell from the snow being blown onto it.

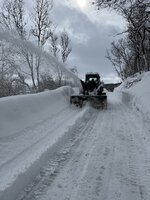
The first pic Mike, that area of the driveway is smaller than your driveway. :)

Now the pile behind the Chevelle...well that is 80 x 112 feet piled up. That pile has survived into June on 1 occasion. I have feeling it will be the same this year.

We are getting 2-4 tonight. And yes I am looking forward to it.
 

Blackbyrd

Well-known member
Joined
Nov 28, 2020
Messages
1,178
Location
TN
I look forward to you thoughts on the Vyper chair. Ive been eyeing a new shop chair outside of the cheap harbor freight jobs. I shutter everytime that thing shows up on my instagram feed.
 
OP
Z

zmotorsports

ALLIANCE MEMBER
Joined
Oct 20, 2009
Messages
21,495
Location
Northern Utah
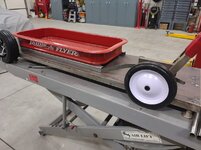
I had a little time last night after clearing snow so I thought I would get some time behind the welding hood and make some progress on the Radio Flyer chassis.

Rear corner gussets tacked in place.
rf20.jpg

Finished weld on the front crossmember.
rf21.jpg

Progress on the rear gussets. There was a little porosity from the previous weld on the outside radius that slightly contaminated the end of the gusset welds. These will get ground smooth and metal finished prior to paint.
rf22.jpg

rf23.jpg

rf24.jpg

rf25.jpg


Thanks for looking.
 
OP
Z

zmotorsports

ALLIANCE MEMBER
Joined
Oct 20, 2009
Messages
21,495
Location
Northern Utah
If you were closer I'd let you borrow my snow blower. The radio decided to **** out this morning so it's almost unbearable to use now so I doubt you'd even want to use it :headshake
KIMG1630.JPG

Thanks for the offer. I'm sure I'll survive.

Guess what? This is the second day this week I haven't had to go home and shovel snow. It's been sunny and beautiful here today. :D

Don't worry however, we're supposed to get another storm tomorrow, Saturday AND Sunday. 🤬
 
OP
Z

zmotorsports

ALLIANCE MEMBER
Joined
Oct 20, 2009
Messages
21,495
Location
Northern Utah
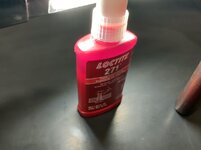
My new bottle of Loctite 271 showed up yesterday. Is it just me or did 50ml look like more years ago? :unsure: My old bottle has lasted me quite a few years but the new bottle was not even halfway full if you look at the fluid level line.
loctite2.jpg

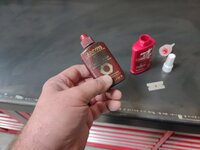
I had a little bit remaining in the old bottle so I added it to the new bottle and tossed the old bottle. Sad day tossing old containers, especially when I'm not as impressed with the new packaging. I do however, like the pull top spouts on the newer Loctite bottles though.
loctite1.jpg

Transition of duties is complete. :D
loctite3.jpg

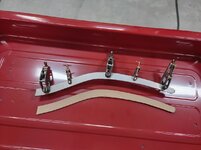
I then shifted gears and moved over to the Radio Flyer project again. I was supposed to have a 2000 Powerstroke come in last night but that job fell through and I was already in the shop so I marked and cut out the front frame horns. Then clamped them together to blend the profiles so they all matched.
rf26.jpg

They were very close just after cutting on the vertical bandsaw but a little blending with a Roloc disc sander and small drum roll will make them a perfect match.
rf27.jpg

Profiles matched, clamps removed and ready to deburr.
rf29.jpg

Mocked up with the chassis and tub for reference.
rf30.jpg

Final sanding in preparation for the next step.
rf31.jpg

Thanks for looking.
 
To avoid these ads, REGISTER NOW!

WoodsTruck

Well-known member
Joined
Jan 12, 2013
Messages
1,028
If Loctite was reading this thread, I would suggest they look at your used bottle and see where the heavy black smudged area is. Notice this area will cover the product number in the future. Place important information like a product number where it won't be hidden or worn off.

Looking forward to the wagon build.
 

LXCam

ALLIANCE MEMBER
Joined
Apr 23, 2013
Messages
19,216
Location
AZ
The wagons coming along nicely Mike, great job as always bud. As for loctite, I've got a luv hate relationship with the revised spout. Ya it does a better job of keeping the product fresher and provides better pin-point application. But what I've come to despise is it a spitter!. Every time I go to secure the top, they'll be a drop or two taking off like a champagne cork.
 

HEEP

Well-known member
Joined
Nov 20, 2007
Messages
121
Location
Chattanooga, TN
Mike, we learned at the plant that there is an expiration date on Loctite. Do we pay attention to it, probably not due to the amount we use, but it is something to keep in the back of your mind. Never saw any data to show how old versus new held, just know they put a date on it. Probably more for marketing than anything.
 
OP
Z

zmotorsports

ALLIANCE MEMBER
Joined
Oct 20, 2009
Messages
21,495
Location
Northern Utah
Thanks for the comments guys. The wagon is being used as filler currently between other tasks but I was able to get quite a bit done last night with a cancellation taking place.


The wagons coming along nicely Mike, great job as always bud. As for loctite, I've got a luv hate relationship with the revised spout. Ya it does a better job of keeping the product fresher and provides better pin-point application. But what I've come to despise is it a spitter!. Every time I go to secure the top, they'll be a drop or two taking off like a champagne cork.

Thanks Cam. I have been using this push/pull spout on the 242 and 262 for several years now and at first I would get the same pop of product when pushing the top closed after use. I then noticed a pattern that if closed immediately while the nozzle was still full of product it would blow out and waste product. If I would let the bottle sit for a few minutes after using and the product would drain back enough to open a clear path through then I could slightly squeeze the bottle slowly to push air out through the nozzle without pushing product out and then release quickly which would create a slight vacuum in the bottle and therefore pull the last remaining fluid back into the bottle and allow me to push the nozzle closed without any loss of product. At least that's how I've been addressing it lately and avoiding wasted material, especially when they don't fill the bottle to begin with.


Mike, we learned at the plant that there is an expiration date on Loctite. Do we pay attention to it, probably not due to the amount we use, but it is something to keep in the back of your mind. Never saw any data to show how old versus new held, just know they put a date on it. Probably more for marketing than anything.

That is correct, they state there is a shelf life. I believe Loctite states in their literature it is one year from opening. We had a rep come and give a seminar about 15 years or so ago and this question came up. He said that it is at least 2-years in fact but they keep 1-year in their literature. Sales tactic I'm sure.

When asked what the rate of degradation was after that 2-year mark and at what point is it worthless and will not perform as advertised, he could not answer nor provide any response at all. From my experience, again nothing scientific, but I generally go through a bottle every 2-3 years and have not had any adverse results in that time frame.

I find I use the 242 and 262 much more than the 271 however and therefore the 271 may be closer to 3+ years compared to the 242 and 262.
 
OP
Z

zmotorsports

ALLIANCE MEMBER
Joined
Oct 20, 2009
Messages
21,495
Location
Northern Utah
And herein is what kills it for me. If I don't do it immediately take action, they'll be a squirrel run by and it's allll over.


I'm sorry Cam, I can help with a lot of things but I don't have squirrels running through my shop so that's not a worry nor can I help. :ROFLMAO: Now in the event that it is "bumped" by me, then that is why I generally set it aside so it's not in line of sight for getting knocked over. ;)
 

signcrafter

Well-known member
Joined
May 9, 2012
Messages
12,535
I try to keep the cap on my right away also, When doing things like brakes I like to put loctite on the caliper bolts and some of the suspension bolts. So I usually have it on my rolling chair tray while reassembling and use it as needed. If I was using a lift I probably would set it on a work cart but if I do that with the car on jack stands I would have to get up and down every time I needed it. I'm getting too old for that. Maybe if I tell the wife I NEED a lift so I don't spill my loctite she would understand more? LOL.

I do need to pick up another bottle of loctite though so thanks for reminding me.
 

HEEP

Well-known member
Joined
Nov 20, 2007
Messages
121
Location
Chattanooga, TN
That is correct, they state there is a shelf life. I believe Loctite states in their literature it is one year from opening. We had a rep come and give a seminar about 15 years or so ago and this question came up. He said that it is at least 2-years in fact but they keep 1-year in their literature. Sales tactic I'm sure.

When asked what the rate of degradation was after that 2-year mark and at what point is it worthless and will not perform as advertised, he could not answer nor provide any response at all. From my experience, again nothing scientific, but I generally go through a bottle every 2-3 years and have not had any adverse results in that time frame.

I find I use the 242 and 262 much more than the 271 however and therefore the 271 may be closer to 3+ years compared to the 242 and 262.

I never got to ask the question of degradation, we just used that to make sure ours was not out of date. In the manufacturing world, we have to cover ourselves for warranty sake.
 

Bob Heine

ALLIANCE MEMBER
Joined
Oct 24, 2009
Messages
10,709
Location
Boca Raton, Florida
That is correct, they state there is a shelf life. I believe Loctite states in their literature it is one year from opening. We had a rep come and give a seminar about 15 years or so ago and this question came up. He said that it is at least 2-years in fact but they keep 1-year in their literature. Sales tactic I'm sure.
Mike, I should use more Loctite just to avoid throwing out almost full old bottles. I suspect mine has Roman numerals for the use-by date.

In a related matter, I sprayed some SPI Universal Clear on a pair of old headlights last weekend. Sanded the yellow off the surface with 800 grit and sprayed outside (82°F and no wind).
PT Cruiser Headlights 11.jpg
Checked the date on the bottom of the third-full gallon on the shelf and it's 1-31-10 (13 years old). The half-full quart of activator is dated 5-25-18 (under 5 years old). I wasn't sure it would be any good but it sprayed and looks better than any of the nearly new big box stuff on the shelf. Their clear doesn't yellow and I'm tired of polishing headlights to get rid of the haze and yellow so I'm putting a decent layer of high-solids clear with outstanding UV protection. The DeKups disposable liner and cap that I chose to re-use leaked and dribbled on the headlights so it's laid on pretty thick so I can cut and buff to eliminate the runs and blobs.
PT Cruiser Headlights 12.jpg
I spray Bloxygen in paint and activator cans before I put the lids/caps back on and I know that helps preserve them. However, I'm still impressed by the SPI products I've bought.
 
OP
Z

zmotorsports

ALLIANCE MEMBER
Joined
Oct 20, 2009
Messages
21,495
Location
Northern Utah
@Bob Heine those turned out freakin' awesome. Nice job on the headlights.

I think your Loctite with the Roman numeral dating system may need to be updated. :ROFLMAO:

As far as Loctite, I never used it growing up, hell, I don't even think I had heard of it until I started as an Industrial Maintenance Mechanic back in the late 80's but over the past 35 years now I have found that I use Loctite quite a lot.
 

bigdave_185

Well-known member
Joined
Feb 14, 2021
Messages
443
Location
Utah
I have been introduced to the glue stick version from working at L3 Harris.

Loctite 826034 442 Blue Quickstix 248 High Strength Threadlockers, 9 g, 3/4" Thread, 0.317 fl. oz. https://a.co/d/6My1XL

Seems to work the exact same and much less mess. Just wipe a stripe on the threads and call it

Loctite is an anaerobic product which means it needs lack of air to cure. I didn’t understand that at first but it definitely works lots better with clean well made threads. Not so much loos sloppy junk

Mike what’s the suspension going to be for the wagon? Or rigid ?
 

Finallygotit

ALLIANCE MEMBER
Joined
Jul 6, 2013
Messages
4,103
Location
Tucson, AZ
I don't know if it makes a difference or not but I keep my Loctite bottles in the fridge in the shop next to my beer. I'm hoping that the cooler temps will extend the shelf life.

Who knows.......

:beer:
 
OP
Z

zmotorsports

ALLIANCE MEMBER
Joined
Oct 20, 2009
Messages
21,495
Location
Northern Utah
I have been introduced to the glue stick version from working at L3 Harris.

Loctite 826034 442 Blue Quickstix 248 High Strength Threadlockers, 9 g, 3/4" Thread, 0.317 fl. oz. https://a.co/d/6My1XL

Seems to work the exact same and much less mess. Just wipe a stripe on the threads and call it

Loctite is an anaerobic product which means it needs lack of air to cure. I didn’t understand that at first but it definitely works lots better with clean well made threads. Not so much loos sloppy junk

Mike what’s the suspension going to be for the wagon? Or rigid ?

Dave, I've tried the solid version and actually carry them in the Jeep's toolbox but in the shop I prefer the liquid Loctite. Just personal preference.

The wagon won't have suspension, just rigid mounted axles.
 
OP
Z

zmotorsports

ALLIANCE MEMBER
Joined
Oct 20, 2009
Messages
21,495
Location
Northern Utah
I was able to spend a little time in the shop over the weekend so the next few posts will be quite picture heavy.

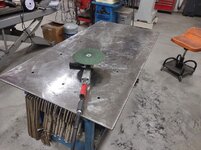
I have wanted to remove the mill scale from my fabrication table for oh, about 20+ years now so Friday night I finally took a couple of hours and removed the mill scale down to bright shiny metal. I would have loved to have had it blanchard ground but not in the cards, nor the budget so this was the next best thing. The table has had a few dents, dings and gouge marks put in it over the past 20+ years but it is still flat and relatively true.

I started by using a couple of Walter discs to remove the bulk of the mill scale trying not to stop or stall in an area creating a deeper mark. This seemed to actually work very well other than the shop floor was covered with black residue. I was going to push the table outside but as I arrived home the clouds set back in and temps dropped quicker than expected.

I started by clearing off my tools and parts from the Radio Flyer project and then commenced the mill scale removal with a Walter disc. The quadrant of the table closest and to the right already had much of the mill scale being worn away as that seems to be the area I work at most frequently and saw the most action.
table1.jpg

After the bulk of the removal I ran over it with a 50-grit 8" disc on my Snap-on pneumatic grinder.
table2.jpg

The step that I forgot to photograph was using my Scotchbrite rolls on the large drum style of surfacer. This really blended the 50-grit scratches out nicely. I went across it about 4 times in multiple directions. Last step was going over the entire surface with 80-grit sandpaper on a DA. As you can see there are a few dings, dents and low spots that were there prior that didn't blend but overall I am very pleased with the results after a couple hours of messy work.
table3.jpg

The fabrication table loaded back up with tools for more progress on the Radio Flyer project along with the swept floors.
table4.jpg

I know this will sound funny but the shop took on a completely different feel Saturday morning when I walked into it. Especially once I started working at the table. Can't quite put my finger on it but everything felt different.
 
Last edited:

OutlawDrifter

Well-known member
Joined
Jan 20, 2015
Messages
3,905
Location
KS
I know this will sound funny but the shop took on a completely different feel Saturday morning when I walked into it. Especially once I started working at the table. Can't quite put my finger on it but everything felt different.

It's that freshly renewed surface, sense of accomplishment, etc. I know the feeling well!
 
OP
Z

zmotorsports

ALLIANCE MEMBER
Joined
Oct 20, 2009
Messages
21,495
Location
Northern Utah
Making some progress on the front frame horns of the Radio Flyer wagon.

I had the outside curves cut previously but now was time to start on the upper and lower part of the frame horns. For those who aren't familiar with the frame of a 32 Roadster, the sides narrow slightly top to bottom and side to side as well as have a somewhat inward slope resulting in a "pinched" affect at the radiator mount. I had some trepidation over just how to accomplish this narrowing effect.

I started by taking some measurements at the frame and then just "guessing" at what would look good to gain the desired result in proportion to a full-size frame. I looked at some pictures on the internet and just marked out the upper and lower frame rails based on what I thought "looked" appropriate. I then figured if I used the un-cut side of the pieces, meaning the straight edge, placed to the outside then as I tacked and welded along the length it should pull the front inward slightly to match the narrower front tips.
rf32.jpg

I figured I could think it to death or just get on with it so to the vertical bandsaw I went to cut the tapers.
rf33.jpg

Right side tapered upper and lower sections cut.
rf34.jpg

Then it was over to the workbench to put the radius into the upper and lower sections.
rf35.jpg

Tweaking until it matched the vertical profiles.
rf36.jpg

More curvatures added.
rf37.jpg

Pretty damn close by hand and the last few minor adjustments could be done during tacking.
rf38.jpg

Tacking and moving along the length of the frame horn.
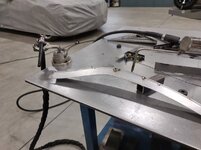
rf39.jpg

Upper frame section tacked and time to test fit to see if the desired results were being met. YEP. I can live with that.
rf40.jpg

Now it was time to tack weld the inside of the right frame horn.
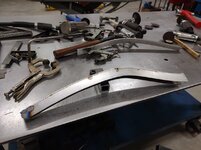
rf41.jpg

More pictures to follow.....
 
To avoid these ads, REGISTER NOW!
Top Bottom