
You are using an out of date browser. It may not display this or other websites correctly.
You should upgrade or use an alternative browser.
You should upgrade or use an alternative browser.
ZMotorsports Shop Projects 2.0
- Thread starter zmotorsports
- Start date
On a side note, I am so sick of that white **** this year. On our side of the mountain range we have gotten over 2 feet of snow in the last week. Temps still around 10 degrees in the mornings. I am so damn over winter….
OP
zmotorsports
ALLIANCE MEMBER
Now that makes sense to me….I was wondering why you said you needed to send in your old wheels. Pretty slick business model!
Yeah, I stumbled across the company and weighed that option carefully over the fall and winter not really deciding but I just haven't found anything I like more than the design of the OEM wheels right now. The chrome plating is amazing on these. I was really concerned but a guy on the Fifth Gen Camaro forum recently installed them on his 2010 and after some communicating with him and hearing his experience and feedback I figured that was the direction I wanted to go.
On a side note, I am so sick of that white **** this year. On our side of the mountain range we have gotten over 2 feet of snow in the last week. Temps still around 10 degrees in the mornings. I am so damn over winter….
You and me both. I know we need the moisture as we've had a few years of drought but this **** is getting old. I was looking at a few pictures the other day and I had the shop doors open and working with ambient temps in the mid-50's last year at this time. Besides the moisture we are still 15 degrees below normal for this time of year and I'm still running the heater in the shop each evening.
SilverJimmy
Well-known member
We’ve had either the 5th or 6th snowiest winter since they started measuring it in the late 1800’s. Woke up to this sky dandruff yesterday morning…
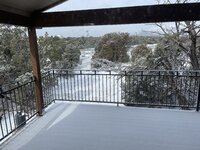
And it continued to snow all day into late last night! Since Flagstaff is right at 7000’ it’s not a surprise, in my 30 years here I’ve seen it snow, with accumulation, every month of the year except August! Many years Flagstaff gets more snow than anywhere else in the lower 48. Yes, I’m ready to move!
And it continued to snow all day into late last night! Since Flagstaff is right at 7000’ it’s not a surprise, in my 30 years here I’ve seen it snow, with accumulation, every month of the year except August! Many years Flagstaff gets more snow than anywhere else in the lower 48. Yes, I’m ready to move!
signcrafter
Well-known member
- Joined
- May 9, 2012
- Messages
- 12,468
It's 74 degrees here now Mike. BUT this afternoon we right in the middle of two storms coming together and the cold front will drop temps back down below freezing tonight and will be snowing tomorrow morning. I was going to head out this morning to Wisco but figured I better stay back and see what this storm does. They calling for tornados and high winds and are shutting down the schools early. Usually when they call for tornados we get tornados. Didn't want to be 6 hours away in case something happens to the house here.
OP
zmotorsports
ALLIANCE MEMBER
It's 74 degrees here now Mike. BUT this afternoon we right in the middle of two storms coming together and the cold front will drop temps back down below freezing tonight and will be snowing tomorrow morning. I was going to head out this morning to Wisco but figured I better stay back and see what this storm does. They calling for tornados and high winds and are shutting down the schools early. Usually when they call for tornados we get tornados. Didn't want to be 6 hours away in case something happens to the house here.
I don't blame ya Scott, I'd be sticking around as well. I'd be too much of a nervous wreck worrying.
Best of luck and hope it misses you.
WoodsTruck
Well-known member
- Joined
- Jan 12, 2013
- Messages
- 1,025
That is going to have a good balance of "shiny" between the car finish and the wheels. Not too gawdy taking the attention away from the chit eatin' grin on the driver.
rattle_snake
Well-known member
The chrome OEM wheels will look good on your, uh, GM product Mike. Like you I found many of the aftermarket options 'not for me', and opted for a stock looking wheel, but in steamroller width for sticky rubber.

OP
zmotorsports
ALLIANCE MEMBER
That is going to have a good balance of "shiny" between the car finish and the wheels. Not too gawdy taking the attention away from the chit eatin' grin on the driver.
The chrome OEM wheels will look good on your, uh, GM product Mike. Like you I found many of the aftermarket options 'not for me', and opted for a stock looking wheel, but in steamroller width for sticky rubber.
Thanks guys. Those were my EXACT thoughts when looking at wheels for the past 6 months. Looking for the right ratio of "bling" but not so much as to detract from the car's lines or beautiful color but more to enhance both. I just kept coming back to the fact that I really like the OEM wheel design, just not in painted fashion. Everything I was looking at was getting compared to the OEM wheels and then when I stumbled across LA Wheel who had an exchange program for their chrome plated version of the OEM wheel I thought it was a win/win. Sometimes less is more. However, if I was building a race car or drastically altering the car's personality then I did find a couple others that would fit the bill, but for a pretty much stock appearing car I think the OEM did a pretty good job of designing the wheels. Even if it is a GM Justin.

Scuderia-F1
Well-known member
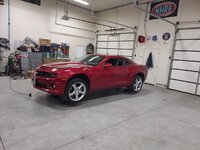
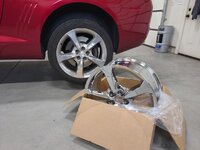
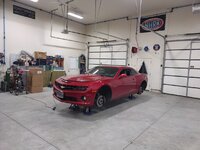
Now THAT is the proper wheelchoice for that car.My new wheels arrived for the Camaro yesterday so I put the car on jackstands and removed the tires/wheels in preparation to have the wheels swapped around. If the weather will cooperate this weekend I would like to get them swapped around so I can get the OEM wheels packaged up and sent back. Wouldn't ya know it we have snow again this morning.
Car cover removed and on jackstands ready to pull tires/wheels.
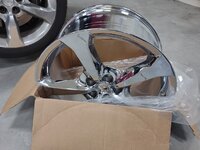
I opened up each box to ensure the wheels were undamaged and get a glance at the awesome chrome work.
Beautiful chrome job and should really pop on the car, especially after I polish the paint out.
Looks a little sad sitting there, like it was left in the hood unsupervised.
Tires/wheels ready to load up and take to the tire shop once the weather clears.
Thanks for looking.


OP
zmotorsports
ALLIANCE MEMBER
Now THAT is the proper wheelchoice for that car.
Thanks Anders. I agree. Everything I kept looking at I was comparing to the OEM wheels but just didn't care for the painted finish. This will be the best of both worlds.
 Just enough bling to make them stand out but not enough to be gaudy...
OP
zmotorsports
ALLIANCE MEMBER
So the next couple of posts will be picture heavy again.
I dropped the tires/wheels off Saturday morning to have them mounted and balanced then came back home to commence the paint correction.
So far I'm about 5 hours into the paint correction and I have the front clip completed. It's slow going but well worth it when you see the results.
I know a few had asked for a video so I am recording how I perform a paint correction so a video will be posted to my YouTube channel once the car is complete. I must state that I am old school when it comes to cutting and buffing paint. I use older products and not the fancy smancy one-step polishing techniques that seem to be so popular by much of the DIY crowd. I have found that the single step process don't remove all of the scratches as they use a less aggressive compound along with the DA type polishers. I've seen some nice work but if you look closely enough you can still see scratches and that just seems like a lot of work for less than perfect results.
The process I use consists of 3M polishing compounds and a combination of wool and foam polishing pads along with a standard circular polisher rather than a DA style. I first use a clay bar with lubricant/detailer to remove any tree sap or residue before going to the first step of compound which is rather course and a white wool pad.
I also go one step further and mask off trim items and other accessories to avoid any compound getting into them, especially the textured black trim as anyone who has gotten compound in those knows how much fun it is to remove later.
Tools and supplies used.

Clay bar on the hood, roof, trunk lid, top of front fenders and top of rear quarters. I also noted a few spots with yellow masking tape as I went around the car with the Final Inspection detailer prior to breaking out the clay bar. I hit those few spots as well before wiping down and prepping for compounding.


This part isn't necessary but sure pays off huge dividends when it comes to final detailing. I also waffled on removing the small Camaro badging on the front fenders as I generally debadge all of my vehicles. However, seeing as how I am going for the clean, stock look on this car to someday be able to hand down, I went ahead and left the badges on the car, just masked them off to prevent compound from getting packed in them. Also kept the hood popped slightly while polishing the hood. If you note in later pictures you'll notice the hood being closed to avoid catching the edges.

It's hard to see in the pictures but there are an awful lot of small micro-scratches on the hood, tops of fenders and front bumper cover above the headlights. It appears as though it was driven through a lot of car washes but can't be certain as to the cause of the scratches.

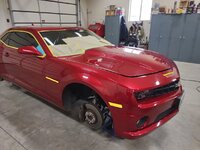
First step. Course compound and white wool pad on the hood. You can see the heavy swirl marks from the course compound as I had to get rather aggressive to remove the scratches.

The driver's side has now had the second step completed and you can already see the difference from the first picture. Step two consists of 3M's Finesse-It compound and a yellow wool pad which is a step finer from step #1. The heavy swirl marks are disappearing and the depth of the shine is really starting to come on strong. I have one rock chip on the front quadrant of the driver's side hood that is quite deep and through the clear, everything else is coming out perfectly.

Another shot of step # 2 completed, trying to catch the light from the window and you can see the clarity in the paint.

The front two corners of the bumper cover had a lot of scratches but after a heavy polishing using the course compound and white wool pad they are a thing of the past. Also had a few around the mail slot which quickly disappeared. The lip along the grille between the headlights was actually in decent shape but after a couple passes with the compound and polisher it looked even better.

More pictures to follow.....
I dropped the tires/wheels off Saturday morning to have them mounted and balanced then came back home to commence the paint correction.
So far I'm about 5 hours into the paint correction and I have the front clip completed. It's slow going but well worth it when you see the results.
I know a few had asked for a video so I am recording how I perform a paint correction so a video will be posted to my YouTube channel once the car is complete. I must state that I am old school when it comes to cutting and buffing paint. I use older products and not the fancy smancy one-step polishing techniques that seem to be so popular by much of the DIY crowd. I have found that the single step process don't remove all of the scratches as they use a less aggressive compound along with the DA type polishers. I've seen some nice work but if you look closely enough you can still see scratches and that just seems like a lot of work for less than perfect results.
The process I use consists of 3M polishing compounds and a combination of wool and foam polishing pads along with a standard circular polisher rather than a DA style. I first use a clay bar with lubricant/detailer to remove any tree sap or residue before going to the first step of compound which is rather course and a white wool pad.
I also go one step further and mask off trim items and other accessories to avoid any compound getting into them, especially the textured black trim as anyone who has gotten compound in those knows how much fun it is to remove later.
Tools and supplies used.
Clay bar on the hood, roof, trunk lid, top of front fenders and top of rear quarters. I also noted a few spots with yellow masking tape as I went around the car with the Final Inspection detailer prior to breaking out the clay bar. I hit those few spots as well before wiping down and prepping for compounding.
This part isn't necessary but sure pays off huge dividends when it comes to final detailing. I also waffled on removing the small Camaro badging on the front fenders as I generally debadge all of my vehicles. However, seeing as how I am going for the clean, stock look on this car to someday be able to hand down, I went ahead and left the badges on the car, just masked them off to prevent compound from getting packed in them. Also kept the hood popped slightly while polishing the hood. If you note in later pictures you'll notice the hood being closed to avoid catching the edges.
It's hard to see in the pictures but there are an awful lot of small micro-scratches on the hood, tops of fenders and front bumper cover above the headlights. It appears as though it was driven through a lot of car washes but can't be certain as to the cause of the scratches.
First step. Course compound and white wool pad on the hood. You can see the heavy swirl marks from the course compound as I had to get rather aggressive to remove the scratches.
The driver's side has now had the second step completed and you can already see the difference from the first picture. Step two consists of 3M's Finesse-It compound and a yellow wool pad which is a step finer from step #1. The heavy swirl marks are disappearing and the depth of the shine is really starting to come on strong. I have one rock chip on the front quadrant of the driver's side hood that is quite deep and through the clear, everything else is coming out perfectly.
Another shot of step # 2 completed, trying to catch the light from the window and you can see the clarity in the paint.
The front two corners of the bumper cover had a lot of scratches but after a heavy polishing using the course compound and white wool pad they are a thing of the past. Also had a few around the mail slot which quickly disappeared. The lip along the grille between the headlights was actually in decent shape but after a couple passes with the compound and polisher it looked even better.
More pictures to follow.....
OP
zmotorsports
ALLIANCE MEMBER
Continuing on with the paint correction.
Here you can see the aggressiveness of the first step of compound on the bumper cover where I had to really get it to bite in and remove the scratches.

More evidence of the aggressiveness can be seen here with the heavy swirl marks.

Moving on to step #2 using the Finesse-It and yellow wool pad. Results are already evident.

The lip above the license plate and between the headlights/grille area is looking great as well.

Next I'm ready to move on to step #3. This is where I varied from the past a bit. I generally use the finer Finesse-It compound here along with a black foam pad. However, I have read some good reviews on this somewhat finer blue foam pad as the final step so I bought one to try. So far I really like the blue foam pad for the third and final machine step as I feel it does a bit better job than the black foam pad for bringing out that deep wet look of the paint.

Here is after only a couple of passes with the 3rd step and already doesn't even look like the same car.

The depth is just jumping out at ya...

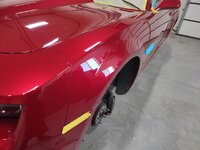
The front corners of the bumper cover just pop with light reflection and depth.


More pictures to come....
Here you can see the aggressiveness of the first step of compound on the bumper cover where I had to really get it to bite in and remove the scratches.
More evidence of the aggressiveness can be seen here with the heavy swirl marks.
Moving on to step #2 using the Finesse-It and yellow wool pad. Results are already evident.
The lip above the license plate and between the headlights/grille area is looking great as well.
Next I'm ready to move on to step #3. This is where I varied from the past a bit. I generally use the finer Finesse-It compound here along with a black foam pad. However, I have read some good reviews on this somewhat finer blue foam pad as the final step so I bought one to try. So far I really like the blue foam pad for the third and final machine step as I feel it does a bit better job than the black foam pad for bringing out that deep wet look of the paint.
Here is after only a couple of passes with the 3rd step and already doesn't even look like the same car.
The depth is just jumping out at ya...
The front corners of the bumper cover just pop with light reflection and depth.
More pictures to come....
OP
zmotorsports
ALLIANCE MEMBER
Continuing on with the last of the pictures of the front clip.
The 3rd step completed on the hood and front bumper cover as well as front fenders.
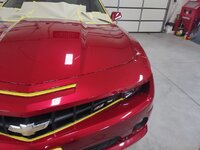

LOVE this picture. The aggressive appearance of the front of the Fifth Gen along with a deep luster of the Crystal Red Tintcoat paint just do it for me.


That is about a third of the car done.
Thanks for looking.
The 3rd step completed on the hood and front bumper cover as well as front fenders.
LOVE this picture. The aggressive appearance of the front of the Fifth Gen along with a deep luster of the Crystal Red Tintcoat paint just do it for me.
That is about a third of the car done.
Thanks for looking.
XJSuperman
Well-known member
I might have missed it Mike, but do you discuss how/if you wash/clean the pads when all is finished? In between working on the car, like now with a 3rd finished, do you clean the pads before resuming again? I'm pretty clueless in the detailing dept.
OP
zmotorsports
ALLIANCE MEMBER
I might have missed it Mike, but do you discuss how/if you wash/clean the pads when all is finished? In between working on the car, like now with a 3rd finished, do you clean the pads before resuming again? I'm pretty clueless in the detailing dept.
In the video I show how I clean the pads to get them ready to accept fresh compound. I don't wash my polishing pads or much of anything for that matter after I'm done other than a quick spin with the spur. However, I do get pretty aggressive with the spur to remove any old residue and prepare them to accept fresh compound when I start again.
Finallygotit
ALLIANCE MEMBER
Mike, I bet that paint is really going to pop when you roll the car out into the sunlight.
Very nice work, sir!

Very nice work, sir!
Trapps
ALLIANCE MEMBER
Mike,
Thanks for sharing your paint correction technique!
Thanks for sharing your paint correction technique!
OP
zmotorsports
ALLIANCE MEMBER
Mike, I bet that paint is really going to pop when you roll the car out into the sunlight.
Very nice work, sir!
Thank you Dan. I think it will really pop in the sun as well. I was surprised just how much better it looked under indirect lighting.
Indeed it will! It should compliment the ginormous rear wing after Mike bolts it on🫣
There's so much wrong with that I don't know where to begin.....
Mike,
Thanks for sharing your paint correction technique!
You're welcome. I hope it all made sense. Again, it's kind of an old school technique but it has worked for me to 30+years and won a few best of paint and people's choice awards over the years when we were building street rods/muscle cars. In all honesty, I'm kind of glad I don't do paint & body any longer as it is a lot of work and quite a drawn out process to achieve mirror like results.
MadeByMiller
Well-known member
Thank you for showing us your process, really looking forward to the video once it's complete! So Is it correct that you only clay bar the top/horizontal surfaces of the body, not the whole vehicle?
OP
zmotorsports
ALLIANCE MEMBER
Thank you for showing us your process, really looking forward to the video once it's complete! So Is it correct that you only clay bar the top/horizontal surfaces of the body, not the whole vehicle?
Austin, I know some people choose to clay bar every inch of the painted surfaces and I know many that forego the clay bar step altogether and just go immediately to compounding once the surface is clean. I guess I'm kind of in the middle of the crowd as I clay bar the top (horizontal) surfaces plus as I'm washing or using a detailer to clean I can feel anything that either snags the towel or feels rough under the towel and I use a small piece of masking tape to highlight the spot. When clay barring the horizontal surfaces I will then also hit those areas that I stuck masking tape on before continuing on with the compounding steps.
OP
zmotorsports
ALLIANCE MEMBER
Last week was the wife's birthday and we really didn't do anything special as all she wanted to do was get some take-out from an Italian restaurant that we frequent and stay home and relax after a quick birthday snuggle with her grandson.
So I thought I'd surprise her on Sunday with a somewhat different breakfast than our usual. There is a small cafe' in Midway, UT which is about 85 miles from our place that we've eaten at a few times when taking a Sunday drive. Midway is a small town with a Swiss theme to it and during the summer actually has a cool Farmer's Market in the park next to their town hall that we'll walk around. Also during warmer months we'll take a mountain pass back home called Guardsman's Pass which is quite pretty, actually fantastic in late September/early October when the leaves are turning. It is very narrow and winding as it skirts along the mountain side before going up and over and dropping down into the valley as we head west back home. The town of Midway is kind of our of the way and nowhere near as hoity toity or uppity as say a Park City or a Telluride, so it's tolerable to me. The cafe' is a really small place that has outdoor seating and only about 4-5 small tables indoors. To keep their doors open during the winter months they setup what they call Alpenglobes which are large plexiglass globes that are heated with a table in the center. These globes are approx 8-10 feet in diameter with 360-degree visibility. They seat between 6-8 people and on their website looked pretty cool. I thought it would be neat to sit in one and eat breakfast with snow all around so I made reservations last week for Sunday morning. During the drive up there the weather was less than ideal as we encountered some rain and snow but as soon as we pulled into the little town of Midway the sun came out. It was an awesome breakfast as we sat, drank some coffee and enjoyed some fantastic food. During the drive we saw several hundred head of elk and quite a few deer as well, even saw a coyote alongside the highway just outside of town.
I didn't get any pictures of the globes but I did snap a picture while we were sitting in ours and you can see how high the snow is surrounding the globe as well as the globe next to ours for a visual.

Then last night as I was closing up the shop and heading into the house the snowflakes started falling again as well as some hellacious wind accompanying it.
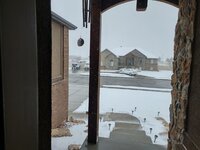


Woke up this morning to a couple more inches of snow and as I was leaving our subdivision I encountered several rather large snow drifts crossing the roads from the high winds overnight.
I am ready for spring.
So I thought I'd surprise her on Sunday with a somewhat different breakfast than our usual. There is a small cafe' in Midway, UT which is about 85 miles from our place that we've eaten at a few times when taking a Sunday drive. Midway is a small town with a Swiss theme to it and during the summer actually has a cool Farmer's Market in the park next to their town hall that we'll walk around. Also during warmer months we'll take a mountain pass back home called Guardsman's Pass which is quite pretty, actually fantastic in late September/early October when the leaves are turning. It is very narrow and winding as it skirts along the mountain side before going up and over and dropping down into the valley as we head west back home. The town of Midway is kind of our of the way and nowhere near as hoity toity or uppity as say a Park City or a Telluride, so it's tolerable to me.
The cafe' is a really small place that has outdoor seating and only about 4-5 small tables indoors. To keep their doors open during the winter months they setup what they call Alpenglobes which are large plexiglass globes that are heated with a table in the center. These globes are approx 8-10 feet in diameter with 360-degree visibility. They seat between 6-8 people and on their website looked pretty cool. I thought it would be neat to sit in one and eat breakfast with snow all around so I made reservations last week for Sunday morning. During the drive up there the weather was less than ideal as we encountered some rain and snow but as soon as we pulled into the little town of Midway the sun came out. It was an awesome breakfast as we sat, drank some coffee and enjoyed some fantastic food. During the drive we saw several hundred head of elk and quite a few deer as well, even saw a coyote alongside the highway just outside of town.I didn't get any pictures of the globes but I did snap a picture while we were sitting in ours and you can see how high the snow is surrounding the globe as well as the globe next to ours for a visual.
Then last night as I was closing up the shop and heading into the house the snowflakes started falling again as well as some hellacious wind accompanying it.
Woke up this morning to a couple more inches of snow and as I was leaving our subdivision I encountered several rather large snow drifts crossing the roads from the high winds overnight.
I am ready for spring.
OP
zmotorsports
ALLIANCE MEMBER
My porch view is similar this morning, maybe a bit more snow, as roads and concrete are covered as well. Looks like a fun “date“ breakfast! Thanks for sharing pics Mike, I’ve never seen pods like that.
Yeah, they were kind of cool and I've never seen or eaten in pods like that either. It's kind of expensive to reserve a globe so not something someone could do very often but for a special occasion it was kind of nice. She sure enjoyed it, although she was anxious driving so far in the **** weather Sunday morning. There was only a 40% chance of snow on Sunday morning so figured we'd experience some weather at least through the canyon if nowhere else and figured we'd better allow a bit more time to compensate for road conditions. Trying to get her to leave the house at a very specific time was not exactly fun as she didn't understand why I was being so adamant that we had to leave so early and at such a specific time. I was trying to give us some wiggle room to drive the 85 miles not knowing how bad the roads would be going through Weber Canyon and as we got closer I was pushing the speed a bit but we made it exactly on time. I had hoped we'd arrive 15-20 minutes early and drive around the town for a few minutes but we turned the corner and someone was backing out of a parking spot and we backed right in exactly at our reservation time. Wheew.
Ole Slewfoot
Well-known member
Omg, we are not going to live in domes on Mars, it will happen right here!
steves_001
Well-known member
Camaro looks great! Finesse-it still a great product and was my go to when I was into painting etc. never disappointed.
SilverJimmy
Well-known member
My wife and I have had pet cats for years so I’m experienced in “Wife” herding, but it’s still a challenge to get out the door on time sometimes, but I’m getting better according to her!
OP
zmotorsports
ALLIANCE MEMBER
Camaro looks great! Finesse-it still a great product and was my go to when I was into painting etc. never disappointed.
Thank you. Yes, I also still like the Finesse-It polish as I've been using it for many, many years now and like you, never have been disappointed with its performance. It works great as step #2 after compounding to remove heavy swirl marks OR I use also use it if I just want to "touch-up" an area and don't have a lot of heavy scratches to remove. The rear bumper cover and lower trunk lid were treated to Step #2 and #3 last night as they didn't have any scratches to speak of. The top of the trunk lid was a different story however, as there were quite a few scratches much like the hood that needed to be removed.
My wife and I have had pet cats for years so I’m experienced in “Wife” herding, but it’s still a challenge to get out the door on time sometimes, but I’m getting better according to her!
When you have it mastered Sterling, please share you wisdom with us less knowledgeable folks here.
Finallygotit
ALLIANCE MEMBER
Waiting here impatiently!!When you have it mastered Sterling, please share your wisdom with us less knowledgeable folks here.
OP
zmotorsports
ALLIANCE MEMBER

OP
zmotorsports
ALLIANCE MEMBER
You just tell them to be ready 30 - 60 mins before needed...c'mon fellas!
Like that makes a difference, newb......
 Hell that trick was used 35 years ago when we were dating. She was on to that one instantly.
OP
zmotorsports
ALLIANCE MEMBER
I'm getting quite tired of shoveling snow each morning before work. THIS **** IS GETTING OLD!!! It's April for hell's sake.
Had another 1.5" or so overnight and the roads were slick as snot this morning.


On the flip side, I actually hung the snow shovel on the wall when I was done shoveling this morning. My wife stuck her head out into the garage to see why I hadn't left yet and saw me hang the shovel on the wall. She said "are you sure you want to do that? You may not be done with it yet". I said the hell I'm not......
The weather actually shows that by the weekend it's in the 60's and by Monday we are supposed to hit the 70's here. I WANT to believe it but not sure. Although I did hang the shovel up..
Had another 1.5" or so overnight and the roads were slick as snot this morning.
On the flip side, I actually hung the snow shovel on the wall when I was done shoveling this morning. My wife stuck her head out into the garage to see why I hadn't left yet and saw me hang the shovel on the wall. She said "are you sure you want to do that? You may not be done with it yet". I said the hell I'm not......
The weather actually shows that by the weekend it's in the 60's and by Monday we are supposed to hit the 70's here. I WANT to believe it but not sure. Although I did hang the shovel up..
OutlawDrifter
Well-known member
We had 88* and wind yesterday...lots and lots of gusty wind.
That was followed up last night with severe thunderstorms. Just to the northeast of us they had golfball sized hail, glad we missed that!
That was followed up last night with severe thunderstorms. Just to the northeast of us they had golfball sized hail, glad we missed that!
MadeByMiller
Well-known member
Odd question, but what snow shovel do you use Mike?
OP
zmotorsports
ALLIANCE MEMBER
Odd question, but what snow shovel do you use Mike?
Austin, for the small (1-2 inches) amounts I have a couple of the Snowplow Snow Pusher UHMW shovels (24" and 30")
When the snow gets past that I fire up the Toro snowblower and go to town with that.
Finallygotit
ALLIANCE MEMBER
Ain't that the truth!Like that makes a difference, newb......
Honch
Well-known member
I bought one of these shovels about 7 years ago and have not touched a regular snow shovel since, I can get out our toro and my wife can clear just as fast with this shovel, depending on how wet the snow is. The beauty is there is no lifting involved, and you can push it well off the area your clearing so no big pile buildups. The part it worked the best at was clearing out the bottom of the driveway after the plow went by, it was easy to get 75lb on it and slide it out of the way.Austin, for the small (1-2 inches) amounts I have a couple of the Snowplow Snow Pusher UHMW shovels (24" and 30")
When the snow gets past that I fire up the Toro snowblower and go to town with that.
Tim in Indiana
Well-known member
I have a big paved drive area like yours at my place in Northern Wisconsin. We get a lot of snow there.
I use a 42" Manplow and it works great. I push everything to the outer edges and then just make 1 or 2 passes around the perimter edges with the snowblower. Keeps me from having to double or triple blow snow to get it off the pavement. I can clear the drive in a fraction of time this way versus just using the blower only.
With the optional Power-U handle you can really lean into it and push a bunch of snow. Especially if it is cold and light snow.
Manplow
I use a 42" Manplow and it works great. I push everything to the outer edges and then just make 1 or 2 passes around the perimter edges with the snowblower. Keeps me from having to double or triple blow snow to get it off the pavement. I can clear the drive in a fraction of time this way versus just using the blower only.
With the optional Power-U handle you can really lean into it and push a bunch of snow. Especially if it is cold and light snow.
Manplow