To avoid these ads, REGISTER NOW!

ZMotorsports Shop Projects 2.0

stockerwithalocker

Well-known member
Joined
Dec 26, 2015
Messages
78
Location
So Cal
Mike, early in your video i believe i spotted a reference book for electrical troubleshooting, but couldn’t catch the name. Mind showing what the book is titled and any feedback on it or other sources you suggest? I’m still trying to make time to watch the vid, i’m to the ratchet drawer over the past few days so there might be more questions.
 
To avoid these ads, REGISTER NOW!

JCQuick

Well-known member
Joined
Nov 29, 2008
Messages
4,933
Location
Apopka Fla.
Funny story Sterling.

While my son and I were working on his Jeep the other day, my DIL brought my grandson over to hang out in the shop with us while we worked. I LOVED it and loved watching him absorb everything (that's not the funny part though).

My wife heard us out there with my grandson so she came out as well. My son was putting an air tool back in the drawer and made a comment about how it didn't fit and the drawer would hit them when closing. I just off-handedly mentioned that "yeah, it's a tight fit and things have to go in a certain order and orientation as I am out of room in my toolbox".

My DIL said "oh, I bet Snap-on makes a bigger toolbox". Without evening blinking my wife told her to be quiet. :ROFLMAO:
You have no idea how hard i just laughed over that statement
 
Last edited:
OP
Z

zmotorsports

ALLIANCE MEMBER
Joined
Oct 20, 2009
Messages
21,477
Location
Northern Utah
Mike, early in your video i believe i spotted a reference book for electrical troubleshooting, but couldn’t catch the name. Mind showing what the book is titled and any feedback on it or other sources you suggest? I’m still trying to make time to watch the vid, i’m to the ratchet drawer over the past few days so there might be more questions.


Thanks for taking the time to watch the video. I'm happy to answer anything I can.

The book is called "Fundamental Electrical Troubleshooting". If memory serves I think I bought it from AES Wave when I purchased some of my other diagnostics tools or equipment. It is an easy read and broken down really well into various sections and components. Both explaining and aiding to diagnose.

It's a nice guide to have readily available for quick reference when needed.
 
OP
Z

zmotorsports

ALLIANCE MEMBER
Joined
Oct 20, 2009
Messages
21,477
Location
Northern Utah
Last night my son came over to work on his Jeep and while he was cleaning components in the solvent tank, I did a quick machining job for a vent fitting on our coach's 150-gallon diesel fuel tank.


I am separating the tank's vent line from the return line coming from the FASS pump that I added several years ago. This will allow the FASS to have its own dedicated return directly into the tank and the vent will be several feet away.

Rather than remove the tank to weld a bung onto it, I opted to machine a fitting flange to accept the vent line and check valve assembly. This will secure to the tank with threaded inserts and have a gasket between the flange and the tank held in place by four 8-32 socket head screws, same as the OEM sending unit that will reside right next to it. I realize there are commercially available flanges for this purpose, however, I wanted one a bit thicker where I could machine a small recess on the backside to provide clearance for the head or flange of the threaded insert.

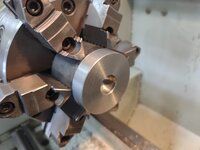
Starting point using a piece of 2.250" diameter 1045 round stock from my assortment.
vent1.jpg

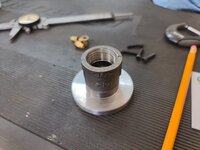
I chucked the 3/4" NPT union up in the lathe to square off one end.
vent2.jpg

Next chucked up the short section of 2.250" diameter 1045 round stock to machine a .375" thick flange.
vent3.jpg

With the .875" center hole drilled, this doesn't need to be exact as it is just the vent port, I removed a few thousandths off the OD to clean it up a bit and prepare it to be parted off.
vent5.jpg

Once parted off, I faced the opposite side and then indicated in on center and backed out half the diameter of the union that will be welded to the plate and put a reference mark on the face of the flange. I used a magnetic dial indicator to quickly measure back half the diameter and put a chamfer tool to make the reference mark.
vent6.jpg

The reference mark was merely to aid in centering the fitting onto the flange for final welding.
vent7.jpg

Next, it's off to the welding table for final welding.
vent8.jpg

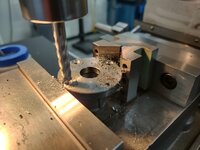
I forgot to take pictures of the welded joint but once it was welded and cooled, I set it in the mill vise upside down. Next, I centered in on the bore using my coaxial indicator and plugged the dimensions into the DRO using the bolt hole circle (Pitch Circle Diameter) mode and drilled the four holes.
vent9.jpg

I then went back around the same hole pattern using a .375" end mill to cut .040" deep reliefs into the flange for the heads of the threaded inserts to fit into. This will allow the flange to sit fully on the gasket on top of the tank without possible interference from fasteners. Hope that makes sense.
vent10.jpg

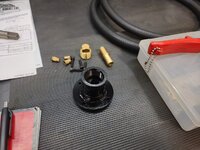
Flange was then bead blasted and painted. Here are all of the components needed to separate the vent from the FASS return port.
vent11.jpg


While the paint was drying, my son began pulling the dash from his WJ so we can remove the HVAC case and replace the heater core and evaporator.

Thanks for looking.
 
Last edited:
OP
Z

zmotorsports

ALLIANCE MEMBER
Joined
Oct 20, 2009
Messages
21,477
Location
Northern Utah
Loved the toolbox tour, Mike! I wanted to point out that I read all 170 comments on the YouTube video currently and every single one is supportive. That's a rare thing, especially for a video with over 30,000 views on the internet!

Thank you Austin. I have to admit, the comments that I read were very flattering and quite humbling.
 

ScepterToad

Well-known member
Joined
Nov 9, 2023
Messages
340
So, are you going to have to drill a big hole in your tank? Any plan on having to get the shavings out? My tank is pretty close to the top of the compartment, so getting in there to drill would be difficult.

On another note, have you ever seen Inheritance Machine on youtube? I think I was turned on to that from GJ, but can't remember where. I think you'd enjoy watching some of his videos. He does some really cool work on some simple and some complex parts with a very good attention to detail. Some pretty cool stuff he's doing.
 
OP
Z

zmotorsports

ALLIANCE MEMBER
Joined
Oct 20, 2009
Messages
21,477
Location
Northern Utah
So, are you going to have to drill a big hole in your tank? Any plan on having to get the shavings out? My tank is pretty close to the top of the compartment, so getting in there to drill would be difficult.

On another note, have you ever seen Inheritance Machine on youtube? I think I was turned on to that from GJ, but can't remember where. I think you'd enjoy watching some of his videos. He does some really cool work on some simple and some complex parts with a very good attention to detail. Some pretty cool stuff he's doing.

Keith, I will have to drill a total of 5 holes in the tank. One for the center vent hole, thinking around 3/4", then four for the threaded inserts. I've done quite a bit of drilling into tanks and as long as you can access enough to put a method of catching the chips you're fine. I've used things like fish nets lined with tape, shop rags tied to welding wire and other various methods to catch the chips. By removing the sending unit I can get access to the area I want to drill adjacent to the sending unit opening. Much better than draining to removed and weld a bung.

Yes, I watch and subscribe to Inheritance Machine on YouTube, he's very knowledgeable and enjoyable to watch.
 

ScepterToad

Well-known member
Joined
Nov 9, 2023
Messages
340
Keith, I will have to drill a total of 5 holes in the tank. One for the center vent hole, thinking around 3/4", then four for the threaded inserts. I've done quite a bit of drilling into tanks and as long as you can access enough to put a method of catching the chips you're fine. I've used things like fish nets lined with tape, shop rags tied to welding wire and other various methods to catch the chips. By removing the sending unit I can get access to the area I want to drill adjacent to the sending unit opening. Much better than draining to removed and weld a bung.

Yes, I watch and subscribe to Inheritance Machine on YouTube, he's very knowledgeable and enjoyable to watch.
That's a pretty solid plan on catching the chips. I hadn't even thought of that method. :beer:
 
OP
Z

zmotorsports

ALLIANCE MEMBER
Joined
Oct 20, 2009
Messages
21,477
Location
Northern Utah
That's a pretty solid plan on catching the chips. I hadn't even thought of that method. :beer:

Keith, another tip that I forgot to add above is to pack the drill bit with grease. This technique alone nearly eliminates all the chips and those few that get past the grease can be caught by one of the above-mentioned methods, thus preventing the chips from falling into the void.
 

SilverJimmy

Well-known member
Joined
Apr 14, 2012
Messages
1,690
Location
Prescott/Flagstaff, AZ
Mike, to free up some room in your box, have you ever considered building an airtool rack? I had one one my tool truck for display, but something similar might help with your overloaded drawer.CDFDA890-7CCE-4404-93E5-C5C15488B866.jpeg
I‘m sure your Finance Manager would be happier with a solution like this one and not what the peanut gallery is cheering for!
 
OP
Z

zmotorsports

ALLIANCE MEMBER
Joined
Oct 20, 2009
Messages
21,477
Location
Northern Utah
Mike, to free up some room in your box, have you ever considered building an airtool rack? I had one one my tool truck for display, but something similar might help with your overloaded drawer.CDFDA890-7CCE-4404-93E5-C5C15488B866.jpeg
I‘m sure your Finance Manager would be happier with a solution like this one and not what the peanut gallery is cheering for!

Thanks Sterling, but no. I'm not going to start down that path of storing tools outside the toolbox, at least for those tools not in blow molded cases which are the only tools I will store in cupboards. I guess I'm just done buying tools as I don't have any more room. I'm not a fan of having tools out in the open such as pegboards or racks and such. I had a pegboard in my last shop for odd tools that I didn't want to take up space in the toolbox and I hated it.
 
OP
Z

zmotorsports

ALLIANCE MEMBER
Joined
Oct 20, 2009
Messages
21,477
Location
Northern Utah
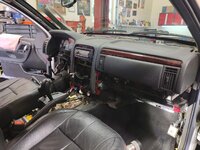
My son and I were able to dive into the dash removal for the evap and heater core replacement as we are waiting on parts to assemble the engine.

Fasteners all removed and steering column just lowered. We were able to compress the steering shaft just enough to tuck it down in front of the seat and didn't have to completely remove it. Then just piled towels up on it and the shifter assembly to avoid scratches or damage while we pivoted the dash rearward.
wj41.jpg

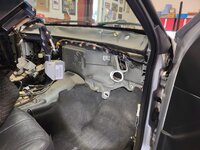
Dash pivoted out of the way just enough to removed the HVAC suitcase and avoided having to fully remove the dash from the vehicle.
wj42.jpg

HVAC suitcase removed.....
wj43.jpg

and sitting on the fabrication table for disassembly.
wj44.jpg


That was the stopping point for the night as my DIL and grandson stopped by so I was entertained watching the little guy walking around the shop with a wrench in his hand seeing what he could fit it on. Yep, I said walking. The little stink is walking everywhere as of the last week and seemed to love wandering around the shop as my DIL followed him around. My son and DIL will definitely be getting their exercise chasing the little guy around in the foreseeable future. :giggle:

I started taking the heater core out and my son held him while I had him push the button on the cordless driver to remove the screws. Although he was intrigued by the powered tool extracting the screw, he had a death grip on that wrench and wouldn't part with it as my son tried to divert his attention to the power tool.

I get it, I'm not all in on the cordless tools either. :ROFLMAO:


Thanks for looking.
 
OP
Z

zmotorsports

ALLIANCE MEMBER
Joined
Oct 20, 2009
Messages
21,477
Location
Northern Utah
great vid Mike! Man, hearing you explain what some of those unique tools were for really highlights just how much experience you have and history you have. I was in awe the entire video. Box was impressive too. 😁

Thank you Matt. It's still sometimes hard to fathom just how many tools a person can acquire over a lifetime of wrenching and how many things I have worked on when looking back 35+ years.
 
To avoid these ads, REGISTER NOW!

Bodj Built

Well-known member
Joined
Feb 3, 2016
Messages
1,167
Location
Moorpark, CA
Thank you Matt. It's still sometimes hard to fathom just how many tools a person can acquire over a lifetime of wrenching and how many things I have worked on when looking back 35+ years.

I haven't even hit the 35 year mark on life, but I can attest to that based on the past 14 years of my life. I didn't even realize how much I have packed into my garage until my neighbor kid came by to borrow a screwgun and goes, "WOW you have a lot of stuff in here!" It made me look around and he wasn't wrong! God has been good.
 

LXCam

ALLIANCE MEMBER
Joined
Apr 23, 2013
Messages
19,206
Location
AZ
And I’ve always said the smart ones do what they do best and pay morons like me to build their ****.


But I’ll add I wouldn’t change a thing. Solving a problem, creating and building is what has made my life worth living and keeps me somewhat sane.
 

Jgaz

Well-known member
Joined
Dec 16, 2016
Messages
1,713
Location
AZ
Most of my neighbors own two screwdrivers but only know how to use one of them. Anytime they come into my shop it's like the monkey touching the monolith in Stanley Kubrick's movie 2001... Very successful people in their own right, but hopeless when it comes to working with their hands.
Amen! I’ve lived in 3 different Michigan neighborhoods as well as two Arizona neighborhoods in the last 45 years.
The lack of overall mechanical knowledge or ability, (or tool ownership) in Az. vs Mi. still amazes me.
As said, smart, successful people but can’t pour piss out of a boot.
 
OP
Z

zmotorsports

ALLIANCE MEMBER
Joined
Oct 20, 2009
Messages
21,477
Location
Northern Utah
To go along with some of the above comments about mechanics having to have a certain skillset and how most people don't possess that skill, I have come to the conclusion that it can be a double-edged sword. Yes, it's nice to have the knowledge but at times it seems like you can never be left alone as someone always wants something and they can't accept when you tell them that your personal stuff and family's stuff comes first. I don't want to sound ungrateful because I am very grateful to have the skillset that I have and also a never-ending list of people that want me to do work for them. I would like to think that comes from a lifetime of treating people well and doing good work, but it can be a pain in the *** at times. Where I don't have my business any longer or commit to others as I have a full-time job, I make it very clear that I do this on the side and more importantly "my stuff and my son's stuff comes first, period. No exceptions". Most people that I have done work for completely understand and support that. However, there are some that still feel the need to call me to complain that I am taking too long to get to their ****. I just had a guy today that I finally had to tell that it may be better if he takes it somewhere else because it will be at least a couple of months before I can get to him. He said he will wait because he doesn't trust anyone else but he's really upset about having to wait so long. :mad:


When talking about tools, I also hear all too often that "if I had all of the tools that you have, I could do that too." That gets really old after a while because people just assume the tools make the mechanic. They also don't realize that there are plenty of guys with tens and tens of thousands of dollars worth of tools that just can't seem to do decent work. To some it's about having the tools more so than actually using them to turn out quality work. I liken it to the old saying "all hat and no cattle".

It's that way with knowledge as well. I heard a saying many, many years ago that was impactful to me. It was "knowledge itself is of no value, it is the use of knowledge that makes it valuable." I have tried to live my life through that perspective because I have known a lot of people in my life that were book smart and could tell you how to do something but had no common sense or couldn't get it to their hands. They could read it and explain it but couldn't do it.


I have also noticed over the years that there are different levels of mechanics, as not all mechanics are created equal. Maybe there have always been those different degrees of mechanics and I'm just realizing it over the past few years with social media or YouTube showcasing more. Now I don't claim to know everything and I make mistakes at times as I'm sure we all do. Part of being a good mechanic I feel is accepting those mistakes and being sure not to make them a second time. A mistake can be a good learning opportunity, albeit sometimes an expensive one. :oops:

What I have a hard time accepting is all of the hack work I see these days from so called "professional mechanics". It really does nothing to help our industry and surely doesn't promote confidence in our field.

While my son and I were removing his dash last night I shared with him that there was a guy I watched on YouTube removing a dash and he was more focused on seeing how fast he could remove it vs. how good of a job he was doing. There are two hard to reach screws at the center of the HVAC suitcase on the WJ model that connect a duct to the main body for the rear heat. This duct is held by two small #4 screws that thread into molded in plastic bosses or standoffs coming off the bottom of the molded case. The guy I had watched grabbed the duct and yanked it out of from under the dash. He mentioned that there were two screws under the dash, and they will more than likely be hard to get out and sometimes break the molded boss so "you may as well just break them off when removing it because they'll probably break anyways". :eek7:

Holy ****. You may as well break them off because they'll probably break anyways? Really? That's what we have digressed to as automotive mechanics? Now I will be the first to admit, that there have been times when I have broken a clip or tab off of a plastic trim piece. But in those few occasions, I generally will go out of my way to replace the part or mix up some epoxy and resecure the tab and I sure as hell don't break them on purpose because "they'll probably break anyways". That makes absolutely no sense to me. And what bothered me more were the numerous comments about what a great "technician" he is and how awesome his work is. What the hell am I missing in this picture? Would they feel the same way if it were their car he just yanked the duct out of and broke the plastic? :headscrat
 
Last edited:

SilverJimmy

Well-known member
Joined
Apr 14, 2012
Messages
1,690
Location
Prescott/Flagstaff, AZ
30 years selling Snap-On Tools to “Professional“ auto mechanics, or “Techs” as they self-identify as these days, and of the 1000’s I did business with, I can count on my hands the number that I let lay a wrench to my stuff. And when I count, I have fingers left over. The kid with the door off the Compass? I was introduced to him as a newborn, he’s in my count.
 

Bigblue&Goldie

Well-known member
Joined
Mar 12, 2009
Messages
10,734
Location
AZ
Amen! I’ve lived in 3 different Michigan neighborhoods as well as two Arizona neighborhoods in the last 45 years.
The lack of overall mechanical knowledge or ability, (or tool ownership) in Az. vs Mi. still amazes me.
As said, smart, successful people but can’t pour piss out of a boot.

Haha, my family resembles that statement to a T! My dad and his side are from Michigan, my grandfather worked for GM in a factory in Saginaw when he was young and later started/owned a huge parts distribution company. My dad and his brother grew up in AZ. Neither of them own **** for tools or could even tell you what they're called or what they're used for. Both did well in life, were excellent athletes, but if I'm fixing my dad's vehicles and I ask him for a "T-25 Torx socket on a flex head ratchet" I'm wasting my time.

My two favorite stories of my dad's handy work.....

In college I went up to my parents place over Christmas break. I turned on the kitchen sink faucet and felt something on my face. I turned it on and off a few times before I finally saw a very fine mist coming off the side of the faucet wand. As I'm staring at it I see what appears to be a blob of super glue on the chrome. I ask my mom WTF is going on with the faucet? and she replied "your dad said he fixed it". He literally used super glue to try to plug the hole instead of spending 20min to put a new faucet on. I don't take my mom's side very often in life, but that night we gave him a lot of ****!

Another time he was staying in Phoenix in his RV and he said was having an issue with a water leak and asked if I could come look at it. I got there, pulled the outside access panel behind the refrigerator to expose a small diameter pex line (I think it was an ice maker line if I remember right). I'm looking at the line and it's all scabbed up like acid leaked on it. I'm scratching my head trying to figure out what kind of chemical reaction happened......."Dad, did you super glue this?" "Yeah, I thought it would work". "You realize the super glue cost more than a union fitting to cut/splice the line?"
 

Bob Heine

ALLIANCE MEMBER
Joined
Oct 24, 2009
Messages
10,709
Location
Boca Raton, Florida
Step 1: Remove Driver Door
Sterling, when the evaporator went out on our PT Cruiser I had a similar simple approach:
Step 1: Sit in driver seat.
Interior DS A-C Repair Start.jpg
Step 2. Remove everything in front of you except the windshield and firewall.
Interior DS A-C Repair.jpg
Step 3. Replace evaporator core and put everything back where it was.
Interior PS A-C Repair.jpg
I paid someone to do it the second time (10 years later).
 

Scuderia-F1

Well-known member
Joined
Feb 9, 2011
Messages
1,198
Location
Stockholm, Sweden
To go along with some of the above comments about mechanics having to have a certain skillset and how most people don't possess that skill, I have come to the conclusion that it can be a double-edged sword. Yes, it's nice to have the knowledge but at times it seems like you can never be left alone as someone always wants something and they can't accept when you tell them that your personal stuff and family's stuff comes first. I don't want to sound ungrateful because I am very grateful to have the skillset that I have and also a never-ending list of people that want me to do work for them. I would like to think that comes from a lifetime of treating people well and doing good work, but it can be a pain in the *** at times. Where I don't have my business any longer or commit to others as I have a full-time job, I make it very clear that I do this on the side and more importantly "my stuff and my son's stuff comes first, period. No exceptions". Most people that I have done work for completely understand and support that. However, there are some that still feel the need to call me to complain that I am taking too long to get to their ****. I just had a guy today that I finally had to tell that it may be better if he takes it somewhere else because it will be at least a couple of months before I can get to him. He said he will wait because he doesn't trust anyone else but he's really upset about having to wait so long. :mad:


When talking about tools, I also hear all too often that "if I had all of the tools that you have, I could do that too." That gets really old after a while because people just assume the tools make the mechanic. They also don't realize that there are plenty of guys with tens and tens of thousands of dollars worth of tools that just can't seem to do decent work. To some it's about having the tools more so than actually using them to turn out quality work. I liken it to the old saying "all hat and no cattle".

It's that way with knowledge as well. I heard a saying many, many years ago that was impactful to me. It was "knowledge itself is of no value, it is the use of knowledge that makes it valuable." I have tried to live my life through that perspective because I have known a lot of people in my life that were book smart and could tell you how to do something but had no common sense or couldn't get it to their hands. They could read it and explain it but couldn't do it.


I have also noticed over the years that there are different levels of mechanics, as not all mechanics are created equal. Maybe there have always been those different degrees of mechanics and I'm just realizing it over the past few years with social media or YouTube showcasing more. Now I don't claim to know everything and I make mistakes at times as I'm sure we all do. Part of being a good mechanic I feel is accepting those mistakes and being sure not to make them a second time. A mistake can be a good learning opportunity, albeit sometimes an expensive one. :oops:

What I have a hard time accepting is all of the hack work I see these days from so called "professional mechanics". It really does nothing to help our industry and surely doesn't promote confidence in our field.

While my son and I were removing his dash last night I shared with him that there was a guy I watched on YouTube removing a dash and he was more focused on seeing how fast he could remove it vs. how good of a job he was doing. There are two hard to reach screws at the center of the HVAC suitcase on the WJ model that connect a duct to the main body for the rear heat. This duct is held by two small #4 screws that thread into molded in plastic bosses or standoffs coming off the bottom of the molded case. The guy I had watched grabbed the duct and yanked it out of from under the dash. He mentioned that there were two screws under the dash, and they will more than likely be hard to get out and sometimes break the molded boss so "you may as well just break them off when removing it because they'll probably break anyways". :eek7:

Holy ****. You may as well break them off because they'll probably break anyways? Really? That's what we have digressed to as automotive mechanics? Now I will be the first to admit, that there have been times when I have broken a clip or tab off of a plastic trim piece. But in those few occasions, I generally will go out of my way to replace the part or mix up some epoxy and resecure the tab and I sure as hell don't break them on purpose because "they'll probably break anyways". That makes absolutely no sense to me. And what bothered me more were the numerous comments about what a great "technician" he is and how awesome his work is. What the hell am I missing in this picture? Would they feel the same way if it were their car he just yanked the duct out of and broke the plastic? :headscrat
Well said Mike, EVERYTHING!
I fully understand, can relate and totally agree with everything you typed (again 😉).
 
OP
Z

zmotorsports

ALLIANCE MEMBER
Joined
Oct 20, 2009
Messages
21,477
Location
Northern Utah
Hope everyone had a great weekend. It was a busy one around home for us.

Today is my wife and I's 35th Wedding Anniversary so we have the kids and my wife's father and aunt over for dinner last night.

Saturday I was able to hang out in the shop with my son much of the day working on his WJ project.

To start with, I hate selling stuff so maybe that's why I hold on to things so long. I hate dealing with the people who try to get something for nothing and having to deal with the scammers.

I had an older Stihl FS85 straight shaft line trimmer given to me a couple of years ago. It was not in good shape having a cracked engine cover/housing and a frayed throttle cable. Initially, I thought I'd fix it up and use it as a spare, so I ordered a new throttle cable, housing, air filter and spark plug for it. Once up and running properly I gave it a test spin around the yard and that was it, hung it on the wall and haven't really used it since. That is until last week when the pull rope broke on my Homelite and I was trying to get the lawns done before the wife got home so I grabbed the Stihl line trimmer to finish the last couple hundred feet of trimming. Well that was it, I didn't care for it, so I opted to sell it.

I decided to try Facebook Marketplace rather than our local online selling portal and I guess maybe I should have asked more for it. My phone blew up all night long and into the Saturday morning.

Had a guy drive up from Spanish Fork, which is about 90-miles south of us and grab it Saturday morning.
trimmer1.jpg

trimmer2.jpg

My son showed up Saturday morning so we commenced tearing the HVAC suitcase apart to swap out the heater core and evaporator. I like to mark the components with a dot, then two, etc. so the actuators go back in the same place as well as any arms or shaft orientations.
wj45.jpg

wj46.jpg

wj47.jpg

After everything on the exterior of the case was stripped away, it was time to split the case and replace the components.
wj48.jpg

Everything replaced, cleaned and put back together and ready to be reinstalled back into the Jeep. Before reinstalling we gave the heater core a pressure test to ensure it will hold and the evaporator was pressurized from the manufacturer, so it was known good and not leaking.
wj49.jpg

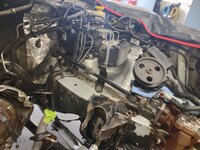
After reassembling it back into the Jeep and putting most of the interior back together we pushed the WJ out and into the next bay so I could use the lift on Sunday to service and give our Jeep a once over. My son commenced cleaning the engine bay to accept the newly rebuilt engine.
jeep6.jpg

It really wasn't too terribly bad for 20+ years old and over 200k miles. But it sure shined up nicely where he cleaned.
wj50.jpg


Thanks for looking.
 
OP
Z

zmotorsports

ALLIANCE MEMBER
Joined
Oct 20, 2009
Messages
21,477
Location
Northern Utah
Sunday morning after the wife and I had a few cups of coffee sitting on the deck and watching the world come alive and the sun come up, I went out and racked the Jeep to perform a LOF service and put eyes on everything to check it over.


jeep1.jpg

After the rear upper control arm failure last year I keep a close eye on them. I beefed them up last year while doing the repair and doubt I'll ever have another issue, but I still keep a close eye on them.
jeep2.jpg

jeep3.jpg

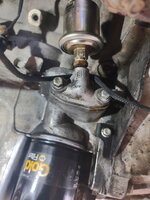
I did notice during the last service that my oil pressure sending unit was weeping so I had ordered another one to keep on hand. When draining the oil I noticed it was leaking worse, so I swapped it out for the new one. I may have to keep one of these on hand as I only got about 3 years out of this one before it started leaking. I love Auto Meter gauges but it seems the sending unit quality has diminished slightly from year ago.
jeep4.jpg

Tires being rotated and torqued back on before test drive.
jeep5.jpg


Thanks for looking.
 
OP
Z

zmotorsports

ALLIANCE MEMBER
Joined
Oct 20, 2009
Messages
21,477
Location
Northern Utah
With the Jeep serviced I thought I would tear into the coach and separate the FASS fuel return from the vent. I machined the vent mount last week but figured I would tackle the mounting and separating while I had some time.

I grabbed the needed tools and some grease to use on the drill bits but also devised a catch apparatus for any shavings that may drop from the grease. Although the grease trick works amazingly well, I didn't want to risk it.
vent12.jpg

With the holes transfer punched, center punched and ready to drill, I snaked the chip catch glove into the fuel tank through the sending unit opening.
vent13.jpg

Holes drilled, surface cleaned and ready to install the threaded inserts.
vent14.jpg

The grease worked like a charm and only had a couple of chips in the glove when I removed it.
vent15.jpg

This is the configuration I had originally devised when I installed the FASS system on the coach. The FASS return line went straight in from the top and the vent came off perpendicular to the return flow. It worked perfectly fine for the last 3 years and over 15k miles. Until our last trip that is, when I got a bit of diesel out of the vent line so that prompted this redesign.
vent16.jpg

The vent fitting also acts as a "rollover check valve" for the tank. With it all cleaned up it was ready to install on the fitting that I machined last week.
vent17.jpg

Threaded into the bung.
vent18.jpg

And orientated to allow easy access to the fastener holes so the fitting didn't interfere with installation.
vent19.jpg

Threaded inserts installed, gasket installed and bung secured in place along with the vent hose installed.
vent20.jpg

Which allowed the FASS return line to have its own dedicated port back to the tank.
vent21.jpg


Thanks for looking.
 
OP
Z

zmotorsports

ALLIANCE MEMBER
Joined
Oct 20, 2009
Messages
21,477
Location
Northern Utah
Congrats on the anniversary! The WJ is coming along nice. Never thought about the dot's like you added, good tip!

Congrats on the 35th Mike. We hit 36 last month on some darn day 🤔 😉

Thanks guys. Hard to believe it's been 35 years already. It really doesn't really feel like it's been 35-years, but then again, I don't know what that's supposed to feel like. All I know is I never imagined we'd be here at this point in our lives. It's been a struggle at times, but I guess all good things come with trials and it makes the smooth times that much sweeter. We truly have been blessed beyond measure and sitting at dinner last night looking around the table and watching my grandson and being so proud of our son and DIL for the parents they have become it was never more evident. The wife and I just sat on the deck last night after everyone left and relived the past 35 years and counted our blessings.
 
To avoid these ads, REGISTER NOW!
Top Bottom