To avoid these ads, REGISTER NOW!

ZMotorsports Shop Projects 2.0

OP
Z

zmotorsports

ALLIANCE MEMBER
Joined
Oct 20, 2009
Messages
21,477
Location
Northern Utah
Smart move Mike. I know you mentioned before about the stress of going back into debt to buy a different house and build a new shop. I was kinda surprised you even toyed with the idea of a new coach at this point in time.


In the long run, I'd imagine better sleeping at night keeping the current coach rather than ante up a stack of Ben Franklins.


So when the coach is parked/plugged in, the water heater is running off electric. When that's not available, it burns diesel rather than LP to heat the water ? So does it use the main fuel tank or is there a secondary tank ?


You’re right Eric, I definitely don’t want any more debt at this point in my life. Once the house is paid off and closer to retirement we'll more than likely look at upgrading one last time. Hopefully by then we can be able to do a cash purchase which will even be better.

As for the heater, the Aqua-Hot setup in my coach has a boiler tank that contains glycol. The glycol is used to transfer heat to the domestic water system for heating my water as well as flowing throughout the coach to a series of heat registers that also provides quiet, comfortable and even heat to the coach’s interior. The glycol is heated by either a 1650 watt electric element or a diesel burner that draws fuel from my main 150-gallon fuel tank. My 10kw Onan generator also draws from the main fuel tank.

When camping and hooked to shore power most of the time the electric element is enough to heat the glycol as long as outside temps are in the forty’s or more. When the temps drop and I need heat inside the coach as well as hot water the diesel burner will ignite.

On my model of Aqua-Hot both the electric side and the diesel side have two thermistors (Klixon)each. One for low temperature to activate and one high temperature to cutout. The nice thing about mine is that the diesel low temp Klixon is a few degrees lower than the electric. This means that as the temperature of the glycol drops the electric element will activate first. IF the glycol temperature rises it will merely rise until the electric high temp Klixon deactivates the electric element. IF the electric element doesn’t provide enough heat and the temperature of the glycol continues to drop and reaches the preset temp of the diesel Klixon then the diesel burner will ignite and both will heat the glycol.

On my system I usually just leave both the switch for the electric and the diesel on so it will work as I described above. On the newer model Aqua-Hot Systems they don’t work that way and share Klixon temperature switches so both systems come on simultaneously once the glycol temp drops enough that heat is required.

Hope all that makes sense. It really is a nice system and provides very even and quiet heat inside the coach. Aqua-Hot was on our list of “must haves” when we were looking at upgrading back in 2007 as I fell in love with them when I worked on a few for friends. As much as we use our coach in cold temperatures I would never have another coach without Aqua-Hot. Also worth mentioning is that our coach has heat registers in the basement as well to keep the tanks from freezing for a true all-weather coach. We’ve used our coach down into the single digits and been quite comfortable inside.


Sent from my iPhone using Tapatalk
 
Last edited:
To avoid these ads, REGISTER NOW!
OP
Z

zmotorsports

ALLIANCE MEMBER
Joined
Oct 20, 2009
Messages
21,477
Location
Northern Utah
I was able to spend some quality time working in my shop today. It is so nice to have it setup and everything in its proper place to be able to walk to a cabinet or drawer and get what I need.

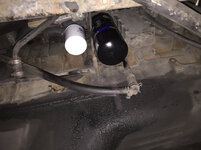
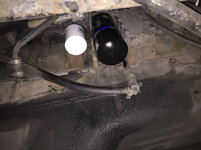
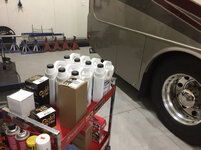
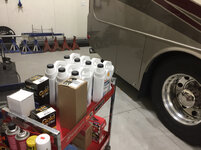
I performed the service on our Cummins ISL in our coach today. Oil, oil filter, coolant filter, primary and secondary fuel filters.
4500fff307d064a136d34389f3fff0ae.jpg

Oil and coolant filters changed.
fd87587a6d5dd8a025548550d624e4b8.jpg

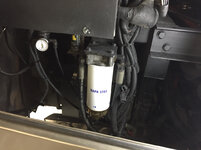
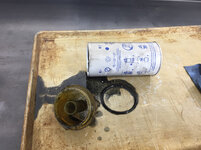
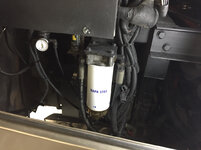
Primary fuel filter changed.
cd3a1ff45da05dd5b5e9803931a99f28.jpg

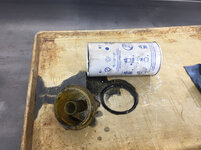
A lot of debris in the sediment/Water separator bowl for some reason on the primary filter.
1ed8351658bb31da08985afc4094935f.jpg

While I was waiting for the oil to drain from the engine I tackled another quick project. My switch box for my A/V keeps coming loose from the double sided tape and rattling around in the cabinet plus it’s a PITA to hold with my right hand while activating the buttons with my left and chasing it around the cabinet when parked.

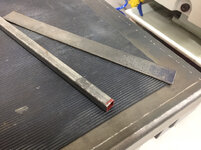
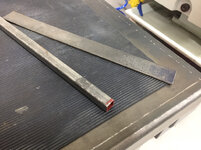
I came up with a plan to make a wedge type device to hold the switchbox in place. It started with a piece of 1/2” square tube and a piece of 10-gauge strap.
c4958a5b5d8255e7371c990d8d26ff71.jpg

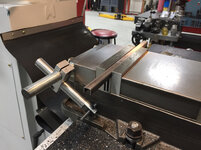
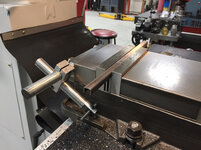
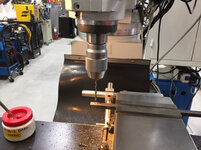
I put the square tube in the mill and cut .080” off to remove one side and land at approx. .400” and have a U-channel. I then cut the 10-gauge strap to fit inside the channel.
0eb0b38b9a12fbcf8c695bd95bebadd0.jpg

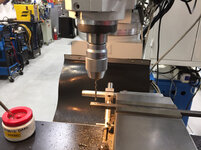
Then I turned the channel over in the mill vise and drilled & tapped a 10-32 hole about a half inch from either end.
66d4b086762157bf168b83755258e4cd.jpg

7a4c8de2cfa881d8f1313d153eea24bb.jpg

eaa069506a22ba2849961d8d7f9936f7.jpg

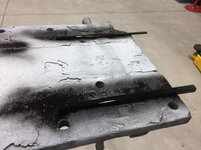
Beadblasted and painted semi-gloss black to match the A/V components.
9fa1195cefe158d2560a9575d04ffaf2.jpg

Here you can see the completed wedge. It is placed on top of the switch box in the small gap between it and the top of the cabinet. The socket head screws are threaded in thus pushing the 10-gauge strap up against the top of the cabinet and the channel down against the switch box in which is pushed down onto the double sided tape and firmly holding it in place. No more chasing it around the cabinet when pushing the buttons and no more rattle.
5171f92e89748d8c51d5da350a2a962e.jpg


Sent from my iPhone using Tapatalk
 

Attachments

  • c4958a5b5d8255e7371c990d8d26ff71.jpg
    c4958a5b5d8255e7371c990d8d26ff71.jpg
    804.1 KB · Views: 1
  • 0eb0b38b9a12fbcf8c695bd95bebadd0.jpg
    0eb0b38b9a12fbcf8c695bd95bebadd0.jpg
    678.7 KB · Views: 1
  • 66d4b086762157bf168b83755258e4cd.jpg
    66d4b086762157bf168b83755258e4cd.jpg
    761.3 KB · Views: 0
  • 7a4c8de2cfa881d8f1313d153eea24bb.jpg
    7a4c8de2cfa881d8f1313d153eea24bb.jpg
    807.3 KB · Views: 0
  • 1ed8351658bb31da08985afc4094935f.jpg
    1ed8351658bb31da08985afc4094935f.jpg
    810.9 KB · Views: 0
  • 9fa1195cefe158d2560a9575d04ffaf2.jpg
    9fa1195cefe158d2560a9575d04ffaf2.jpg
    769.8 KB · Views: 0
  • 5171f92e89748d8c51d5da350a2a962e.jpg
    5171f92e89748d8c51d5da350a2a962e.jpg
    919 KB · Views: 0
  • cd3a1ff45da05dd5b5e9803931a99f28.jpg
    cd3a1ff45da05dd5b5e9803931a99f28.jpg
    696.1 KB · Views: 0
  • fd87587a6d5dd8a025548550d624e4b8.jpg
    fd87587a6d5dd8a025548550d624e4b8.jpg
    732 KB · Views: 0
  • 4500fff307d064a136d34389f3fff0ae.jpg
    4500fff307d064a136d34389f3fff0ae.jpg
    745.5 KB · Views: 1
  • eaa069506a22ba2849961d8d7f9936f7.jpg
    eaa069506a22ba2849961d8d7f9936f7.jpg
    772.9 KB · Views: 5

rmack898

Well-known member
Joined
Jan 23, 2007
Messages
3,212
Location
Honu Grove NE Florida
Mike,
I sometimes look at pictures of your shop and think I'm looking at my shop, although I must say yours is much cleaner than mine.

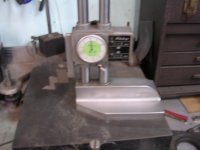
Between the welding table clones and now seeing my height gauge on your surface plate, I sometimes get confused although that is not difficult for me.

I also picked mine up at an estate sale along with a very nice sine plate for $50
 

Attachments

  • DSCN5011.jpg
    DSCN5011.jpg
    142.3 KB · Views: 143

kbs2244

Well-known member
Joined
Nov 11, 2006
Messages
14,065
That "While I was waiting" project deserves a thread of it's own.
Good thinking, as well as good work.
 
OP
Z

zmotorsports

ALLIANCE MEMBER
Joined
Oct 20, 2009
Messages
21,477
Location
Northern Utah
Mike,

I sometimes look at pictures of your shop and think I'm looking at my shop, although I must say yours is much cleaner than mine.


Between the welding table clones and now seeing my height gauge on your surface plate, I sometimes get confused although that is not difficult for me.


I also picked mine up at an estate sale along with a very nice sine plate for $50


That’s awesome Mac. I’d love to see some pics of your shop.


Sent from my iPhone using Tapatalk
 

NUTTSGT

Super Moderator
Staff member
Joined
Sep 14, 2009
Messages
51,166
Location
Northern Central Ohio
Thanks for the explanation of the heating system Mike.

Also, love the old school in the coach....some members may not know what a VCR is. :spit:
 
OP
Z

zmotorsports

ALLIANCE MEMBER
Joined
Oct 20, 2009
Messages
21,477
Location
Northern Utah
Thanks for the explanation of the heating system Mike.

Also, love the old school in the coach....some members may not know what a VCR is. :spit:

Believe it or not Eric, we actually still have some movies on VHS and it works great so no reason to remove it at this time. That may change when it craps out but no harm in packing it along on trips at this time.:lol:

Thanks for following my projects thread Eric.
 

NUTTSGT

Super Moderator
Staff member
Joined
Sep 14, 2009
Messages
51,166
Location
Northern Central Ohio
Believe it or not Eric, we actually still have some movies on VHS and it works great so no reason to remove it at this time. That may change when it craps out but no harm in packing it along on trips at this time.:lol:

Thanks for following my projects thread Eric.

No worries Mike, I have a combo VCR/DVD player in the garage....I still have a stack of movies on VHS also. It's nice to break one out every now and then.
 

ttpete

Well-known member
Joined
Mar 8, 2011
Messages
6,737
Location
Dearborn, MI
No worries Mike, I have a combo VCR/DVD player in the garage....I still have a stack of movies on VHS also. It's nice to break one out every now and then.

I have the "Godfather Saga" set on VHS. It was made by combining Godfather 1&2 so everything is in chronological order. It's never been made in DVD as far as I know.
 

Wanna Ride

Well-known member
Joined
Jul 28, 2010
Messages
2,790
The VCR just made me chuckle.

As I stare at mine sitting on the shelf in front of me, in my shop, just above the stereo I'm listening to as I type this. I just realized that I haven't turned it on, in at least a decade. Maybe even fifteen years.
 
OP
Z

zmotorsports

ALLIANCE MEMBER
Joined
Oct 20, 2009
Messages
21,477
Location
Northern Utah
I got home late again tonight and didn’t feel like creating a mess and starting another project so I pulled up a stool and watched my son as he ran a couple of mock programs on his CNC mill.
dc945e9efc1165eed894ad41fbb25700.jpg

I’m getting as excited as he is to see some chips. Unfortunately I don’t think it will be for a couple of weeks as he found out today he has to go out of town for training and will be gone for at least a week.


Sent from my iPhone using Tapatalk
 

Attachments

  • dc945e9efc1165eed894ad41fbb25700.jpg
    dc945e9efc1165eed894ad41fbb25700.jpg
    730.8 KB · Views: 7
OP
Z

zmotorsports

ALLIANCE MEMBER
Joined
Oct 20, 2009
Messages
21,477
Location
Northern Utah
I was thinking "it must take a long time to drain that oil pan".:bounce:

It actually does, it usually takes about an hour or so to drain all 28 quarts from the pan. This is why when planning the servicing of the coach I generally have a secondary project planned to occupy my time waiting. I just keep an eye on that first 5-gallon bucket especially so it doesn't overflow. Once I swap them around I can walk away and forget about it because I know I'm safe from an overflow.:)

The timing on this one was about right. I was applying the paint by the time the oil was about done draining. Pretty good timing.
 

sanddan

Well-known member
Joined
Jul 7, 2005
Messages
708
Location
Oregon
Funny to see the VHS player. After hauling mine around for years without using it (we have a blue ray player in our coach) I gave it to goodwill along with most of the tapes.
 

C_F

ALLIANCE MEMBER
Joined
Jan 21, 2005
Messages
9,675
Location
Utah...SNOW BLOWS!
It actually does, it usually takes about an hour or so to drain all 28 quarts from the pan. This is why when planning the servicing of the coach I generally have a secondary project planned to occupy my time waiting. I just keep an eye on that first 5-gallon bucket especially so it doesn't overflow. Once I swap them around I can walk away and forget about it because I know I'm safe from an overflow.:)

The timing on this one was about right. I was applying the paint by the time the oil was about done draining. Pretty good timing.

I see, sounds like a good plan then to have another project to play with while you're waiting. Out of curiosity, what sort of oil change intervals do you have with your coach? With that much oil, I imagine it's quite a lot of miles between oil changes.
 
OP
Z

zmotorsports

ALLIANCE MEMBER
Joined
Oct 20, 2009
Messages
21,477
Location
Northern Utah
I see, sounds like a good plan then to have another project to play with while you're waiting. Out of curiosity, what sort of oil change intervals do you have with your coach? With that much oil, I imagine it's quite a lot of miles between oil changes.

The Cummins maintenance intervals call out for oil changes @ 15k miles, coolant filter changes @ 15k miles, primary fuel filter @ 20k miles and secondary fuel filters @ 40k miles.

I generally shoot for filter and fluid changes every other year which generally equates to around 10k-14k mile range. At that time I replace all of the above, including both primary and secondary filters. Probably a bit overkill but I'm ok with that.
 
To avoid these ads, REGISTER NOW!
OP
Z

zmotorsports

ALLIANCE MEMBER
Joined
Oct 20, 2009
Messages
21,477
Location
Northern Utah
What does an oil change and filter/flush cost, curious.

For everything I️ listed it was right around $400. I️ change out my air filter every other oil change and it wasn’t due so I️ didn’t change it this round.

The fuel filters are quite spendy but not worth taking chances with the pressures these systems pushing through the injectors.


Sent from my iPhone using Tapatalk
 
OP
Z

zmotorsports

ALLIANCE MEMBER
Joined
Oct 20, 2009
Messages
21,477
Location
Northern Utah
Tonight I️ hung up my American flag in the shop. My son bought this flag for me last year but I️ didn’t hang it in our old shop due to the move so I️ decided what better time to hang my new flag in my new shop than Veteran’s Day.

d7593f788246787b5ea86735e80c74c2.jpg


Sent from my iPhone using Tapatalk
 

Attachments

  • d7593f788246787b5ea86735e80c74c2.jpg
    d7593f788246787b5ea86735e80c74c2.jpg
    667.5 KB · Views: 2
Last edited:
OP
Z

zmotorsports

ALLIANCE MEMBER
Joined
Oct 20, 2009
Messages
21,477
Location
Northern Utah
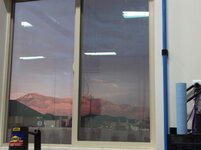
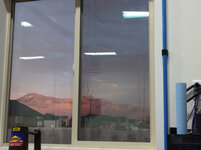
Before closing up shop tonight I️ snapped a couple pictures of the view of my mountains to the east out of my shop windows.
92504f5ace084df886578a71e56555a1.jpg

6f6ab41bbbf177765158158a592974ae.jpg

What a great view of the mountains out either of my shop windows.


Sent from my iPhone using Tapatalk
 

Attachments

  • 92504f5ace084df886578a71e56555a1.jpg
    92504f5ace084df886578a71e56555a1.jpg
    647.1 KB · Views: 2
  • 6f6ab41bbbf177765158158a592974ae.jpg
    6f6ab41bbbf177765158158a592974ae.jpg
    667 KB · Views: 2

GRN96WS6

Well-known member
Joined
Dec 23, 2012
Messages
2,269
Location
SOMD
For everything I️ listed it was right around $400. I️ change out my air filter every other oil change and it wasn’t due so I️ didn’t change it this round.

The fuel filters are quite spendy but not worth taking chances with the pressures these systems pushing through the injectors.


Sent from my iPhone using Tapatalk
Not bad for every other year.
 
OP
Z

zmotorsports

ALLIANCE MEMBER
Joined
Oct 20, 2009
Messages
21,477
Location
Northern Utah
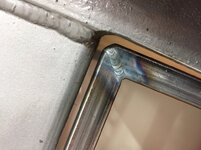
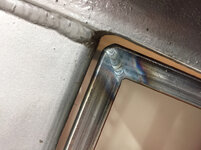
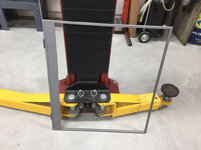
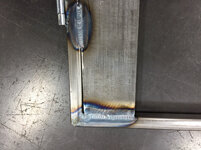
I️ had about an hour yesterday morning so I️ ran out to the shop and knocked out one of the door frames for my workbenches.

Frame welded together and set into the opening to place the hinges.
ea66ebf128947d30eb7bc6356565bd07.jpg

Opens and closes smoothly.
9c3b1987d5899ff425db8692aabd24e9.jpg

Fairly nice consistent gap around the perimeter.
82ec11f3a564d979dd17777c0a7b68f5.jpg

I️ have one more frame to fabricate for the L-shaped workbench then I’ll have to dig through my slim assortment of sheet and see what I️ have available. I️ hope I️ have some aluminum and won’t have to purchase anything.


Sent from my iPhone using Tapatalk
 

Attachments

  • 82ec11f3a564d979dd17777c0a7b68f5.jpg
    82ec11f3a564d979dd17777c0a7b68f5.jpg
    759.7 KB · Views: 1
  • 9c3b1987d5899ff425db8692aabd24e9.jpg
    9c3b1987d5899ff425db8692aabd24e9.jpg
    122.4 KB · Views: 1
  • ea66ebf128947d30eb7bc6356565bd07.jpg
    ea66ebf128947d30eb7bc6356565bd07.jpg
    802 KB · Views: 1
Last edited:
OP
Z

zmotorsports

ALLIANCE MEMBER
Joined
Oct 20, 2009
Messages
21,477
Location
Northern Utah
Completed the second workbench cupboard door today.
48d3e85c751ab20226c94b74d5c7f9a1.jpg

2c99fee864c3ac7f8a03fedd117d34f9.jpg

If I can get home before dark tomorrow (daylight savings time ending really *****) maybe I can get the door frames painted.

Then I can get some aluminum cut for the exterior of them and riveted on.


Sent from my iPhone using Tapatalk
 

Attachments

  • 48d3e85c751ab20226c94b74d5c7f9a1.jpg
    48d3e85c751ab20226c94b74d5c7f9a1.jpg
    837 KB · Views: 1
  • 2c99fee864c3ac7f8a03fedd117d34f9.jpg
    2c99fee864c3ac7f8a03fedd117d34f9.jpg
    818.6 KB · Views: 1
Last edited:
OP
Z

zmotorsports

ALLIANCE MEMBER
Joined
Oct 20, 2009
Messages
21,477
Location
Northern Utah
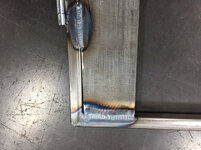
After opening and closing the work bench doors a few times last night, I think I may add a piece of .125" x 2" flat strap vertically down the hinge side to add a bit of rigidity to the framework. It seemed a bit more flimsy than I like, although I know it will have strength added with the aluminum sheeting I think the flat strap will help a lot.

Then it looks like I need to get my snowblower out of the garage and bring it into the shop for a once over. The news stated this morning that we could have our first snow on the valley floor on Friday and I don't want to be caught off-guard.
 

shortykorte

Well-known member
Joined
Sep 1, 2014
Messages
8,039
Location
Tallahassee, Fl
Ok I'm confused. The door in corner appears to have hinges on both sides. Also what are you using to keep doors closed, magnetic catch?


Sent from my iPhone using Tapatalk
 
OP
Z

zmotorsports

ALLIANCE MEMBER
Joined
Oct 20, 2009
Messages
21,477
Location
Northern Utah
Ok I'm confused. The door in corner appears to have hinges on both sides. Also what are you using to keep doors closed, magnetic catch?


Sent from my iPhone using Tapatalk

It may just be the way the picture is. The door in the corner is hinged on the left if looking at the picture. The component you can see on the right in the same picture is the magnetic catch. It does kinda look like another hinge but only hinged on the left, both are actually hinged on the left.

Thanks for looking so in-depth and for following along Shorty. It's nice to see people take such interest that you're looking that hard.
 

shortykorte

Well-known member
Joined
Sep 1, 2014
Messages
8,039
Location
Tallahassee, Fl
Thanks. Guess I wasn't looking to close. The earlier picture clearly shows the magnetic latch. My bad. Lol

Quality work is always worth getting a good look at.


Sent from my iPhone using Tapatalk
 

C_F

ALLIANCE MEMBER
Joined
Jan 21, 2005
Messages
9,675
Location
Utah...SNOW BLOWS!
The news stated this morning that we could have our first snow on the valley floor on Friday and I don't want to be caught off-guard.

I'm sure not looking forward to that ****.:( Oh well, I know we've been very lucky to have the decent weather we've had so far.

The doors will look nice when you're finished! :)
 
OP
Z

zmotorsports

ALLIANCE MEMBER
Joined
Oct 20, 2009
Messages
21,477
Location
Northern Utah
I'm sure not looking forward to that ****.:( Oh well, I know we've been very lucky to have the decent weather we've had so far.


The doors will look nice when you're finished! :)


Thank you.

I’m not ready for that white **** either, I sure hope it’s not like last year, the winter that wouldn’t end. I’m sure last year was because I was trying to get my shop built though. [emoji15]


Sent from my iPhone using Tapatalk
 
OP
Z

zmotorsports

ALLIANCE MEMBER
Joined
Oct 20, 2009
Messages
21,477
Location
Northern Utah
I was able to get some more work done on my work bench cupboard doors tonight. Welded some strap down the hinge side to give a little more support then wiped down and painted with Rustoleum Hammered paint to match the benches themselves.

779f78dc46396b9e378abbc11d06cf2f.jpg

e223853e7b9150f304c7611c54c01db5.jpg

7e62cc58e699df12badd1c470dd9923e.jpg

9585ccf5fe6a21ca2e9e2aeaa5376a37.jpg

I also scrounged through my limited supply of aluminum sheet and found some 16-gauge brushed aluminum that is just enough for the two doors but not enough for the one side of the storage compartment on the 6’ bench. I was able to also find some 16-gauge polished ATP but seeing as how I have nothing else in the shop that is ATP nor polished I think I will install the ATP with the flat side out and tread in so it more closely matches the coloring of the sheet on the doors.
f5ea47ea86826bdfafe29f0a7a298764.jpg

While the paint was drying on the door frames I took my patio furniture from the deck and put it up on the mezzanine so it will be out of the weather throughout the winter.

Tomorrow I will work on getting the aluminum cut as well as get my snowblower ready for that white ****.
 

Attachments

  • f5ea47ea86826bdfafe29f0a7a298764.jpg
    f5ea47ea86826bdfafe29f0a7a298764.jpg
    651.2 KB · Views: 1
  • 779f78dc46396b9e378abbc11d06cf2f.jpg
    779f78dc46396b9e378abbc11d06cf2f.jpg
    714 KB · Views: 1
  • e223853e7b9150f304c7611c54c01db5.jpg
    e223853e7b9150f304c7611c54c01db5.jpg
    845.2 KB · Views: 1
  • 7e62cc58e699df12badd1c470dd9923e.jpg
    7e62cc58e699df12badd1c470dd9923e.jpg
    673 KB · Views: 1
  • 9585ccf5fe6a21ca2e9e2aeaa5376a37.jpg
    9585ccf5fe6a21ca2e9e2aeaa5376a37.jpg
    665.4 KB · Views: 2
Last edited:

customh

Well-known member
Joined
Feb 18, 2013
Messages
562
Location
East Bethel, MN
Very nice Mike. Watched a selection of the videos and looked through the whole thread Saturday. I just began last year as a maintenance technician, so hopefully your success is a sign of things to come for me. Not without lots of hard work and dedication of course.
 
OP
Z

zmotorsports

ALLIANCE MEMBER
Joined
Oct 20, 2009
Messages
21,477
Location
Northern Utah
Very nice Mike. Watched a selection of the videos and looked through the whole thread Saturday. I just began last year as a maintenance technician, so hopefully your success is a sign of things to come for me. Not without lots of hard work and dedication of course.

Thank you for taking the time to read through the thread and especially for watching my videos. I hope you have found them informative.

Congratulations on your new career. I hope you find it as rewarding as I have in the 30 years I have been a maintenance mechanic.
 
Last edited:
OP
Z

zmotorsports

ALLIANCE MEMBER
Joined
Oct 20, 2009
Messages
21,477
Location
Northern Utah
Although I was going to finish up my cupboard doors tonight and get my snowblower checked out, plans just changed.

My upholstery guy just called me and said if I could get my Jeep seats to him tomorrow he could possibly get on them Friday and finish them up Monday at the latest. He also said he had a cancellation for next week and if I could get my coach seats/couches to him by Monday he will more than likely be able to jump right on them.

When I talked to him last week about my two front seats in the Jeep and my coach interior he told me he could more than likely get the Jeep seats done right after Thanksgiving but he has two large jobs coming in right after the new year and would try to get my coach done by Christmas but couldn't make any promises. I was shocked when he just called and asked if I could get everything to him this soon. I hope he has my coach interior finished up by the first part of December, that would be great.

Next couple of nights will be spent removing interior.
 
To avoid these ads, REGISTER NOW!
Top Bottom