To avoid these ads, REGISTER NOW!

ZMotorsports Shop Projects 2.0

jjeffries

Well-known member
Joined
Sep 7, 2013
Messages
91
I need some educatin', please,
The air system fitting repair: does the bus use compressed air rams to open and close the doors (like a city bus)?
What's the big green metal box/tank that's slid forward from the front of the bus in the picture where you greased the front end?
What do you use to jack up the front end?
Thanks in advance for the lesson. John/CT.
 
To avoid these ads, REGISTER NOW!
OP
Z

zmotorsports

ALLIANCE MEMBER
Joined
Oct 20, 2009
Messages
21,450
Location
Northern Utah
I need some educatin', please,
The air system fitting repair: does the bus use compressed air rams to open and close the doors (like a city bus)?
What's the big green metal box/tank that's slid forward from the front of the bus in the picture where you greased the front end?
What do you use to jack up the front end?
Thanks in advance for the lesson. John/CT.

John, the compressed air for the door is not to open/close the door but to supply compressed air to an air seal that is encased in the door jamb. Once the door is closed, the air operated E-brake is released and the coach is placed in gear, the solenoid opens which allows regulated compressed air to enter the seal to create a sound proof seal. This provided a very quiet and air leak free seal while traveling down the road. No air whistling or hissing past the door when driving down the road.

The big green box sticking out the front is my Onan onboard generator. Our coach carries a 10k watt Onan Quiet Diesel generator to provide AC power to the coach's house system.

As for raising the coach, I have an air over hydraulic 22/35 ton jack that I use to raise it and then a couple of 22-ton jack stands to place under the coach to secure it in place while working under it.

Hope that answers your questions and if you have any others please don't hesitate to ask.

Thanks for stopping by my thread.
 
Last edited:
OP
Z

zmotorsports

ALLIANCE MEMBER
Joined
Oct 20, 2009
Messages
21,450
Location
Northern Utah
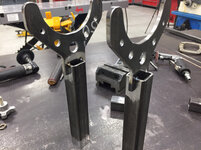
I was able to complete my axle fixture tonight.

I like to “blast tack” components so I can simply weld over the top of them on final weld. To do this I bump my amperage up to nearly double what I would be welding at for the specific material thickness. Then just max the pedal and a small fusion tack will form. This is done very fast and works great when TIG welding because it will allow you to hold a component with one hand while holding the TIG torch with the other to tack.
32508e95b741dda5619257cee9fb6588.jpg

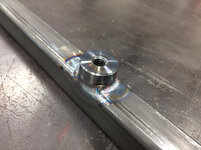
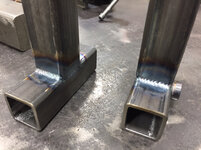
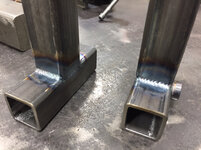
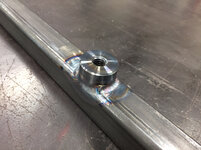
Bungs final welded.
7cbe96d34f0c53c57a625b4140af4557.jpg

2d468ccda78c71ca28e617c4ae8196ef.jpg

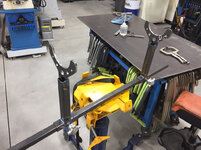
To prevent the tubing from bowing or pulling I place a TIG rod under the middle and clamp each end flat to the table. Basically pre-loading it to compensate for the contraction.
232d6039b8906160bd4fe3572e747c74.jpg

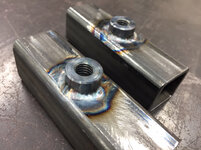
Bungs welded on the two slider pieces.
3332be9e776ad0be18129c693803db4a.jpg

Next I cut out the two straddle supports and blast tacked them in a couple places to make them symmetrical.
889b98bbff0ce0772969326f23f08dca.jpg

eed418d7711f45853605709284042a46.jpg

Blended and speed holes added.
1ea4a0ed685d22f515a7a04bf45d812d.jpg

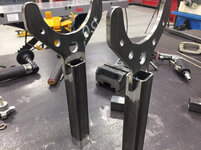
Next I clamped the vertical support tubes in the mill vise and found the middle with an edge finder. DRO’s are so awesome.
c7b0bbe063fe71a9f36b1a629920554a.jpg

Cutting a 1/4” slot to a depth of .800”.
798e973d5a2941f040752b8cf52408d7.jpg

Test fit.
eecd013d7aa805728c10f471f31aa626.jpg

Tacked in position.
a11b088fca2e1ba92148313db140727c.jpg

Final welding completed.
7ca84c1fdc649334cc1eb713f4e7cf0e.jpg

7a0a0a9eb7bad5961ea63328a5484c47.jpg

13fbc47a44fbfbd0ce3f98d3ec8fc822.jpg

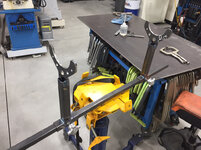
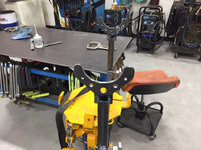
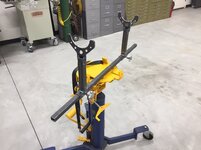
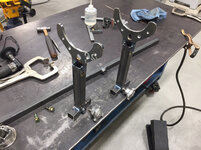
All components completed and ready to bolt together.
2ec907f3cf784991e48559fe38df8907.jpg

2857da86ef81f275afeeff6090fba75c.jpg

803622ce393a28d965a33f1f2d52d06d.jpg

77edfcfdc2c58c514f303bcb68af23a2.jpg

e34ab0d27c9e6ae969c88cc0ece83f4c.jpg

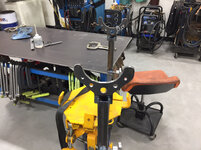
Ready for use and another item knocked off the white board.

Thanks for looking.
 

Attachments

  • eecd013d7aa805728c10f471f31aa626.jpg
    eecd013d7aa805728c10f471f31aa626.jpg
    668.9 KB · Views: 0
  • a11b088fca2e1ba92148313db140727c.jpg
    a11b088fca2e1ba92148313db140727c.jpg
    758.5 KB · Views: 0
  • 7ca84c1fdc649334cc1eb713f4e7cf0e.jpg
    7ca84c1fdc649334cc1eb713f4e7cf0e.jpg
    713.5 KB · Views: 0
  • 7a0a0a9eb7bad5961ea63328a5484c47.jpg
    7a0a0a9eb7bad5961ea63328a5484c47.jpg
    741.8 KB · Views: 0
  • 13fbc47a44fbfbd0ce3f98d3ec8fc822.jpg
    13fbc47a44fbfbd0ce3f98d3ec8fc822.jpg
    798 KB · Views: 0
  • e34ab0d27c9e6ae969c88cc0ece83f4c.jpg
    e34ab0d27c9e6ae969c88cc0ece83f4c.jpg
    668.7 KB · Views: 0
  • 77edfcfdc2c58c514f303bcb68af23a2.jpg
    77edfcfdc2c58c514f303bcb68af23a2.jpg
    775.5 KB · Views: 0
  • 803622ce393a28d965a33f1f2d52d06d.jpg
    803622ce393a28d965a33f1f2d52d06d.jpg
    667.9 KB · Views: 0
  • 2ec907f3cf784991e48559fe38df8907.jpg
    2ec907f3cf784991e48559fe38df8907.jpg
    778.2 KB · Views: 0
  • 798e973d5a2941f040752b8cf52408d7.jpg
    798e973d5a2941f040752b8cf52408d7.jpg
    650.2 KB · Views: 0
  • c7b0bbe063fe71a9f36b1a629920554a.jpg
    c7b0bbe063fe71a9f36b1a629920554a.jpg
    615.8 KB · Views: 0
  • 1ea4a0ed685d22f515a7a04bf45d812d.jpg
    1ea4a0ed685d22f515a7a04bf45d812d.jpg
    974.8 KB · Views: 0
  • 32508e95b741dda5619257cee9fb6588.jpg
    32508e95b741dda5619257cee9fb6588.jpg
    718.2 KB · Views: 0
  • 7cbe96d34f0c53c57a625b4140af4557.jpg
    7cbe96d34f0c53c57a625b4140af4557.jpg
    682.8 KB · Views: 0
  • 2d468ccda78c71ca28e617c4ae8196ef.jpg
    2d468ccda78c71ca28e617c4ae8196ef.jpg
    722.5 KB · Views: 0
  • 3332be9e776ad0be18129c693803db4a.jpg
    3332be9e776ad0be18129c693803db4a.jpg
    733.9 KB · Views: 0
  • 232d6039b8906160bd4fe3572e747c74.jpg
    232d6039b8906160bd4fe3572e747c74.jpg
    683.6 KB · Views: 0
  • 889b98bbff0ce0772969326f23f08dca.jpg
    889b98bbff0ce0772969326f23f08dca.jpg
    638.8 KB · Views: 0
  • eed418d7711f45853605709284042a46.jpg
    eed418d7711f45853605709284042a46.jpg
    730.6 KB · Views: 0
  • 2857da86ef81f275afeeff6090fba75c.jpg
    2857da86ef81f275afeeff6090fba75c.jpg
    789.3 KB · Views: 0
Last edited:

lilscorpion

Well-known member
Joined
Mar 15, 2010
Messages
3,600
Location
Colorado
Ready for use and another item knocked off the white board.


That’s sweet, I like it as an add-on to the ****** Jack. Thought - add another rail forward of that one and make another U so you can support the pinion. The rail would only need to be half the length too. If I had one I could more easily adjust the uppers on Andrew’s LJ at the moment.
 
OP
Z

zmotorsports

ALLIANCE MEMBER
Joined
Oct 20, 2009
Messages
21,450
Location
Northern Utah
Great work Mike!

Another piece of artistry by Craftsman Mike.

Another great project.

I like what your neighbor did with the flag, that is a nice gesture.

Great work as always Mike!

Thanks guys. I appreciate all of the comments.


That’s sweet, I like it as an add-on to the ****** Jack. Thought - add another rail forward of that one and make another U so you can support the pinion. The rail would only need to be half the length too. If I had one I could more easily adjust the uppers on Andrew’s LJ at the moment.

Thanks Matt. I'll keep that in mind if I end up needing to support the pinion. For the most part I just wanted something to catch the axle and provide a means of getting it over to my fabrication table where I usually do the work on them. Then positioning it back into place without having to raise and lower the vehicle and climb around on my back.

Next up this winter is a different type of fixture that I want to fabricate to hold the axle securely to my fabrication table for not only setting up gears but also when adding or modifying bracketry. Something for using the table as a reference and then set up mounting brackets at certain degrees and dimensions. Still mulling over ideas in my head but I think I have somewhat of a plan. Let's say that the plan is in "jello" as it's not quite rock solid yet.:lol_hitti

All of this is more due to the fact that I no longer have my trusty sidekick in the shop like I have become accustomed to over the past 25+ years. My son's been by my side in the shop since he was about 3 or 4 years old and giving me a helping hand since he was about 5 or 6 and very helpful from the time he was about 8 or so and now I'm back to working alone and having to figure out what that looks like and how to do certain jobs so I'm not calling him every other day to give me a hand. This fixture will definitely help with getting axles in/out of vehicles.

Thanks for following along and commenting everyone.
 

polexican23

Banned
Joined
Jun 11, 2013
Messages
2,168
Location
burbs-Illinois
I am stupid and sure the wide caster base helps, but would it be more stable if mounted it across the center of the top plate on instead of across the front of the plate? does that even make sense?
 
OP
Z

zmotorsports

ALLIANCE MEMBER
Joined
Oct 20, 2009
Messages
21,450
Location
Northern Utah
I am stupid and sure the wide caster base helps, but would it be more stable if mounted it across the center of the top plate on instead of across the front of the plate? does that even make sense?

Yes, that makes perfect sense. However, there are movable supports that run across the middle which negated the ability to fasten anything in that area. The table does tilt in both axis so my intent was to merely preload it one direction when putting the load of the axle on it. I would have much rather mounted it across the middle but this was the next best option and really the only option to keep the movable supports functioning.

Thanks for the question and I hope the response makes sense as it may not easy to see in the picture(s).
 

rattle_snake

Well-known member
Joined
Jun 25, 2015
Messages
5,229
Location
Chandler, AZ
Nice job (as always) on the axle adapter.
It would be much easier for me, if you lived down the street so I could use all your custom tools instead of having to duplicate them. Maybe even leave a project vehicle in your shop for awhile so you could do most of the work.
:)

I get the one man show, as I get 'older' I can't just muscle heavy stuff around anymore without consequences.
 
OP
Z

zmotorsports

ALLIANCE MEMBER
Joined
Oct 20, 2009
Messages
21,450
Location
Northern Utah
Nice job (as always) on the axle adapter.
It would be much easier for me, if you lived down the street so I could use all your custom tools instead of having to duplicate them. Maybe even leave a project vehicle in your shop for awhile so you could do most of the work.
:)

I get the one man show, as I get 'older' I can't just muscle heavy stuff around anymore without consequences.

Thanks for the comments Justin. My wife is nervous about me working by myself and I tweaked my back a few months ago that kind of shocked me to reality that I'm not as young as I used to be. Now I've been looking at things a bit differently in terms of how to accomplish them being a one man shop again.
 

OutlawDrifter

Well-known member
Joined
Jan 20, 2015
Messages
3,895
Location
KS
Working by yourself is a bit of an art, and takes extra patience and thought. I'm also very specific about how I like things done, and have "control issues" when it comes to my shop and vehicles. I'm not very good at directing people down the path my mind has created a lot of times, and therefore, can get more done by myself.

When I need extra muscle, I call in the nephew (6'3ish 270lbs) or daughter #2's boyfriend. He stays focused, works hard, and doesn't require babysitting or constant instructions, lol.
 

dittle fart around

Well-known member
Joined
Jan 9, 2011
Messages
2,455
Location
Vancouver, Washington, USA
Working by yourself is a bit of an art, and takes extra patience and thought. I'm also very specific about how I like things done, and have "control issues" when it comes to my shop and vehicles. I'm not very good at directing people down the path my mind has created a lot of times, and therefore, can get more done by myself.

My kids won't work with me. They can't read my mind, and I can't tell them what's in there without knowing myself.


:beer::beer::beer:
 
OP
Z

zmotorsports

ALLIANCE MEMBER
Joined
Oct 20, 2009
Messages
21,450
Location
Northern Utah
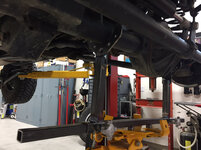
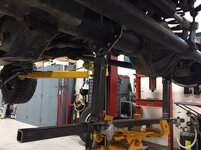
Tried out the axle fixture last night and it works perfectly.

f3bb236ef2d52d4ebb42b8be66f4cf17.jpg

4bf04e813100547aca40bdf3732a7451.jpg
 

Attachments

  • 4bf04e813100547aca40bdf3732a7451.jpg
    4bf04e813100547aca40bdf3732a7451.jpg
    709.7 KB · Views: 1
  • f3bb236ef2d52d4ebb42b8be66f4cf17.jpg
    f3bb236ef2d52d4ebb42b8be66f4cf17.jpg
    733.6 KB · Views: 1
To avoid these ads, REGISTER NOW!

alexb2000

Well-known member
Joined
Feb 7, 2010
Messages
664
Location
Fort Worth, TX
Mike-

Nice work as always. What (if anything) do you plan to do to keep the diff from rotating in the saddles when the U-bolts or links are off?

I use a set of chain vice grips to keep mine from doing that, but it requires the saddles on the stand to have a flange parallel to the axle tubes so you have something to clamp to.
 
OP
Z

zmotorsports

ALLIANCE MEMBER
Joined
Oct 20, 2009
Messages
21,450
Location
Northern Utah
Axle stand looks great Mike, any chance of a video on YouTube?

Thanks Anders. I showed a little bit of it on my last video from this past weekend called Saturday Shop Tour #5 but I wasn't able to get it completed on Saturday.

I may do another video this coming weekend if I have enough projects lined out. I appreciate you taking the time to follow along on my videos and I've been asked to put out more videos so I am going to try to document a bit more of my work. I'm worried about though because I don't want to just throw up videos unless they actually have decent content otherwise it's just occupying space and everyone's time. Much of my work is just standard jobs or projects and only try to focus on the unique stuff or projects with a twist but maybe I'll try a bit more and see if people respond favorably or not.

I really appreciate followers like you that appreciate the content and my rambling though.
 
OP
Z

zmotorsports

ALLIANCE MEMBER
Joined
Oct 20, 2009
Messages
21,450
Location
Northern Utah
Mike-

Nice work as always. What (if anything) do you plan to do to keep the diff from rotating in the saddles when the U-bolts or links are off?

I use a set of chain vice grips to keep mine from doing that, but it requires the saddles on the stand to have a flange parallel to the axle tubes so you have something to clamp to.

Thank you. I'm not as worried about the pinion dropping because this is just to hold the weight of the actual axle itself. When I have removed them via jackstands and raise the car up and away from the axle the pinion will sometimes fall downward and others times not as it really depends on the balance of the axle front to rear. When it comes to installing bolting lower control arms or upper control arms first is really irrelevant and then a simple movement up or down on the pinion will align the other control arms.

If I discover later on that a way to hold the pinion will be beneficial I'll cross that bridge when I get to it but I'm not too worried about it at this time. I merely wanted a means of raising and lowering the axle housing while the car is up on the lift which is what I have achieved. So far I've only used it once a couple of nights ago and it has worked perfectly. Last night reinstalling the axle went just like I described by moving the pinion yolk slightly to align the mounting points.

Thanks for the comments and for following along.
 
OP
Z

zmotorsports

ALLIANCE MEMBER
Joined
Oct 20, 2009
Messages
21,450
Location
Northern Utah
I started another change to the Jeep a couple of nights ago.

When I originally built the Jeep back in late 2011 (over 100k miles ago) I added a BDS 4.5" long-arm suspension lift with the JKS ACOS front setup. The ACOS are an adjustable coil spacer that allows a couple inch range of adjustability placed between the upper spring bucket and the coil spring itself. It is designed to have the ability to compensate for changing weight and/or ride height of the vehicle and we all know Jeeps are never done and ever evolving so I thought they would work perfectly for my application.

That being said I don't think I would ever run them again. In the 8 years and just over 100k miles I have had my Jeep I have only adjusted them one time and that was about a year and a half after the initial build. I made about a 3/8" adjustment to compensate for some slightly taller springs I added to the rear in which to compensate for the added weight.

Personally, I would suggest that a person uses springs and if necessary a small spacer for final adjustment as once these are installed they are on there. Even on the JKS website they say these are irreversible. Although I am reversing them it comes with some time and effort.

Hands down the worst part was removal of the ACOS from the Jeep and I put a healthy dose of anti-seize on them upon initial installation.

A few pictures from last couple of nights work.

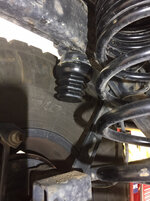
Passenger side ACOS removed with a little persuasion but really not that bad to remove.
b6eda6267108ae87b538c35e973f43c8.jpg

Driver’s side was much, much more stubborn. Trying to free the driver’s side ACOS.
b2d0cfb6ddf8022fe750d58f16bd53ac.jpg

Passenger’s side assembly and lower portion of the driver’s side.
e7c3142191f4d9fe2000c159bb3fb44f.jpg

Finally. All the components removed.
a7d01f5bdc5cc9f9ca9a84d54712f454.jpg

Passenger’s side painted.
eb9f0af51c47cac149ebcc2278e76a2e.jpg

Driver’s side painted.
c8b198b45bff7d12c7925723115910ab.jpg

Stay tuned for reassembly.
 

Attachments

  • c8b198b45bff7d12c7925723115910ab.jpg
    c8b198b45bff7d12c7925723115910ab.jpg
    681.5 KB · Views: 0
  • eb9f0af51c47cac149ebcc2278e76a2e.jpg
    eb9f0af51c47cac149ebcc2278e76a2e.jpg
    787.6 KB · Views: 0
  • a7d01f5bdc5cc9f9ca9a84d54712f454.jpg
    a7d01f5bdc5cc9f9ca9a84d54712f454.jpg
    637.2 KB · Views: 0
  • e7c3142191f4d9fe2000c159bb3fb44f.jpg
    e7c3142191f4d9fe2000c159bb3fb44f.jpg
    673.8 KB · Views: 0
  • b2d0cfb6ddf8022fe750d58f16bd53ac.jpg
    b2d0cfb6ddf8022fe750d58f16bd53ac.jpg
    719.7 KB · Views: 0
  • b6eda6267108ae87b538c35e973f43c8.jpg
    b6eda6267108ae87b538c35e973f43c8.jpg
    681.6 KB · Views: 0
Last edited:
OP
Z

zmotorsports

ALLIANCE MEMBER
Joined
Oct 20, 2009
Messages
21,450
Location
Northern Utah
Looks good. Are you installing some fox air bumps in those tubes or what's the plan for bumps now.


Nothing that high tech. I was going to install some hydraulic bumps but for a daily driver/weekend wheeler that’s not built to run high speeds through the whoops that is way overkill. I’m going a much simpler route.
 
OP
Z

zmotorsports

ALLIANCE MEMBER
Joined
Oct 20, 2009
Messages
21,450
Location
Northern Utah
Today’s work consisted of finishing up my Jeep suspension.

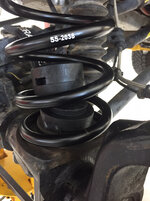
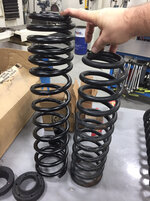
After removing the ACOS spacers that provide about 1-1/2” of lift at their lowest setting I had to install a bit longer spring to compensate. I have been so impressed with the ride quality and flex of the Metalcloak dual rate springs that I have installed in the rear that I again went with some Metalcloak coil springs for the front.

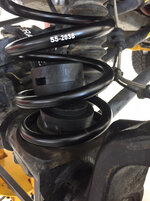
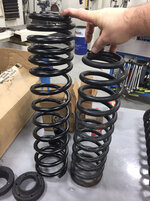
Here is a side by side comparison of the old BDS 4.5” coil springs compared to the new Metalcloak 4.5” dual rate springs with a higher spring rate. The Metalcloaks have a 22.5” free length which also prevent them from unseating at full droop.
59add1ada1a9adf241b7658555241401.jpg

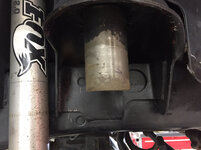
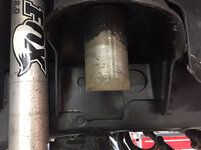
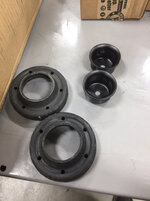
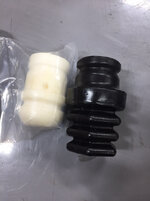
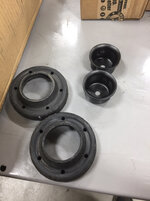
OEM Mopar spring isolators that will reside on top of the spring between the spring and coil bucket. Also in the picture are TJ/LJ OE replacement jounce buckets. On a JK/JKU these jounce buckets are welded to the coil supporting tubes but seeing as how I cut them off when I installed the JKS ACOS & years ago I had to come up with an alternate plan. These will be bolted to the vertical tubes for an OEM function and appearance.
7cfb588b48662ef7660ab37df712aae2.jpg

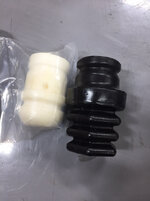
OEM jounce stops on the left and new Metalcloak Duro-spring microcellular urethane jounce stops on the right.
10edf80c97c2191e6b71122c9e6cf0a8.jpg

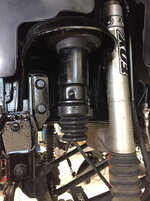
OEM isolator, OE style jounce bucket and Metalcloak jounce stops installed and ready to accept the new 4.5” Metalcloak coil springs.
bac2be55a08f2aad2bbc2014877cd0f1.jpg

122af0287cb1d64547f84627e6a383b3.jpg

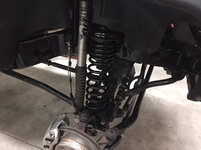
Springs installed along with Synergy stackable bump stop adapters.
99006faa2ba7e555178055c09585d5f6.jpg

09dc409fa818e3552811c899192d426b.jpg

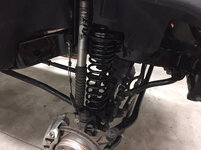
Shocks and sway bar links reconnected.
2fca613fc065393389e81d1d9191a52a.jpg

f1c4881f42d941860a4b19294887e471.jpg

Rear OEM jounce stops with new Metalcloak rear Duro-springs.
3c9dfdd0f3adcc62a944d0fb1845ef65.jpg

acc0c9ee03cf27368fa40e46acbc5e09.jpg

Metalcloak rear jounce stops installed.
cd22c6b0fc1bea99685bcb7fe799b965.jpg

Final assembly and sitting back down on its tires/wheels.
abff0e7a7b983f21d05e9ce651f4bc42.jpg

7ee76d865c972112f8cd4b36639422cb.jpg

Before backing it out of the shop and taking off with the wife for a drive I wanted to do one more small mod.

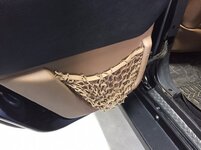
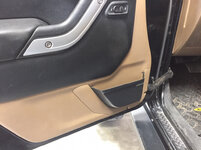
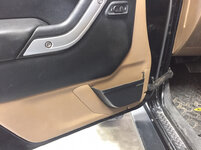
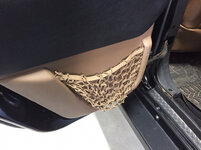
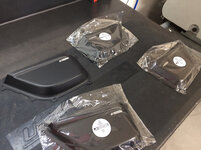
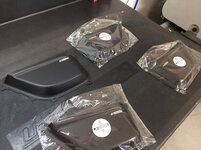
I have been disgusted by these ugly door nets that FCA thought were a good idea. Not only are they as ugly as Fido’s **** but they’re useless. I’ve been eying these JK Pockets for a few years but finally pulled the trigger and bought a set. I went with the standard black as I didn’t want the carbon fiber ones.
163421afc3b05a909765be83ce472e58.jpg

d02d5041eceb60b853220aad9c70e2e0.jpg

670c72c2d2ed770ba62d5281b44ad69b.jpg

9f970089ed3213e94fae6a1a1c6fdb68.jpg

Thanks for looking.
 

Attachments

  • 7ee76d865c972112f8cd4b36639422cb.jpg
    7ee76d865c972112f8cd4b36639422cb.jpg
    637.7 KB · Views: 0
  • 7cfb588b48662ef7660ab37df712aae2.jpg
    7cfb588b48662ef7660ab37df712aae2.jpg
    635.4 KB · Views: 0
  • 59add1ada1a9adf241b7658555241401.jpg
    59add1ada1a9adf241b7658555241401.jpg
    789.2 KB · Views: 0
  • 10edf80c97c2191e6b71122c9e6cf0a8.jpg
    10edf80c97c2191e6b71122c9e6cf0a8.jpg
    587.6 KB · Views: 0
  • bac2be55a08f2aad2bbc2014877cd0f1.jpg
    bac2be55a08f2aad2bbc2014877cd0f1.jpg
    765.7 KB · Views: 0
  • 670c72c2d2ed770ba62d5281b44ad69b.jpg
    670c72c2d2ed770ba62d5281b44ad69b.jpg
    738.6 KB · Views: 0
  • d02d5041eceb60b853220aad9c70e2e0.jpg
    d02d5041eceb60b853220aad9c70e2e0.jpg
    737.4 KB · Views: 0
  • 163421afc3b05a909765be83ce472e58.jpg
    163421afc3b05a909765be83ce472e58.jpg
    758.7 KB · Views: 0
  • abff0e7a7b983f21d05e9ce651f4bc42.jpg
    abff0e7a7b983f21d05e9ce651f4bc42.jpg
    681.2 KB · Views: 0
  • cd22c6b0fc1bea99685bcb7fe799b965.jpg
    cd22c6b0fc1bea99685bcb7fe799b965.jpg
    741.8 KB · Views: 0
  • 3c9dfdd0f3adcc62a944d0fb1845ef65.jpg
    3c9dfdd0f3adcc62a944d0fb1845ef65.jpg
    682.6 KB · Views: 0
  • f1c4881f42d941860a4b19294887e471.jpg
    f1c4881f42d941860a4b19294887e471.jpg
    660.4 KB · Views: 0
  • 2fca613fc065393389e81d1d9191a52a.jpg
    2fca613fc065393389e81d1d9191a52a.jpg
    645.3 KB · Views: 0
  • 09dc409fa818e3552811c899192d426b.jpg
    09dc409fa818e3552811c899192d426b.jpg
    716.5 KB · Views: 0
  • acc0c9ee03cf27368fa40e46acbc5e09.jpg
    acc0c9ee03cf27368fa40e46acbc5e09.jpg
    672.4 KB · Views: 0
  • 99006faa2ba7e555178055c09585d5f6.jpg
    99006faa2ba7e555178055c09585d5f6.jpg
    802.6 KB · Views: 0
  • 122af0287cb1d64547f84627e6a383b3.jpg
    122af0287cb1d64547f84627e6a383b3.jpg
    786 KB · Views: 0
  • 9f970089ed3213e94fae6a1a1c6fdb68.jpg
    9f970089ed3213e94fae6a1a1c6fdb68.jpg
    630.1 KB · Views: 0
Last edited:

Scuderia-F1

Well-known member
Joined
Feb 9, 2011
Messages
1,198
Location
Stockholm, Sweden
Thanks Anders. I showed a little bit of it on my last video from this past weekend called Saturday Shop Tour #5 but I wasn't able to get it completed on Saturday.

I may do another video this coming weekend if I have enough projects lined out. I appreciate you taking the time to follow along on my videos and I've been asked to put out more videos so I am going to try to document a bit more of my work. I'm worried about though because I don't want to just throw up videos unless they actually have decent content otherwise it's just occupying space and everyone's time. Much of my work is just standard jobs or projects and only try to focus on the unique stuff or projects with a twist but maybe I'll try a bit more and see if people respond favorably or not.

I really appreciate followers like you that appreciate the content and my rambling though.

I’ve somehow managed to miss your latest video but just fired up my TV to correct that.

Massive fan of your video productions no matter what job you’re tackling.
Just looking around at your equipment is massively inspiring and your ramblings are GREAT!:beer:

Regards,
Anders
 

PhantomEB

Well-known member
Joined
Feb 6, 2006
Messages
6,817
Location
Medicine Hat, AB, Canuckistan
Them door pockets look way more cleaner.

That’s the one thing I always laughed at with the jeeps in my old club....ramp champs that always had their coils fall out. I was 27 at the time when they would ask what’s so funny... I go are you gonna be able to put a coil back in on the trail? Mine are captured top and bottom.
 
OP
Z

zmotorsports

ALLIANCE MEMBER
Joined
Oct 20, 2009
Messages
21,450
Location
Northern Utah
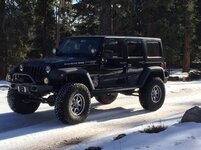
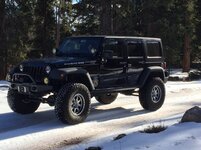
Today my wife and I took off for a drive up and over the Mirror Lake Highway (US 150) out of Evanston, WY and down through Kamas, UT.

We put about 250 miles on and put the Jeep through its paces as well as just relaxed with the wife and enjoying the drive and conversation.

The Jeep is so planted and sure footed through the curves even at speed and flexed out nicely on the couple of obstacles I tested it out on today.

58c2ba942e7bfe6903aa91262920fd0f.jpg

53aed72c59882a533c1082135f906b55.jpg

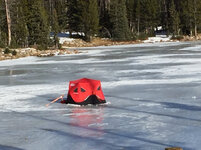
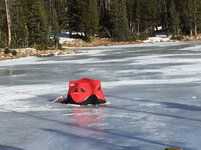
We even saw a few people out on the little kettle lakes ice fishing although I don’t think it was thick enough and especially with it being in the mid-50 degree range today.
bfd328b90ce94dc4f2f231f7c2b4d4fa.jpg

ab1ac9e8032b825181bc7402248393cb.jpg

Thanks for looking.
 

Attachments

  • 58c2ba942e7bfe6903aa91262920fd0f.jpg
    58c2ba942e7bfe6903aa91262920fd0f.jpg
    810.2 KB · Views: 0
  • 53aed72c59882a533c1082135f906b55.jpg
    53aed72c59882a533c1082135f906b55.jpg
    1.1 MB · Views: 0
  • bfd328b90ce94dc4f2f231f7c2b4d4fa.jpg
    bfd328b90ce94dc4f2f231f7c2b4d4fa.jpg
    767.9 KB · Views: 0
  • ab1ac9e8032b825181bc7402248393cb.jpg
    ab1ac9e8032b825181bc7402248393cb.jpg
    703.3 KB · Views: 0
Last edited:
OP
Z

zmotorsports

ALLIANCE MEMBER
Joined
Oct 20, 2009
Messages
21,450
Location
Northern Utah
I sure am Matt.

Love these 37’s. The Nitto Ridge Grapplers worked great in the snow today.

Mileage out of this LS is pretty good as well. Pushing a 6k pound brick down the interstate @ 70 MPH then up over a 10k foot mountain pass at 45-60 MPH a few miles of snow-wheelin’ and still netted me 16 MPG when I filled up back at home.
 

lilscorpion

Well-known member
Joined
Mar 15, 2010
Messages
3,600
Location
Colorado
I sure am Matt.

Love these 37’s. The Nitto Ridge Grapplers worked great in the snow today.

Mileage out of this LS is pretty good as well. Pushing a 6k pound brick down the interstate @ 70 MPH then up over a 10k foot mountain pass at 45-60 MPH a few miles of snow-wheelin’ and still netted me 16 MPG when I filled up back at home.


So jealous. Maybe in the spring for me but until then, I’m more than happy to live vicariously through you. Need some LS vs. deep snow bashing pics now. [emoji6]


Sent from my iPad using Tapatalk Pro
 
OP
Z

zmotorsports

ALLIANCE MEMBER
Joined
Oct 20, 2009
Messages
21,450
Location
Northern Utah
So jealous. Maybe in the spring for me but until then, I’m more than happy to live vicariously through you. Need some LS vs. deep snow bashing pics now. [emoji6]


Sent from my iPad using Tapatalk Pro

Matt, I had asked my wife to jump out and take some video of me driving through the snow but she just looked at me and said "are you kidding me? It's warm and dry in here why would I go out and walk around in the snow and get cold and wet?" I actually couldn't argue with that logic.:lol_hitti
 
To avoid these ads, REGISTER NOW!
Top Bottom