To avoid these ads, REGISTER NOW!

ZMotorsports Shop Projects 2.0

jackson1701

Well-known member
Joined
Jan 13, 2015
Messages
157
Location
Jarrettsville, MD
Mike, how do you like your parts cleaner? does it do a good job of keeping the solvent clean? if there was another option for you to use, would you choose it or stay with the one you have. The one I use at work is from safety-kleen and has a recycler on it, When my solvent gets dirty, I can run it at the end of my day and the next morning when I come in I have a fresh and clean tank of solvent ready to go. Unfortunately that's not an option for me at my home shop with the cost. Steve
 
To avoid these ads, REGISTER NOW!
OP
Z

zmotorsports

ALLIANCE MEMBER
Joined
Oct 20, 2009
Messages
21,461
Location
Northern Utah
Mike, how do you like your parts cleaner? does it do a good job of keeping the solvent clean? if there was another option for you to use, would you choose it or stay with the one you have. The one I use at work is from safety-kleen and has a recycler on it, When my solvent gets dirty, I can run it at the end of my day and the next morning when I come in I have a fresh and clean tank of solvent ready to go. Unfortunately that's not an option for me at my home shop with the cost. Steve


Steve, I really like my ZEP parts washer. We have a contract with Safety-Kleen at work and although it is nice to have them come and service our multiple solvent tanks once a month and have freshly cleaned solvent, for a home shop that really isn't feasible.

I purchased my ZEP solvent tank at least 20 years ago now and I would buy it again. It has the recycling feature that uses a sand bag style of filtration system that when you run it through the sand bag it cleans the solvent. It also has a side mounted filter that filters it one more time before going through the hose and brush/nozzle to the part.

I am somewhat **** about how I utilize my solvent tank to help aid in prolonging the solvent. I don't merely dump grungy and filthy parts directly into the tank. I scrape all large debris such as thick grease and/or dirt & oil combinations onto a paper towel before it ever gets near the solvent tank. If the parts are merely oily such as a transmission, rear end parts or most engine related parts they can go directly to the tank from the car. I put a gate valve on my line supplying the brush at the outlet port of the side filter and when I first change the side filter I have to turn the flow down a bit to keep the solvent from splashing off of the parts and getting all over the place as the flow when not "throttled" is quite high. As the side filter begins to get contaminated and the flow slows I open the gate valve a little at a time. Once the gate valve is completely open AND my flow diminishes I know my side filter is getting plugged and I replace it. Then the process starts all over. Depending on how much I use it each month I generally will run the recycling/filtration portion during a Saturday when I'm working in the shop doing something other than using the parts washer and I'll run it for 6-8 hours maybe once a month.

I end up adding a gallon or two a year as a top off to compensate for what is consumed in the changing of the filters as well as what I would call "blow-off", the small amount that gets displaced when a part is removed from the solvent tank and blown off with compressed air. In the 20+ years I have owned this solvent tank I have completely torn down, disposed of and exchanged the solvent only 3 times so this is what I have found works optimum for my application. The solvent never seems to get to the point that it is really dark and completely saturated with debris and always seems to have that golden brown lightly used appearance.

Sorry for the lengthy explanation Steve, but bottom line is I love this solvent tank.
 
Last edited:

larry4406

Well-known member
Joined
Jan 27, 2006
Messages
19,565
Location
Northern Virginia
...I purchased my ZEP solvent tank at least 20 years ago now and I would buy it again. It has the recycling feature that uses a sand bag style of filtration system that when you run it through the sand bag it cleans the solvent. It also has a side mounted filter that filters it one more time before going through the hose and brush/nozzle to the part...
I purchased a used ZEP parts cleaner and it came with a white cloth bag thing about 16-18" long, about 6" wide and maybe 3-4 inches deep. Is this the filtration bag you speak off? If you have any details on how it is plumbed, used, etc, please share.

Your shop, skills, and documentary efforts are 5-star.

Sorry for the white stuff that fell from the sky.
 
OP
Z

zmotorsports

ALLIANCE MEMBER
Joined
Oct 20, 2009
Messages
21,461
Location
Northern Utah
I purchased a used ZEP parts cleaner and it came with a white cloth bag thing about 16-18" long, about 6" wide and maybe 3-4 inches deep. Is this the filtration bag you speak off? If you have any details on how it is plumbed, used, etc, please share.

Your shop, skills, and documentary efforts are 5-star.

Sorry for the white stuff that fell from the sky.

Thank you for the kind words, I very much appreciate them.

You are correct, the bag is just as you described it. I purchased my ZEP tank new and it came with a thin (probably 16-gauge) steel cover that hides the bag underneath and is very nice to set parts on in the tank and keep them up and off the bottom of the tank. I will set small assemblies on this shelf in preparation for cleaning and then they are easily handled one by one into the bottom of the tank, clean and then set on my side tray that I fabricated. The side tray that I fabricated slightly tilts towards the solvent tank and hangs on the side. I also place an absorbent pad on the side tray and just replace it as it gets soiled. Usually only half a dozen times a year or so is all.

The pump is located in the bottom of the reservoir and has a hose that feeds the inlet port of the side filter. From there it feeds into the back of the tank and then at the user side of the tank there is a "T" fitting. One side goes to the brush with a ball valve and the other goes to the recycling bag filter under the metal shelf. When recycling I close the ball valve off going to the brush and it merely filters through the side bag and drains back into the reservoir via the drain hole in the center of the tank.

One additional thing worth mentioning is that when I purchased the solvent tank new, it also came with a pad that went in the bottom of the user tank. It was referred to by our ZEP rep as the horse-hair pad. It is a very coarse blue fibrous pad that is meant to catch the big stuff before it goes into the drain and back to the reservoir. That pad ended up being a bigger pain in the **** than it was worth as parts kept getting snagged or caught on the fibers of the pad so I added a piece of expanded metal over the pad which helped somewhat but ultimately the horse-hair pad was a pain to have to deal with so I tossed that option early on and immediately adopted my OCD method of scraping debris before it hits the actual solvent.

I might add that although it sounds like a lot of work cleaning before going to the solvent tank it really is not that time consuming and is very efficient. For example, the yoke from the Dana 44 front axle I am rebuilding was extremely covered in grease, grime, dirt and debris. I put a paper towel on the workbench next to the solvent tank and after removing the yoke, I placed it on the paper towel. I grabbed my scraper and scraped the large stuff off of the yoke onto the paper towel until I was down to the casting. I folded the paper towel and wiped the exterior off very roughly, tossed the paper towel in the garbage and the yoke went to the solvent tank where I would say 85+ percent of the grime was removed from the yoke and therefore never made it into my solvent. It actually goes much faster doing it than explaining how I do it so it doesn't impede the process or slow the process as much as one would think.
 

4 FN 27

ALLIANCE MEMBER
Joined
Oct 19, 2015
Messages
4,635
Location
Minnesnowta
These pictures are for Pat. Hope you enjoy them, cuz I didn't enjoy taking them. :(

Thank you for thinking of me Mike!!!

Here we sit in MN tonight with Thunderstorms rolling through and almost all the snow we got is gone and it was 57° on the Shop Thermometer about 20 minutes ago. I am entering depression at this point.

I stood outside the door of the Shop watching the rain wash the snow from the roof of the building in total disappointment...

My new Sled is delayed getting here along with the Trailer. Told the Wife when I walked in the door I think we should sell all the sleds and buy a Boat.

18-34 foot waves predicted on Lake Superior tonight. Not sure if that qualifies as "Walleye Chop".
 
OP
Z

zmotorsports

ALLIANCE MEMBER
Joined
Oct 20, 2009
Messages
21,461
Location
Northern Utah
More Pat pictures. Hate to pile on there bud but we woke up to more snow this morning. Not as much as yesterday but still more snow.


Just before the sunset last night. I had blown the side yard and about a third of the back yard in this picture but as the sun was going down it lit up the mountain and thought I'd take a picture. Here in the virgin snow in the foreground you can see we had about 5-6 inches total yesterday.
snow1.jpg

And this is what it looks like after 3 hours of snow removal. The new wall packs that I installed on the house last year (exactly a year ago now) sure work great to illuminate the back and side yard. With daytime temperatures yesterday barely lingering above freezing, as soon as the sun went down the surface instantly turned to ice.
snow2.jpg

snow3.jpg


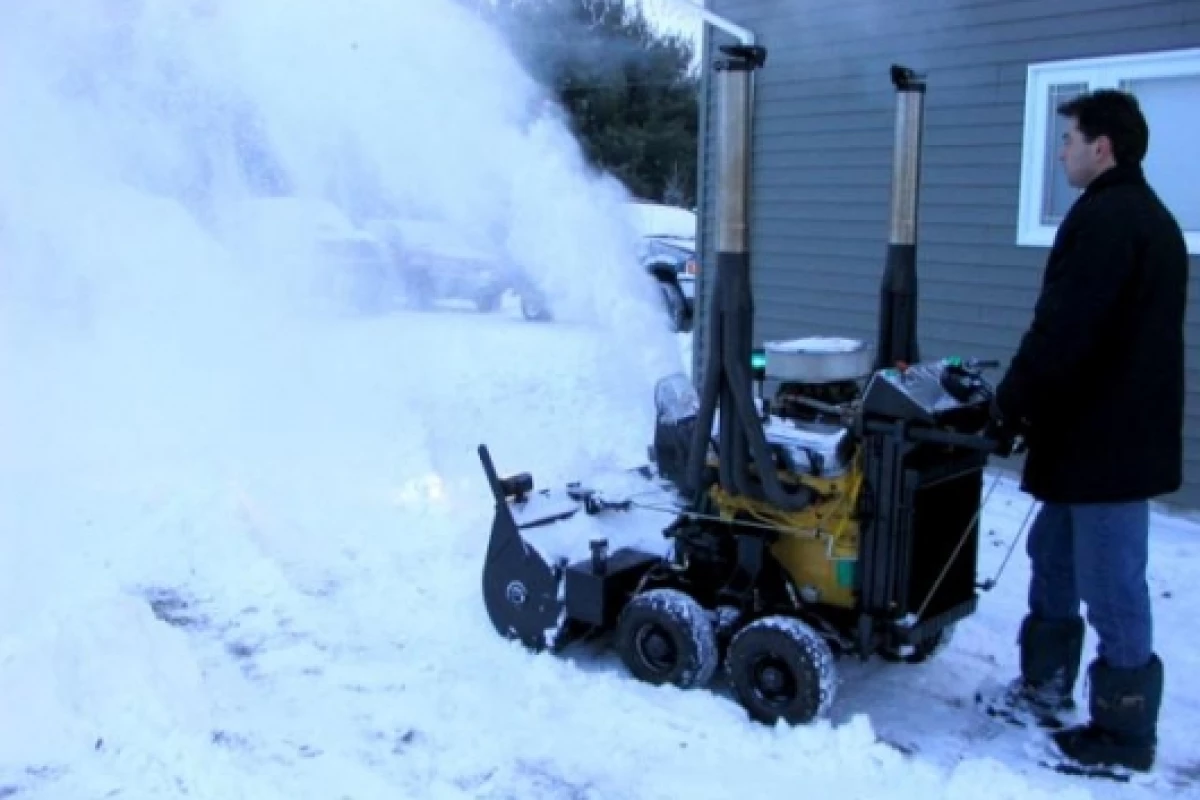
By the time I was done clearing snow I was spent and didn't get any work done in the shop last night. My wife asked me if I would like to get a small tractor to help clearing all of the snow which I thought was nice that she asked. I think if I were to even hint that I needed something larger to clear snow that she would give me the green light. I replied by stating I would rather build an LS powered snowblower to throw the snow into the next county before I'd buy a tractor for the few times a year I'd use in and then have to store it. She just smiled and said "then go ahead and build one." :D
 

4 FN 27

ALLIANCE MEMBER
Joined
Oct 19, 2015
Messages
4,635
Location
Minnesnowta
More Pat pictures. Hate to pile on there bud but we woke up to more snow this morning. Not as much as yesterday but still more snow.


Just before the sunset last night. I had blown the side yard and about a third of the back yard in this picture but as the sun was going down it lit up the mountain and thought I'd take a picture. Here in the virgin snow in the foreground you can see we had about 5-6 inches total yesterday.
snow1.jpg

And this is what it looks like after 3 hours of snow removal. The new wall packs that I installed on the house last year (exactly a year ago now) sure work great to illuminate the back and side yard. With daytime temperatures yesterday barely lingering above freezing, as soon as the sun went down the surface instantly turned to ice.
snow2.jpg

snow3.jpg


By the time I was done clearing snow I was spent and didn't get any work done in the shop last night. My wife asked me if I would like to get a small tractor to help clearing all of the snow which I thought was nice that she asked. I think if I were to even hint that I needed something larger to clear snow that she would give me the green light. I replied by stating I would rather build an LS powered snowblower to throw the snow into the next county before I'd buy a tractor for the few times a year I'd use in and then have to store it. She just smiled and said "then go ahead and build one." :D

When does the LS Blower project start? Separate Thread I suspect?

Looks like you may have had a bit of wind too seeing the snow stuck to the building.

We woke to all the snow being completely gone except the piles and windrows. Nasty wind at about 20-30 MPH. Was howling bad enough last night at 1:30 am I got up and put ear plugs in. We dropped 30° overnight. Going to be windy for the next couple of days with daytime highs of 20° +/- to night time lows in the single digits...and no snow...well snow that would matter anyway.
 
OP
Z

zmotorsports

ALLIANCE MEMBER
Joined
Oct 20, 2009
Messages
21,461
Location
Northern Utah
Yesterday I had a couple comments about my ZEP solvent tank so I thought I'd snap a few pictures of it last night if anyone is interested in them.

Overview of the solvent tank with the side tray that I fabricated about 7 or 8 years ago. I build this side tray when I purchased my new Precision Mathews lathe and mill while still in my old shop. I had a roll around cart next to my solvent tank in the old shop where I would place parts on after cleaning them to drip off onto an absorbent pad. When I sold my small 3-in-1 machine and bought the new lathe and mill I ended up rearranging things to where I no longer had that roll around cart next to my solvent tank so I built this tray that just hangs on the side of the of the solvent tank with support rods underneath. I keep an absorbent pad on the side tray plus keep it slightly angled towards the tank for any drain back off of cleaned parts that the pad doesn't capture.
tank1.jpg

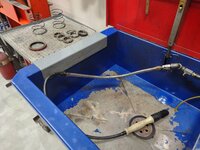
Here is the small sheet metal shelf that covers the sand bag for recycling/cleaning of the solvent. Sorry, the inside is a bit dirty as it needs a good cleaning. I set the greasy outer hub bearing on the shelf until I get them all torn apart then I will wipe off as much of the grease as possible with a paper towel before cleaning with solvent.
tank2.jpg

Here are the two ball valves for turning the flow on or off to either the brush or the recycling sand bag.
tank3.jpg

Picture of how the side tray overhangs the side of the tank yet still allows the lid to fully close and not interfere with the safety function if the link melts.
tank4.jpg

The side filter with the gate valve at the outlet going to the tank. I use this to restrict flow to the brush after a filter change and as the flow slows I open this valve over time until it is fully open. This is how I gage my filter changes and usually end up changing this side filter 2-4 times a year is all.
tank5.jpg

Hope that helps and if I can answer any more please don't hesitate to ask.
 

XJSuperman

Well-known member
Joined
Jan 26, 2018
Messages
3,088
Location
Central Iowa
She's definitely a keeper Mike.

One more question on the parts washer. I have one thats very similar in description made by EverClear. (I think). Where do you get your filters for canister on the side? Mine has that but it came with a nasty old filter and I haven't yet replaced it. The sandbag seems to be doing a great job.
 
OP
Z

zmotorsports

ALLIANCE MEMBER
Joined
Oct 20, 2009
Messages
21,461
Location
Northern Utah
She's a keeper!

Yes she is Marc. It's like she knows me.....;)

When does the LS Blower project start? Separate Thread I suspect?

Looks like you may have had a bit of wind too seeing the snow stuck to the building.

We woke to all the snow being completely gone except the piles and windrows. Nasty wind at about 20-30 MPH. Was howling bad enough last night at 1:30 am I got up and put ear plugs in. We dropped 30° overnight. Going to be windy for the next couple of days with daytime highs of 20° +/- to night time lows in the single digits...and no snow...well snow that would matter anyway.

Not sure if that will ever come to fruition Pat. I was actually being a smart *** but was shocked when she said go for it. Seems like a lot of time and money into a toy that may or may not get used each year plus have to give up space to store it.
 

Finallygotit

ALLIANCE MEMBER
Joined
Jul 6, 2013
Messages
4,097
Location
Tucson, AZ
Mike, so you going to add juice or a hair drier to the LS snowblower? Go big or go home!

BTW, that does not look like a lot of fun. What about putting a blade on your pick-up? You're spending way too much time throwing snow.

Just my $0.02

:beer:
 
OP
Z

zmotorsports

ALLIANCE MEMBER
Joined
Oct 20, 2009
Messages
21,461
Location
Northern Utah
Mike, so you going to add juice or a hair drier to the LS snowblower? Go big or go home!

BTW, that does not look like a lot of fun. What about putting a blade on your pick-up? You're spending way too much time throwing snow.

Just my $0.02

:beer:

I completely agree Dan, any time throwing snow is too much.

My wife told me to contract it out but I can't allow someone else in my yard, especially with a blade to hit either the house, shop, fence or my gates. Damn OCD....

Last year was great with only two storms and none requiring the snowblower but looking at the weather we have storms lined up through Christmas Eve at this point. Hard to get things done in the shop when I come home from work just to blow snow for 3+ hours per night.
 

jackson1701

Well-known member
Joined
Jan 13, 2015
Messages
157
Location
Jarrettsville, MD
Mike, Thanks so much for all the info on your parts cleaner. That's exactly what I was hoping to get from you. You now made my decision a lot more clear. I'll be picking one up in the near future. Maybe a future idea for a shop video featuring the parts cleaner.... As always, thanks again for going above and beyond to help us all out!!!! Steve
 

JCQuick

Well-known member
Joined
Nov 29, 2008
Messages
4,933
Location
Apopka Fla.
Mike I have that exact same ZEP tank with the side mount filter and recycle bag. I acquired it back when GM was closing dealer ships and friend of mine got like 5 of them for FREE. The bag was pretty used up and the connection hose was broken so I have never used it. i looked into buying a new one but was not sure if it was worth the price they want for it. I scored some safety kleen fluid for it 2 full drums and have only changed it once since I got it. Does that bag really make a difference? I change my filters when it starts to get dirty. But I heard that the bags help remove oil from the fluid.

I like you love it like you i drain every part that gets washed before I hose it off. I would love to know more on how you did that side tray. They sell one if I remember but its kind of fancy and pricey
 

TimeWarpF100

Well-known member
Joined
Aug 21, 2010
Messages
6,784
Location
not here
More Pat pictures. Hate to pile on there bud but we woke up to more snow this morning. Not as much as yesterday but still more snow.


Just before the sunset last night. I had blown the side yard and about a third of the back yard in this picture but as the sun was going down it lit up the mountain and thought I'd take a picture. Here in the virgin snow in the foreground you can see we had about 5-6 inches total yesterday.
snow1.jpg

And this is what it looks like after 3 hours of snow removal. The new wall packs that I installed on the house last year (exactly a year ago now) sure work great to illuminate the back and side yard. With daytime temperatures yesterday barely lingering above freezing, as soon as the sun went down the surface instantly turned to ice.
snow2.jpg

snow3.jpg


By the time I was done clearing snow I was spent and didn't get any work done in the shop last night. My wife asked me if I would like to get a small tractor to help clearing all of the snow which I thought was nice that she asked. I think if I were to even hint that I needed something larger to clear snow that she would give me the green light. I replied by stating I would rather build an LS powered snowblower to throw the snow into the next county before I'd buy a tractor for the few times a year I'd use in and then have to store it. She just smiled and said "then go ahead and build one." :D
Will the LS powered snowblower have a heated cab?

In the past I have had safety kleen washers then a cheap one but now I found no longer needed. Bit of MagicSoap and my steamer does the trick for me. Have not had a parts washer since 2006.
 
OP
Z

zmotorsports

ALLIANCE MEMBER
Joined
Oct 20, 2009
Messages
21,461
Location
Northern Utah
Mike, Thanks so much for all the info on your parts cleaner. That's exactly what I was hoping to get from you. You now made my decision a lot more clear. I'll be picking one up in the near future. Maybe a future idea for a shop video featuring the parts cleaner.... As always, thanks again for going above and beyond to help us all out!!!! Steve

Steve, you are very welcome. I was hoping that I provided the kind of information that you were looking for. As for a shop video, I have been thinking about doing a ZMotorsports Shop Tour Update because it has changed somewhat from where it was back in 2018 when I did the first shop tour video. I have changed a couple things around and I have added a few pieces of equipment plus a couple that I already had I have added wheels and/or a cart to so they are more easily accessible and rolled from the RV/storage bay over in to the shop when needed and then rolled back to storage. I wasn't sure if anyone would want to see another shop tour or not though.


Mike I have that exact same ZEP tank with the side mount filter and recycle bag. I acquired it back when GM was closing dealer ships and friend of mine got like 5 of them for FREE. The bag was pretty used up and the connection hose was broken so I have never used it. i looked into buying a new one but was not sure if it was worth the price they want for it. I scored some safety kleen fluid for it 2 full drums and have only changed it once since I got it. Does that bag really make a difference? I change my filters when it starts to get dirty. But I heard that the bags help remove oil from the fluid.

I like you love it like you i drain every part that gets washed before I hose it off. I would love to know more on how you did that side tray. They sell one if I remember but its kind of fancy and pricey

JC, it is rare to see people with these ZEP solvent tanks. When I bought mine back around 2000~ish they were relatively new and kind of a new spin on solvent tanks. I was impressed with the filtrations vs. the Safety-Kleen mindset of having it exchanged monthly. After using the one we got at work for a very short time I was impressed and really thought they would catch on but I don't think they ever did. They weren't the cheapest solvent tank option at the time but I can attest that now over a 20+ year timespan that it was not only the least expensive route for me, I think it was also one of the higher quality tanks on the market because it has stood the test of time when I know others who are on at least their second one in the time that I have had mine.

I didn't realize they made a side tray for the solvent tank, I merely made mine out of necessity. If memory serves I bent it up out of 14-gauge P&O then welded the tabs to the underside for the strut rods. It hangs on the side then has two strut rod style of angled rods underneath that are attached to a piece of angle iron that sits on the lower welded seam of the tank. I was building sand drag quads at the time I built the side tray so I had some small pieces of 4130 chromoly tubing and some rod ends that I incorporated into the strut rods mainly for the "kool" factor but they're not very visible.
 
OP
Z

zmotorsports

ALLIANCE MEMBER
Joined
Oct 20, 2009
Messages
21,461
Location
Northern Utah
Will the LS powered snowblower have a heated cab?

In the past I have had safety kleen washers then a cheap one but now I found no longer needed. Bit of MagicSoap and my steamer does the trick for me. Have not had a parts washer since 2006.

Randy, don't have any details on or even if I'll build a V8 powered snowblower. It was merely an off the cuff statement and that is about all of the thought I have given it. Doesn't make any sense to dedicate that kind of time and money for something as bespoke as an LS powered snowblower that may get used 8-10 times a year at most and potentially not at all.

I don't think I could survive without my parts washer. I use it a lot and love having the ability to thoroughly clean my parts before reassembly. I have a pressure washer to clean the undercarriage of my vehicles after driving in foul weather but I would never think of pressure washing anything greasy or grimy in my yard on my shop apron. Now back when I lived on my parent's farm that was different scenario. The few times I have had greasy larger components such as transmissions and/or axles, etc. I have thrown them on my little utility trailer and driven them to a local car wash and hit them with some Gunk engine degreaser, pressure washed and then returned home to the shop. It's not ideal but works for me to keep my yard clean as well as not have to work on greasy components.

Thanks for stopping by and checking in on my projects Randy, I appreciate it.
 

TimeWarpF100

Well-known member
Joined
Aug 21, 2010
Messages
6,784
Location
not here
Randy, don't have any details on or even if I'll build a V8 powered snowblower. It was merely an off the cuff statement and that is about all of the thought I have given it. Doesn't make any sense to dedicate that kind of time and money for something as bespoke as an LS powered snowblower that may get used 8-10 times a year at most and potentially not at all.

I don't think I could survive without my parts washer. I use it a lot and love having the ability to thoroughly clean my parts before reassembly. I have a pressure washer to clean the undercarriage of my vehicles after driving in foul weather but I would never think of pressure washing anything greasy or grimy in my yard on my shop apron. Now back when I lived on my parent's farm that was different scenario. The few times I have had greasy larger components such as transmissions and/or axles, etc. I have thrown them on my little utility trailer and driven them to a local car wash and hit them with some Gunk engine degreaser, pressure washed and then returned home to the shop. It's not ideal but works for me to keep my yard clean as well as not have to work on greasy components.

Thanks for stopping by and checking in on my projects Randy, I appreciate it.
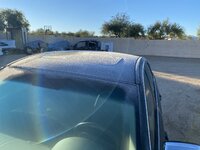
I was joking on the LS powered blower and didn’t think you were serious. All in fun because this morning we had heaviest frost i have seen here in Az.
any grimy parts that are small enough to fit in a 5gallon pail do get scraped first then dipped in carb/cleaner prts wash. Smells bad but works good & kept outside. Works really good in hot summer when it boils. For me hand washing in the parts washer too much effort. 😆
I have a 40x25 concrete area i clean & blast in. Hot sun bakes it then i can dispose of.
i im usually cleaning smaller stuff that is really not very grimy dirty.

7A20382F-585C-4DD4-8716-A5AAF9D74B22.jpegEB095932-AFF0-4371-8ED3-B646CBCEAC57.jpeg
 
To avoid these ads, REGISTER NOW!
OP
Z

zmotorsports

ALLIANCE MEMBER
Joined
Oct 20, 2009
Messages
21,461
Location
Northern Utah
I was joking on the LS powered blower and didn’t think you were serious. All in fun because this morning we had heaviest frost i have seen here in Az.
any grimy parts that are small enough to fit in a 5gallon pail do get scraped first then dipped in carb/cleaner prts wash. Smells bad but works good & kept outside. Works really good in hot summer when it boils. For me hand washing in the parts washer too much effort. 😆
I have a 40x25 concrete area i clean & blast in. Hot sun bakes it then i can dispose of.
i im usually cleaning smaller stuff that is really not very grimy dirty.

7A20382F-585C-4DD4-8716-A5AAF9D74B22.jpegEB095932-AFF0-4371-8ED3-B646CBCEAC57.jpeg

Oh my gosh Randy. How will you Arizonians handle that heavy frost??? :oops: Just kidding and giving you ****. I'm jealous of your weather "most" of the time. It's that 110+ in the summer that I am not in the least bit envious of.
 

rattle_snake

Well-known member
Joined
Jun 25, 2015
Messages
5,230
Location
Chandler, AZ
Man I got all excited about the v8 snow machine. After seeing some of Mike's projects I can imagine what a work of art he could whip up. Tig welded powder coated frame, custom paint and so on. The roar of an open header v8 at full song at 4 am?
90

Oh and yes it froze at my place. Should have put some blankies on my garden
 

OutlawDrifter

Well-known member
Joined
Jan 20, 2015
Messages
3,898
Location
KS
Man I got all excited about the v8 snow machine. After seeing some of Mike's projects I can imagine what a work of art he could whip up. Tig welded powder coated frame, custom paint and so on. The roar of an open header v8 at full song at 4 am?
90

Oh and yes it froze at my place. Should have put some blankies on my garden


Justin, that reminds me of the mower Randy Quaid runs in the Richard Pryor movie Moving.


csp

Well-known member
Joined
Mar 23, 2010
Messages
5,720
Location
Franktown, CO
I think I'd be tempted to find a way to put a 3.5-4' wide blade on the front of the snowblower to push small snowfalls like that vs blowing it. You could probably go at it at a higher ground speed and cut your time spent way down. Or at least push several rows into deeper piles with a blade on an angle then blow it.

I have a blade and a rear 3-point mounted blower on my tractor and the blower only gets used in the deep stuff just from a speed perspective.
 
OP
Z

zmotorsports

ALLIANCE MEMBER
Joined
Oct 20, 2009
Messages
21,461
Location
Northern Utah
I think I'd be tempted to find a way to put a 3.5-4' wide blade on the front of the snowblower to push small snowfalls like that vs blowing it. You could probably go at it at a higher ground speed and cut your time spent way down. Or at least push several rows into deeper piles with a blade on an angle then blow it.

I have a blade and a rear 3-point mounted blower on my tractor and the blower only gets used in the deep stuff just from a speed perspective.

I purchased a couple of Snowplow snow pushers several years ago that do pretty much what you mention but without the power of the snowblower. I bought a 40" and 48" version and for light snow and/or the small windrows left after snowblowing these work quite well and you can go about as fast as you can walk with a light snowfall.

 
OP
Z

zmotorsports

ALLIANCE MEMBER
Joined
Oct 20, 2009
Messages
21,461
Location
Northern Utah
She's definitely a keeper Mike.

One more question on the parts washer. I have one thats very similar in description made by EverClear. (I think). Where do you get your filters for canister on the side? Mine has that but it came with a nasty old filter and I haven't yet replaced it. The sandbag seems to be doing a great job.

I'm sorry I must have missed this question earlier.

I used to get them directly from our ZEP representative at work but when he retired about 8 years ago they did not replace him in our area. I then started buying them from my local Grainger.

Grainger.


Hope that helps.
 
OP
Z

zmotorsports

ALLIANCE MEMBER
Joined
Oct 20, 2009
Messages
21,461
Location
Northern Utah
A couple more pictures of my solvent tank side tray that I fabricated years ago as there was some interest.

Tabs welded to the underside of the tray and the support rods with rod ends attached. I have a small amount of adjustment which really isn't necessary but I have the tray sloped very slightly back towards the tank for any spillage or drip off of parts. This was completely unnecessary but I thought it would look cool at the time.
tank1.jpg

At the opposite end of the support rods I just welded a small piece of angle iron that rests or is nestled into the welded tank seam. This allows me to quickly lift the side tray off to clean when necessary because it isn't actually bolted or hard mounted to the tank. By the looks of this picture I need to clean it again. :oops:
tank2.jpg

Lastly, here is a picture of the solvent as I was using it last night. You can see that it isn't black nor appearing all that contaminated but I will probably run it through a recycling period tomorrow while working in the shop as I haven't run one for at least the past month or so. This solvent is about 7 or 8 years old and has only had maybe about 5 gallons added over the past several years to compensate for evaporation, "blow off" and the amount that remains in the side filters when they get replaced.
tank3.jpg

Sorry for the lengthy discussion on the solvent tank for those who aren't interested and for those who asked I hope this answers the questions. If I can answer any more questions or if I didn't explain something well enough please don't hesitate to ask.
 

bradpac

Well-known member
Joined
Sep 8, 2013
Messages
721
Location
Central TX
I didn't inquire, but I very much appreciate the in depth discussion of your parts cleaner. I have been thinking about getting one for my garage, but one of my hang-ups, keeping the solvent serviceable for a longer period of time, is exactly what this setup solves. Now I just need to see if I can find one of these style of cleaners, although it doesn't look like too hard of a setup to fabricate.
 
OP
Z

zmotorsports

ALLIANCE MEMBER
Joined
Oct 20, 2009
Messages
21,461
Location
Northern Utah
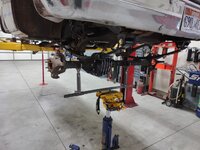
I got out of work late last night and didn't have a lot of time in the shop but I was able to remove the old front leaf springs, install the new 4" lift springs and then stab the axle back under the truck. The axle adapter that I made for my transmission jack a few years ago sure makes this a non-event nowadays. Dropping or installing an axle is slick and much easier to do for one person now.

K101.jpg

k102.jpg

Thanks for looking.
 
Last edited:

Jarhead0408

Well-known member
Joined
Apr 1, 2012
Messages
5,783
Location
Who knows?
Mike, personally I’ve enjoyed everything on your parts washer setup. I’ve got a massive Handi-Kleen unit that I scored for $25 that needs to be put back into service. I wouldn’t be surprised if several of the features and modifications on your unit find their way to mine. Doing a tear down on our Jeep has made me realize how useful a parts washer and/or blast cabinet would have been.

Also, I finally checked out and subscribed to your channel on YouTube. It’s good to put a face to a name!
 

WoodsTruck

Well-known member
Joined
Jan 12, 2013
Messages
1,025
My dad lives in Idaho and both blows and plows with the same quad. We set up the blade to hook up the same way as the blower so he can swap attachments in about 10-15 minutes by himself with no lifting. He got cold so we fabbed a cab up for it. Then recently he didn't like the crosswind so he sent me dimensions and I made a side curtain to snap in. He rides side saddle since it too hard to climb over the seat all the time for an old guy so one side boxed in works good enough. He plows almost a 1/2 mile driveway for 3 houses up on a hill.
 

Attachments

  • Side Window.jpg
    Side Window.jpg
    397 KB · Views: 85
OP
Z

zmotorsports

ALLIANCE MEMBER
Joined
Oct 20, 2009
Messages
21,461
Location
Northern Utah
Mike, personally I’ve enjoyed everything on your parts washer setup. I’ve got a massive Handi-Kleen unit that I scored for $25 that needs to be put back into service. I wouldn’t be surprised if several of the features and modifications on your unit find their way to mine. Doing a tear down on our Jeep has made me realize how useful a parts washer and/or blast cabinet would have been.

Also, I finally checked out and subscribed to your channel on YouTube. It’s good to put a face to a name!

Thank you John. I appreciate you taking the time to follow along here and my YouTube channel.
 
OP
Z

zmotorsports

ALLIANCE MEMBER
Joined
Oct 20, 2009
Messages
21,461
Location
Northern Utah
I have a confession to make.......

I broke my own cardinal rule when disassembling projects. 🤬

I will ALWAYS make a list of parts as I am tearing a project down so I know I have the parts when the project is going back together. I don't get nearly the shop time I want these days so I schedule my projects and time as efficiently as possible and nothing irritates me more than when I have a project going back together only to find out a small very specific bolt, shim, washer or something more major is holding up the project because of poor execution of my plan. I follow a very strict Seven "P" policy. Proper Prior Planning Prevents Piss Poor Performance. Well, I poorly executed this one.

As I was tearing down the square body K10 a couple of weeks ago I made sure to write down such as grease seals for the front hubs as I was certain they would need to be replaced and bearings repacked. As I was tearing down the front spindles and bearings I noted a couple of the hub nuts had some burrs where the previous owner must have used a punch to tighten the nut rather than the proper four wheel drive nut socket. This is not acceptable but also not uncommon but I generally can walk over to the belt sander and touch up the edges on the belt and be good to go.

Well as I started cleaning parts on Friday evening to reassemble the front axle knuckles I saw that the spindles were in very poor condition and had the inner bearings spin on the spindle. This caused one to have a nasty groove worn into it and the other side wasn't far behind. Also the nuts were in much worse condition once I got them cleaned in the solvent tank. I could have kicked my own *** Friday night.

Luckily I called the owner, who has been great to do work for as he had expected some "surprises" on a 45+ year old truck. He was quick to locate and order new spindles and bearing kits. I guess I lucked out and hadn't really wasted any much time because the parts were readily available and should be here any time and I still had the rear axle to work on so it wasn't a total game stopper but still pissed me off that I broke my own rule.

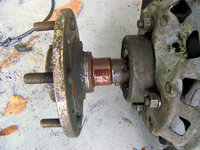
This was the passenger side spindle that was the better of the two.
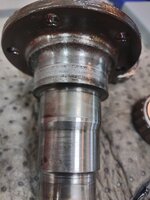
k10f1.jpg

Driver's side bearing as I was removing the seal and bearing. Glad this failed in the shop rather than on the road. I think the cage was barely holding the rollers in the bearing.
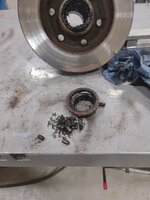
k10f2.jpg

Passenger's side bearings show some signs of spinning on the spindle and the cages are damaged slightly.
k10f3.jpg

Driver's side spindle. Deep groove where the bearing had been spinning on the spindle for quite some time.
k10f4.jpg

Now on to the rear axle....
 

Bob Heine

ALLIANCE MEMBER
Joined
Oct 24, 2009
Messages
10,708
Location
Boca Raton, Florida
Mike, I wish I was that organized. I bought the '72 Corvette in 1978 and discovered the rear wheel bearings were difficult to grease and needed a special tool that I ordered. In 1982 I finally pumped some grease in the bearings and the next day they started growling. Apparently 10 years is too long to wait. Your pictures brought back a sad memory.
Rear Axle.jpg
 
OP
Z

zmotorsports

ALLIANCE MEMBER
Joined
Oct 20, 2009
Messages
21,461
Location
Northern Utah
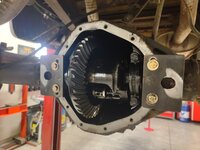
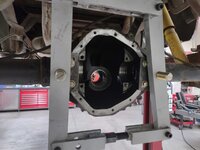
Last night I was able to get the rest of the GM 12-bolt rear axle disassembled and cleaned in preparation for reassembly.

Had to drill a couple additional holes to the case spreader adapter plates that I fabricated a couple of months ago when I worked on that Ford F-150.
k101.jpg

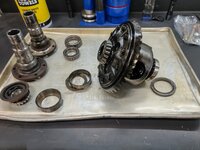
Carrier assembly removed and on the work bench.
k102.jpg

Housing cleaned, old pinion races removed and new races driven into place.
k103.jpg

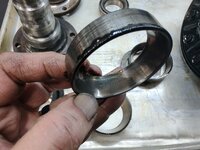
When I removed the pinion yoke I noted the nut was loose and then noticed the outer pinion race showing quite a bit of wear due to debris. The oil was in very poor condition that came out of this axle and this bearing reflects the lack of maintenance.
k104.jpg

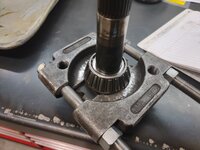
Preparing to press the inner pinion bearing off the pinion with a bearing splitter then over to the hydraulic press.
k105.jpg

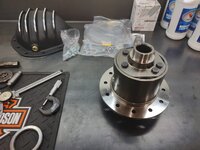
New differential cover in the background and new Eaton TrueTrac in the foreground ready for installation.
k106.jpg

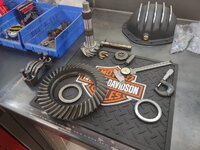
Parts cleaned, measured and ready to start assembling.
k107.jpg


Thanks for looking.
 
OP
Z

zmotorsports

ALLIANCE MEMBER
Joined
Oct 20, 2009
Messages
21,461
Location
Northern Utah
Mike, I wish I was that organized. I bought the '72 Corvette in 1978 and discovered the rear wheel bearings were difficult to grease and needed a special tool that I ordered. In 1982 I finally pumped some grease in the bearings and the next day they started growling. Apparently 10 years is too long to wait. Your pictures brought back a sad memory.
Rear Axle.jpg

Sorry to add salt to that wound Bob. ;) But thanks for sharing. Sometimes when things are neglected and we decide to do some preventive maintenance it can bite us in the rear end.....
 
To avoid these ads, REGISTER NOW!
Top Bottom