To avoid these ads, REGISTER NOW!

ZMotorsports Shop Projects 2.0

To avoid these ads, REGISTER NOW!
OP
Z

zmotorsports

ALLIANCE MEMBER
Joined
Oct 20, 2009
Messages
21,477
Location
Northern Utah
Keeping and rebuilding older equipment seems like the best bet nowadays.................. The last several years even the higher end stuff that is new is still not built as well as it's predecessor. ;)

Agreed. I feel the same way about auto's and RV's. From what I've seen the best may have already been built and the new stuff is more "fluff" and things that will cost a lot of money to replace down the road. I have NOT been that impressed with some of the newer RV's that we have been seeing at some of our rallies and gatherings, not for the price anyways.
 
OP
Z

zmotorsports

ALLIANCE MEMBER
Joined
Oct 20, 2009
Messages
21,477
Location
Northern Utah
OP
Z

zmotorsports

ALLIANCE MEMBER
Joined
Oct 20, 2009
Messages
21,477
Location
Northern Utah
Made some progress on the Stihl trimmer last night but only had about an hour to work due to more snow removal. :mad:


Started by pulling the carb as it didn't want to idle very well.
trim1.jpg

Checking fuel lines to make certain neither were cracked and sucking air.
trim2.jpg

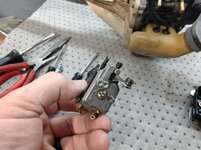
Carb removed and ready to disassemble. Looks like a Zama carburetor. Similar in appearance and operation to a Walbro and Zenith.
trim3.jpg

Primer/plunger bulb is in good condition and not hard or brittle.
trim4.jpg

Grabbed my Walbro carb kit out of the toolbox. I don't use this much these days but it has seen some heavy use over the years and is sure nice to be able to grab it and have all the specialty tooks needed in one box.
trim5.jpg

trim6.jpg

After cleaning I checked to confirm the needle is holding pressure.
trim7.jpg

Fully assembled and setting up the idle RPM and mixture.
trim8.jpg


Thanks for looking.
 

Jarhead0408

Well-known member
Joined
Apr 1, 2012
Messages
5,784
Location
Who knows?
Ah man. See Mike, the thing is you do it to yourself lol.

Now I have to ask… what is that RPM meter (?) and how do you perform that particular calibration?
 
OP
Z

zmotorsports

ALLIANCE MEMBER
Joined
Oct 20, 2009
Messages
21,477
Location
Northern Utah
Ah man. See Mike, the thing is you do it to yourself lol.

Now I have to ask… what is that RPM meter (?) and how do you perform that particular calibration?


I have to ask John, what is it that I do to myself? You'll have to be more specific as I feel the list is long. :ROFLMAO:

As for the meter, it is an analog Strandix RPM meter. I've had it for a long time and it works well and is extremely reliable and repeatable. That being said, I also have a digital Oregon meter that I use as well but I seem to reach for the Strandix more often.

I haven't seen the prices in quite some time so I am a bit shocked when I Googled it just now.
 

Jarhead0408

Well-known member
Joined
Apr 1, 2012
Messages
5,784
Location
Who knows?
I have to ask John, what is it that I do to myself? You'll have to be more specific as I feel the list is long. :ROFLMAO:

As for the meter, it is an analog Strandix RPM meter. I've had it for a long time and it works well and is extremely reliable and repeatable. That being said, I also have a digital Oregon meter that I use as well but I seem to reach for the Strandix more often.

I haven't seen the prices in quite some time so I am a bit shocked when I Googled it just now.
Haha. “It” would be putting a bow on a current post that already had a ton of informative detail…just to add a hook right there at the end that compels us to ask more questions; ergo, if you thought you were gonna get a break from teaching shop class you were wrong haha!

Much thanks again. I’ll be picking those tools up for my Dad. Now that he’s retired he’s really enjoying small engine repair as a hobby. He’s doing good with a basic set of tools, but specialty tools would really make his day.
 

Bigblue&Goldie

Well-known member
Joined
Mar 12, 2009
Messages
10,733
Location
AZ
I love the RPM meter to set the idle on a weed whacker! Attention to detail at it's finest!


I'll never forget being a kid and hanging around my uncle's construction business. I vividly remember working on an old water truck with him. We got done and he went to set the idle; he held a paper plate next to the exhaust and watched the way the plate fluttered and made his adjustments accordingly.
 
OP
Z

zmotorsports

ALLIANCE MEMBER
Joined
Oct 20, 2009
Messages
21,477
Location
Northern Utah
Haha. “It” would be putting a bow on a current post that already had a ton of informative detail…just to add a hook right there at the end that compels us to ask more questions; ergo, if you thought you were gonna get a break from teaching shop class you were wrong haha!

Much thanks again. I’ll be picking those tools up for my Dad. Now that he’s retired he’s really enjoying small engine repair as a hobby. He’s doing good with a basic set of tools, but specialty tools would really make his day.

Thanks John. I don't claim to be a teacher by any stretch of the word but I do enjoy documenting my projects and even doing videos of them in my shop. But I wouldn't call myself a teacher. I just see so many incorrect ways of doing things online that I try to encourage people that doing it the right way isn't that much more work and that they can be so much more fulfilled knowing it was done correctly.

Please don't get me wrong, I don't know everything, far from it in fact. That's why I spend the time here, to learn from all of the smart people on this forum just as much as I hope others are able to pick up something from one of my posts.

As for tools for your dad, have you considered a small assortment of carburetor screwdrivers? They can be had for a relatively small amount but on many of these small engines these days I have been seeing a wide range of odd screws on carburetors. Everything from double D heads to 21-spline and several others. It seems as though they are doing everything possible to encourage people not to work on these without investing in some tools. Just a thought as they are a necessity when working on these small engine carburetors.

Thanks again for the kind words.
 
OP
Z

zmotorsports

ALLIANCE MEMBER
Joined
Oct 20, 2009
Messages
21,477
Location
Northern Utah
I love the RPM meter to set the idle on a weed whacker! Attention to detail at it's finest!


I'll never forget being a kid and hanging around my uncle's construction business. I vividly remember working on an old water truck with him. We got done and he went to set the idle; he held a paper plate next to the exhaust and watched the way the plate fluttered and made his adjustments accordingly.

Okay Ryan, I have to snap a picture of my old Tecumseh tachometer tonight then since you brought up the paper plate trick.
 
OP
Z

zmotorsports

ALLIANCE MEMBER
Joined
Oct 20, 2009
Messages
21,477
Location
Northern Utah
I love the RPM meter to set the idle on a weed whacker! Attention to detail at it's finest!


I'll never forget being a kid and hanging around my uncle's construction business. I vividly remember working on an old water truck with him. We got done and he went to set the idle; he held a paper plate next to the exhaust and watched the way the plate fluttered and made his adjustments accordingly.

Can someone explain the paper plate trick?

Okay, this is for Ryan but will more than likely answer your question as well Ohmthis.

I originally thought this was a Tecumseh tach but when I pulled it out of my toolbox last night I remember it was actually a Briggs & Stratton, however, I think Tecumseh markets the exact same one just branded differently.
tach2.jpg


The theory of operation is the you put it on anything that rotates and it will produce vibrations/harmonics which correlate through to the pointer and indicate on the dial chart the RPM. It works amazingly well and is quite accurate. I have used this for not only IC engines, but also electric motors as I had one in my toolbox at work as well.

You simply place the outer ring (body) firmly on the motor or engine, then turn the inner ring which is attached to the wire and as the wire extends from the dial, the point at which it the wrapped end swings the largest arc is max RPM, then you simply read the corresponding range on the dial chart.

I am assuming the paper plate method is similar but you'd need a point of reference. I have heard of the trick from a few old-timers but never used it myself so Ryan may have to expand on it.
 
OP
Z

zmotorsports

ALLIANCE MEMBER
Joined
Oct 20, 2009
Messages
21,477
Location
Northern Utah
Also while taking a few photos last night I thought I'd show a couple of other of my small engine/powersports tools that have been used extensively throughout my years of work.

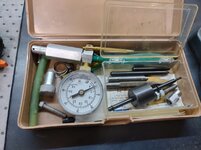
On the left is my trusty old Oregon digital tach that is a quick and easy tool to use. To the right is my inductive pickup tach. I can't even remember where I got it from but it works very well also. I seemed to use it quite a lot on snowmobiles when dialing in.
tach1.jpg

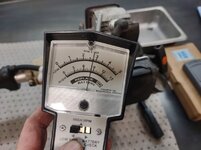
Here is my old "buzz box" for setting up ignition systems. Many may not be familiar with these as it was used for setting up points ignition systems. An ohmmeter wasn't accurate enough as it didn't put enough current through the points and when setting up a points style of ignition it must be extremely accurate knowing when the points open and the duration. This buzz box puts a current through the system and then the points are set accordingly by the audible tone. Very quick, reliable and repeatable, which is necessary, especially on a 2-stroke that can have catastrophic results if timing is off.
tach3.jpg

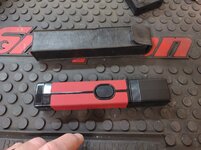
Next is my old timing light. This was used heavily on snowmobiles, dirtbikes and ATV's when timing the engines. It came in a nicely packaged storage case to keep it protected.
tach4.jpg

The inductance pickup stores in the tail with a nice coiled wire, the light extends out the front and the button starts the strobe when the spark event occurs to view the timing marks. Many Polaris, Arctic Cat, Yamaha and Ski-Doo (Bombardier) had small plugs that screwed into the ignition side that was removed to allow viewing of the timing marks rather easily. Same with the Yamaha Banshee and the Suzuki LT's but others were not quite so easy to access for quick references.
tach5.jpg

Lastly, a picture of my OPE FSM's. I keep all my original owners and service manuals that come with my equipment and write the date and vendor in which I purchased them from. Then inside the cover is usually where I write things like important part #'s and such for quick references. Seeing as how I acquired my Stihl FS85 line trimmer used with no history, I was able to locate a FSM on Stihl's website and print off the English version for my records.
FSM.jpg


Thanks for looking and taking a trip down memory lane with me.
 

Bigblue&Goldie

Well-known member
Joined
Mar 12, 2009
Messages
10,733
Location
AZ
Okay, this is for Ryan but will more than likely answer your question as well Ohmthis.

I originally thought this was a Tecumseh tach but when I pulled it out of my toolbox last night I remember it was actually a Briggs & Stratton, however, I think Tecumseh markets the exact same one just branded differently.
tach2.jpg


The theory of operation is the you put it on anything that rotates and it will produce vibrations/harmonics which correlate through to the pointer and indicate on the dial chart the RPM. It works amazingly well and is quite accurate. I have used this for not only IC engines, but also electric motors as I had one in my toolbox at work as well.

You simply place the outer ring (body) firmly on the motor or engine, then turn the inner ring which is attached to the wire and as the wire extends from the dial, the point at which it the wrapped end swings the largest arc is max RPM, then you simply read the corresponding range on the dial chart.

I am assuming the paper plate method is similar but you'd need a point of reference. I have heard of the trick from a few old-timers but never used it myself so Ryan may have to expand on it.

I'd love to expand on it, but I was pretty young at the time and your description is spot on from what I remember. It was definitely an old timers trick as that's the kind of mechanic my uncle is. He's actually a carpenter/general contractor by trade, but he's always worked on his own equipment.

Probably a year or two after that he and his partner swapped a CAT dozer motor in the field. Looking back, it was rather impressive that two guys could split a dozer with hand tools and a backhoe. Going to the CAT dealer as a kid to get a rebuilt motor was eye opening; I'd never seen motors that sat on multiple pallets before. We often talk about mentors, and he's probably taught me more than anyone about mechanics. When equipment was down, the jobs stopped, so they would fix everything to get back in action. I think the biggest thing I picked up from him is to not be afraid to tear into stuff.

Seeing some of your specialty tools is always cool; it's educational to see what the pro's use/used. While a lot of the tuning specialty tools have been replaced by a scanner/computer, specialty hand tools are now increasingly more common for chassis and suspension work. We all can look back at our father's/grandfather's tool boxes and appreciate how small they were in comparison to what we need these days. It's an interesting paradigm shift.
 

Bob Heine

ALLIANCE MEMBER
Joined
Oct 24, 2009
Messages
10,709
Location
Boca Raton, Florida
Mike, thanks for the memories. Back in 1968 we bought a bare-bones Pontiac GTO (400ci engine, turbo400 transmission, power steering and AM radio). Bought the FSM for about $5 and discovered I needed a new tool. To be able to tune it properly I needed a meter so I went to Montgomery Ward and bought their dwell-tach/volt-amp/points meter. Since converting the '72 big block to Pertronix/MSD, I don't need the meter but I can't bear to part with it.
Dwell Meter 1.jpg
 

jackson1701

Well-known member
Joined
Jan 13, 2015
Messages
157
Location
Jarrettsville, MD
my son picked up a FS80 a few months ago, only fired up one time and didn't run but for a few seconds. The other day I ordered a $15 ebay carb, and it came with all new lines, fuel filter, air filter, gaskets , and a spark plug. 15 minutes later it was running as good as new. I'm not sure how long it will last vs. the original carb but was pretty impressed for the $15 i have in it.
 
To avoid these ads, REGISTER NOW!
OP
Z

zmotorsports

ALLIANCE MEMBER
Joined
Oct 20, 2009
Messages
21,477
Location
Northern Utah
my son picked up a FS80 a few months ago, only fired up one time and didn't run but for a few seconds. The other day I ordered a $15 ebay carb, and it came with all new lines, fuel filter, air filter, gaskets , and a spark plug. 15 minutes later it was running as good as new. I'm not sure how long it will last vs. the original carb but was pretty impressed for the $15 i have in it.

Good to hear you had success with an aftermarket kit. I have had hit and miss successes with aftermarket when it comes to the small Zama, Zenith or Walbro carburetors. I generally try to use OEM as I have never had an issue with any of the OEM replacement carb. kits. My cousin is a Stihl dealer so those are pretty easy to get OEM parts for but some of the other brands sometimes take some research to avoid paying as much as a new carb.
 

Jarhead0408

Well-known member
Joined
Apr 1, 2012
Messages
5,784
Location
Who knows?
Thanks John. I don't claim to be a teacher by any stretch of the word but I do enjoy documenting my projects and even doing videos of them in my shop. But I wouldn't call myself a teacher. I just see so many incorrect ways of doing things online that I try to encourage people that doing it the right way isn't that much more work and that they can be so much more fulfilled knowing it was done correctly.

Please don't get me wrong, I don't know everything, far from it in fact. That's why I spend the time here, to learn from all of the smart people on this forum just as much as I hope others are able to pick up something from one of my posts.

As for tools for your dad, have you considered a small assortment of carburetor screwdrivers? They can be had for a relatively small amount but on many of these small engines these days I have been seeing a wide range of odd screws on carburetors. Everything from double D heads to 21-spline and several others. It seems as though they are doing everything possible to encourage people not to work on these without investing in some tools. Just a thought as they are a necessity when working on these small engine carburetors.

Thanks again for the kind words.
Mike,

The best teachers are the ones we learn from and they weren’t even trying. That’s a “natural teacher” and you qualify even if you don’t have a syllabus lol.

Yes sir, after looking up your Walbro kit, I noticed several links to small screwdriver assortments from Stihl and a few others. I’ll be buying a set for each of us.

Thanks for posting your other small engine tools too.
 
OP
Z

zmotorsports

ALLIANCE MEMBER
Joined
Oct 20, 2009
Messages
21,477
Location
Northern Utah
Mike,

The best teachers are the ones we learn from and they weren’t even trying. That’s a “natural teacher” and you qualify even if you don’t have a syllabus lol.

Yes sir, after looking up your Walbro kit, I noticed several links to small screwdriver assortments from Stihl and a few others. I’ll be buying a set for each of us.

Thanks for posting your other small engine tools too.


Thank you John, I appreciate the comments. You will enjoy having the correct screwdrivers. Kind of pisses me off that they keep comin gup with new ones just to have to buy more screwdrivers.
 
OP
Z

zmotorsports

ALLIANCE MEMBER
Joined
Oct 20, 2009
Messages
21,477
Location
Northern Utah
It seems like you have a tool for everything. On every project you tackle you introduce me to a few new tools that I then instandly want. That's leading to issues as my garage is way smaller then yours.

Yeah, sorry about that. I'm sure you've heard me mention in the past that I am not a big believer of "specializing" and prefer to have a much more vast knowledge of things and work on a wide variety of things. If I only worked on a small selection of things I could get by with fewer tools but unfortunately due to the wide range of tasks, I need a wide range of tools. One of the reasons I needed a larger shop as well. :D
 
OP
Z

zmotorsports

ALLIANCE MEMBER
Joined
Oct 20, 2009
Messages
21,477
Location
Northern Utah
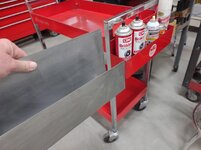
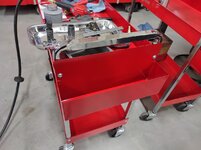
Friday night after arriving home I thought I'd knock out a small aerosol tray for my new Sunex tool cart. I have been looking for either a MAC or Matco aerosol tray to keep with the whole "vintage" theme of my tool cart but one was not to be had, even from either tool supplier. Even if so, I doubt I'd pay the $75 or so for one. That being said, I dug through some sheet metal and grabbed a piece of 19-gauge P&O in which to made my tray out of.

I copied the measurements of the MAC one on my Snap-on tool cart with the exception that I would make the back just a little taller so the aerosol cans could be just below the handle when sitting in the tray rather than at or slightly above the handle on my Snap-on cart.
tray1.jpg

After deburring the edges I made the first bend. The Di-Acro pan brake sure makes nice bends and I sure enjoy the few times I get to use it.
tray2.jpg

Making the second bend for the front or short side.
tray3.jpg

Wiped down and sanded with some 180-grit on the DA.
tray4.jpg

Mocked up for size and mounting comparison.
tray5.jpg

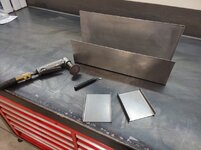
Next I measured, marked, cut and bent up the two end caps.
tray6.jpg

End caps mocked up.
tray7.jpg

tray8.jpg

Deburring and adding a very slight radius to the corners.
tray9.jpg

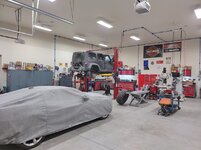
Saturday morning my son was bringing his wife's Subaru over to address an issue with the struts so I thought I'd roll the cover back a little on the Camaro and toss the charger on for a few hours at low amperage. It's been a couple of weeks since we drove the car and although I'm sure I will put a new battery in it in the spring, I want to get through the winter months with the battery in the event we are able to take it for a drive or 10 on nice weekend days.
shop1.jpg


Stay tuned for the completion of the tray and Saturday's work.
 
Last edited:
OP
Z

zmotorsports

ALLIANCE MEMBER
Joined
Oct 20, 2009
Messages
21,477
Location
Northern Utah
After throwing the charger on the car I commenced my Saturday morning with coffee in hand...........

I measured even distances and punched holes at the corners to accept the end caps for Rosette welds.
tray11.jpg

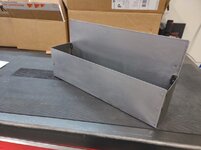
Wiped down and assembled prior to clamping.
tray12.jpg

End caps clamped in place. I let the end caps protrude out from the edges about .060" to prevent from catching on the edges as the end caps have a nice radius to them. Thought this may also look a bit nicer than having that abrupt edge right at the end cap.
tray13.jpg

Rosette (plug) welds completed and allowed to cool.
tray14.jpg

Using a cutoff disc to knock down the plug weld to just above the parent material.
tray15.jpg

After hitting with a 80-grit Roloc disc to fully blend the welds I hit the entire tray with 180-grit on a DA then a wipe with wax & grease remover in preparation for metal etching primer and then paint.
tray16.jpg

Primed.
tray17.jpg

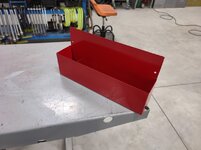
Painted. I used the same Red from my Snapper mower as it was the closest match to the Sunex tool cart as well.
tray18.jpg

I used the existing screws from the tool cart in which hold the legs to the upper tray. This way no additional holes were needed.
tray19.jpg

Loaded up and being used while working on my son's car.
tray20.jpg


All in all I think I had just slightly over an hour in the aerosol tray and I am pleased with the way it turned out.

Thanks for looking.
 
OP
Z

zmotorsports

ALLIANCE MEMBER
Joined
Oct 20, 2009
Messages
21,477
Location
Northern Utah
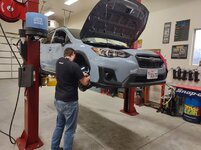
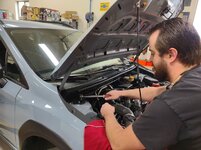
For the most part I sat and supervised while my son worked on his wife's car. It was an awesome Saturday to be able to share the time with my son and even had a few laughs. I was there merely for moral support......

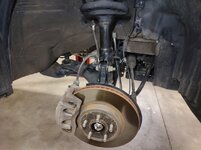
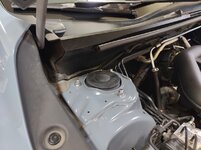
My DIL had detected a slight noise in the front when turning and my son and I suspected an upper strut bearing plus there was a TSB released a while back pertaining to the rubber caps on top of the struts not sealing properly and allowing rust to form. My DIL's 2018 Crosstrek had a lot of rust and corrosion on the upper strut mounts so my son opted to replace them.

Here he's removing the passenger side strut.
sub1.jpg

sub2.jpg

Strut out and clamped in the Branick 7600 strut compressor that I rolled over from the storage bay. This has been a valued addition to the shop's equipment roster.
sub3.jpg

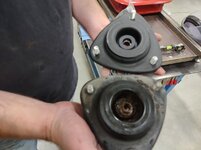
Old upper mount compared to the severely corroded one.
sub4.jpg

Going back together as he is torquing the fasteners to spec.
sub5.jpg

Passenger side lower completed and ready to move topside.
sub6.jpg

Upper mounts torqued to spec.
sub7.jpg

New redesigned upper caps installed. These are slightly larger and supposedly do a better job of sealing the elements out.
sub8.jpg

Both sides complete, car sat back down, test drive and then alignment double checked.
sub9.jpg

After the car was moved outside the job of cleaning tools, putting tools away and then finally cleaning the tool cart before locking up the shop for the day.
sub10.jpg

Thanks for looking.
 
OP
Z

zmotorsports

ALLIANCE MEMBER
Joined
Oct 20, 2009
Messages
21,477
Location
Northern Utah
Sunday morning after the wife and I returned from breakfast I pulled the Jeep into the shop for a quick LOF service. I have a lot going on between now and the first of the year and it was right at being due so rather than delay I figured I would service it and then it should be good until around February~ish or even March timeframe.

As I was writing my notes down I noted that it was exactly 54k miles ago and 4 years ago that I swapped in the 6.2 liter LS engine and 6L80 transmission. She's still running great and puts a grin on my face every time I turn the ignition. Although it was quite filthy as we've had a series of storms last week and another duzy this morning, but it is in dire need of a good wash job, as is my wife's Acura.

Raised slightly above ground level to check ball joints and suspension links.
shop2.jpg

Draining the engine oil.
shop3.jpg

Tires/wheels removed and oil draining while I inspected the undercarriage/chassis.
shop4.jpg

WOW! That is one filthy Jeep.:(
shop5.jpg

The Mickey Thompson BAJA Boss A/T's are wearing very well. I had between 14 and 15/32nds among all tires. This one was the most worn of the five.
shop6.jpg

And this one has the most tread as it was just rotated in from the spare position.
shop7.jpg

I am very pleased with these tires both on road and off. Even on slick snowpacked roads these do quite well considering the lug size. They do much, much better than my old KM2's and even better than my previous Nitto Ridge Grapplers on snow covered roads.
 

MadeByMiller

Well-known member
Joined
Dec 29, 2018
Messages
1,230
Location
Rapid City, SD
Really like the aerosol can holder Mike, and I'm selfishly glad that you weren't able to source one for purchase so that we could "watch" you build one! I'm sure that your son is stoked to have access to your empire and to spend time with his dad. I was doing some mechanic-ing just last night in the cold and gravel driveway, and while I'm grateful to have my shop and all the tools within, having access to a shop big enough to pull a vehicle inside would be a big upgrade! I hope you have a great week!
 
OP
Z

zmotorsports

ALLIANCE MEMBER
Joined
Oct 20, 2009
Messages
21,477
Location
Northern Utah
Really like the aerosol can holder Mike, and I'm selfishly glad that you weren't able to source one for purchase so that we could "watch" you build one! I'm sure that your son is stoked to have access to your empire and to spend time with his dad. I was doing some mechanic-ing just last night in the cold and gravel driveway, and while I'm grateful to have my shop and all the tools within, having access to a shop big enough to pull a vehicle inside would be a big upgrade! I hope you have a great week!

Thanks Austin, I hope he enjoyed the day as much as I did.

Like you and many others here, I too started working in a gravel drive long before I had anything enclosed to work in.
 

GRN96WS6

Well-known member
Joined
Dec 23, 2012
Messages
2,267
Location
SOMD
Saturday morning my son was bringing his wife's Subaru over to address an issue with the struts so I thought I'd roll the cover back a little on the Camaro and toss the charger on for a few hours. It's been a couple of weeks since we drove the car and although I'm sure I will put a new battery in it in the spring, I want to get through the winter months with the battery in the event we are able to take it for a drive or 10 on nice weekend days.
shop1.jpg


Stay tuned for the completion of the tray and Saturday's work.
Kind of surprised you don't use a trickle charger, I use them on my cars that sit for a bit over winter, no need for the large charger and small form factor. They also put a small load on them and condition the battery also.
 

jbmatth

Well-known member
Joined
Jun 3, 2013
Messages
5,692
Location
Northern Ok.
I'm with GNR96WS6, I use a Battery Tender on my Cobra and Viper as they sit a lot over winter, I need to pick up another for the mower battery as well, but is great to know when I walk out all will be ready to start.

JB
 
OP
Z

zmotorsports

ALLIANCE MEMBER
Joined
Oct 20, 2009
Messages
21,477
Location
Northern Utah
Kind of surprised you don't use a trickle charger, I use them on my cars that sit for a bit over winter, no need for the large charger and small form factor. They also put a small load on them and condition the battery also.

I'm with GNR96WS6, I use a Battery Tender on my Cobra and Viper as they sit a lot over winter, I need to pick up another for the mower battery as well, but is great to know when I walk out all will be ready to start.

JB

I let me last Battery Tender go with my bike. I have my large MAC (made by Schumacher) that I throw on it as well as the battery out of my zero turn mower on occasion. I also have a small Schumacher charger but it is up on the mezzanine in the house garage and I didn't feel like grabbing it so I tossed the large one on the car in low amp mode.
 
OP
Z

zmotorsports

ALLIANCE MEMBER
Joined
Oct 20, 2009
Messages
21,477
Location
Northern Utah
Oh look, more snow to remove.........

Last night I cleared snow again as it snowed much of the day yesterday, and it's snowing again today. We had mid to upper 40's all weekend and most all of the snow in my yard had melted, until yesterday.
snow.jpg

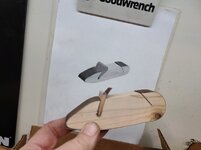
After putting the snowblower away I thought I'd hurry and knock out a small wood project that I've had on my clipboard for a while. I dug through my limited supply of wood and found a piece that would work to make a Waldorfshop block sander. I then had a piece of hardwood (oak I think) that I made the wedge out of.
Waldorfshop.jpg


By that time it was dark and the wife was nearly home so I closed up shop for the night. Clearing snow each night is really cutting into my agenda. I wish it would just stay in the mountains.......
 

moab11

Well-known member
Joined
Nov 22, 2015
Messages
582
Location
Thunder Bay, Ontario
I let me last Battery Tender go with my bike. I have my large MAC (made by Schumacher) that I throw on it as well as the battery out of my zero turn mower on occasion. I also have a small Schumacher charger but it is up on the mezzanine in the house garage and I didn't feel like grabbing it so I tossed the large one on the car in low amp mode.
Look into the Ctek chargers Mike. You can buy panel mounts and such to make a remote plug for the charger. I have one for everything that uses a battery, snowmobiles, quad, trailer, car, truck, etc. Never have to worry about a dead battery from sitting and keeps them lasting a lot longer too.
 
To avoid these ads, REGISTER NOW!
Top Bottom