To avoid these ads, REGISTER NOW!

WWII "Theater Knife" Recreation Project

555

Well-known member
Joined
Nov 10, 2007
Messages
2,313
Location
Nomad-Arkansas & Georgia
Lucite was used in aircraft windows during WWII. I think you can fudge with green. Colored Lucite was popular with the Hot Rod and Custom guys for windows and dash knobs. I can imagine some young gear head "fixing" up his jeep in the motor pool with Lucite knobs.
One of my mentors was a LTC with the 1st Armored Division. He was a gear head and his guys did a lot of unauthorized modifications to military vehicles.
 
To avoid these ads, REGISTER NOW!

4xdog

Well-known member
Joined
Aug 18, 2012
Messages
5,629
Location
Santa Fe, NM
I’ll bet if a serviceman wanted “green” in the field and nothing obvious was available, he’d have used painted wood. Wood and green paint were almost certainly close at hand.
 
  • Like
Reactions: 555
OP
P

Private Lugnutz

Well-known member
Joined
Mar 30, 2012
Messages
30,700
Location
The Authentic Jersey Shore
Lucite was used in aircraft windows during WWII
Thanks!
All the colors of the rainbow.
I was worried about the diameter, being too small, Don, but they're a perfect fit. I lined some up last night. They even provide an octagonal grip that I would have to be careful to maintain when shaping the stacked handle. But I already have a plan for that, conceived when thinking about wanting to maintain the edge on some of the other sources as well. I'm going to use dummies for those and shape it before I epoxy. Then replace the dummies with the final washers when I epoxy. I need to start picking up orphans at the flea, though. I'm not breaking up these sets I have.
I’ll bet if a serviceman wanted “green” in the field and nothing obvious was available, he’d have used painted wood. Wood and green paint were almost certainly close at hand.
Agreed. My first plan was use all leather washers, but dye them.
 

Lassen Forge

Well-known member
Joined
Apr 26, 2014
Messages
15,415
Location
The romantic hills of central Umbria, Italy,
I was wondering... for an authentic field expedient "green"... why not cut rounds from green canvas tarp? You can either make a laminated stack of this (using like an epoxy as the laminate adhesive) to cut the rounds out of, or use sufficient layers of said canvas and then coat the entire handle with a similar coating once it's all tight and right. The only ?? is if it's light enough, but to me it might be worth playing with to see if it works or not.
 

flyingblind

Well-known member
Joined
Aug 16, 2011
Messages
624
Location
Washington
I can’t wait to see how you compress the handle all back together. I did a Kbar handle by clamping the blade in wood jaws and metal brackets and a steering wheel puller. Not sure I still have pictures
 
  • Like
Reactions: 555
OP
P

Private Lugnutz

Well-known member
Joined
Mar 30, 2012
Messages
30,700
Location
The Authentic Jersey Shore
I was wondering... for an authentic field expedient "green"... why not cut rounds from green canvas tarp?
Funny you should mention this. Swear to god I just had a PM conversation with @gpw_42 about the same technique you're recommending, but for the single blue stripe, using denim. Not many casual observers think of denim as military, but the Navy used it extensively. I still have my father's denim ditty bag with a white rope drawstring through the little grommets. I thought denim would be a nice touch. But yeah, it would have to be laminated onto something else, probably wood, and I would likely use a dummy to shape the stacked handle, then stick it back in, then lacquer everything.
can’t wait to see how you compress the handle all back together.
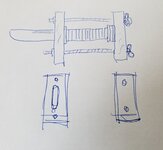
I was planning to make a simple clamp with two long bolts going through two blocks of wood, one with a slot for the blade, which would catch the guard, and the other backing the **** end, with washers and some kind of nut to tighten it. See pic.
 

Attachments

  • 20230707_105221.jpg
    20230707_105221.jpg
    427.2 KB · Views: 27

flyingblind

Well-known member
Joined
Aug 16, 2011
Messages
624
Location
Washington
Funny you should mention this. Swear to god I just had a PM conversation with @gpw_42 about the same technique you're recommending, but for the single blue stripe, using denim. Not many casual observers think of denim as military, but the Navy used it extensively. I still have my father's denim ditty bag with a white rope drawstring through the little grommets. I thought denim would be a nice touch. But yeah, it would have to be laminated onto something else, probably wood, and I would likely use a dummy to shape the stacked handle, then stick it back in, then lacquer everything.

I was planning to make a simple clamp with two long bolts going through two blocks of wood, one with a slot for the blade, which would catch the guard, and the other backing the **** end, with washers and some kind of nut to tighten it. See pic.
I made a very similar drawing but when you compress the guard you will leave a gap between the blade and guard. I found I had to compress the pommel toward the blade. And I had to pin and peen the base as well. Eta my jig self destructed after one successful use.
 

Old tool guy

Well-known member
Joined
Apr 13, 2023
Messages
3,343
Awesome project. Two comments:

re: using canvas or denim, my experience when the material get abraded, like would happen when you shape it, the color fades and becomes much lighter.

Not saying you are incorrect, just thinking … how do you know it was European theater?
 
OP
P

Private Lugnutz

Well-known member
Joined
Mar 30, 2012
Messages
30,700
Location
The Authentic Jersey Shore
re: using canvas or denim, my experience when the material get abraded, like would happen when you shape it, the color fades and becomes much lighter.
...not to mention abraded!

I'm probably not describing my planned process well enough, but with any cloth material washer, or with *any washer that I don't want to sand down when I am shaping the handle* (see footnote), I am going to use a dummy in its place in the stack when sanding and shaping. Before final epoxy. Then pull the dummy out and replace it with the actual piece. I would use the dummy piece as a model to get that actual piece just right in size and shape within the stack. Frankly, if it's off a tad (low or high) I would consider it a desirable effect. The spacing of those tad low or high ones will provide a little more "texture" to the overall grip. No need for the deliberate gouges that were often put in these handles, either at the factory or in the field (somewhat open debate).

** For example, I already made some black washers out of a hard rubber Allyne-Zerk grease gun handle. I would want to retain some of the knurling on the edges. Same with anything else that may have sone texture, like a checker or the nut driver slices. I'll have to see how this all goes with the shaping in some as of yet unknown balance between aesthetics and function.
 

Shiftless

Well-known member
Joined
Mar 9, 2014
Messages
14,595
Location
East Bay SFO
I’m following along on this great project, Lugz.

If you post the needed diameter of the nut driver handle, there might be some of us who have odd pieces not in a set that could be easily donated to your knife project.
 

Lassen Forge

Well-known member
Joined
Apr 26, 2014
Messages
15,415
Location
The romantic hills of central Umbria, Italy,
I always thought the EAME ribbon one of the prettier ones of the war... I found it interesting that most people I've talked to don't realize that the color stripes on the brown and green (Mud & Forest) were the traditional colors for the 2 countries who were the "enemy" (Italy, and Germany) and the ones we helped liberate (France, Holland) from the enemy.

And BTW, Lugz, I'm also following this. Because, well, yeah, it's just both honorable and COOL in a way some would never undersand.
 
OP
P

Private Lugnutz

Well-known member
Joined
Mar 30, 2012
Messages
30,700
Location
The Authentic Jersey Shore
Not saying you are incorrect, just thinking … how do you know it was European theater?
If "it" refers to the knife, I have no idea. It had no provenance when I found it and Q knives were very widely issued during WWII. It may have never left CONUS, or it may have come back from the Pacific instead. This is not a matter of correctness. I'm not saying this particular specimen served in the ETO. But it's going to be European when I'm done with it!
 

Old tool guy

Well-known member
Joined
Apr 13, 2023
Messages
3,343
Yeah, i wasn’t thinking about the history of your knife, where it had been. I guess I was wondering why you chose ETO vs Pacific.
 

Provincial

Well-known member
Joined
Sep 21, 2011
Messages
6,874
Location
Near Salem, OR
Lugz, if you clamp the blade end of your tool in a vise, it can clamp onto the blade. If you slot it with a thin saw blade a little beyond the opening for the blade, and make the blade opening a close fit, it should clamp quite tightly.
 
OP
P

Private Lugnutz

Well-known member
Joined
Mar 30, 2012
Messages
30,700
Location
The Authentic Jersey Shore
I’m following along on this great project, Lugz.
Thanks.
If you post the needed diameter of the nut driver handle, there might be some of us who have odd pieces not in a set that could be easily donated to your knife project.
Will do.
I always thought the EAME ribbon one of the prettier ones of the war...
Totally agree. Even though I was already fairly familiar as a WWII buff, I reviewed all the WWII medals again, with a very loose assessment algorithm in my head, something between pure aesthetics, ethics, practicality (materials sources), and impact. I eliminated all the valorous ones, not only because it borders on unethical, but they're visually boring. I necked the remaining down to European, Pacific, and American campaign medals, and the WWII Victory medal. The Victory medal has alot of rainbow in it, which connotes all kinds of things. My dad fought in the Pacific, and one of my uncles died there, on Saipan, and I am on record here and elsewhere talking about how the European theater has always somewhat unfairly gotten the lion's share of attention. But I honor them in so many other personal ways, with so many actual things, that many of you have already seen, and to be blunt, it has alot of yellow in it. The American campaign medal ribbon had a lot of appeal to me. It's a beautiful pattern. Several colors dominated by light blue. And I think we all tend to forget the significance of winning the North Atlantic, of coastal defense, and, frankly, the industrial effort on the homefront, including all the Rosie the Riveters. In the end, though, the ETO was the clear right answer. It's very appealing, it's popular, it's Patton, it's the Bulge, Liberation, etc, and it's the pattern of bands and colors I think the most casual observer would look at the knife and think, "Oh, I get it, it's one of those things worn on the chest of a uniform."
I guess I was wondering why you chose ETO vs Pacific.
See above.
 
To avoid these ads, REGISTER NOW!

Cruzan80

Well-known member
Joined
Jul 22, 2015
Messages
4,316
Location
Denver, CO
While we are on the "history lesson", were stras given at the start or end of the service year? Aka. was three stars denoting 2yrs+1day, or 3yrs+1day? If the latter, how common were three stars, given the narrow band (start early enough in '42 to hit 3yrs+1day before VE day)?
 
OP
P

Private Lugnutz

Well-known member
Joined
Mar 30, 2012
Messages
30,700
Location
The Authentic Jersey Shore
This...
...with three campaign stars, often called battle stars, signifying three years.
...was sloppy of me at the end there. These "devices" (the technical term for anything pinned on a ribbon) are not service stars, which can denote a service period. WWII had official campaigns. Usually geographic oriented. You can look them up. Wiki is probably pretty good on the subject. Some of them started and ended within the same year. Some of them had multiple battles. It was very possible for someone in the 1st Infantry Division, just for one example, to have at least three and probably 5 bronze stars. 1st ID landed in Algeria (1942). That was a campaign. Then they went to Sicily (1943). Another campaign. Then they went on leave in England. Then they landed in Normandy (1944). A third campaign. Later, Ardennes, a 4th campaign, and finally, the Rhineland (44 into 45) itself. If they wanted, they could replace those with 1 silver campaign star. But a lot of guys liked the look of the 5 stars.
 
Last edited:
  • Like
Reactions: 555

RTM

Well-known member
Joined
May 13, 2019
Messages
13,258
Location
SF Bay Area
Since you won't abrade certain washers, what about making wooden washers, and covering them with your green canvas, maybe dyed to get the right hue? A slot in the wood might allow tucking of the ends, a bit of glue to hold them, and burnished down to be the back non display side.
 

alinc100

Well-known member
Joined
May 26, 2013
Messages
3,043
Location
Dearborn,MI
Lugz, what if you took your denim and green canvas pieces and layered them up with fiberglass resin or West System epoxy to a desired layer count/thickness. I would think in a small batch a good clamp would compress/squeeze the snot out of it. It could then be shaped and formed just like the other washers and the final coat of epoxy would bring back the sheen/color . Also let me know rough size of raw material ,I may have a contribution .
 
OP
P

Private Lugnutz

Well-known member
Joined
Mar 30, 2012
Messages
30,700
Location
The Authentic Jersey Shore
@d42jeep @Shiftless
I don't think nutdrivers are going to work. Unless you guys know of some real fatties. I misspoke! I only eyed them up last night. Today I measured and better "fitted" some 50's Protos - all the same handle, and also a couple Xceltite, including one of those green distributor tools, they're too small.

The measurements below are the pommel end piece. Note the washer is just a tad smaller than those spacers.
 

Attachments

  • 20230707_185415.jpg
    20230707_185415.jpg
    367.5 KB · Views: 32
OP
P

Private Lugnutz

Well-known member
Joined
Mar 30, 2012
Messages
30,700
Location
The Authentic Jersey Shore
Since you won't abrade certain washers, what about making wooden washers, and covering them with your green canvas,
That is what I said I would do. Get it the right size. And then replace the dummy that keeps its place when I shape the handle before epoxying. But I'm growing less keen on this idea. I don't think they would do it. The theater knives that show up tend to be solid composite materials.
A slot in the wood might allow tucking of the ends, a bit of glue to hold them, and burnished down to be the back non display side.
There will be no non display side. This knife will be fully useable. I am going to rest it in a knife cradle, but I do want to be able to pick it up and handle it and hand it to admirers to handle as well.
Also let me know rough size of raw material ,I may have a contribution .
See above. Thanks for thinking of me.
 
OP
P

Private Lugnutz

Well-known member
Joined
Mar 30, 2012
Messages
30,700
Location
The Authentic Jersey Shore
Green plastic:
Huey greenhouse windows (the ones in the roof)
Thanks! My brother, Mr. Practical, who has had his own little home renovation company for decades, made the same suggestion. "Just use plexiglass or micarta. Comes in every color you want. Who's going to know?"
Would cutting on a diagonal give enough long-direction to make a cellulosic driver handle work?
It might. I just sliced up a distributor tool on a sharp angle to find out and it did get closer, but still too small. I'm just going to start picking up the fattest nut driver handles I see at the flea, regardless of age and brand.

What is a perfect source for wood are handles on ball-pein hammers over 16 ozs.

Need to find some widemouth bottles with widemouth corks.

//// BREAK ////

This is by no means me getting anywhere near ready to start making washers or anywhere near a draft layout. This is just me warming up and figuring out what works or not. For example, regardless of what I pick for green, I think having two different sources (e.g., poker chips and genuine wartime snow goggle lenses) is going to detract. Whatever I use, I am going to use it in all bands/stripes. I could get away with different whites and maybe even different browns and reds, but I already don't like two drastically different greens.
 

Attachments

  • 20230708_123418.jpg
    20230708_123418.jpg
    874.3 KB · Views: 29
  • 20230708_124102.jpg
    20230708_124102.jpg
    529.3 KB · Views: 30

bbbarracuda

Well-known member
Joined
Jun 1, 2008
Messages
709
I have no suggestions, but just wanted to comment on what a great project this is.
After seeing other restorations you’ve done, I look forward to seeing this going forward.
 
OP
P

Private Lugnutz

Well-known member
Joined
Mar 30, 2012
Messages
30,700
Location
The Authentic Jersey Shore
Thanks, 'Cuda!

A GJer who can remain as nameless as he wants, or not, just gave me a great idea! He made a very generous offer of a chunk of Douglas Fir personally removed by him from the deck of the U.S.S. Missouri in 2015. As cool as that sounds, it crosses theaters, and there's a personal connection for him, not me. But I do have all kinds of genuine WWII wood from Europe, to include Garand stocks, all kinds of crates, and - entrenching tool handles!
 

Mike'smeatshop

Well-known member
Joined
Apr 1, 2023
Messages
1,273
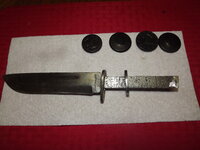
Private Lug. If you can use any of these Navy buttons they are yours for the black. I am not sure of the year that they were worn? But I need a measurement from the tip of the handle to the slot and the depth of the slot. Measure in thousandths would be great. My end of the handle was broke off so mine will be shorter. But I think it will be okay. Thanks. DSCF6117.JPG
 
OP
P

Private Lugnutz

Well-known member
Joined
Mar 30, 2012
Messages
30,700
Location
The Authentic Jersey Shore
If you can use any of these Navy buttons they are yours for the black.
Buttons! What a great idea! Thanks so much, Mike. THIS is why I'm glad I opened my aperture.

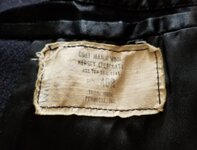
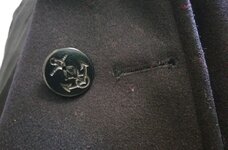
I appreciate the offer, but I will pass. You keep those buttons for your project. I have a few peacoats, one is my dad's which I don't wear (too small!), and I would never touch, and one I found at the flea a few years ago that I wear all the time in the winter. If you're a wartime guy, you know how rare it is to see a tag like this ("46R"!!!!) on a coat. Dudes were tiny back then. :) In decades of flea marketing, I have never seen an Ike jacket in 46. Ever. Anyway, all peacoats originally came with an extra button sewn on the inside. I just might have to think about going joint services on this handle. The size (1-1/4" diameter) is very conducive, as you can see in your photo, too. But my mind is going green, though, and thinking through all the field coats and coveralls I have.

Thanks again for the idea!
 

Attachments

  • 20230711_101007.jpg
    20230711_101007.jpg
    640.3 KB · Views: 15
  • 20230711_101143.jpg
    20230711_101143.jpg
    689 KB · Views: 16
OP
P

Private Lugnutz

Well-known member
Joined
Mar 30, 2012
Messages
30,700
Location
The Authentic Jersey Shore
But I need a measurement from the tip of the handle to the slot and the depth of the slot. Measure in thousandths would be great.
Will do!
My end of the handle was broke off so mine will be shorter. But I think it will be okay. Thanks.
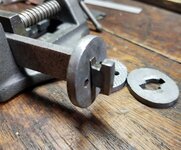
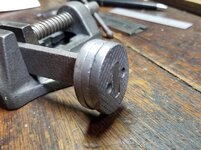
I see one spacer, not sure which one. If you have the three pommel spacers, you could cut your own notch, and everything would look the same, and the pommel would work the same, just be shorter. If you don't have the middle spacer with the angle-cam that turns and locks, there's no reason to cut a notch. If you have the end spacer there with the waffled face, it would be best, aesthetically, but even if it's the other one, you could still drive two twist nails into a composite spacer and a couple washers.

Honestly, either way, I think it would have an even beefier even more lethal look than it already does. I look forward to seeing the finished knife!
 

Mike'smeatshop

Well-known member
Joined
Apr 1, 2023
Messages
1,273
Buttons! What a great idea! Thanks so much, Mike. THIS is why I'm glad I opened my aperture.

I appreciate the offer, but I will pass. You keep those buttons for your project. I have a few peacoats, one is my dad's which I don't wear (too small!), and I would never touch, and one I found at the flea a few years ago that I wear all the time in the winter. If you're a wartime guy, you know how rare it is to see a tag like this ("46R"!!!!) on a coat. Dudes were tiny back then. :) In decades of flea marketing, I have never seen an Ike jacket in 46. Ever. Anyway, all peacoats originally came with an extra button sewn on the inside. I just might have to think about going joint services on this handle. The size (1-1/4" diameter) is very conducive, as you can see in your photo, too. But my mind is going green, though, and thinking through all the field coats and coveralls I have.

Thanks again for the idea!
Yea. I have my dads peacoat and I found another at a yard sale and I would never touch my dads. I am going to go original with my handle and cut out the ends. If I could get the measurement from the end, that would be great. Thanks.
 
OP
P

Private Lugnutz

Well-known member
Joined
Mar 30, 2012
Messages
30,700
Location
The Authentic Jersey Shore
Measurements will not be decimal, sorry, but I don't think it's required. Also, my pieces are very chewed up, as you can see, referring to the slots and to the angle cam in the middle locking spacer. It's very crude. Plus, remember that I had to file some of the peening down on the very end. But these will be close enough, I think.

My recommendation is to use the spacers. You can't go wrong if you do that. That would be better than specified measurements, nominal measurements or my measurements. The spacers are all 3/16" thick. I am sure yours are, too. The first spacer that goes on the tang sits just behind the slot, but it's kind of irrelevant. The locking spacer with the angled cam MUST occupy the slot you need to make in order to turn. When you turn and lock it in place, there is only enough space for the waffled **** plate to sit on the tang at the very end and it should be flush or close to it. That placement and that spacing is what should determine your slot cut. See Pics 4, 5, and 6. As for the depth of the slot, it sure looks like 1/8" on either side to me. The tang is 5/8" wide and there is 3/8" of steel between slots. That angled cam in my middle locking spacer is machined with very little tolerance. I have to really muscle it to get it to turn in my slot. I think that's by design.

Hope this helps.
 

Attachments

  • 20230711_125302.jpg
    20230711_125302.jpg
    779.6 KB · Views: 14
  • 20230711_125221.jpg
    20230711_125221.jpg
    738.3 KB · Views: 13
  • 20230711_125207.jpg
    20230711_125207.jpg
    765.1 KB · Views: 14
  • 20230711_123442.jpg
    20230711_123442.jpg
    679.1 KB · Views: 13
  • 20230711_123318.jpg
    20230711_123318.jpg
    959.2 KB · Views: 14
  • 20230711_122752.jpg
    20230711_122752.jpg
    539.6 KB · Views: 12
  • 20230711_144139.jpg
    20230711_144139.jpg
    415 KB · Views: 14
OP
P

Private Lugnutz

Well-known member
Joined
Mar 30, 2012
Messages
30,700
Location
The Authentic Jersey Shore
Two 3/4" OAL twist nails. They go through all three spacers and into the first washer, which was really a composite (probably micarta) spacer. It's really an ingenious design for any knife. Between the nails and that locking spacer, the handle is not going anywhere, and it should never get loose. Unless of course the leather starts deteriorating, which is exactly what happened.
 

Attachments

  • 20230711_155805.jpg
    20230711_155805.jpg
    762 KB · Views: 10
To avoid these ads, REGISTER NOW!
Top Bottom