To avoid these ads, REGISTER NOW!

ZMotorsports Shop Projects 2.0

To avoid these ads, REGISTER NOW!
OP
Z

zmotorsports

ALLIANCE MEMBER
Joined
Oct 20, 2009
Messages
21,477
Location
Northern Utah
I just jumped back in time too, now I understand why the Camaro is RED!

Funny you mention that Sterling. When we were looking for a Fifth Gen Camaro last year the color red was not even on my radar. I was specifically looking for a charcoal gray, white or black in that order. However, when I wasn't finding anything that I liked in those colors I figured beggars can't be choosers, so I expanded my options sort of speak. The only red that kept popping in my head was the GM Torch Red that they've had forever and although a beautiful color and very near to what I painted our 1940 Chev street rod, it wasn't what I wanted for my hot rod.

When I found this red one I almost dismissed it because the pictures washed the color out so much but upon a bit more research I discovered that they offered the Crystal Red Tintcoat as a factory color on the Camaro's and a buddy of mine had that color on his Corvette and I liked it.

Once I saw this car in person I really liked it and upon the drive home I called the wife to tell her I bought it she wasn't too awfully excited about the color red. That is until I brought it home and parked it outside in the sun when she first saw it. Then she fell in love with it and even moreso once I did the paint correction on it earlier this year. Now it seems she's on the lookout for another one when we out driving it and we've yet to see another in our area.

Funny story though, we were in the line at our local Chic-fil-A several weeks ago during date night and there was a charcoal gray Camaro in front of us. When the person taking our order walked from their car back towards ours she told me "I'm supposed to tell you guys how much the guy in front of you loves your car, especially the color." The grin on the wife's face was priceless.

After having a red Camaro for a year now I actually can't imagine any other color gracing our stable, so I guess it was meant to be. :unsure:
 

PhantomEB

Well-known member
Joined
Feb 6, 2006
Messages
6,821
Location
Medicine Hat, AB, Canuckistan
Mark, I don't remember exactly how much we got out of it but I know it wasn't much. I generally don't get **** out of my stuff when I sell it. 🤬
That’s why i am only allowed one project at a time. thankfully I don’t got shitloads of room, just plenty enough to sustain my hobbies, otherwise I would have several other units….. bronco ain’t for sale any time soon.
 

bigdave_185

Well-known member
Joined
Feb 14, 2021
Messages
443
Location
Utah
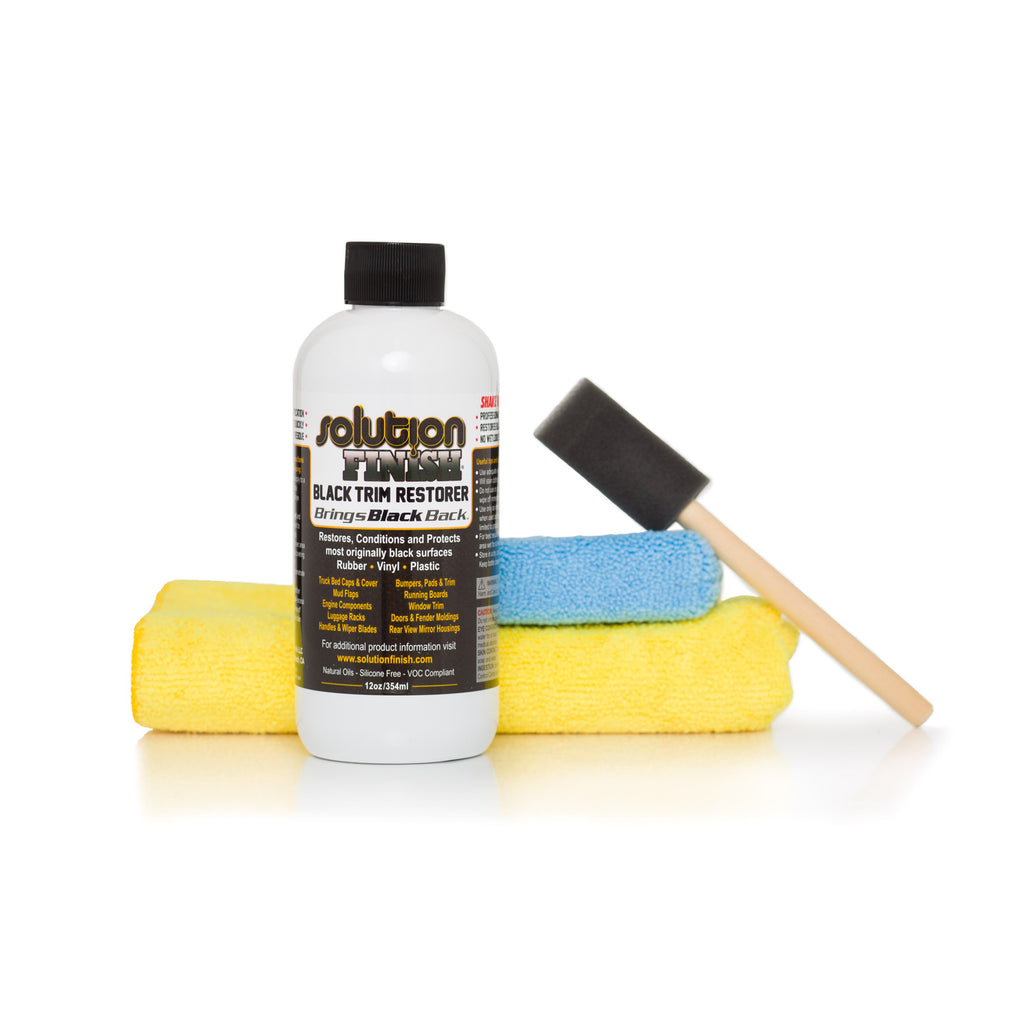
Mike, here is a link to the product
I used it today on our shop truck as well as a test
The jeep has had four weeks and five washes with great holding power and more to come

The shop truck was in lots worse shape

48D1E5EA-E70D-4D6F-89EE-C0B6FF08EEC6.jpeg
Also tried a tire coating on my Peterbilt that feels and looks great! Not excessively shiny but should last a long time for a one time application. I’ll text you those to avoid your thread clutter
 
OP
Z

zmotorsports

ALLIANCE MEMBER
Joined
Oct 20, 2009
Messages
21,477
Location
Northern Utah
The Hotrod Radio Flyer looks awesome like that! Any additional pin strips going on it now that you’re getting close to finished?


Also haven’t seen a baby growth update, no grandpa sleepin with a kid in his arms photos or anything

Thanks Dave. I'll look into that plastic treatment.

Our grandson is growing like a weed and just passed the 5-month old milestone. He's doing well and it's really great watching his little personality take shape. I couldn't be more proud of my son and daughter-in-law at the parents they are becoming.

As for the wagon, I will leave the body/tub OEM and won't be applying any further graphics or striping. The chassis it getting close to being ready for a little body work before paint. I still have the steering to do then I can move on to the paint work.
 
OP
Z

zmotorsports

ALLIANCE MEMBER
Joined
Oct 20, 2009
Messages
21,477
Location
Northern Utah
Mike, here is a link to the product
I used it today on our shop truck as well as a test
The jeep has had four weeks and five washes with great holding power and more to come

The shop truck was in lots worse shape


Also tried a tire coating on my Peterbilt that feels and looks great! Not excessively shiny but should last a long time for a one time application. I’ll text you those to avoid your thread clutter

Thanks Dave. I ordered a bottle and will definitely give it a try.
 
OP
Z

zmotorsports

ALLIANCE MEMBER
Joined
Oct 20, 2009
Messages
21,477
Location
Northern Utah
Friday on the way home I stopped to give the truck a bath.

Once home I gave the interior a good wipe down, including windows inside and out as well as ran a vacuum through it.
gm1.jpg

gm2.jpg

The kids come by Sunday for brunch and we got to spend some time with them as well as the little nugget for a few hours.

Had to run and grab some fuel for the OPE so I snapped a couple of pics of our truck and our son's in the driveway.
gm3.jpg

gm4.jpg

Also brought the wife's Acura into the shop to give it a quick once over before the work week. Checked battery, fluids and tires.

Had a full shop.
sundayshop.jpg
 
OP
Z

zmotorsports

ALLIANCE MEMBER
Joined
Oct 20, 2009
Messages
21,477
Location
Northern Utah
The day we were leaving for our Ouray, CO trip as I was backing the Jeep out of the garage to hook up to the coach I noted a small drip on the garage floor. It's location was a bit odd as it was just inboard of the passenger's side front tire and was dark in color. After feeling it I thought it seemed like glycol but had some oil characteristics as well. A quick look underneath and I noted a small drip hanging off the front lower control arm so after grabbing the creeper and crawling around under the Jeep for a few minutes I detected a slight drip or residual fluid on the passenger's side motor mount. I figured I had a motor mount beginning to leak but it didn't appear to be bottomed out of sagging, yet, so off to Colorado we went. That was in the back of my mind the entire trip and I checked on it daily but it didn't leak any additional while we were on vacation and never gave me any trouble. While on vacation I had ordered a pair of motor mounts so they'd be there when we arrived home but I haven't had time to replace them until now.

Saturday morning I racked the Jeep and began motor mount replacement. The driver's side had much more room than the passenger's side mount. I removed the engine cover and verified the clearance between the valve covers and the firewall so I knew how much I could raise the engine without any issues. Unfortunately, I had to remove the driver's side as well as the engine had to be raised evenly and then shifted slightly to the driver's side once that mount was removed in order to gain enough clearance to remove the passenger's side. It was still tight but I was able to remove it once the engine was shifted.
mm1.jpg

Here you can see the fluid leaking from the passenger's side motor mount in the cradle. It didn't really leak much more after we arrived home from vacation but just kept some slightl residual fluid around the mount.
mm2.jpg

Passenger's side motor mount removed and on the bench. Here the leak was more evident.
mm3.jpg

This is what surprised me though. The driver's side had also failed but the failure was in the rubber encapsulation and it wasn't leaking.
mm4.jpg

New GM motor mounts actually came with heat shields so maybe they will help. The aftermarket ones I originally installed didn't come with heat shields and they are quite close to the exhaust manifolds so maybe that was a factor.
mm5.jpg

New motor mounts swapped over onto the brackets and ready for reassembly.
mm6.jpg

Motor mounts installed and fasteners tightened. The heat shields are in place and not contacting anything.
mm7.jpg

All of the fasteners are treated to a quick reference of Seal Check and/or a paint pen so I can notice if a fastener ever comes loose.
mm8.jpg

After a quick road test last night, it feels like a successful replacement and the Jeep is ready to tackle the highway and dirt roads again.

Thanks for looking.
 

Mr.zippy

Well-known member
Joined
Apr 27, 2020
Messages
2,221
Location
Wyoming
The day we were leaving for our Ouray, CO trip as I was backing the Jeep out of the garage to hook up to the coach I noted a small drip on the garage floor. It's location was a bit odd as it was just inboard of the passenger's side front tire and was dark in color. After feeling it I thought it seemed like glycol but had some oil characteristics as well. A quick look underneath and I noted a small drip hanging off the front lower control arm so after grabbing the creeper and crawling around under the Jeep for a few minutes I detected a slight drip or residual fluid on the passenger's side motor mount. I figured I had a motor mount beginning to leak but it didn't appear to be bottomed out of sagging, yet, so off to Colorado we went. That was in the back of my mind the entire trip and I checked on it daily but it didn't leak any additional while we were on vacation and never gave me any trouble. While on vacation I had ordered a pair of motor mounts so they'd be there when we arrived home but I haven't had time to replace them until now.

Saturday morning I racked the Jeep and began motor mount replacement. The driver's side had much more room than the passenger's side mount. I removed the engine cover and verified the clearance between the valve covers and the firewall so I knew how much I could raise the engine without any issues. Unfortunately, I had to remove the driver's side as well as the engine had to be raised evenly and then shifted slightly to the driver's side once that mount was removed in order to gain enough clearance to remove the passenger's side. It was still tight but I was able to remove it once the engine was shifted.
mm1.jpg

Here you can see the fluid leaking from the passenger's side motor mount in the cradle. It didn't really leak much more after we arrived home from vacation but just kept some slightl residual fluid around the mount.
mm2.jpg

Passenger's side motor mount removed and on the bench. Here the leak was more evident.
mm3.jpg

This is what surprised me though. The driver's side had also failed but the failure was in the rubber encapsulation and it wasn't leaking.
mm4.jpg

New GM motor mounts actually came with heat shields so maybe they will help. The aftermarket ones I originally installed didn't come with heat shields and they are quite close to the exhaust manifolds so maybe that was a factor.
mm5.jpg

New motor mounts swapped over onto the brackets and ready for reassembly.
mm6.jpg

Motor mounts installed and fasteners tightened. The heat shields are in place and not contacting anything.
mm7.jpg

All of the fasteners are treated to a quick reference of Seal Check and/or a paint pen so I can notice if a fastener ever comes loose.
mm8.jpg

After a quick road test last night, it feels like a successful replacement and the Jeep is ready to tackle the highway and dirt roads again.

Thanks for looking.

Mike, I wasn’t aware those mounts had liquid in them. What do you figure the fluid consists of?
 
OP
Z

zmotorsports

ALLIANCE MEMBER
Joined
Oct 20, 2009
Messages
21,477
Location
Northern Utah
Mike, I wasn’t aware those mounts had liquid in them. What do you figure the fluid consists of?

I've read they have a solution of glycol and hydraulic fluid. Based on the dark color of fluid that came out of mine I would say that is pretty accurate.

I thought about just replacing them with a rubber or traditional style of motor mount but I sure like the smooth ride and feel the Jeep has. There is no significant NVH at all in the cabin and I love it. It's a catch-22 because I feel they failed a bit premature, but I sure like how smooth it runs. :unsure:
 

Monza Harry

Well-known member
Joined
Dec 29, 2018
Messages
1,433
Location
Windsor ON
Last edited:

signcrafter

Well-known member
Joined
May 9, 2012
Messages
12,528
I've read they have a solution of glycol and hydraulic fluid. Based on the dark color of fluid that came out of mine I would say that is pretty accurate.

I thought about just replacing them with a rubber or traditional style of motor mount but I sure like the smooth ride and feel the Jeep has. There is no significant NVH at all in the cabin and I love it. It's a catch-22 because I feel they failed a bit premature, but I sure like how smooth it runs. :unsure:
Just add them to the 3,4, or 5 year maintenance schedule Mike. LOL
 
OP
Z

zmotorsports

ALLIANCE MEMBER
Joined
Oct 20, 2009
Messages
21,477
Location
Northern Utah
During our last road trip the radio in our coach gave up the ghost on us. We don't listen to the radio or even CD's while driving but we do like to listen to books on tape. I have a frequency transmitter that we link to the dash radio and it plays the book through the coach's ceiling speakers via the wife's tablet and it works awesome.

When the radio quite on us we ran down to the local ACE Hardware in Green River, UT and picked up an inexpensive bluetooth speaker so we could finish out the trip and I'd diagnose the radio when we returned home.

I determined that the radio had failed, only after 22 years so that's odd. :ROFLMAO: I really didn't want to spend $500 plus on a fancy double DIN radio as we really don't need the radio for anything other than transmitting our digital books. These early 2000's Ford radios are readily available for $80-$100 from many salvage yards so I found one after diagnosing the failed radio.

Upon removing the OEM dash radio and plugging the new(used) one in, it didn't work either. I thought that was odd as the salvage company mentioned it had been tested. They gave me no issues returning it and getting me another which was awesome of them. Upon plugging the second one in, it didn't function either. The clock illuminated, the band could be changed and even the stations could be scanned and it would sense another station and stop. I thought the odds of two bad head units was far stretched so upon doing some internet searching I was able to locate a factory Ford radio connector pinout.

After comparing it to my Monaco wiring diagram I found there was a missing ground wire to an auxiliary terminal. I wasn't sure if the aux. terminal was to feed an external amp or what it was for because it already had one ground. Upon grabbing my PowerProbe and giving it the secondary ground everything functioned perfectly.

Next I removed the wiring harness from the coach and got it into the shop's workbench where I could work on it in comfort.

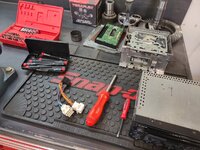
Here is the OEM head unit in the background which I disassembled to look for any obvious connection issues or failed solder joints in the circuit boards but couldn't detect anything. The new/used radio in the foreground along with the pigtail assembly removed from the coach's dash.
radio1.jpg

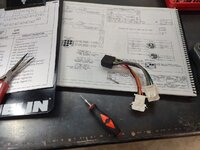
After comparing the Ford pinout to the Monaco wiring schematic I located the missing wire. I depinned the connector and found it had been cut off at some point. This had me stumped as to why Monaco would have not connected this wire and even in their wiring schematic stated it was not used. :unsure:
radio2.jpg

Rather than dwell on it and waste more time thinking I opted to just add the missing ground by soldering an extension to the depinnend connector.
radio3.jpg

Plugged the dash connections back in, plugged in the antenna and gave it a try. Worked perfectly. To be sure I left the radio on for about an hour while I worked in the shop to make sure it functioned properly before sliding it back in and locking to the dash.
radio4.jpg

Before closing up the shop I slid it back into the dash engaging the locking tabs and she's ready to go.
radio5.jpg


Thanks for looking.
 
OP
Z

zmotorsports

ALLIANCE MEMBER
Joined
Oct 20, 2009
Messages
21,477
Location
Northern Utah
Just add them to the 3,4, or 5 year maintenance schedule Mike. LOL

I sure hope not Scott. I did however add them to my routine inspection as something to look at during each service. I am hoping these having the heat shields will prevent any further premature failure as I really haven't seen too many issues with these in the GM vehicles. There'll be a failed one here or there but nothing to indicate a high failure rate, maybe the dealerships have a different story but I like the smoothness they provide so much if I have to replace them every 4-5 years I guess that's what I'll have to do.
 
OP
Z

zmotorsports

ALLIANCE MEMBER
Joined
Oct 20, 2009
Messages
21,477
Location
Northern Utah
Mike, I was a bit baffled when you mentioned it was your motor mounts that were leaking, never knew that was a thing, just like blinker fluid, another thing I learned about recently. ;)

Yeah, when I saw the fluid on the garage floor, I thought about the blinker fluid but it was much too dark for that. :ROFLMAO:
 

signcrafter

Well-known member
Joined
May 9, 2012
Messages
12,528
Mike, to bad you didn't mention something on here about the radio. I have a few of those ford factory radios laying around from back when I was younger and into car stereos I ripped them out as soon as I got a new truck and they just been on a shelf. I would have sent you one, or in this case two. :ROFLMAO:
 
To avoid these ads, REGISTER NOW!
OP
Z

zmotorsports

ALLIANCE MEMBER
Joined
Oct 20, 2009
Messages
21,477
Location
Northern Utah
Mike, to bad you didn't mention something on here about the radio. I have a few of those ford factory radios laying around from back when I was younger and into car stereos I ripped them out as soon as I got a new truck and they just been on a shelf. I would have sent you one, or in this case two. :ROFLMAO:

Thanks Scott. Maybe I should have mentioned it but I thought it would be nothing more than a plug n' play operation. Wasn't planning on spending as much time diagnosing as I did. :rolleyes:
 
OP
Z

zmotorsports

ALLIANCE MEMBER
Joined
Oct 20, 2009
Messages
21,477
Location
Northern Utah
Mike, question, on the radio, why do you think the unit worked until this last trip not having that secondary ground.

:beer:

Was wondering that myself.


I have absolutely no idea. That's why I was so stumped and scratching my head. Why did Monaco cut that auxiliary ground wire and the original radio did not need it yet a factory Ford radio requires it? They even mentioned it in the Monaco wiring schematic that the black wire is not used. :headscrat


**On edit, one thing I noticed is that the Monaco OEM radio had a different part # than the Ford radio. If memory serves the Ford one that I just purchased started with a YU3F prefix whereas the one I pulled out that Monaco installed was completely different. I can't remember what it was but I couldn't find any pinouts for it but when I typed in the YU3F I got some pinouts that came up.

I wonder if Monaco purchased the radios directly from Sony under a different part number and something was slightly different than the ones Ford was using. Just a thought is all because I cannot see any other differences.
 
Last edited:

Just Fishing

Well-known member
Joined
Dec 21, 2020
Messages
57
Location
Utah


Amazing work as always! :beer:

And I think I recognize that new bench tool. :ROFLMAO:
I'm glad you found a use for it. :cool:

Great idea with the set screw, has me thinking of ideas for that set of G4 LS rods I have in my compressor shed.

I also have a LS crank and a 5.3 block that's about to head to the scrap yard, if you need a coffee table or a creative mailbox. :ROFLMAO:
 
OP
Z

zmotorsports

ALLIANCE MEMBER
Joined
Oct 20, 2009
Messages
21,477
Location
Northern Utah
Amazing work as always! :beer:

And I think I recognize that new bench tool. :ROFLMAO:
I'm glad you found a use for it. :cool:

Great idea with the set screw, has me thinking of ideas for that set of G4 LS rods I have in my compressor shed.

I also have a LS crank and a 5.3 block that's about to head to the scrap yard, if you need a coffee table or a creative mailbox. :ROFLMAO:


Thanks Chris. Actually that particular piston and rod are from an old Suzuki GS1100 build from many years ago and I made the TIG torch holder about 6 years ago after moving shops and finding the damaged rod & piston in the move. It works well for a TIG torch holder.

I don't think I have a use for a crank or block at this time but thanks for offering. I think my son would give me **** if I brought in scrap parts after all of the ones he made me toss out when we moved. :cool:
 

Just Fishing

Well-known member
Joined
Dec 21, 2020
Messages
57
Location
Utah
Thanks Chris. Actually that particular piston and rod are from an old Suzuki GS1100 build from many years ago and I made the TIG torch holder about 6 years ago after moving shops and finding the damaged rod & piston in the move. It works well for a TIG torch holder.

I don't think I have a use for a crank or block at this time but thanks for offering. I think my son would give me **** if I brought in scrap parts after all of the ones he made me toss out when we moved. :cool:

Well dang, I hoped that I contributed to your work bench in some way. :(
 
OP
Z

zmotorsports

ALLIANCE MEMBER
Joined
Oct 20, 2009
Messages
21,477
Location
Northern Utah
Well dang, I hoped that I contributed to your work bench in some way. :(

Well Chris, your piston and rod are technically still on my bench, just not currently being used and on my main workbench.

Here in the background behind the vise and next to the failed ring & pinion.
radio1.jpg


I haven't found a use for it, yet....... ;)
 
OP
Z

zmotorsports

ALLIANCE MEMBER
Joined
Oct 20, 2009
Messages
21,477
Location
Northern Utah
I almost forgot to post a picture of my latest addition to the shop.

A couple of months ago my wife was helping at a work golf tournament for our local children's hospital. One of the big portions of the day is a raffle at the end of the evening to drive donations. The raffle prizes are donated by various vendors and businesses. I went with the wife to support her at the event and we decided to take the Camaro plus she had gotten a room comp'd from the venue, so we decided to make a mini getaway out of it.

I decided to buy some raffle tickets to support the cause and while I was wandering around, I found a cool little fire pit and a small benchtop/tabletop refrigerator that would be cool to have. The refrigerator for the shop and a small gas fired stainless steel fire pit for the deck when those fall temps start to roll in.

We ended up getting the refrigerator and a friend of the wife's won the fire pit in which she didn't want and gave it to the wife so we ended up with both items. Unfortunately, we had the Camaro and no room in which to bring them home with us, so we had to arrange other transportation.

I don't drink and am not necessarily a fan of beer related paraphernalia so I will end up removing the Samual Adams wrap from the refrigerator at some point, I just haven't had the time yet.
refrig1.jpg
 
OP
Z

zmotorsports

ALLIANCE MEMBER
Joined
Oct 20, 2009
Messages
21,477
Location
Northern Utah
Last night I racked the Chevy to do a LOF service. While the fluids were draining I took a few minutes to run a vacuum through the Jeep and check fluids on it.
truck1.jpg

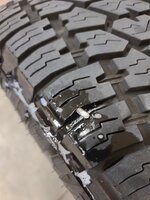
While rolling the tires/wheels to their new positions I noted a screw in a tire. I grabbed the soapy water to ensure it hadn't penetrated into the cavity and was only in the lug. Luckily it appeared to only be in the lug but I continued to spray with soapy solution as I removed it to ensure there were no bubbles.
truck2.jpg

Sure enough, just in the lug.
truck3.jpg

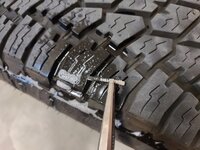
As I rolled the third tire around I saw another screw. 🤬 I thought there was no way I would get lucky twice in one night, but I was wrong. This one didn't penetrate the tire either, only in a lug. I also must say I am quite pleased with how these Nitto G2 Terra Grapplers are wearing plus they are quiet and smooth in operation.
truck4.jpg

The two screws pulled from the tires.
truck5.jpg

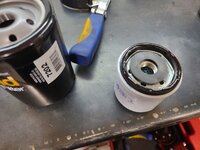
After the engine oil had drained I removed the spin-on transmission filter. On these Allison transmissions, don't forget to grab the magnet that resides just inside the filter. I see all too many of these filters missing the magnet so I can only assume people (or shops) don't realize they are there and toss them with the filter after removal.
truck6.jpg

Magnet cleaned and reinserted into the new filter.
truck7.jpg

I sure like this form-a-funnel for redirecting oil around certain components. Nothing worse than getting oil down into a U-joint and have it spin all over the place upon first drive. This way the oil detours around the driveshaft and into the drain barrel.
truck8.jpg

After completing the fluid exchange, filters and greasing of the front suspension components I turned my attention to the rear inner fender liners that have been sitting in the shop for about six months now.
truck9.jpg

Driver's side completed. I temporarily stuck the OEM bolts in which were painted white but found some black oxide coated fender bolts that will replace these.
truck10.jpg


One side down and just the passenger's side to go then I can reinstall the tires/wheels, add engine oil and she's good to go for another 5k miles.

Thanks for looking.
 
To avoid these ads, REGISTER NOW!
Top Bottom