To avoid these ads, REGISTER NOW!

ZMotorsports Shop Projects 2.0

OutlawDrifter

Well-known member
Joined
Jan 20, 2015
Messages
3,886
Location
KS
Mike, I think the GM Blue (LS6/LS2 if I remember correctly) would be just fine and give you some extra security. BTR also makes a replacement spec'd the same as the GM Blue, and I have heard very good things about them. The GM, Melling, or BTR would probably do everything you need it to.

I 100% agree, if one of my springs broke, and I wasn't in a position where I could only afford to replace the broken spring, I would do all 16 just for peace of mind.
 
To avoid these ads, REGISTER NOW!
OP
Z

zmotorsports

ALLIANCE MEMBER
Joined
Oct 20, 2009
Messages
21,441
Location
Northern Utah
Thanks for the comments guys.

Now I'm leaning towards the GM "Blue" even though they are no longer blue. Part # 19420455 seems to be the ones most people on the Camaro and Corvette forums are running on stock to mild engines with good success. I can also get them easily from Summit Racing as they are in stock currently.

I really haven't had any issues with Melling parts at all but seeing as how these GM springs also came on the infamous LS3 engine which has been run in many off-road race series trucks in stock form, I think I am leaning that way because I doubt I'll ever push my Jeep to that level.
 

Bigblue&Goldie

Well-known member
Joined
Mar 12, 2009
Messages
10,706
Location
AZ
I really haven't had any issues with Melling parts at all but seeing as how these GM springs also came on the infamous LS3 engine which has been run in many off-road race series trucks in stock form, I think I am leaning that way because I doubt I'll ever push my Jeep to that level.

In the years my team has been racing LS3's (both high/low output versions) we've never had a valve spring failure, and I can't say I've ever heard of it being an issue. Granted, the guys that push the rules have shimmed the valve springs to even them out (rules mandate stock springs). The bigger issues with the LS3's as they're delivered is the oil pump (Melling makes a high volume replacement) and wildly varied torque specs on the rotating and timing assemblies from the factory.

It used to be back in the day that you got your LS1, slapped in a cam, stiffer springs, a tune, and some headers and that was the go-to "reliable" ~425hp package. Springs were essential when doing a big cam and running high RPM's.
 

Finallygotit

ALLIANCE MEMBER
Joined
Jul 6, 2013
Messages
4,095
Location
Tucson, AZ
Mike, sorry to hear of your issue but at least you and your wife made it home safe and sound. That would have really sucked had you been out on a trail. I also agree that replacing all 16 springs is the way to go and also give you piece of mind. From your posts, it doesn't sound at all like your driving stressed the springs. Unless you're one of those "stop light grand prix" drivers that you haven't told us about. :lol:

So get those springs replaced and get that great rig on the road again!

:beer:
 
OP
Z

zmotorsports

ALLIANCE MEMBER
Joined
Oct 20, 2009
Messages
21,441
Location
Northern Utah
In the years my team has been racing LS3's (both high/low output versions) we've never had a valve spring failure, and I can't say I've ever heard of it being an issue. Granted, the guys that push the rules have shimmed the valve springs to even them out (rules mandate stock springs). The bigger issues with the LS3's as they're delivered is the oil pump (Melling makes a high volume replacement) and wildly varied torque specs on the rotating and timing assemblies from the factory.

It used to be back in the day that you got your LS1, slapped in a cam, stiffer springs, a tune, and some headers and that was the go-to "reliable" ~425hp package. Springs were essential when doing a big cam and running high RPM's.

Thanks for the confirmation Ryan. I have not seen a spring issue on any of the later LS engines, especially the LS3's that I've seen being pushed to redline. I must have gotten an anomaly in my L94 but ordered the new GM Performance Valve springs that came in the LS3 and are the replacements for the older LS6 which did have a lot of failures in the early 2000's C5 Vettes.

Some of the others that I spec'd out had just too much seat pressure for my liking on a stock cam, especially where I don't push it to redline so no fear of floating the valves. The seat pressure @ 1.800" installed height of my L94 OEM springs was 89.4 PSI and the new GM Performance springs show 90 PSI at same height, so pretty much the same but a slightly higher spring rate. Open on the stock L94 is 263 and the GM Performance show 290. Some of the Melling and PAC ones I looked up were upwards of 135-145 PSI @ 1.800" and well over 320 at opening. I feel that is too much for a stock cam and for what I need.

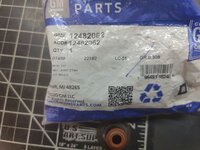
I think these GM springs will do the trick as well as I ordered new GM intake and exhaust valve guide seals. Funny, my local GM dealership actually had the GM Performance springs in stock as well as the 12482062 (brown/intake) guide seals but not the 12482063 (black/exhaust). Summit Racing had the valve springs at the same price but were much cheaper on the seals and they had both sets in stock. Should be here later in the week so I can try and do the repair over the upcoming weekend.


Mike, sorry to hear of your issue but at least you and your wife made it home safe and sound. That would have really sucked had you been out on a trail. I also agree that replacing all 16 springs is the way to go and also give you piece of mind. From your posts, it doesn't sound at all like your driving stressed the springs. Unless you're one of those "stop light grand prix" drivers that you haven't told us about. :lol:

So get those springs replaced and get that great rig on the road again!

:beer:

Agreed Dan. Glad this happened a few miles from home and not 650+ miles away during one of our RV Gatherings or Rallies and especially 20 or more miles off the pavement.

My wife keeps saying she's impressed with how I'm handling this but in my mind I keep thinking how blessed I am because it happened when and where it did as it could have been much worse scenario and more catastrophic as well.

It'll be repaired and back on the road in no time for future off-road trips and vacations. :bounce:
 

Just Fishing

Well-known member
Joined
Dec 21, 2020
Messages
57
Location
Utah
I have heard of the stock valve springs breaking on people.
Not sure what causes it, I would expect it to break early on and not after many miles.

And that's one thing I like about the PAC springs I have in my Tahoe's 6.0; double valve springs.
In my mind it's a little redundancy to prevent a valve drop should I ever have a broken spring.
 
OP
Z

zmotorsports

ALLIANCE MEMBER
Joined
Oct 20, 2009
Messages
21,441
Location
Northern Utah
I have heard of the stock valve springs breaking on people.
Not sure what causes it, I would expect it to break early on and not after many miles.

And that's one thing I like about the PAC springs I have in my Tahoe's 6.0; double valve springs.
In my mind it's a little redundancy to prevent a valve drop should I ever have a broken spring.

Yeah, not sure why one broke after almost 65k miles. I know it is rare and probably even more rare to have another break in the same engine. I've read on one of the Corvette forums where the early C5's were breaking springs and many under warranty when the dealership just changed the broken spring and sent it out the door. I guess that's one way to keep work coming back in but makes me wonder. One half my brain told me to replace the broken spring and put it back together until I tear the top end down to perform an AFM delete in a year or so, but the other side tells me there is no way I can put it together with the worry of another of the same batch breaking, especially when we are 20+ miles off the pavement as we many times are. :headscrat

I actually like the beehive springs that the LS's come with for harmonics and weight and with stock .500" or so lift, there really isn't much seat pressure needed. I looked at the PAC as well as I really like BTR too. I will probably go with BTR or maybe PAC when I do the L99 in the Camaro but it sees a little higher RPM's than L94 in the Jeep.
 
OP
Z

zmotorsports

ALLIANCE MEMBER
Joined
Oct 20, 2009
Messages
21,441
Location
Northern Utah
I haven't stepped foot in the shop for a couple of days as I've been waiting on parts for the Jeep, so I've just been hanging out with wife after work and enjoying a couple of visits from the kids and our grandson. However, the parts were supposed to arrive yesterday so I figured I would bump the heat up in the shop and work on the Jeep after arriving home from work.

Unfortunately, the parts didn't arrive via UPS until well after 7pm last night so I didn't get as much done as I had hoped.

I figured I'd tear the left bank down to the same point as the right in preparation for the parts arriving.
spring7.jpg

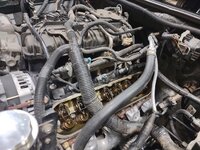
Left bank was a little more time consuming but not bad. Just a bit tighter due to steering shaft, ECM main wiring harness and A/C lines but still not a bad job removing the rocker cover and getting to the valve train. As for the right bank, I'm glad I turned my battery tray and TIPM several months ago as it sure made access to the right rocker cover much, much easier.
spring8.jpg

Plugs removed and rocker arms exposed and ready for removal.
spring9.jpg

I had closed up shop and headed in the house within only about an hour of being in the shop. Then after dinner around 7pm the doorbell rang as UPS was delivering the parts.

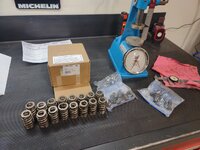
I took them to the shop to open up the box, make sure all 16 springs were accounted for as well as the valve guide seals and then randomly tested a couple springs to ensure I got the correct ones. These are the GM Performance Parts "Blue" springs that are also known as the LS6 spring. These springs used to be blue in color years ago but the last set I used as well as this set were bare with a white stripe. When I used the last set a few years ago and they were not blue as advertised I did some digging and found out that they were no longer coming painted but most vendors continued to use the same picture from when they were painted blue which has just added to the confusion.

This time I expected and knew they would be bare wire but just to be sure I grabbed the Rimac tester, dusted if off and tested about half. Here's the GM Performance Parts part #.
spring10.jpg

It's been a while since I used my spring tester so I had to dust it off before using. This was one of the more expensive tools that I purchased nearly 30 years ago when I was building a lot of engines and doing some racing. This also worked excellent to test snowmobile drive and driven clutch springs for comparing height pressures and spring rates as we were always playing with clutches and fine tuning them and I was tailoring them to their owner's riding style, weight, engines, etc. Awe, those were the days.....;)
spring11.jpg

Spec's show seat pressure at 92 pounds @ 1.800" installed height and all of these measured around 93-94 pounds pressure. It is very common for new springs to measure a pound or two more until they "take a seat".
spring12.jpg


Thanks for looking.
 
Last edited:

Mr. Roboto

Well-known member
Joined
Dec 11, 2012
Messages
2,161
Location
New Hampshire
What a bummer about your engine! The timing of it was quite unfortunate as well... but noting you can't handle, however :cool:

What a cool tool the spring tester is.... I have never seen one of those before. When the springs fail like that, do they usually break at a point far up enough where either side of the broken spring is retained by the valve? Or can an small end of the spring break off and become loose? Can you re-use the old keepers as well? Do you use compressed air to hold the valves while replacing the spring? (Sorry if these seem like silly questions, I have not done much engine work in my time.... something I hope to learn more about)
 
OP
Z

zmotorsports

ALLIANCE MEMBER
Joined
Oct 20, 2009
Messages
21,441
Location
Northern Utah
What a bummer about your engine! The timing of it was quite unfortunate as well... but noting you can't handle, however :cool:

What a cool tool the spring tester is.... I have never seen one of those before. When the springs fail like that, do they usually break at a point far up enough where either side of the broken spring is retained by the valve? Or can an small end of the spring break off and become loose? Can you re-use the old keepers as well? Do you use compressed air to hold the valves while replacing the spring? (Sorry if these seem like silly questions, I have not done much engine work in my time.... something I hope to learn more about)

My wife was surprised at how I was handling the whole thing. All I kept thinking about was it could have been so much worse. It could have broken while we were way off in the back country somewhere rather than a couple miles from home or it could have dropped the valve into the cylinder, smacked the piston and caused a major catastrophic failure and damage. If it was going to happen, it couldn't have been at a more convenient time, place or scenario which allowed an easy repair to get it back up and running.

As for where these springs break, it's kind of a **** shoot. Personally, I have not had a valve spring break before but I've seen a few and repaired a few and there doesn't seem to be any rhyme or reason as to where the springs break. I was just glad this one broke where it did which still captured the valve and didn't allow it to drop nor damage any other components.

I will post up a bunch of progress pictures as well as my latest video to my YouTube channel depicting the repair in following posts.

Thanks.


I haven't seen a spring tester like that in probably near 45 years. 😍

And I want one….
just cuz!

Yes, this is an old school valve spring tester for sure. I've had this particular one for about 30 years or so now. I bought it when I was doing a lot of cylinder head work as well as used it heavily for snowmobile setups back in the early/mid-90's. I couldn't find a used one so had to pay full price and bought this one new but I think they can be purchased quite reasonably now if you can find used ones as I'm sure there are some that have been inherited and people don't know what they are or what to do with them as cylinder head work is less common these days.
 
OP
Z

zmotorsports

ALLIANCE MEMBER
Joined
Oct 20, 2009
Messages
21,441
Location
Northern Utah
The next few posts will be picture heavy as I post up pictures from my valve spring replacement/repair in our 2011 Jeep Wrangler. I was able to finish up the work on Saturday afternoon so the wife and I could relax and enjoy the New Year's holiday weekend.

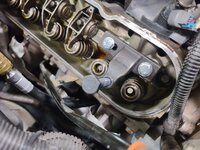
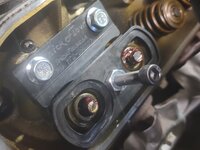
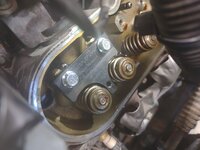
I have two styles of LS valve spring compressors for use with the heads on the engine. One style has a radius at the bottom that resides in the trunnion plate that the rockers nest into, this one is made by Comp Cams. The other style is made by Trick Flow and has a flat base that mounts directly to the machined boss on the head after removing all rockers and stand.

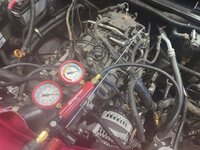
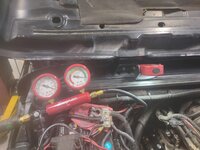
My thinking was that I would do cylinder #2 first just in case there was cylinder or valve damage and I had to dig deeper so I opted to use the Comp Cams tool. I apply a small amount of moly lube on the threads to keep them lubed and prevent galling of the threads. Once the tool is mounted to the trunnion stand, the threaded bolt is threaded into the tool and across the bridge. The bridge is what rests on the valve retainers and as the bolt is tightened, the bridge collapses the springs to reveal the keepers. I must also point out that before the tool goes on, I take a mallet and smack each retainer to shock the keepers loose from the taper. This allows the retainers to easily move away from the keepers as the springs are compressed and easy removal of the keepers from the valve stems. All of this is performed after using my leak down tester to apply about 100 PSI of compressed air to hold the valves closed. A cylinder leakage tester is not necessary, just compressed air to hold the valve but I like to check the health of the valves and cylinders at the same time. I have also heard of people using the string method, which consists of inserting string into the cylinder, then rolling the engine over until the string compresses and holds the valves closed for spring replacement. I have never used the string method because I have always had compressed air in my shops and it is much easier and faster to move through the valve removal and assembly process.

Here the keepers are removed and the bridge is removed allowing the springs to relax. The bridge on this particular set of springs did not compress evenly due to the exhaust spring being broken so I had to push a little extra on the exhaust valve to gain enough space to remove the keepers.
ls1.jpg

There is the culprit, broken exhaust spring for cylinder #2.
ls2.jpg

One of these is not like the others. :unsure: New springs in the foreground, cleaned and awaiting installation.
ls3.jpg

New valve guide seals and springs installed on cylinder #2.
ls4.jpg

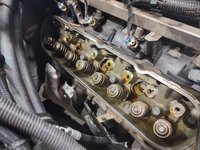
With cylinder #2 showing good and evidence no further major work was necessary, I removed the last of the rocker arms and trunnion stands in preparation to move on through the remaining 7 cylinders replacing springs and guide seals.
ls5.jpg

I haven't used my valvetrain organizer in a few years, but it was nice to have it handy to keep all of the parts in order and organized.
ls6.jpg

Here you can see that cylinder #2 is healthy and in good condition with only about 7% leakage. Anything under 10% is considered excellent so I am very pleased with this result, especially on an engine with just over 64k miles on it.
ls7.jpg

Moving to the left bank I used the Trick Flow spring compressor now that the rocker stand is out of the way.
ls8.jpg

Part # for the exhaust valve guide seals. The exhaust seals have a red top.
ls9.jpg

Intake guide seals which have the black top.
ls10.jpg


More progress pics to follow.
 
OP
Z

zmotorsports

ALLIANCE MEMBER
Joined
Oct 20, 2009
Messages
21,441
Location
Northern Utah
Continuing on.

New springs installed and compressed. I like to apply a small amount of grease to the valve stems which aid in holding the keepers in place upon installation.
ls11.jpg

Keepers held in place by the grease so they don't dislodge when the spring pressure is released and the retainers raise up onto the tapers.
ls12.jpg

Bridge removed and ready to remove the base of the tool and move to the next cylinder.
ls13.jpg

Once the springs are removed, I grab the seals with a pair of pliers and remove. Then add a little lube to the valve stems before installing the new guide seals to avoid damage. This step was probably not necessary as there was oil residue still on the valve stems but a little extra insurance no damage would be done to the seals.
ls14.jpg

Intake seal being installed.
ls15.jpg

That cylinder also tested good at well under 10% leakage.
ls16.jpg

As you can tell by the small amount of grease on top of the retainers, this bank is complete.
ls17.jpg

With the hardest bank completed (left) it was time to move back over to the right bank and complete cylinders 4, 6 and 8. Again, all cylinders tested good after spring repalcements.
ls18.jpg

Valve spring tools put away until needed next time.
ls19.jpg

All of the old valve springs and seals.
ls20.jpg


More to follow...
 
OP
Z

zmotorsports

ALLIANCE MEMBER
Joined
Oct 20, 2009
Messages
21,441
Location
Northern Utah
Continuing on.

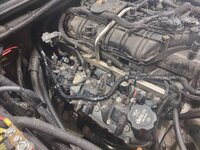
With the valve springs and seals replaced it was time to start reassembly. Rocker covers cleaned in the solvent tank along with new Felpro gaskets and grommets on the fasteners.
ls21.jpg

New OEM iridium spark plugs also at the ready.
ls22.jpg

Rocker bases reinstalled onto the head while awaiting the rockers.
ls23.jpg


Next comes the installation of the rockers and torquing to spec. Now this part is somewhat controversial, much like the removal process. Some people will just remove all of the rockers in one take and install much the same way. However personally, I don't like to exert that much pressure on the threads in the heads nor the fasteners while trying to compress the valve springs and opening valves. Therefore, I will take notice of which rockers are at "rest" sort of speak by looking at their position. The ones that are below the upper rocker cover mating surface indicate that the lifters are on the base circle of the camshaft and are therefore not trying to open the valves. Those rockers that are above the mating surface are riding up on the lobe of the camshaft trying to open a valve and so I will not tighten those at this time. For those that are on the base circle I will tighten to zero lash, then count turns as they should be between 3/4 turn and 1-1/2 turns from zero lash. All of mine were right @ 1 turn from zero lash and then I torqued to specification which is 22 ft/lbs.

For those that followed my Cummins ISL overhead, you will notice that I also use a paint pen to mark a rocker when completed before moving on. Once those rockers were torqued that were sitting on the base circle I rotated the engine one full revolution and tightened the remaining rockers to spec. I then went back through all of them with the torque wrench one more time before moving on.


Rocker installation is complete. Note the paint pen markings.
ls24.jpg

Right bank the same way.
ls25.jpg

Now the rocker covers can go on and these get torqued to 106 in/lbs.
ls26.jpg

Here is a section of old OEM convoluted casing that was deteriorating and in need of replacement. Old one removed and some new nylon split loom casing installed.
ls27.jpg

New nylon split loom.
ls28.jpg

ls29.jpg

Also noted another section of convoluted casing on the main positive cables that needed to be replaced.
ls30.jpg


More pictures to follow....
 
OP
Z

zmotorsports

ALLIANCE MEMBER
Joined
Oct 20, 2009
Messages
21,441
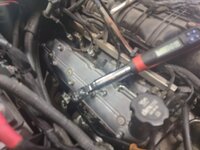
Location
Northern Utah
Continuing on with the repair.

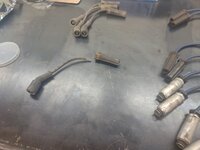
The next part I think was my own doing. A couple of the plug wires were hard to reach upon disassembly so I thought I'd test them before reinstalling and I'm glad I did. One wire tested open while all others were good at around 770-790 ohms. This one tested open and upon grabbing it and pulling I discovered why. ****, wasn't planning on new wires and I couldn't easily locate a single so I had to buy a set.
ls31.jpg

I've seen people slather dielectric grease on the ends of the boots before so I thought I'd share my thoughts. Dielectric grease on the end of the boot really does nothing to aid sealing. It is really used to coat the porcelain of the plug and aid in sealing out moisture from the boot as well as aid in removal next time.
ls32.jpg

You can either apply it to the porcelain of the plug before installation or the boot. I like to use a rubber installation tool for installing the plugs so that negates the ability to use the dielectric grease on the plug or it will just spin on the install tool. Therefore, I take a little on my pocket screwdriver, not too much as it really doesn't need to be slathered all over. In fact, some people just spray a light coating of silicone spray in the boot which would also work. I've just been using dielectric grease for decades and am kind of stuck in my ways. :bounce:
ls33.jpg

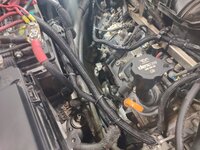
Put it slightly up inside the boot. Next when installing the boot onto the plug, give it a bit of a twist to spread it uniformly around the plug. Then snap it onto the plug and orientate the wire to the natural lay of the wire in relation to the coil.
ls34.jpg

Plug wires installed.
ls35.jpg

After the test fire, everything was double checked and the engine cover reinstalled.
ls36.jpg

The wife and I went for a test drive that night for dinner and then on Sunday, New Year's Eve morning I went back out to the shop with coffee in hand to give the shop a good cleaning in which to bring in the new year.
ls37.jpg

ls38.jpg

ls39.jpg


Thanks for looking.
 

OutlawDrifter

Well-known member
Joined
Jan 20, 2015
Messages
3,886
Location
KS
Mike, I use the dielectric grease in the same manner. On the silicone front, I worry it will degrade the rubber faster :dunno: , right, wrong, or indifferent.

Just to clarify on the rockers...did you get 1 full turn to 22ft/lbs of torque?
 
OP
Z

zmotorsports

ALLIANCE MEMBER
Joined
Oct 20, 2009
Messages
21,441
Location
Northern Utah
I hope everyone had a safe and Happy New Year heading into 2024.

The wife and I enjoyed our three day weekend and for the first time in many years we actually thoroughly enjoyed our Christmas season this year.

Lord knows we sure ate well the past few weeks. :ROFLMAO:

Saturday after getting the Jeep completed and back on the road we opted for a do-over from the week prior when the valve spring broke. We went to one of our favorite local restaurants for dinner and I splurged with one of their pastrami burgers. I generally get their turkey avocado sandwich which I quite enjoy but for some reason I was craving a burger and the pastrami burger caught my attention.
hughes.jpg


For New Year's Eve we opted to stay home and grill. We picked up a nice steak for myself and some chicken for the wife.
ny1.jpg

And what's a steak without some grilled mushrooms to go along with it.
ny2.jpg

She also spoiled me with some shrimp in the air fryer for a little surf n' turf style dinner.
ny3.jpg

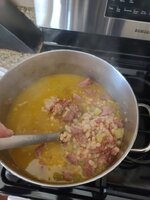
For New Year's Day she used the ham hock and put on a pot of ham & bean soup.
ny4.jpg

All in all a GREAT holiday weekend and we're ready to go into 2024.

Thanks for looking.
 
OP
Z

zmotorsports

ALLIANCE MEMBER
Joined
Oct 20, 2009
Messages
21,441
Location
Northern Utah
Mike, I use the dielectric grease in the same manner. On the silicone front, I worry it will degrade the rubber faster :dunno: , right, wrong, or indifferent.

Just to clarify on the rockers...did you get 1 full turn to 22ft/lbs of torque?

Marc, I haven't used the silicone spray personally as I always have used and continue to use the dielectric grease. A few people I follow have used the silicone spray which I think will work fine, especially since most boots are more silicone than rubber for heat resistance anyways.

As for the rockers, I was just past one turn to the final torque of 22 ft/lbs. I got at or just slightly under from zero lash to tight with a ratchet and then just a little more with the torque wrench to final torque.
 
To avoid these ads, REGISTER NOW!

OutlawDrifter

Well-known member
Joined
Jan 20, 2015
Messages
3,886
Location
KS
As for the rockers, I was just past one turn to the final torque of 22 ft/lbs. I got at or just slightly under from zero lash to tight with a ratchet and then just a little more with the torque wrench to final torque.

I figured that's where you were at on them, just verifying my memory was correct!


That ham and bean soup looks awesome! I'm a big fan, that was always my favorite part of bean harvest back home. I would dip a bucket of Great Northern beans out of the combine and take them to grandma...ham and bean soup and cornbread were always waiting when we got home that night :love:
 
OP
Z

zmotorsports

ALLIANCE MEMBER
Joined
Oct 20, 2009
Messages
21,441
Location
Northern Utah
I figured that's where you were at on them, just verifying my memory was correct!


That ham and bean soup looks awesome! I'm a big fan, that was always my favorite part of bean harvest back home. I would dip a bucket of Great Northern beans out of the combine and take them to grandma...ham and bean soup and cornbread were always waiting when we got home that night :love:

Yeah, we had ham for Christmas day at my FIL's and my wife's sisters were going to throw it out. I about smacked the silly right out of them and said that's the best part for ham & bean soup. Like you though, we prefer the Great Northern beans to lima beans. Not a fan of lima beans personally.

The only drawback is that it made so much. We'll be eating it for much of the week I'm afraid. :oops:
 

WoodsTruck

Well-known member
Joined
Jan 12, 2013
Messages
1,025
Mike,
What is your tool of choice to keep the valves in place when the springs are removed?
 
OP
Z

zmotorsports

ALLIANCE MEMBER
Joined
Oct 20, 2009
Messages
21,441
Location
Northern Utah
I wanna know where ya got that sandwich at!!
I still make the drive up to Tony’s pizza for their pastrami sandwich for lunch about once a month

Hug-Hes Cafe in North Ogden on 2600 N. just west of Wash. Blvd. on the north side of the road before the light. Same parking lot as Lee's Market.

One of our favorite places to frequent. They also have an amazing Prime Rib dip sandwhich that they use leftover prime rib from the weekend.
 

Fixr

Well-known member
Joined
Dec 23, 2012
Messages
9,708
Location
SW VA
Marc, I haven't used the silicone spray personally as I always have used and continue to use the dielectric grease. A few people I follow have used the silicone spray which I think will work fine, especially since most boots are more silicone than rubber for heat resistance anyways.

As for the rockers, I was just past one turn to the final torque of 22 ft/lbs. I got at or just slightly under from zero lash to tight with a ratchet and then just a little more with the torque wrench to final torque.
Um, guys, all the dielectric grease I have ever used is silicone dielectric grease. Do you use some other kind? I'm no chemist, but I have a suspicion that a lot of the difference between the silicone grease and the silicone spray is basically viscosity. Anyway, I have used both on plug boots for well over 40 years and the only difference I've noticed is that the greased ones come off a bit easier a few years later.

But I'm kind of a new guy here, so I may have missed something.
 
OP
Z

zmotorsports

ALLIANCE MEMBER
Joined
Oct 20, 2009
Messages
21,441
Location
Northern Utah
I love all the pics, very meticulous work. Quick question - is a trick of the camera or do some of those old springs (not the broken one) look a little shorter than the others? Any idea why that #2 spring failed?

Thank you. I also see that you are relatively new to the forum, so welcome.

Yes, the appearance must be an optical illusion as they are all the same height other than the one that broke. No idea why it broke other than fluke incident as the internals of the engine are 100% OEM at this point and have been for the past 64K+ miles.

Thank you for following along and for the comments. I hope you'll browse through the rest of my thread as well.


Um, guys, all the dielectric grease I have ever used is silicone dielectric grease. Do you use some other kind? I'm no chemist, but I have a suspicion that a lot of the difference between the silicone grease and the silicone spray is basically viscosity. Anyway, I have used both on plug boots for well over 40 years and the only difference I've noticed is that the greased ones come off a bit easier a few years later.

But I'm kind of a new guy here, so I may have missed something.

Good point. Yes, the dielectric grease is silicone, I have just not used the spray version on spark plug boots.
 

fouckhest

Well-known member
Joined
Jul 24, 2013
Messages
1,866
Location
Greer, SC
Mike - Thats a great write up on the valve replacement, very detailed!

One question, will you go back after *** miles and check the lash on the rockers? Not sure if that is common practice, but I remember you mentioned when you tested the valve spring pressure that they will "settle" a little, which makes me think lash should be checked after some run time/heat cycling?
 
OP
Z

zmotorsports

ALLIANCE MEMBER
Joined
Oct 20, 2009
Messages
21,441
Location
Northern Utah
Mike - Thats a great write up on the valve replacement, very detailed!

One question, will you go back after *** miles and check the lash on the rockers? Not sure if that is common practice, but I remember you mentioned when you tested the valve spring pressure that they will "settle" a little, which makes me think lash should be checked after some run time/heat cycling?

Thank you for the kind words.

No need to go back and check the lash after the springs "take a seat". That is the wonderful thing about hydraulic lifters as they provide a relatively wide range of preload and a couple of pounds will have no impact on them. But even on solid lifters, once the valve clearances are adjusted to spec, those clearances won't necessarily change with spring pressures as that won't affect valve stem to rocker clearance or interference (depending on solid or hydraulic lifters). The clearances, or lack of, in solid lifter valvetrains occur over many miles as components wear slightly and/or valve seats sink into the heads and valves may stretch ever so slightly, but springs won't affect any of those parameters.

For solid lifters I have found just sticking to the manufacturers recommended intervals seems to work well for daily drivers. Race engines are a totally different animal and would require more frequent inspections obviously.
 
OP
Z

zmotorsports

ALLIANCE MEMBER
Joined
Oct 20, 2009
Messages
21,441
Location
Northern Utah
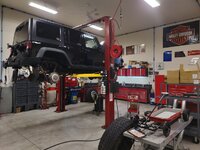
After about 60-80 miles or so on the Jeep since the valve spring repair and close to being due for a LOF service, with the engine up to operating temperature after work the other night, I thought I'd toss the Jeep on the lift and perform a service and tire rotation.

Jeep racked and given a thorough inspection of the undercarriage/chassis as well as suspension and brake components.
jeep1.jpg

jeep2.jpg

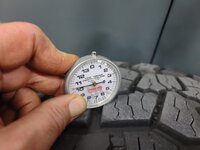
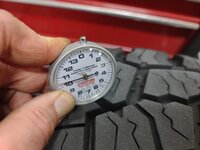
All five of the tires were measured for tread depth and all seem to be wearing very consistently. These Mickey Thompson Baja Boss A/T tires now have just over 24k driven miles and another almost approx. 11k flat-towed miles.
jeep3.jpg

jeep4.jpg

jeep5.jpg

This was the spare tire that was rotated into service which is why it has slightly more tread depth.
jeep6.jpg

jeep7.jpg

It's good to have the ole' girl back on the road and purring like a kitten again.


Thanks for looking.
 

fouckhest

Well-known member
Joined
Jul 24, 2013
Messages
1,866
Location
Greer, SC
Thank you for the kind words.

No need to go back and check the lash after the springs "take a seat". That is the wonderful thing about hydraulic lifters as they provide a relatively wide range of preload and a couple of pounds will have no impact on them. But even on solid lifters, once the valve clearances are adjusted to spec, those clearances won't necessarily change with spring pressures as that won't affect valve stem to rocker clearance or interference (depending on solid or hydraulic lifters). The clearances, or lack of, in solid lifter valvetrains occur over many miles as components wear slightly and/or valve seats sink into the heads and valves may stretch ever so slightly, but springs won't affect any of those parameters.

For solid lifters I have found just sticking to the manufacturers recommended intervals seems to work well for daily drivers. Race engines are a totally different animal and would require more frequent inspections obviously.
Thanks for that detail!...looking back I didnt notice that there was no adjustment on the rocker, which would lend it to being a hydraulic lifter, DOH!

Interesting on the solid lifter even on daily drivers, I must be use to hearing people talk about solid lifters on race/high performance engines.

As always, appreciate your willingness to share knowledge!
 
OP
Z

zmotorsports

ALLIANCE MEMBER
Joined
Oct 20, 2009
Messages
21,441
Location
Northern Utah
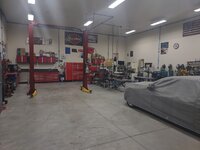
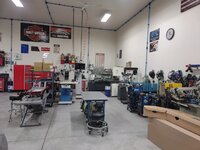
Last night before our winter storm hit Northern Utah, I pulled the truck into the shop in order to commence the facelift on the ole' girl. I also pulled the Jeep into the shop to widdle a bit on the engine cover and tweak my airflow frequency table just a tad.
shop.jpg

The last couple of times I have driven the Jeep since the valve spring replacement I had noticed a very slight vibration at idle while in gear. It sounded like it was behind the dash so I had removed the glove box looking for a loose connector flopping around or something in the glovebox and I could not find anything out of the norm. The wife only heard it once but it was driving me absolutely nucking futs.

As I was walking out to leave work yesterday I thought to myself I wonder if it could be something in the engine bay. I popped the hood and noticed that the OEM plastic engine cover was slightly touching one coil on each bank. I tapped the cover a few times and thought maybe that could be it so I removed it and tossed it in the back for the drive home just to take it out of the equation. Sure as shittin', that was the source of the vibration. Nice and quiet all the way home and at each stoplight.

Upon arriving home, I pulled the Jeep in the shop and went to work figuring how much to trim from the bottom. I put some masking tape along the bottom edge on either side and figured I'd start small and only removed about 5/16" to start with.
cover3.jpg

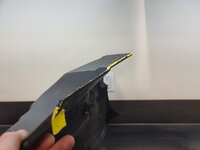
I don't get to use my Snap-on PTS1000 pneumatic saw very often but when I do I sure enjoy it. I have a Matco air saw as well, but this old Snap-on air saw is so much smoother and easy to control. The Matco one isn't too bad but the newer Snap-on one is a bit larger and seems to have a longer stroke therefore I don't care for it as much.

The air saw makes short work of a little trimming.
cover4.jpg

Next take a regular razor blade.
cover5.jpg

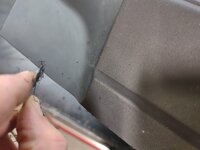
And drag is backwards along the freshly cut edges, think negative rake. This will cause the plastic to kind of curl up behind the blade and does a great job of "deburring" the plastic. I like to work my way around the edges to put that factory appearing radius on the edge.
cover6.jpg

Here if you look closely after only a half dozen passes with the razor blade the edge has a nice smooth radius that looks factory.
cover7.jpg

Other side that was trimmed and radiused.
cover8.jpg

Looks factory and can't even tell it was altered.
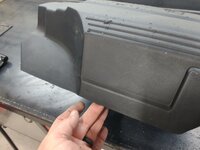
cover9.jpg

And more importantly, it now clears the coils with a good 3/16"-1/4" clearance.
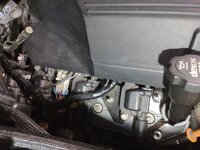
cover10.jpg

Ready to go.
cover11.jpg

While it was in the shop I thought I'd plug the laptop into it and tweak the airflow frequency every so slightly just one more time. I adjusted them last spring when I installed the shorter air intake duct after changing the battery and TIPM orientation and the trims were very, very good reading around 2.7 to 3.9 positive on LTFT. They remained very consistent and never went above 5% but I wanted to get them just a little lower and closer to zero if possible.

I adjusted the calculation by 2.5% additional last night. I figured it was under-reporting just by a little and didn't want to go too far negative on my trims. I adjusted the trim table by multiplying it by 1.025 and hit the nail on the head. Took it for a spin last night and not only was it smooth as silk with no vibrations at stoplights, but my LTFT's running down the road at speeds from 40-55 MPH and light throttle, the trims settled around -.7 to 0.0. Then driving to work at freeway speeds from 60-75 and light throttle I was sitting about the same with much of the drive right at 0.0. Occasionally upon a few "rollers" in the freeway and just increasing throttle ever such a small amount I saw 0.7 positive but it would settle right back to 0.0 as the road leveled.

The last 20 or so miles now it has varied from -0.7 to positive 0.7 so that is about as perfect as I think I can get it as far as fuel trims are concerned.
 

fouckhest

Well-known member
Joined
Jul 24, 2013
Messages
1,866
Location
Greer, SC
Nice work on tracking down the annoying noise....I like your trimming methods on plastic, I use a very similar method, only adding that depending on what you will see, at times I will take a little pocket torch and quickly pass over the fresh cut to remove any further burrs or cut marks to make it totally smooth
 
OP
Z

zmotorsports

ALLIANCE MEMBER
Joined
Oct 20, 2009
Messages
21,441
Location
Northern Utah
Nice work on tracking down the annoying noise....I like your trimming methods on plastic, I use a very similar method, only adding that depending on what you will see, at times I will take a little pocket torch and quickly pass over the fresh cut to remove any further burrs or cut marks to make it totally smooth

Thanks. I've had a tremendous amount of practice trimming and cutting plastic body panels from my quad sand drag building days. I don't think there was a single one that came through my shop that we didn't trim or alter the plastic body panels in one form or another. Some received paint afterwards and many didn't but we did our best to make sure the cut edges looked as factory as possible.

Trust me, we saw some terribly done plastic trimming jobs on the dunes that just made me cringe. :oops:
 

fouckhest

Well-known member
Joined
Jul 24, 2013
Messages
1,866
Location
Greer, SC
Thanks. I've had a tremendous amount of practice trimming and cutting plastic body panels from my quad sand drag building days. I don't think there was a single one that came through my shop that we didn't trim or alter the plastic body panels in one form or another. Some received paint afterwards and many didn't but we did our best to make sure the cut edges looked as factory as possible.

Trust me, we saw some terribly done plastic trimming jobs on the dunes that just made me cringe. :oops:

Oh yeah, I didn't even think about your days with quads....I had a brief stint racing motocross on a quad (300ex, bored to 330cc, Laegers extended a-arms, swing arm, cant remember who's shocks I used)...but when it came to plastics, I put Maier plastics on it b/c I couldn't bring myself to cut up the OEM stuff.

I'm sure you saw some doozies, probably lots of zip ties too lol
 
OP
Z

zmotorsports

ALLIANCE MEMBER
Joined
Oct 20, 2009
Messages
21,441
Location
Northern Utah
Gotta love the pneumatic saws. I use mine every chance I get.

I agree, although I don't use mine as often as I used to, I enjoy using it and a good quality pneumatic saw is priceless.

I also recently purchased some new 24 tpi and 32 tpi scroll blades from Benchmark Abrasives with my last order and they seem to be good quality blades.
 

SilverJimmy

Well-known member
Joined
Apr 14, 2012
Messages
1,643
Location
Prescott/Flagstaff, AZ
When the PTS1000 saw was introduced I purchased a large pack of them. So I HAD to sell them, demonstrated it to anyone that I thought might be interested. When I got to my audio install shop the owner was using his old saw to cut a door panel. So I grabbed my demo saw and showed it to him. He wasn’t impressed, said he already had a saw just like that (holding up the one he was using, looking at me like I was stupid!) and that he didn’t have time for me, he was busy! I finally convinced/coerced him to try it out. He plugged it into his airline, put it up to the door panel and pulled the trigger for about 2 seconds and then looked at me and said “I’ll take it!” Literally the easiest sale I ever made in 30 years! I kept one when I retired, it’s sweet!
 
To avoid these ads, REGISTER NOW!
Top Bottom