To avoid these ads, REGISTER NOW!

What did you do "IN" your garage today?

zmotorsports

ALLIANCE MEMBER
Joined
Oct 20, 2009
Messages
21,477
Location
Northern Utah
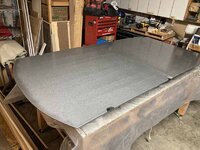
Awhile back when I was painting my HUOT drill bit organizer with RustOleum hammered paint, I noticed changes in the hammered effect based on paint temperature... I noticed when I painted with a chilled can I got more of the hammered effect...

I ran a test today and documented the conditions...
Paint: RustOleum Hammered Silver
Sample on the left... Paint can temperature 49.5F
Sample on the right... Paint can temperature 90.7F
Room temperature 52F
Humidity... 54%

The sample on the right had a smoother finish which gave the silver a darker gray tint...
Both samples got a single heavy coat...
IMG_3560.jpg

Very interesting results. Thank you.

I started using the Rustoleum Hammer Gray paint in my new shop 7 years ago for items such as hangers, workbench frames, etc. as the trim color. I really like the effect it provides.

I didn't think too much about temperatures, but I did notice early on that the coat thickness played a big role in how heavy the hammer effect was or not. If I applied several lighter coats the effect was less drastic compared to two heavy coats. I'll have to play with temps as well. Although I can't really control that as I paint my parts outside and not in the shop so it ends up being whatever the ambient temperature of the day is.
 
To avoid these ads, REGISTER NOW!

Snip's

Well-known member
Joined
Apr 29, 2017
Messages
1,867
Location
Ohio
Rustoleum notes the recommended temperature span on the cans which were the extremes I used for the test...
I simply put the paint cans in a bucket with water and ice or hot water until they reached temperature...
Heavy paint coat and horizontal surfaces to prevent running is one of the keys...
On my HUOT drill bit organizers, it took 6 days, doing one flat at a time...
It would show less of the hammered effect on round objects...
 

rd65

Well-known member
Joined
Sep 29, 2017
Messages
2,845
Location
Granite Falls, WA
Rustoleum notes the recommended temperature span on the cans which were the extremes I used for the test...
I simply put the paint cans in a bucket with water and ice or hot water until they reached temperature...
Heavy paint coat and horizontal surfaces to prevent running is one of the keys...
On my HUOT drill bit organizers, it took 6 days, doing one flat at a time...
It would show less of the hammered effect on round objects...
Wrinkle paint is a lot like the hammer it seems, not temp of paint as much as ambient temp when spraying. I made the mistake of painting different parts on different days the difference in the final product was very obvious. Lesson learned.
 

rayra

Well-known member
Joined
Dec 1, 2014
Messages
4,724
Location
Escaped from Los Angeles
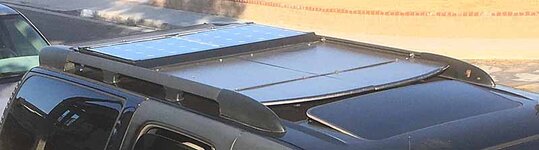
Definitely coat thickness and how quick it flashes, for either paint effect. I,ve used hammered a few times on a large roof deck on my Suburban and learned to keep it out of direct sunlight and not do it in peak summer. It would get tacky so fast I couldnt even get the full coat on without it starting to string like cotton candy. And could see the application pattern in the color shifts, like stripes in mown grass.


I'm on the 3rd version of that roof deck now, and the next one is going to be made out of a thick sheet of UV-resistant HDPE aka 'Starboard', a plastic used for boat deck modifications. It really helped with sun heating of the black Suburban and keeping it cool running down the road. But last year I got ceramic tint put on the windshield and it also helped a great deal.
 

Attachments

  • roof deck mk4 bottom paint 1.jpg
    roof deck mk4 bottom paint 1.jpg
    79.2 KB · Views: 56
  • roof deck mk4 bottom paint 2.jpg
    roof deck mk4 bottom paint 2.jpg
    76.8 KB · Views: 33
  • solarpanelmount85 installed.jpg
    solarpanelmount85 installed.jpg
    36.7 KB · Views: 38
Last edited:

kaymccampbell

Well-known member
Joined
Feb 27, 2015
Messages
29,627
Location
Upstate New York
I was going to say that 350 blocks are a dime a dozen, but everyone else kind of beat me to it.

I get the idea of wanting a high nickel content, but that one is already cracked. Doesn’t that kind of defeat the point of having it?

All that being said, I can’t count how many times I’ve spent more time and money repairing something that I could have replaces easier and cheaper..lol
But, if it works, then he can repair that freeze cracked 1923 Continental flathead four in his Jaeger mixer.
 

rayra

Well-known member
Joined
Dec 1, 2014
Messages
4,724
Location
Escaped from Los Angeles
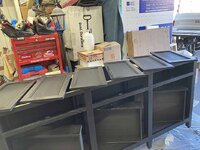
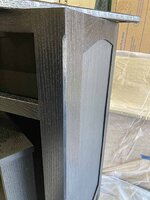
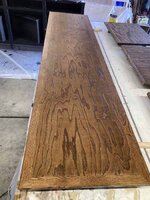
2nd application of black stain on the 'beauty' / exterior faces. And a couple pics while it was still wet, approximating what it will look like with the poly coats on it. Waffling between Satin and Semi-Gloss.
The graining shows well in the right lighting / angle.
I think I'm always going to regret not staining it all brown. Bet we have a lot of black cabinetry and other black furniture in this house, as well as several dark brown wood finishes and floors. So it is going to look good overall, whether I like it much or not.

About to stain the countertop and interior shelves with brown 'Provincial'
 

Attachments

  • dining hutch 111 2nd staining.jpg
    dining hutch 111 2nd staining.jpg
    101.9 KB · Views: 37
  • dining hutch 112 2nd staining.jpg
    dining hutch 112 2nd staining.jpg
    54.3 KB · Views: 33
  • dining hutch 113 2nd staining.jpg
    dining hutch 113 2nd staining.jpg
    52.6 KB · Views: 33
  • something like this.jpg
    something like this.jpg
    59 KB · Views: 32

Jgaz

Well-known member
Joined
Dec 16, 2016
Messages
1,713
Location
AZ
Definitely coat thickness and how quick it flashes, for either paint effect. I,ve used hammered a few times on a large roof deck on my Suburban and learned to keep it out of direct sunlight and not do it in peak summer. It would get tacky so fast I couldnt even get the full coat on without it starting to string like cotton candy. And could see the application pattern in the color shifts, like stripes in mown grass.


I'm on the 3rd version of that roof deck now, and the next one is going to be made out of a thick sheet of UV-resistant HDPE aka 'Starboard', a plastic used for boat deck modifications. It really helped with sun heating of the black Suburban and keeping it cool running down the road. But last year I got ceramic tint put on the windshield and it also helped a great deal.
@rayra I think you are on the right track using Starboard for your roof deck.
Almost 7 years ago I used that material to replace the wood composite product that made up the work surface of my B+D Workmate.
IMG_3880_Original.jpeg
The Workmate lives outside, full time, on a west facing pad beside my Phoenix garage.
100+ temps, full afternoon sun, max UV exposure.
The Starboard looks as good today as it did when I installed it.
 

GrayFlattop

Well-known member
Joined
Jan 18, 2018
Messages
1,051
Location
Chicago
2nd application of black stain on the 'beauty' / exterior faces. And a couple pics while it was still wet, approximating what it will look like with the poly coats on it. Waffling between Satin and Semi-Gloss.
The graining shows well in the right lighting / angle.
I think I'm always going to regret not staining it all brown. Bet we have a lot of black cabinetry and other black furniture in this house, as well as several dark brown wood finishes and floors. So it is going to look good overall, whether I like it much or not.

About to stain the countertop and interior shelves with brown 'Provincial'
I think it looks great in Black - it really makes the grain pop. What stain did you use? My vote would always be for a satin finish, but that's just my personal opinion.
 

rayra

Well-known member
Joined
Dec 1, 2014
Messages
4,724
Location
Escaped from Los Angeles
And the 'Provincial' on the top and shelves
 

Attachments

  • dining hutch 114 brown staining.jpg
    dining hutch 114 brown staining.jpg
    103.2 KB · Views: 26
  • dining hutch 115 brown staining.jpg
    dining hutch 115 brown staining.jpg
    66.2 KB · Views: 26
  • dining hutch 116 brown staining.jpg
    dining hutch 116 brown staining.jpg
    123.2 KB · Views: 51

rayra

Well-known member
Joined
Dec 1, 2014
Messages
4,724
Location
Escaped from Los Angeles
I think it looks great in Black - it really makes the grain pop. What stain did you use? My vote would always be for a satin finish, but that's just my personal opinion.
MInwax oil-based semi-transparent 'True Black' and 'Provincial'. Last 16? 20? years in CA with no oil-based / high VOC stains really sucked. Glad to have ready access to better products again. Even if their prices have doubled.
 

rayra

Well-known member
Joined
Dec 1, 2014
Messages
4,724
Location
Escaped from Los Angeles
@rayra I think you are on the right track using Starboard for your roof deck.
Almost 7 years ago I used that material to replace the wood composite product that made up the work surface of my B+D Workmate.
IMG_3880_Original.jpeg
The Workmate lives outside, full time, on a west facing pad beside my Phoenix garage.
100+ temps, full afternoon sun, max UV exposure.
The Starboard looks as good today as it did when I installed it.
I need to do the same, still have my Workmate as well. I've used it as a work stand for wet saws too many times and swelled that composite / particle board garbage deck they have.

Have you ever found / seen where to get replacement dogs for it?
 

Jgaz

Well-known member
Joined
Dec 16, 2016
Messages
1,713
Location
AZ
I need to do the same, still have my Workmate as well. I've used it as a work stand for wet saws too many times and swelled that composite / particle board garbage deck they have.

Have you ever found / seen where to get replacement dogs for it?
You can get the OEM dogs here

However, when I installed my Starboard I drilled my dog holes 3/4”.
That allowed me to use my woodworking dogs and other pieces.
Here is my selection of things to fit a 3/4” dog hole stored under my main bench.
IMG_4205.jpeg

Also, I use these Kreg dogs all the time.
I like that you can add a dowel, cut on an angle, to make a paint point.
IMG_4206.jpeg
 
Last edited:

Jgaz

Well-known member
Joined
Dec 16, 2016
Messages
1,713
Location
AZ
2nd application of black stain on the 'beauty' / exterior faces. And a couple pics while it was still wet, approximating what it will look like with the poly coats on it. Waffling between Satin and Semi-Gloss.
The graining shows well in the right lighting / angle.
I think I'm always going to regret not staining it all brown. Bet we have a lot of black cabinetry and other black furniture in this house, as well as several dark brown wood finishes and floors. So it is going to look good overall, whether I like it much or not.

About to stain the countertop and interior shelves with brown 'Provincial'
@rayra I also don’t think the black looks bad.
The dark wood seems to be, or was, popular.

I built the top for this sofa table about 2000? A bit too “orange” for me but it matched our then kitchen cabinets.
IMG_7137_Original.jpeg
Fast forward a couple houses and the interior decorator (my wife) asked if we could stain the top darker.
I was happy to find that I was able to scrape, lightly plane, and sand off the original finish without a lot of work.
IMG_1983_Original.jpeg
Here is the same table with its darker finish.
I admit not as dark as yours but I think the dark is an improvement
IMG_4207.jpeg
Most importantly my wife is happy with it.
 

rayra

Well-known member
Joined
Dec 1, 2014
Messages
4,724
Location
Escaped from Los Angeles
You can get the OEM dogs here

However, when I installed my Starboard I drilled my dog holes 3/4”.
That allowed me to use my woodworking dogs and other pieces.
Here is my selection of things to fit a 3/4” dog hole stored under my main bench.
IMG_4205.jpeg

Also, I use these Kreg dogs all the time.
I like that you can add a dowel, cut on an angle, to make a paint point.
IMG_4206.jpeg
I'll probably do the same. I intend to drill the dog hole array in my replacement work table top, when I embed my new resin router insert and t-tracks. And when I get the Starboard sheet for the Suburban I'll have enough offcuts to do the workmate. I can only find the Starboard in white, black or gray. Don't really want white or black for the vehicle roof. And/but nothing will really adhere to UHDPE so I'm kind of stuck on color. And prices these days, fuggedaboutit, $400 a sheet last I looked, probably much worse now.
 

rzims

Well-known member
Joined
Oct 25, 2006
Messages
461
Location
Grass Valley, CA
It's FAR too late now, but I'm feeling kinda ambivalent about staining it black. I put a lot of work and cost into making the piece in oak and trying to have a nice woodgrain finish. And I've just obliterated it.

Anyway, black is provisionally 'done'. Minwax semi-transparent 'True Black'. I might make a 2nd application on the exterior surfaces tomorrow morning. Dunno.
The countertop and three interior shelves are still nekkid. Probably getting hit 2x with 'Provincial'.

Probably using a wipe-on satin poly as a topcoat.
I like the black and you can still see the grain....of course everything in my shop is grey, dark grey or black
 
To avoid these ads, REGISTER NOW!

welder4956

Well-known member
Joined
Apr 8, 2010
Messages
3,084
Location
Birmingham, AL USA
Finally back home from our trip to Florida. We did manage to squeeze in time to see the Daytona 500 last Monday, but not the Xfinity race afterwards. It was fun, but 4 hours of sitting in the stands is a bit much. Seems like most of the excitement is in the first couple of laps and the last few laps. Big wreck at the end took out most of the leaders.

Getting back in the garage today, the Hobart Handler 187 mig welder was giving me feeding problems with the HF 0.024" wire. I tried blowing out the liner and it was full of crud, but that did not help. Also, this machine does have the ability to adjust the gap between the drive rolls and the liner to help reduce the bird nesting issue. So I made a run to pick up some new Hobart wire and a new liner. That seems to have solved the problem.
 

rayra

Well-known member
Joined
Dec 1, 2014
Messages
4,724
Location
Escaped from Los Angeles
@rayra I also don’t think the black looks bad.
The dark wood seems to be, or was, popular.

I built the top for this sofa table about 2000? A bit too “orange” for me but it matched our then kitchen cabinets.
IMG_7137_Original.jpeg
Fast forward a couple houses and the interior decorator (my wife) asked if we could stain the top darker.
I was happy to find that I was able to scrape, lightly plane, and sand off the original finish without a lot of work.
IMG_1983_Original.jpeg
Here is the same table with its darker finish.
I admit not as dark as yours but I think the dark is an improvement
IMG_4207.jpeg
Most importantly my wife is happy with it.


I like that table a lot, did you do the iron work too? And that tray was a license plate??

I started out building various side tables for the place in the Sierras ~20yrs ago, and many bookcases later (and the drawers in the Suburban) we moved here and I've been continuing to build a lot of basic stuff. But my workshop and tools all need improving, which I am just now getting around to.

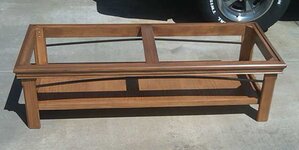
Here's a coffee table I did many years ago, using some remnant metalwork from a 10'x10' gazebo kit. The gazebo kit had these wide decorative panels forming its corners. I embedded several in between pairs of posts on our back patio in L.A. and then used the surplus panels for a potting bench. And some of the arched top pieces in this coffee table.
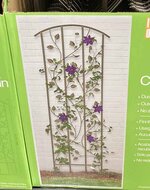
Then 3yrs ago we saw some nice metal garden panels at Costco and I built a new potting bench here and repeated the idea of trapping the panels between the posts.

It's all turning into a giant version of 'Groundhog Day'. Variations on a theme, which I keep re-re-re-building.
 

Attachments

  • benchoverallcolor.JPG
    benchoverallcolor.JPG
    138.3 KB · Views: 30
  • shingling11.jpg
    shingling11.jpg
    107.6 KB · Views: 31
  • sparta potting bench 01 metal panel.jpg
    sparta potting bench 01 metal panel.jpg
    60.5 KB · Views: 28
  • sparta garden bench 36.jpg
    sparta garden bench 36.jpg
    79.5 KB · Views: 25
  • coffeetable finished-090316.jpg
    coffeetable finished-090316.jpg
    23.5 KB · Views: 27

Jgaz

Well-known member
Joined
Dec 16, 2016
Messages
1,713
Location
AZ
I like that table a lot, did you do the iron work too? And that tray was a license plate??

I started out building various side tables for the place in the Sierras ~20yrs ago, and many bookcases later (and the drawers in the Suburban) we moved here and I've been continuing to build a lot of basic stuff. But my workshop and tools all need improving, which I am just now getting around to.

Here's a coffee table I did many years ago, using some remnant metalwork from a 10'x10' gazebo kit. The gazebo kit had these wide decorative panels forming its corners. I embedded several in between pairs of posts on our back patio in L.A. and then used the surplus panels for a potting bench. And some of the arched top pieces in this coffee table.
Then 3yrs ago we saw some nice metal garden panels at Costco and I built a new potting bench here and repeated the idea of trapping the panels between the posts.

It's all turning into a giant version of 'Groundhog Day'. Variations on a theme, which I keep re-re-re-building.
Sadly no I didn’t build the base other than to weld some crossbars at the top to mount the oak top.

I like that coffee table and your use of the metal panels.
 
Last edited:

GrayFlattop

Well-known member
Joined
Jan 18, 2018
Messages
1,051
Location
Chicago
Swapped drawers in the vertical files. Reorganized the cheapimo trays. Painted the new welding locker. Bench checked the chlorinator. Put away some new rattle cans. Thinned a bunch of obsolete PC parts. Fixed the garden shed overhead door.
IMG_20240228_165209.jpgIMG_20240228_165158.jpg
Wow - you’re on a roll with your spring cleaning!

What do you do with old PC parts? I’m going to assume most of them go to the landfill as recycling would probably not be worth the time. I’ve got nothing against recycling - we do it religiously, I hate waste, but how does one extract value from old pc parts?
 

rzims

Well-known member
Joined
Oct 25, 2006
Messages
461
Location
Grass Valley, CA
Today I started building some built-in bookcases that will go in my basement office.
They'll surround my gunsafe and be painted once they're done....hence the use of MDF instead of nicer wood.
Man this stuff is heavy.....
 

Attachments

  • 20240228_155125.jpg
    20240228_155125.jpg
    841.7 KB · Views: 30
  • 20240228_155008.jpg
    20240228_155008.jpg
    797.9 KB · Views: 28

kaymccampbell

Well-known member
Joined
Feb 27, 2015
Messages
29,627
Location
Upstate New York
Wow - you’re on a roll with your spring cleaning!

What do you do with old PC parts? I’m going to assume most of them go to the landfill as recycling would probably not be worth the time. I’ve got nothing against recycling - we do it religiously, I hate waste, but how does one extract value from old pc parts?
I think the cleanup, etc, as a mass event, is done.
For electronics, I break them down. Plastic in the plastic bin, metal to the scrap yard, and I save up the boards for the town-wide electronics recycle day, or I use them as art.
 

JSGAuto

Well-known member
Joined
Aug 29, 2009
Messages
743
Location
Northern NJ
Installed by new "big brakes" on my track day car, and safety wired the two-piece brake rotors. I may have to trim the wheel weights down to make sure no contact between the weights and caliper. It's about a sheet of paper's worth of gap between the two.

That is close, I bet you are going to see some free weight removal after some hard laps.

I had the same issue on my track car. Ended up using a static balance (1 plane). I haven't noticed any issues (140ish top end). The rubber loss/gain seems to effect balance much more.

Nice job on the safety wire!
 

Metallitubby

Well-known member
Joined
Aug 12, 2019
Messages
26,100
Location
ATL OTP North
That is close, I bet you are going to see some free weight removal after some hard laps.

I'm going to trim a couple millimeters off the weights that face the caliper (inboard facing) and move the same amount to the ends of the line of weights. Like you said, even if it's a few grams off, it won't be noticeable anyway.
 

welder4956

Well-known member
Joined
Apr 8, 2010
Messages
3,084
Location
Birmingham, AL USA
I'm going to trim a couple millimeters off the weights that face the caliper (inboard facing) and move the same amount to the ends of the line of weights. Like you said, even if it's a few grams off, it won't be noticeable anyway.
Can you shift them toward the inner wheel lip so they aren't in line with the caliper?
 

ObnoxiousFumes

Well-known member
Joined
May 22, 2023
Messages
1,526
Location
Southwest Sask
Installed by new "big brakes" on my track day car, and safety wired the two-piece brake rotors. I may have to trim the wheel weights down to make sure no contact between the weights and caliper. It's about a sheet of paper's worth of gap between the two.

EP3 Rotor Wiring_2024.jpg
EP3 Caliper to Wheel Weight.jpg
Four-lug wheels? Or am I missing something?
 

rayra

Well-known member
Joined
Dec 1, 2014
Messages
4,724
Location
Escaped from Los Angeles
Just finished the 2nd application of Provincial brown on the top and shelves. The black stuff is almost dry. Intend to start applying poly to the black parts on Saturday.
 

Attachments

  • dining hutch 117 2nd brown staining.jpg
    dining hutch 117 2nd brown staining.jpg
    76.6 KB · Views: 20
  • dining hutch 118 2nd brown staining.jpg
    dining hutch 118 2nd brown staining.jpg
    143.8 KB · Views: 22
  • dining hutch 119staining.jpg
    dining hutch 119staining.jpg
    118.7 KB · Views: 31

CoogarXR

Well-known member
Joined
Jan 11, 2016
Messages
6,873
Location
Ohio
Built my water-source switcher for my new place. White pipes are the rain-collection system cistern, blue is the well. This way I can switch any of the 6 branches from well to cistern easily. This will be mounted above the two pumps and pressure tanks in the basement. 84 friggin' crimps on this panel! Yes, I know the inlet valves don't have rings on them, I ran out. That can be finished another day, my friggin' forearms are swollen like Popeye, lol.

I would have liked to mount the filters above each other, in-line, but I only have 23" of vertical space on the wall to use, so I had to stagger them. Visually, the arrangement is not very satisfying, but it works.

20240229_134332b.jpg
 

kaymccampbell

Well-known member
Joined
Feb 27, 2015
Messages
29,627
Location
Upstate New York
Built my water-source switcher for my new place. White pipes are the rain-collection system cistern, blue is the well. This way I can switch any of the 6 branches from well to cistern easily. This will be mounted above the two pumps and pressure tanks in the basement. 84 friggin' crimps on this panel! Yes, I know the inlet valves don't have rings on them, I ran out. That can be finished another day, my friggin' forearms are swollen like Popeye, lol.

I would have liked to mount the filters above each other, in-line, but I only have 23" of vertical space on the wall to use, so I had to stagger them. Visually, the arrangement is not very satisfying, but it works.

20240229_134332b.jpg
It looks very nice. Don't forget to label the board.
 

rayra

Well-known member
Joined
Dec 1, 2014
Messages
4,724
Location
Escaped from Los Angeles
Turned some more scraps of wood in to useful project parts, again proving that saving those scraps was a good idea and totally not a waste of space.
That's what I keep telling myself too!

/Been busy sorting my furniture building offcuts into Expensive scraps (oak poplar) / pizza oven scraps (pine/ww) / trash bin scraps (ply and treated).
 

bctexas

Well-known member
Joined
Sep 6, 2015
Messages
671
Location
Aubrey, TX
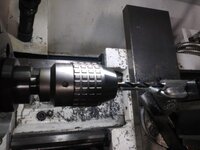
Repaired a part for a neighbor's small John Deere farm tractor. A piece broke off of part of the mower deck assembly. The part is a shaft with three odd pieces welded to it - made it a puzzle to mount in the lathe. After milling the broken end off of the shaft, I had to find a way to drill and tap it. Finally hit on the idea of mounting the part in a tool holder, and replacing the lathe chuck with my drill chuck. Drilled and tapped the shaft, and made a replacement part. Hopefully it is up to the task....

3 tool holder and alignment tool.jpg4 drill.jpg5 finished part.jpg6 DONE.jpg
 
To avoid these ads, REGISTER NOW!
Top Bottom