To avoid these ads, REGISTER NOW!

Below 265 SQ/FT Pool shed build

All workspaces below 265 squarefeet.

mike93lx

ALLIANCE MEMBER
Joined
Dec 9, 2013
Messages
37,854
Location
Richmond, VA
This one has been planned for a bit and I'm finally getting started.

We had a pool put in between the summer of '21 and spring of '22, and the pool deck included a 16x16 slab for a shed. Since then, I've posted a few threads related to it, with the latest being on modeling with foam board.

It will be 16x16, to stay within my county's limit for an unpermitted structure. Two courses of 6x8x16 block to get the wood away from the ground, 8' stick frame walls, 8:12 gable roof, 1' overhangs, LP smartside lap siding and a 6' French door. Walls will be 2x6 and 24OC.

It will be mostly storage, but will have a changing room and a fridge. Electrical is a 20a MWBC and I have a water line to feed a hose reel. There is the possibility of a shower at some point, but that is TBD.

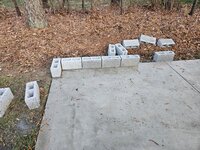
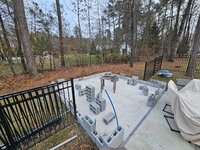
The fence ran through the slab, so I removed the panels and posts, pressure washed and pepped the area. I needed to tweak the conduits that are in the slab (you can just see three over on the left) so they would clear the block and a replaced the original pex line with a longer one

Screenshot_20220719-131830_EufySecurity.jpg

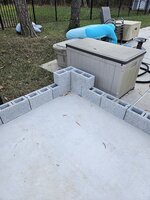
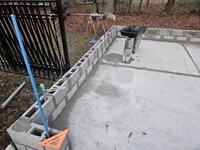
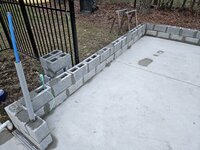
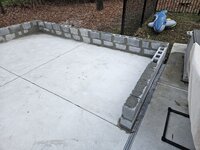
I picked up a little over half the block and started laying out the corners. This is my first masonry project, so I'm going slow and planning. My hope is to set the corners next weekend and maybe start placing some of the wall blocks. I'll set some rebar pins and fill at least some of the cores, if not all.

The slab is not super flat, so I am hoping to take some of it out with the block and anything left will be handled in framing.
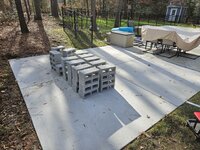
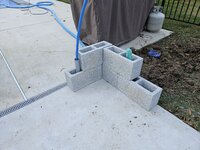
1000006689.jpg1000006695.jpg1000006691.jpg

I want it completely done before we start using the pool in May. I'll pick away at it and probably take a week off in January/February to make some bigger progress.

I'm open to suggestions/critiques.

I have a nearly complete BOM... Hoping to land around $7k including some labor for the roof, excluding the slab
 
Last edited:
To avoid these ads, REGISTER NOW!
OP
M

mike93lx

ALLIANCE MEMBER
Joined
Dec 9, 2013
Messages
37,854
Location
Richmond, VA
Why block construction in a non-hurricane zone?
As I said in the OP, it's two courses just to get the wood away from grade.

Plus it's a chance to learn something new.

If I was starting over, I'd hold on the slab, pour a footing then either do a block or poured stem wall with the slab poured at the end. But this is what I have to work with
 
Last edited:

GlennSullivan

Well-known member
Joined
Mar 15, 2006
Messages
341
Location
Yorktown, NY
As I said in the OP, it's two courses just to get the wood away from grade.

Plus it's a chance to learn something new.

If I was starting over, I'd hold on the slab, pour a footing then either do a block or poured stem wall with the slab poured at the end. But this is what I have to work with
Thanks, maybe I should read entire posts before commenting on them.
 

larry4406

Well-known member
Joined
Jan 27, 2006
Messages
19,532
Location
Northern Virginia
Mike

When I did the kitchen extension at our house, I had a mason install block for the crawl space. I had rebar turned up in the footing to engage with the block cells which were later grouted solid.

I am not a mason, and this was my first go with block.

For your case, I think having one course of block is smart to elevate the wood. I think I would drill and epoxy long anchor rods into the slab, and the rods extend above the block by about 2" which then become your sill anchor bolts. I would fill the cells solid.
 
OP
M

mike93lx

ALLIANCE MEMBER
Joined
Dec 9, 2013
Messages
37,854
Location
Richmond, VA
Mike

When I did the kitchen extension at our house, I had a mason install block for the crawl space. I had rebar turned up in the footing to engage with the block cells which were later grouted solid.

I am not a mason, and this was my first go with block.

For your case, I think having one course of block is smart to elevate the wood. I think I would drill and epoxy long anchor rods into the slab, and the rods extend above the block by about 2" which then become your sill anchor bolts. I would fill the cells solid.
I'll definitely be epoxying (sp?) anchors in and was undecided on just rebar, ending below the top course, or threaded rod all the way up and out. If I do rebar, I'll anchor the walls with large tapcons or Simpson titen HD's. Those have the added benefit of not having to lift heavy walls up and onto anchor bolts, which would make it easier to stand fully sheathed walls. I'm leaning towards this way and grabbing a pair of wall jacks as sheathing on the ground will be a lot easier, especially solo
 

PCustoms

Well-known member
Joined
Jul 23, 2011
Messages
23,393
Location
VT
Are you epoxying rebar to the slab and then up through the core in the block?
 

PCustoms

Well-known member
Joined
Jul 23, 2011
Messages
23,393
Location
VT
That was the idea. I figured I would get the first course set, then drill holes and epoxy it in, then set the second course
Following along

I need to either form and pour a wall, or do about three courses of block next spring. Either way I definitely need to dowel it into the slab and the existing stem wall.
 

Joemctag

Well-known member
Joined
Aug 11, 2017
Messages
813
Location
Outside raleigh nc
Will be following, Mike!
Don’t think you really need them, but they make 6” corner blocks. Would have to get them at a masonry supply yard. They’re kinda hard to lay because the short leg has alot of area and doesn’t want to squeeze out the mortar.
Also, if you’re considering surface bonding stuff, it works great.
 
OP
M

mike93lx

ALLIANCE MEMBER
Joined
Dec 9, 2013
Messages
37,854
Location
Richmond, VA
Will be following, Mike!
Don’t think you really need them, but they make 6” corner blocks. Would have to get them at a masonry supply yard. They’re kinda hard to lay because the short leg has alot of area and doesn’t want to squeeze out the mortar.
Also, if you’re considering surface bonding stuff, it works great.
I already don't know what I'm doing so adding another block shape probably won't help :)

If it meant I could avoid cuts, it could be nice, but I doubt it will shake out that way.

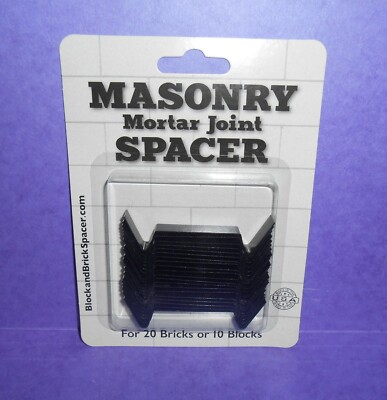
I did order some spacers to try and help me a little with not ending up too thin. Reviews seemed quite favorable on them, so what the hell.

Plan is to mortar set and then parge

 
OP
M

mike93lx

ALLIANCE MEMBER
Joined
Dec 9, 2013
Messages
37,854
Location
Richmond, VA
We have some warmer weather coming up Sunday to Tuesday, so I'm hoping to get a lot of the block work done.

I emailed two local truss companies to see what they would quote, not sure if they would be interested in making 9 trusses...

If I diy, I'd likely do 2x6 rafters and either 2x6 or 2x8 joists. At 24OC, 2x6 Is a hair too small per tables, but maybe I can use a 2x4 vertical to the ridge, or I can raise them to shorten the span. That material cost will be about $50 for each intermediary and about $65 for the ends. So $510 with tax and I can pickup the lumber locally

One truss shop just emailed me back, $800 if I pick up, although they are 1.5hr each way. $120 for delivery. I'm not surprised by the price and don't think it's unreasonable, but I'm feeling like I'd diy. The other shop is closer, so I'll wait and see what they say
 

billconner

Well-known member
Joined
Jul 20, 2021
Messages
6,971
Location
Thousand Islands NYS
I second the surface bonding. So easy and fast and stronger laterally than mortar bonded.

I set rebar pins in footing so you need epoxy in. I set j-bolts in same grouted cores. Seems to have worked well. But I had minimum of three courses, up to 8 in rear corner where it was cut deepest into hill.
 
OP
M

mike93lx

ALLIANCE MEMBER
Joined
Dec 9, 2013
Messages
37,854
Location
Richmond, VA
I second the surface bonding. So easy and fast and stronger laterally than mortar bonded.

I set rebar pins in footing so you need epoxy in. I set j-bolts in same grouted cores. Seems to have worked well. But I had minimum of three courses, up to 8 in rear corner where it was cut deepest into hill.
Is the suggestion to just dry set the walls, surface bond then fill cells? Do you use mortar for the first course to get it level/flat?

I need to parge anyway, so surface bonding could replace that
 

billconner

Well-known member
Joined
Jul 20, 2021
Messages
6,971
Location
Thousand Islands NYS
Basically, yes. I did set first course in mortar - just under, not ends, to level. I've read that if you have a very level footer (slab) you can skip that mortar bed. My base course is not visible so surface bonding cement flares out on footer. Should be enough on a good footer. You may have appearance concerns on intetior floor. Since there are tiny irregularities in block, I used brick ties to shim.

I like the method a lot. Very diy friendly. Not sure if I would use it for enclosing heated space around here because insulating block is not simple or "thin". And it does look good.
 
OP
M

mike93lx

ALLIANCE MEMBER
Joined
Dec 9, 2013
Messages
37,854
Location
Richmond, VA
Basically, yes. I did set first course in mortar - just under, not ends, to level. I've read that if you have a very level footer (slab) you can skip that mortar bed. My base course is not visible so surface bonding cement flares out on footer. Should be enough on a good footer. You may have appearance concerns on intetior floor. Since there are tiny irregularities in block, I used brick ties to shim.

I like the method a lot. Very diy friendly. Not sure if I would use it for enclosing heated space around here because insulating block is not simple or "thin". And it does look good.
Thanks. The slab is relatively flat, but the edges are not flat or level enough to place a row of block without mortar.

With only two courses, plus needing to set the first course anyway, I feel like I might as well just give it a go using mortar. If I was going much taller, the benefit would be bigger.
 
To avoid these ads, REGISTER NOW!
OP
M

mike93lx

ALLIANCE MEMBER
Joined
Dec 9, 2013
Messages
37,854
Location
Richmond, VA
Truss quote 2 came in at 690 plus 200 for delivery. They are about 1 hr away.

18' long trusses in my 10' utility trailer isn't ideal though and I hate borrowing stuff. Probably could rope my neighbor in to help with his tandem axle trailer, but then I am tying up two people for 3-4hrs to save $120-200

So a $400 premium to save hauling a bunch of material, a day of cutting, and going up and down ladders a bunch
 
OP
M

mike93lx

ALLIANCE MEMBER
Joined
Dec 9, 2013
Messages
37,854
Location
Richmond, VA
I'm not winning any awards for masonry... That's for damn sure.

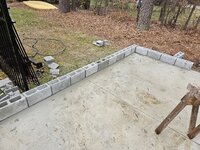
Set a few blocks and it started raining, so I am waiting for these to set then will see how they feel and move on from there. If they are reasonably solid, I'll continue on. The edges of this slab are not level, which made it a little tough to get the blocks level.

Its weird... Despite watching a ton of videos on laying block, I am not yet an expert

1000006740.jpg1000006741.jpg1000006742.jpg1000006743.jpg
 
OP
M

mike93lx

ALLIANCE MEMBER
Joined
Dec 9, 2013
Messages
37,854
Location
Richmond, VA
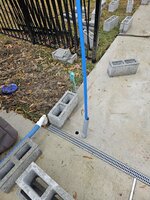
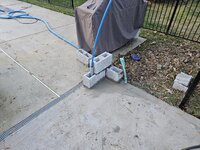
Made some more progress and am getting a little better. Thankfully mortar is cheap as I am using up what feels like a lot. That half block at the water line still need mortar, but i going to drill for a rebar pin before doing that 1000006752.jpg1000006749.jpg1000006751.jpg
 

jar944

Well-known member
Joined
Jul 26, 2010
Messages
5,951
Location
Northern VA
Maybe it's just the angle but are you buttering the end corners of the block when you are laying? Looks a little light, unless you are going to grout with a bag after.
 
OP
M

mike93lx

ALLIANCE MEMBER
Joined
Dec 9, 2013
Messages
37,854
Location
Richmond, VA
Maybe it's just the angle but are you buttering the end corners of the block when you are laying? Looks a little light, unless you are going to grout with a bag after.
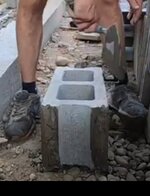
Yes, I am, but this is an area I am struggling with. There is a lot of mortar between each block but it's tapering out at the edges. I'm expecting to need to grout before core filling. I figured I would be better to get good coverage around the centers as I can fill the edges afterwards. It doesn't help that these blocks have smooth ends on both sides
 

jar944

Well-known member
Joined
Jul 26, 2010
Messages
5,951
Location
Northern VA
Yes, I am, but this is an area I am struggling with. There is a lot of mortar between each block but it's tapering out at the edges. I'm expecting to need to grout before core filling. I figured I would be better to get good coverage around the centers as I can fill the edges afterwards. It doesn't help that these blocks have smooth ends on both sides

Are you only hitting the corners?
Screenshot_20241210_133016_Chrome.jpgScreenshot_20241210_133215_Gallery.jpg
 
OP
M

mike93lx

ALLIANCE MEMBER
Joined
Dec 9, 2013
Messages
37,854
Location
Richmond, VA
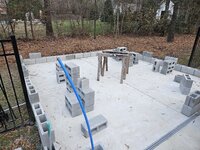
Progress. Can't say the head joints are any better, but I bought a grout bag, so I'm all good now. 😂

First course is done and most of the rebar is epoxied in place.

I'm just doing a MWBC, so I don't need ground rods, but I decided to grab one anyway. Looking forward to using a jackhammer for it instead of a sledgehammer

The random second course blocks are just to cover the rebar so I don't have to worry about my kids

1000006787.jpg1000006786.jpg
 
Last edited:
OP
M

mike93lx

ALLIANCE MEMBER
Joined
Dec 9, 2013
Messages
37,854
Location
Richmond, VA
Looking good! Any reason you didn't choose to use a ufer ground?
There is rebar in that slab, plus ground wires for the pool... Just didn't think about adding a clamp and a wire. Would have been easy and cheap

If I was doing it again, I would.
 
OP
M

mike93lx

ALLIANCE MEMBER
Joined
Dec 9, 2013
Messages
37,854
Location
Richmond, VA
Today's progress.

Second course is done and I filled all the interior head joints. Couldn't get a mortar bag to work, so I just did it with a pointing trowel and then tooled them all.

Second course took about 2.5 hrs, so definitely improved. Not having to kneel the whole time was quite nice.

Overall, I'm happy for a first go at it.

Filling cores tomorrow, but I'm not doing all.
1000006813.jpg1000006812.jpg
 
To avoid these ads, REGISTER NOW!
Top Bottom