To avoid these ads, REGISTER NOW!

Between 705 & 1200 SQ/FT The 'NOT' a garage, CABIN build.

Workspaces between 705 and 1200 squarefeet.
OP
P

PWC Repair

Well-known member
Joined
Dec 27, 2012
Messages
3,188
Location
Arkansas
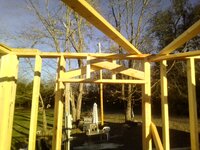
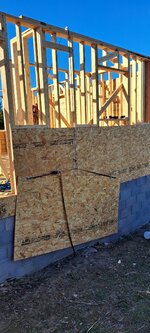
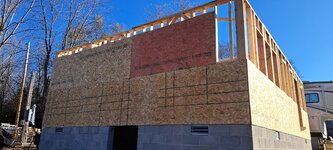
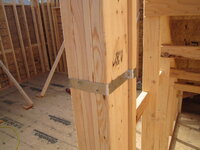
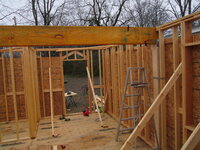
We finished up all the openings except one which we are using as a doorway. Also added blocking along the walls and in between joists where that living room wall ended up.
Does anybody have thoughts on those headers ??
 
To avoid these ads, REGISTER NOW!
OP
P

PWC Repair

Well-known member
Joined
Dec 27, 2012
Messages
3,188
Location
Arkansas
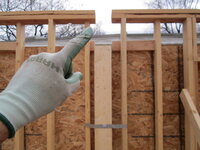
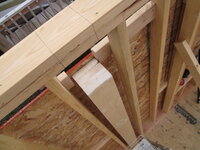
We took yesterday off to run errands. And I'll be changing out the starter on my Xterra tomorrow.......ALONG with the sticking blower relay in my HVAC air handler......in the attic,......BUT, we got some stuff accomplished today. I doubled up a few studs on this living room wall that the stairs will be up against. The I-joists above this room will be sitting ON this wall making it load bearing. I really wasn't worried about 2x4 studs at 16 inch centers but a few more can't hurt anything. My google-fu and math lead me to believe a single 2x4 with cripples above a 24" window opening AND double 2x6 top plates is sufficient. I don't have any inspections or code to comply with so they're staying. Now for the 36" openings I did some more math and came up with a solution that DIDN'T involve cutting. I "trussed" the headers. Maybe unconventional but I did find a few pics of similar headers in 100+ year old renovations. So, unless somebody else has a program for stuff like thisthat shows it WON'T work.......this is how they stay.
 

Attachments

  • IMG_20241126_152548_HDR_073335~2.jpg
    IMG_20241126_152548_HDR_073335~2.jpg
    700.8 KB · Views: 311
  • IMG_20241126_152618_HDR_073314.jpg
    IMG_20241126_152618_HDR_073314.jpg
    711.7 KB · Views: 203

rzims

Well-known member
Joined
Oct 25, 2006
Messages
461
Location
Grass Valley, CA
Very cool project you and your wife have taken on. Will also be a really neat story when your son tells people he's living in a house his parents built!
You're making great progress!
I'll be following for sure!
 
OP
P

PWC Repair

Well-known member
Joined
Dec 27, 2012
Messages
3,188
Location
Arkansas
Do you have any floor joists landing on those?

If it's not load bearing a flat 2x4 is sufficient and would be code compliant.

Article dealing with alternatives to the standard laminated 2x12 header.
There is one 24 inch window that joists will land on. I can't view the article, it wants a login.
 

jar944

Well-known member
Joined
Jul 26, 2010
Messages
5,958
Location
Northern VA
The Right Header for Every Wall
Several code-approved options beyond the standard double 2x12 save material and energy.
By Mike Guertin Issue 264 – Dec 2016/Jan 2017
Xfacebooklinkedinpinterestemailadd to favorites

Synopsis: Double 2×12 headers are still the standard for window and door openings, even though the IRC lists other options for headers that save lumber, minimize thermal bridging, and save space for insulation. Builder Mike Guertin provides a comprehensive look at header design and discusses how to figure out the right-size header for a given span. He also discusses several alternative designs to the double 2×12 and when they are appropriate: rim-board header, box header, and using a flat 2x instead of a header.

When I started framing houses in the late 1970s, the standard header for almost any size window and door opening was a double 2×12 with a 1⁄2-in. plywood spacer to bring the header flush with the stud edges in a 2×4 wall. When the header is pushed hard to the double top plate of an 8-ft.-high wall, its bottom sets up window and door head jambs 6 ft. 10 in. off the floor, perfect for standard 6-ft. 8-in. doors.

When high-performance homes gained market share in the late 1980s, the building industry looked for options to reduce the amount of lumber used to build headers — or to eliminate conventional headers altogether — in order to save resources, minimize thermal bridging, and provide more space for insulation. Double 2×12 headers are often oversize for the load, but they’re still the standard. In most cases, there is no structural advantage to installing headers that are larger than required, and there are downsides. Not only do they cost more than right-size headers, but the deeper a lumber header is, the more likely it is to lead to drywall cracks as green lumber dries or dried lumber expands during seasonal humidity changes.

doesn’t require a header
When an opening less than 8 ft. wide is in a nonbearing wall, a flat 2x does the job.
When I look at the prescriptive options available in the IRC, I’m surprised by how many builders still frame the way I did nearly 40 years ago. I guess bigger and beefier looks stronger and impresses clients, and I admit that it’s easier to use the same-size headers throughout a house whether for a large patio door or a narrow window. Thoughtful header design takes planning and organization, but it’s a better way to build. Shallower headers, single-ply headers, engineered lumber, innovative use of rim joists, and even no headers at all save material, money, and energy.

Do you even need a header?
The 2015 IRC says, “Load-bearing headers are not required in interior or exterior nonbearing walls. A single flat 2-inch by 4-inch member may be used … for openings up to 8 feet in width” (R602.7.4).

In essence, the code doesn’t require a header unless the end of a floor joist, roof rafter, or truss lands on that wall or there’s a concentrated load bearing over the opening. You don’t even need to install structural jack studs, since there is no load for them to bear.

A header also isn’t required when a window or door is narrow enough to fit between studs on layout. This is more typical with framing on 24-in. centers. Then, when a window is less than 22 in. wide, you don’t need a header; you just install 2x head and sill boards to box out the rough opening.

Right-size headers optimize lumber usage
Sizing a header for the load it will carry is pretty simple, can be done without an engineer, and usually results in headers that use less material. For conventionally framed houses, tables in the IRC help you determine the right-size header for the opening width and the load it supports. In the 2012 IRC and earlier versions, the header span table for exterior bearing walls (R502.6[1]) was published in chapter 5, “Floors”—hardly a logical spot—and the table only included two-ply, three-ply, and four-ply headers. The 2012 IRC added a table for single-ply headers in chapter 6. The 2015 IRC consolidated this information in a single exterior-wall-header table (R602.7[1]) in chapter 6. This section includes similar tables for headers in interior walls and porches.

In addition to their listing in the table, single-ply headers have a subsection requiring that one 2x flat board be installed at the bottom of the header and another one on the top (unless the header is tight to the top plate).

The header options are listed by the number of plies (one to four) and the lumber size (2×4 to 2×12). While only three building widths (20 ft., 28 ft., and 36 ft.) are shown, the code permits you to interpolate for building widths between those listed. If you don’t want to interpolate, you can just use the spans listed for the next-larger building width. Also in the tables are columns labeled NJ, meaning “number of jack studs” required under each end of the header.

Interpolation
If the house width falls between the three provided in the IRC, header spans can be interpolated with some simple math. For example, let’s use the same rough opening and house configuration as before, except that in this case the house is 26 ft. wide. We’ll use a single 2×8 header.

Begin with the difference in span for a given header configuration between the building width on each side of the actual building width. At 20 ft., a single 2×8 can span 3 ft. 11 in. At 28 ft., it can span 3 ft. 5 in., so the header span difference is 6 in. over 8 ft. To find the difference per foot, divide 6 in. by 8 ft.:
6 in. ÷ 8 ft. = 0.75 in. per ft.

Since the 26-ft.-wide building is 6 ft. wider than the 20-ft. width from the table, calculate the following:
0.75 in. per ft. × 6 ft. = 4.5 in.

Subtract the above number from the header span for a 20-ft.-wide building to find the allowable header span for a 26-ft.-wide building:
3 ft. 11 in. – 4.5 in. = 3 ft. 6.5 in.

Rim-board headers use existing framing
Why does a header have to be framed into an exterior wall when there’s already a rim board in the floor framing above the top plate? A rim board often can bridge a window or door opening, and as of the 2015 IRC, there is a subsection on them (R602.7.2). Rim-board headers are sized according to the same table used to size regular headers, and in many cases the single-ply rim board you’re already installing may eliminate the need for a conventional header below. In situations where the loads are greater or the opening is larger, the rim board can be sistered with additional material (photo). In all cases, there can be no joints in a rim-board header over the opening and for 6 in. past the outer bearing studs. The number of outer studs framing each end of the rough opening must at least equal half the studs displaced by the opening, assuming you are using the maximum stud spacing permitted in table R602.3(5). This may sound confusing, but it’s easy in practice. If there would be two studs falling in the opening, then you would need one jack stud at the left side of the opening and another at the right side.

According to the IRC, as long as floor joists have at least 1-1⁄2 in. of top plate to bear on (say, a single rim board on a 2×4 top plate), hangers are not required. This is one case when I go beyond the code; I install hangers on all rim-board headers.

Rim-board headers use existing framing.

Box headers take advantage of the sheathing
Box headers are made by installing structural-sheathing panels to the outside face or to the inside and outside faces of the framing between the top plate and a flat 2x at the head of a rough opening. The sheathing and framing combine to act as a truss. Because they are built with a minimal amount of lumber, there is more space to fill with insulation. Box headers can be used only in walls supporting just a roof and a ceiling, and in walls supporting a roof, a ceiling, and one center-bearing floor with an interior center-bearing wall. The IRC lists spans for 9-in.-tall and 15-in.-tall box headers.

Two-sided box headers have greater spans than single-sided ones. All you have to do is follow a few conditions outlined in figure R602.7.3. Begin by framing in the cripple studs between the top plate and a flat 2x at the head of the rough opening, and support the flat 2x with the same number of jack studs the code requires for a conventional header of that length. Make sure the structural sheathing and top plate continue through the opening without any joints. Follow the fastening schedule: 8d common nails spaced every 3 in. and driven into the plates and the cripples. The sheathing must be a nominal 1⁄2 in. thick, and its strength axis must run parallel with the wall length. (The strength axis of most structural sheathing aligns with the sheets’ long edges.) In many cases, the exterior wall sheathing alone can be used to create a one-sided box header. For instance, in a 28-ft.-deep house with two stories and a center-bearing wall, a one-sided 9-in.-tall box header can span up to 3 ft.

Two-sided box headers give greater spans, but the interior structural panel is applied to the face of the studs, requiring you to pad out all the studs to match the plane before installing drywall. Alternatively, if you’re framing walls from 2x6s, you can rip 1⁄2 in. off the plate, the tops of the king studs, and the head board. This isn’t allowed with a 2×4 wall.

If you’re already framing with 1⁄2-in. structural sheathing, then one-sided box headers are easy to incorporate. Just keep joints in the sheathing and top plate from falling above the opening, and nail the perimeter of the header properly. If the house is being sheathed with 7⁄16-in. OSB, you can install pieces of 1⁄2-in. panels just for box headers. The slight difference in thickness won’t cause any problems.

Building up headers
When building multi-ply headers, you should start with the IRC’s fastening schedule (table R602.3[1]), which covers two-ply headers with a 1⁄2-in. plywood or OSB spacer, presumably for a 2×4 wall. (No fastening schedule is given for other headers.) The schedule calls for 16d common nails at 16 in. on center or 16d box nails at 12 in. on center. I run two rows of nails on 2×6 to 2×10 headers and add a third row in the middle of 2×12 headers.

In 2×6 walls, I usually frame double headers by sandwiching 2-in. rigid foam between 13⁄4-in. LVL stock or 21⁄2-in. rigid foam
between 2x stock. Because nails aren’t long enough to penetrate both plies and the foam, I use 5-in. or 51⁄2-in. Fasten
Master FlatLok or HeadLok screws, or 5-in. Simpson Strong-Tie SDWS screws. The low-profile heads on these screws sit flush with the surfaces of the lumber, so they don’t interfere with sheathing or drywall. I space the screws roughly 16 in. apart about 2 in. down from the edges of the header.

I rarely frame walls with 2x4s, but when I do, I use 1⁄2-in. rigid foam between the plies of built-up headers rather than OSB or plywood. Even though the R-value of the foam is small, it breaks the thermal bridge somewhat.

Building up headers

Engineered-lumber headers
LVL, LSL, and insulated headers are usually more consistent in size and less prone to shrinking and swelling than sawn-lumber headers, which is one reason many builders have adopted them. Some companies make headers in a laminated sandwich with a rigid insulating-foam core or face. Engineered-lumber manufacturers provide header-span tables similar to the ones listed in the IRC, making it easy to size them. I’ve used engineered lumber as single-ply headers, multi-ply headers, and rim-board headers. In many cases, the engineered-lumber members can span greater distances compared to sawn-lumber headers of similar sizes. It’s important to check the manufacturer’s instructions, as there may be special-use conditions not covered in the code.

Why header spans change
Today’s lumber isn’t as strong as the old-growth material of years past, so lumber-rating authorities have been reducing the rated structural capacity of most species. One way that those reductions are manifest is in shorter header spans. If your code jurisdiction adopts a more recent version of the IRC, you may have to change your header sizes according to the revised table.

Photos courtesy of Mike Guertin. Drawing courtesy of Don Mannes.
 
OP
P

PWC Repair

Well-known member
Joined
Dec 27, 2012
Messages
3,188
Location
Arkansas
Wife and I got a bit of work done today. Haven't been able to do much on it cause, well,.......Thanksgiving!...........EXCEPT.......I missed that show all-together!! Got laid down with FOOD POISONING from Taco Bell on Wednesday. Then while feeling completely puny Thanksgiving morning......like I got rolled over by a 1 ton truck.....my wife was getting ready to go to her mom's where everybody else would be.......I was trying to get some rest on the couch from the AWFUL 6 hour exorcism the night before........and wifey says "I hate to even mention this, we don't have any hot water."...... YOU GOTTA BE F'ING KIDDING ME!!!!! So, she goes off to Thanksgiving dinner, and I roll over off the couch onto my knees in the floor, slowly stand up and shuffle to the bathroom, pop 2 Aspirins and a shot of Theraflu, and get some work clothes on. Then I shuffle down to the shop and grab everything I think I'm gonna need including a new element and t-stat kit.....I keep one on hand cause I heat the shop with an electric water heater. So then I spend the next 2 hours on an old paint bucket, under my house, digging the lime buildup and broken elements out of the water heater and installing new. Slouching over to catch my breath about every 15 minutes or so. Got it together, purged and flushed all the faucets, then lights out on the couch until my wife was back home and woke me up. Felt good yesterday, and got some done today, long story over............SO IF YOU THINK YOUR THANKSGIVING WAS BAD I WOULD HAVE GLADLY TRADED LOL!!!!!!!!!
ANYWAY, I had laid out exact placement of lvl beam support columns so I got under the house to scope it out. The inner room column lands right on one floor joist. Easy enough, I grabbed a couple 2x8's and tripled up that joist. Now that column is spread over a triple 2x8 about 42" either direction from a main gider support pier. I CAN put a new concrete block pier right up under it if anybody thinks it's necessary.
 

Attachments

  • 20241201_120638_044339.jpg
    20241201_120638_044339.jpg
    510.7 KB · Views: 134
OP
P

PWC Repair

Well-known member
Joined
Dec 27, 2012
Messages
3,188
Location
Arkansas
Now on the exterior wall side......that's the end where the joists landed a bit close and I couldn't get right up into the sill. I marked it out and cut out a section of the one floor joist, and the rim insulsation. Then I tripled a 2x8 for a "squash" block. Finally sistering another 2x8 joist section in between main girders. Obviously this column will be transferring load right to the sill and foundation. Again, if anybody sees an issue here let me know. This is purely what common sense told me to do.
 

Attachments

  • 20241201_125228_044441.jpg
    20241201_125228_044441.jpg
    691.6 KB · Views: 109
  • 20241201_123219_044407.jpg
    20241201_123219_044407.jpg
    780.3 KB · Views: 94
  • 20241201_120614_044302.jpg
    20241201_120614_044302.jpg
    870.2 KB · Views: 92
  • 20241201_114847_044227.jpg
    20241201_114847_044227.jpg
    799.1 KB · Views: 88
  • 20241201_114833_044144.jpg
    20241201_114833_044144.jpg
    789.9 KB · Views: 95
OP
P

PWC Repair

Well-known member
Joined
Dec 27, 2012
Messages
3,188
Location
Arkansas
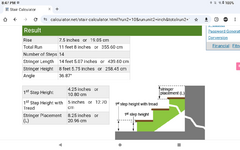
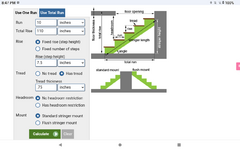
I've been working with measurements on graph paper tonight. Found a neat tool online and I think I have a stair plan!
 

Attachments

  • Screenshot_20241201-204716.png
    Screenshot_20241201-204716.png
    133.8 KB · Views: 84
  • Screenshot_20241201-204735.png
    Screenshot_20241201-204735.png
    120.7 KB · Views: 112
OP
P

PWC Repair

Well-known member
Joined
Dec 27, 2012
Messages
3,188
Location
Arkansas
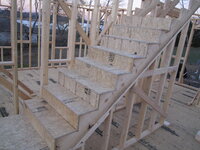
Well, the stairs were slow going.......man, that's a lot of circular saw use! I made the first stringer, screwed it to the stud wall, measured everything out, re-adjusted, then nailed it home! Next I squared off from the beam column position, and built the short stair wall right up under the stringer. I figured this way I had an exact pattern and everything would sit nice. Amazingly enough, this alone took about 5 hours today @ 42 degrees, with a 15-20mph COLD Noth wind.........I'm currently thawing out.
 

Attachments

  • IMG_3315.JPG
    IMG_3315.JPG
    752.6 KB · Views: 94
  • IMG_3313.JPG
    IMG_3313.JPG
    911.4 KB · Views: 85
  • IMG_3314.JPG
    IMG_3314.JPG
    873.7 KB · Views: 83
  • IMG_3316.JPG
    IMG_3316.JPG
    806.8 KB · Views: 106
OP
P

PWC Repair

Well-known member
Joined
Dec 27, 2012
Messages
3,188
Location
Arkansas
I spent several more hours working on stairs today. I've never built a set of real stairs, throw in the corner at the bottom, add an oddball dimension for good measure,........WOO, GOOD TIMES!!!
 

Attachments

  • 20241203_164601_060606.jpg
    20241203_164601_060606.jpg
    522.2 KB · Views: 89
  • 20241203_164609_060642.jpg
    20241203_164609_060642.jpg
    621.4 KB · Views: 91
  • 20241203_164628_060715.jpg
    20241203_164628_060715.jpg
    712.8 KB · Views: 106
OP
P

PWC Repair

Well-known member
Joined
Dec 27, 2012
Messages
3,188
Location
Arkansas
Wife and I worked on stairs today........center stringer up, supported, leveled off, then we started boxing 'em in. I also built the columns for the LVLs to sit on. SO,...half the hard stuff on the stairwell is complete. The other half will be framing it all into the upper level floor. I'll cross that path when I get there.
 

Attachments

  • IMG_3322.JPG
    IMG_3322.JPG
    702 KB · Views: 103
  • IMG_3323.JPG
    IMG_3323.JPG
    847.9 KB · Views: 88
  • IMG_3324.JPG
    IMG_3324.JPG
    581.5 KB · Views: 86
  • IMG_3321.JPG
    IMG_3321.JPG
    686.7 KB · Views: 89
OP
P

PWC Repair

Well-known member
Joined
Dec 27, 2012
Messages
3,188
Location
Arkansas
I used a pulley, couple "D" rings, and some rope to hoist more sheathing up into position. My wife pulled and held the rope while I went up and down the ladder.
 

Attachments

  • 20241207_141138_051842.jpg
    20241207_141138_051842.jpg
    745.5 KB · Views: 75
  • 20241207_141452_051925.jpg
    20241207_141452_051925.jpg
    912.7 KB · Views: 68
  • 20241207_143059_052010.jpg
    20241207_143059_052010.jpg
    838 KB · Views: 67
  • 20241207_163211_052055.jpg
    20241207_163211_052055.jpg
    741.2 KB · Views: 83
OP
P

PWC Repair

Well-known member
Joined
Dec 27, 2012
Messages
3,188
Location
Arkansas
We finished up osb for now. Dang 25-35mph winds today almost blew me off the ladder twice!
 

Attachments

  • 20241211_134050_090612.jpg
    20241211_134050_090612.jpg
    548.7 KB · Views: 61
  • 20241211_120059_090821.jpg
    20241211_120059_090821.jpg
    806.1 KB · Views: 94
To avoid these ads, REGISTER NOW!

theoldwizard1

Well-known member
Joined
Feb 22, 2011
Messages
43,250
Location
SE MI
OP
P

PWC Repair

Well-known member
Joined
Dec 27, 2012
Messages
3,188
Location
Arkansas
The support columns for the LVLs are up, screwed down with brackets, and strapped in place. You can see I had to cut through the double top plate and the LVLs will sit right there flush with the top plate and also get bracketed in. I also trimmed off the tops of 2 stringers that will get reattached to the LVLs once they're up............the first floor is officially framed!
 

Attachments

  • IMG_3358.JPG
    IMG_3358.JPG
    733.3 KB · Views: 76
  • IMG_3357.JPG
    IMG_3357.JPG
    578 KB · Views: 80
  • IMG_3359.JPG
    IMG_3359.JPG
    648.7 KB · Views: 77
  • IMG_3353.JPG
    IMG_3353.JPG
    657.9 KB · Views: 75
  • IMG_3356.JPG
    IMG_3356.JPG
    574.6 KB · Views: 70
  • IMG_3355.JPG
    IMG_3355.JPG
    738.8 KB · Views: 67
  • IMG_3354.JPG
    IMG_3354.JPG
    649.4 KB · Views: 69
  • IMG_3360.JPG
    IMG_3360.JPG
    549.1 KB · Views: 101

captain14

Well-known member
Joined
Dec 19, 2012
Messages
7,065
Location
Near College Park Maryland 20740
Yep, I had to figure out EXACTLY where they'd go and work in a column support for the LVL's............since I don't really know what I'm doing and all LOL!!
Larry Haun used to say when writing his articles and books
FormFine Homebuilding, the stairs have to go in anyway, why not put them in first so you can enjoy and use them while building the next floor and walls up. It’s much safer than having to climb up and down ladders while carrying tools and material.

Same thing with a deck.
 
OP
P

PWC Repair

Well-known member
Joined
Dec 27, 2012
Messages
3,188
Location
Arkansas
We got the LVL up in place today. I was exactly 1/8" off so I shimmed it with some plate aluminum I had in stock at my shop. Then I got all my measurements and started trimming down I-joists. According to my research I'm 1 ply overkill on that beam.
 

Attachments

  • IMG_3361.JPG
    IMG_3361.JPG
    472.9 KB · Views: 90
  • IMG_3362.JPG
    IMG_3362.JPG
    830.8 KB · Views: 88
  • IMG_3363.JPG
    IMG_3363.JPG
    975.5 KB · Views: 88
  • IMG_3364.JPG
    IMG_3364.JPG
    805.8 KB · Views: 88
  • IMG_3365.JPG
    IMG_3365.JPG
    977.5 KB · Views: 97
OP
P

PWC Repair

Well-known member
Joined
Dec 27, 2012
Messages
3,188
Location
Arkansas
.........JOI-ST to the world.........
Got the rest of these up today. I just need to pick up some hangers so I can fill in at the top of the stairs.
 

Attachments

  • IMG_3373.JPG
    IMG_3373.JPG
    660 KB · Views: 58
  • IMG_3372.JPG
    IMG_3372.JPG
    715.9 KB · Views: 51
  • IMG_3371.JPG
    IMG_3371.JPG
    723 KB · Views: 55
  • IMG_3370.JPG
    IMG_3370.JPG
    1,017.7 KB · Views: 55
  • IMG_3369.JPG
    IMG_3369.JPG
    893.8 KB · Views: 56
  • IMG_3368.JPG
    IMG_3368.JPG
    820.4 KB · Views: 57
  • IMG_3367.JPG
    IMG_3367.JPG
    995.5 KB · Views: 91

MongoTA

Well-known member
Joined
Mar 10, 2018
Messages
1,017
Location
CT
Congrats! First house I ever framed was my own. For framing I figured 3 days "per". 3 days for the 1st floor platform, 3 days for the 1st floor walls, same for the 2nd floor, the attic platform, all the way up to the stick framed roof. Worked solo, swinging a hammer, with my wife as a gofer. Long days and short nights!

Good project, good memories. Again, congrats!
 
OP
P

PWC Repair

Well-known member
Joined
Dec 27, 2012
Messages
3,188
Location
Arkansas
Congrats! First house I ever framed was my own. For framing I figured 3 days "per". 3 days for the 1st floor platform, 3 days for the 1st floor walls, same for the 2nd floor, the attic platform, all the way up to the stick framed roof. Worked solo, swinging a hammer, with my wife as a gofer. Long days and short nights!

Good project, good memories. Again, congrats!
3 days per..........you 2 were HAULIN'!!!!!!!!
 
OP
P

PWC Repair

Well-known member
Joined
Dec 27, 2012
Messages
3,188
Location
Arkansas
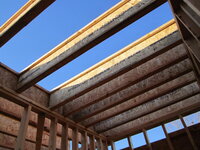
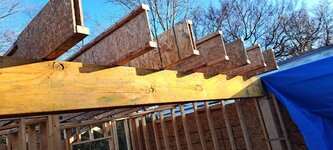
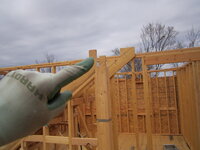
Hung a bunch of joist bridges today.......2 rows in those 12ft wide sections! ........I tend to overbuild but DANG, why do people skip these? They really just solidify the whole floor! I made my mind up to use these after watching a video of a "blocked" floor section versus a cross "bridged" section. Also hung the I-joists in that stair landing area, and reinforced every other cantilevered I-joist. According to the spec sheet (if I read it right) there is no reinforcement necessary on this setup of only 16" overhang. BUT....I figured it surely won't hurt.
 

Attachments

  • 20241221_160412_085930.jpg
    20241221_160412_085930.jpg
    905.2 KB · Views: 85
  • 20241221_160353_090020.jpg
    20241221_160353_090020.jpg
    672.4 KB · Views: 76
  • 20241221_160327_090053.jpg
    20241221_160327_090053.jpg
    864.6 KB · Views: 79
OP
P

PWC Repair

Well-known member
Joined
Dec 27, 2012
Messages
3,188
Location
Arkansas
I finished up the........"unconventional"...... stringer mounting. I wanted to keep a standard angle with the stairs but part of that LVL was in the way. SURE, I could have cut the whole thing off and moved the column further out into the room missing the stairs entirely, but........I didn't! Mostly cause I didn't want that column out in the room, so MOST of it is in the stairwell wall. ANYWAY, the stringers are re-configured and braced back into place. We also completed a bit more bridging and some blocking today, and finally carried and heaved a bunch of subfloor up to the top..........we are beat!
 

Attachments

  • IMG_3376.JPG
    IMG_3376.JPG
    548.5 KB · Views: 75
  • IMG_3378.JPG
    IMG_3378.JPG
    855.6 KB · Views: 68
  • IMG_3379.JPG
    IMG_3379.JPG
    789.3 KB · Views: 63
  • IMG_3374.JPG
    IMG_3374.JPG
    977 KB · Views: 63
  • IMG_3375.JPG
    IMG_3375.JPG
    826.8 KB · Views: 66
OP
P

PWC Repair

Well-known member
Joined
Dec 27, 2012
Messages
3,188
Location
Arkansas
After seeing what you're doing, I wish I had the same level of courage to tackle projects myself. Well done and keep posting.
The thing is......really ANYTHING you need to know can be found on the internet these days. TRUST ME, I have worn this little tablet out researching all this stuff. It's been kind of like homework! I research it, take notes, then bring my cheat sheets up to the jobsite with me.
 
OP
P

PWC Repair

Well-known member
Joined
Dec 27, 2012
Messages
3,188
Location
Arkansas
Merry Christmas everybody!!
Nothing new to report but we got everything tarped up before the rain came yesterday. All this project needed was a huge bow!!
 

Attachments

  • 20241225_170143_050525.jpg
    20241225_170143_050525.jpg
    678.3 KB · Views: 70
OP
P

PWC Repair

Well-known member
Joined
Dec 27, 2012
Messages
3,188
Location
Arkansas
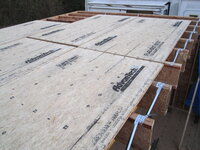
Well.........it FINALLY quit raining. And the tarps did their job.....everything stayed dry! Wife and I got about 1/2 the upper level subfloor down. I also cut a few pieces and finished the stairs. We can now actually WALK right up onto the upper level......YAY!
 
To avoid these ads, REGISTER NOW!
Top Bottom