To avoid these ads, REGISTER NOW!

Above 1200 Sq/FT The Action Sports Garage

Wokspaces above 1200 squarefeet.
OP
G

Grant Gunderson

Well-known member
Joined
May 17, 2013
Messages
2,331
Location
Bellingham, WA
Those are great shots but looking at them from an older perspective (also old enough to know better but starting to care) some seem terrifying where I’m more worried about the skier than awed by the photo. How do you / they balance awesome vs risk? I know they’re experts, but still….
Almost all of the athletes I’d shoot with were best in the world caliber and many were former Olympians / Workd champions. So they are extremely skilled. A lot of what we did was more a kind to stunt coordination so lots of trust between the athletes and myself to line things up and do our best to make sure things went right / as safely as possible.
That being said it is dangerous work and I have more friends than I can count that are no longer with us. Mostly do to avalanches ( and on typically less risk prone looking terrain). A few of the guys have gone on to doing stuntman work for major Hollywood movies as well.
 
To avoid these ads, REGISTER NOW!

Cdubu52

Well-known member
Joined
Sep 4, 2014
Messages
636
Location
Pittsboro, NC
IMG_5498.jpeg
Here is a few more from the archive. Dana Flahr hitting the baker road gap at night.
Josh Daiek201203066185.jpeg
Josh Diake in Pemberton
Mattias Evangelista2016122422177.jpeg
My buddy Mattias at Baker
Dave Treadway201312299712.jpeg
The late Dave Treadway
Adam Ü2017011325107.jpeg
Skiing with Monkeys in Japan
James HeimDrumScan02JamesHeim.jpeg
James Heim at Baker shot way back in the film days.
KC Deane GG2015011119078.jpeg
KC Deane in Revelstoke
Zack Giffin201008238552.jpeg
Zack Giffin in Chilie
Bryce Philips20080306.jpeg
Bryce Phillips in Alta.

Lots of good memories and adventures over the years. I miss that lifestyle it feel very fortunate I got to experience it and share those moments with others.
Good lord, those are amazing shots. How do you get those shots? Ski down and have them ski around you? Helicopter? Perch on other areas and use telephoto lenses. Wow, they are unreal.
 
OP
G

Grant Gunderson

Well-known member
Joined
May 17, 2013
Messages
2,331
Location
Bellingham, WA
Good lord, those are amazing shots. How do you get those shots? Ski down and have them ski around you? Helicopter? Perch on other areas and use telephoto lenses. Wow, they are unreal.
All of the above including using snowmobiles, etc. most of the time tho I am skiing with them and will set up a shot then direct them to ski the right spot.
 

Dig Doug

Well-known member
Joined
Apr 16, 2018
Messages
1,128
You are a Super Star behind the Camera !!
Totally Awesome - Thank you for posting them

That is Total Team Work !
Having to Match the Talent of the Skier w/ the Photographer

When All goes well it’s Just Magical
 

Dig Doug

Well-known member
Joined
Apr 16, 2018
Messages
1,128
I have a question or 2 about your Rigid Band saw, I’ve had the same one for 15 years, bought it for $75 bucks brand new. I’ve never really used it, It sits like New just Like I bought it, wouldn’t mind setting it up for some use.

What blade do you use? Have you done anything special to it?
What do you have it set up for? Have you used it for wood, aluminum or thin light metal


Thank you In advance
Im in no hurry for a reply if your busy, I know how things go !

Doug
 
OP
G

Grant Gunderson

Well-known member
Joined
May 17, 2013
Messages
2,331
Location
Bellingham, WA
Incredible photos! I was LOLing at the previous post with Plake, then read the above. That shot of Bryce in Alta?!?!?!? Astro, action, micro and macro all in one shot? :bowdown:
Thanks. Plake is an awesome guy to work with. Even at his age he’s still better than 99% including pros a ⅓ his age.
You are a Super Star behind the Camera !!
Totally Awesome - Thank you for posting them

That is Total Team Work !
Having to Match the Talent of the Skier w/ the Photographer

When All goes well it’s Just Magical
Thanks. It’s a lot of fun when it all comes together.
I have a question or 2 about your Rigid Band saw, I’ve had the same one for 15 years, bought it for $75 bucks brand new. I’ve never really used it, It sits like New just Like I bought it, wouldn’t mind setting it up for some use.

What blade do you use? Have you done anything special to it?
What do you have it set up for? Have you used it for wood, aluminum or thin light metal


Thank you In advance
Im in no hurry for a reply if your busy, I know how things go !

Doug
I very rarely use it. But the handful of times I have it’s been good to have. I replaced the wheel rubber with polyurethane and then put on a kreg fence. For the blade I’m using a Starrett bi-metallic blade on it as i mostly use it with Aluminum. Speeds are not ideal but it works. Someday I’d like to find a metal / wood band saw with variable speed
 
OP
G

Grant Gunderson

Well-known member
Joined
May 17, 2013
Messages
2,331
Location
Bellingham, WA
95EAD729-6AAE-4119-A907-CD639B5E5535.jpeg
Last week k was crazy busy doing re-valve jobs on shocks to tune them. I like doing that work and none of the other guys that do suspension work around here want to mess with it.
IMG_5660.jpeg
Found this guy in the shop. It’s a northern Aligator Lizard in 25+ years never seen one in Bellingham but in one day saw him in the shop then 2 different ones on two different trail Systems. Seems like all of the logging is moving them around.
IMG_5677.jpeg
I then took off for a 5 day road trip with my Son last week. On Friday we road Squamish and he’s starting to Lide some of the black rock features there. Pretty cool to see his progression then on Saturday we ride the Whistler bike park. It was a Canadian long weekend so it got busy but we had top of the world lift tickets so headed up top when the bottom got busy and managed to avoid the crowds. IMG_5690.jpeg
The entrance to top of the world is rocky and exposed then after that it becomes a high speed loose and rocky trail for 5k feet to the valley bottoms. It’s amazing for the view but there is better trails in Whistler.
IMG_5700.jpeg
We stayed at my buddy Jeff’s in Pemberton for a couple of nights and the kids got Stian into some street hockey. Who needs shoes.
9208597811647695511.jpeg
We then headed to SilverStar for crankworks and a day of riding. Stian loved the trails there as they had a lot of cool features and despite it being a holiday and crankworks there was no one on the trails. IMG_5809.jpeg
We then headed to Sunpeaks for the day. By the end of the trip Stian got to the point he can clear every blue trail jump. We went from him landing in the grey zone to not only clearing jumps to occasionally over shooting. Would have some better jump pics but he kept going bigger than I expected so didn’t get shots of most of them. Only a few videos but no idea how to post those here. You’d think dad would be better at shooting with his phone. Haha.
IMG_5829.jpeg
In 4 days of riding we ride 161 miles. Happy dad happy kid and a well earned ice cream. It’s amazing how fun it is to ride with Stian. I keep forgetting he’s only 8 so it’s going to be really interesting to see what we get into as he gets older. I do know that the bike bug has fully seated with him and all he wants to do now is ride every day.
 

Cruzan80

Well-known member
Joined
Jul 22, 2015
Messages
4,318
Location
Denver, CO
Who needs shoes.

Crocs don't count as shoes? :lol_hitti
Would have some better jump pics but he kept going bigger than I expected so didn’t get shots of most of them.
I do love the irony of a professional sports photographer (even retired,) lamenting the fact that the "athlete" isn't cooperating, because he is too excited and over-committed.

Please know everything in this post above is sarcasm and tongue-in-cheek. Giving Dad a hard time simply because you can almost see the ear-to-ear smile in all of the shots (and not just because of the ice cream).
 
OP
G

Grant Gunderson

Well-known member
Joined
May 17, 2013
Messages
2,331
Location
Bellingham, WA
Crocs don't count as shoes? :lol_hitti

I do love the irony of a professional sports photographer (even retired,) lamenting the fact that the "athlete" isn't cooperating, because he is too excited and over-committed.

Please know everything in this post above is sarcasm and tongue-in-cheek. Giving Dad a hard time simply because you can almost see the ear-to-ear smile in all of the shots (and not just because of the ice cream).
Haha! It’s funny how bad i am with a cell phone camera. It’s just not the same as using my pro gear. Kids eager, and has already learned to communicate about dropping in etc, just got to work with him about linking his jumps up. Regardless we are having a ton of fun!
If I were your friend, I’d move my truck 😇
Haha! Between street hockey and loading snowmobiles on the back all winter that truck has taken a beating!
 
OP
G

Grant Gunderson

Well-known member
Joined
May 17, 2013
Messages
2,331
Location
Bellingham, WA
IMG_5874.jpeg
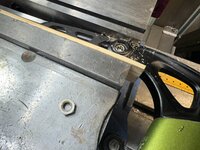
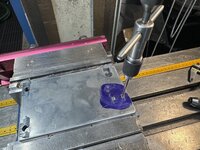
Customer had an ice axe with a stripped bolt head.

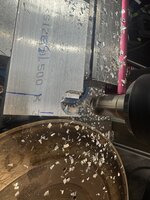
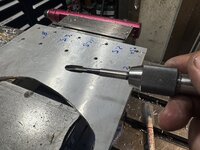
IMG_5875.jpegNothing better than when it drills out perfectly leaving bolt threads in a spiral.
IMG_5877.jpeg Hardest part was figuring out how the hell to clamp it, but a piece of wood and a machinist jack did the trick. Sure is nice having a Bridgeport mill with brand new spindle bearings.
 
OP
G

Grant Gunderson

Well-known member
Joined
May 17, 2013
Messages
2,331
Location
Bellingham, WA
IMG_5836.jpeg
Had a guy bring in a MRP Hazzard shock. First one I’ve seen. Not a single one of my nitrogen adapters would fit it.
BD7B5812-D103-45D5-8E78-463B481D9357.jpeg
So ended up having to order theirs and a bunch of there specialty tools but I can now service MRP. I’m pretty impressed actually in how well these are made and how straightforward they are to service. Very well thought out.
IMG_5866.jpeg
Jamie and Evelina had a surprise for us when we got back from our father son bike trip. Two Maincoon kittens. These guys are going to be big cats. They are almost the size of our single house cat already. The silver one is a polydactyl and has 6 toes on each foot! Everyone loves them so they are nice addition to the family, but they eat a small fortune in food!
IMG_5903.jpeg
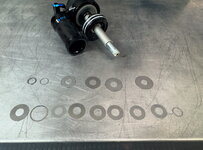
Had a guy bring in a Vivid air shock that had zero dampening. All of the seals looked great on tear down. Turns out the compression shims had all warped. Notice the gap in the shim stack above. The dampers in shocks work by having oil push against these shim stacks
IMG_5906.jpeg
The more they deflect the more oil comes through and the shock moves quicker. So when we tune a shock all we are doing is altering how stiff these shim stacks are. When they get deflects in them they loose their ability to act as a spring resistant to the oil flow and you loose dampening.

On another note I’ve been on the hunt for a new shop space. The business has out grown my garage and space is the bottle neck.

It’s damn difficult around here to find a good space as they are either total shitholes that would require a small fortune to make usable or they are way out in the sticks away from the customer base.

I think I’ve finally found the right spot to build out my dream shop. So hopefully more details on that soon if they accept our offer, terms, etc. The next few months are going to involve some major life changes, but I’m excited to open a new chapter in life and pursue one of my dreams. I’m damn grateful I have Jamie as a partner that fully backs that vision. Given the 3 years of hell I went through with the divorce/ custody battle, our Japan avalanche accident, the ski industry imploding and my dads declining health, I’m really grateful to be in a spot now where a lot of positive things are happening and the future looks very bright. I honestly didn’t see this happening 3 years ago at all.
 
Last edited:

zanyad

ALLIANCE MEMBER
Joined
Apr 26, 2018
Messages
2,841
Location
NE Ohio
On another note I’ve been on the hunt for a new shop space. The business has out grown my garage and space is the bottle neck.

It’s damn difficult around here to find a good space as they are either total shitholes that would require a small fortune to make usable or they are way out in the sticks away from the customer base.

I think I’ve finally found the right spot to build out my dream shop. So hopefully more details on that soon if they accept our offer, terms, etc. The next few months are going to involve some major life changes, but I’m excited to open a new chapter in life and pursue one of my dreams.
How exciting! Looking forward to further developments.
 
OP
G

Grant Gunderson

Well-known member
Joined
May 17, 2013
Messages
2,331
Location
Bellingham, WA
IMG_5927.jpeg
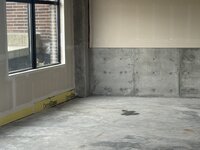
Well I thought I found the perfect location. Size was right, location in town is ideal and price was ok too…
IMG_5913.jpeg
IMG_5926.jpeg
But there’s a **** ton of water coming into it from two separate walls. Checked the next space in the same building and the lower section of dry wall was removed and the metal studs had an 1” of water in them inside of the wall. Pretty disappointing given its new construction too.

So the search continues.
 
OP
G

Grant Gunderson

Well-known member
Joined
May 17, 2013
Messages
2,331
Location
Bellingham, WA
Grant you’re a crafty guy. I’m thinking “water feature”.

Ya know, maybe some water lilies and a few frogs. Ya-ya that’s it!, guard frogs that’s what you need. 🤘
Parking garage is bellow seal level. Maybe it’s part of their new Salmon habitat restoration. Makes me think I should sell fishing gear and waders too….
 
OP
G

Grant Gunderson

Well-known member
Joined
May 17, 2013
Messages
2,331
Location
Bellingham, WA
IMG_5943.jpeg
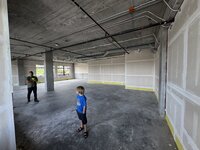
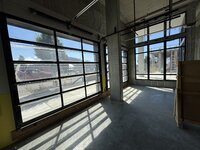
Well I think I found the spot. It’s 4ksqf so all depends if the developer will divide it.
IMG_5944.jpeg
There is a natural spot to divide as the slab steps down back where the guy is standing.
IMG_5946.jpeg
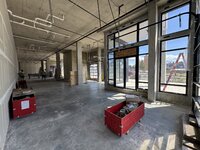
Lots of windows and roll up doors too in addition to two standard double man doors.
IMG_5949.jpeg

The floor is a post tension slab. Can I drill through it? It sits around a foot bellow the exterior finished grade so their intent is to build out a sub floor. I’d prefer just epoxied concrete with the machines and nature of the shop working with suspension oil etc. So gotta figure out what makes sense for that. I may build a subfloor for a customer / retail area then have it step down to the slab behind the service counter. It’s just a grey shell space so I’ll still need to build out the plumbing, electrical and HVAC plus ventilation.
Next building down from the previous one and it’s still under construction so I’m at least 6months out from getting build out / moving in. So still need to find a transition place.

Lots to think about. From an investment standpoint, the commercial property should do really well in this location, the machine tool investment I’m looking at for servicing skis / boards is a bit more scary. There is a reason most ski shops are struggling so if I’m going to do this I gotta invest in automation that provides better quality tunes with minimal labor / skill requirements.

I know nothing about post tension slabs so would love some education on those and or putting machine tools into a subfloor.

If I pull the trigger on it, it’s going to be a massive investment to build out and fully equip with the machines I have in mind, but if my vision is successful it will be a good move long term.

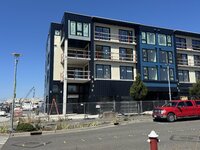
Location is ideal on the waterfront here in Bellingham and the city / port are putting a big effort into developing the area. It used to be a large paper mill / superfund site the city / port / epa did a full cleanup on and now they are redeveloping. They already have a massive beer garden and park / pump track. It’s going to be the main area for development in Bellingham for the next 15-20 years and I’d be the first business in the area other than the beer garden over in the park directly across from the space.
 

Johanfpa

Well-known member
Joined
Dec 27, 2016
Messages
241
Location
Aberdeen Scotland
Would never drill myself in post tension slabs as the safety risk and to have very expensive to rectify damage is high if you hit a tensioned cable. @ my work place they hired a specialist company who AFAIK used a ground penetrating radar to confirm where it was safe to drill. Not cheap but safe and a lot cheaper than fixing the potential damage.
Do you need to fix down some of the machines you are planning to use?
Good luck with your endeavour and I'm sure with your attention to detail and work ethic you will do well.
 
OP
G

Grant Gunderson

Well-known member
Joined
May 17, 2013
Messages
2,331
Location
Bellingham, WA
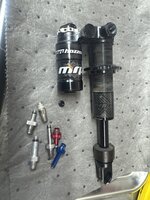
IMG_5979.jpegPicked up a new Victor nitrogen regulator as the enclosed gauges seemed more robust than the other offerings. It’s a million times easier to adjust pressure than the Amazon Chineseium one I had before. Can’t dial in pressure bellow 200psi, but I have two valves and a bleed off on the fill manifold to do that.
IMG_5981.jpeg
I put Milton Blue quick disconnects on all of my nitrogen fill adapters. This makes things way quicker to charge shocks.
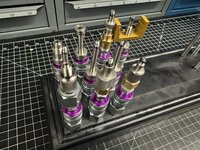
IMG_0232.jpeg
My vacuum bleed / feel adapters are the purple Milton quick disconnects
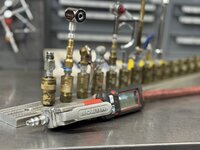
IMG_5993.jpeg
And all of my air fittings used the silver Milton qd’s so everything in the shop is now color coded to match the proper QD.
IMG_5984.jpeg
Did another walkthrough of the new shop space with Jamie and she loves it, so we are moving forward with a purchase.
IMG_5986.jpeg
From this view is 4k sqf, but I’m having it divided so I’ll just be purchasing this end with the windows / garage doors.
IMG_5988.jpeg
This is the view from the dividing line. Just gotta get the realtor to write up the LOI to purchase. Won’t actually be finalized till the developer finishes the building, but that gives me time to sell my house. Not totally sure on the SQF yet as they need to do a survey but should be around 1200, it’s a bit smaller than I was looking for, but the location is ideal and it’s within the budget and will leave me enough funds to cover the build out. I’ll need to have power installed including 3 phase drops, a restroom and or work sink plus small office.

Originally I planned on just epoxy coating the slab and placing the machines on it, however the slab is 12” bellow the exterior grade / door jambs so at a minimum I’ll need a sub floor under the customer area. City most likely would require ramps instead of steps, so thinking a full sub floor is best.

So need to figure out options for flooring as I’ll have the mill, lathe and ski tuning machine on it. Plus it needs to be good for easy wipe up of suspension oils, etc.

Once I have final dimensions from the builder I’ll need to figure out the layout. Idea is to have a service counter / small retail area up front then a full open shop layout so customers can see the workshop space.

This will be just over double my current work area but I’ll still need to be creative and efficient with the layout. At least all of my wood working tools will live at home so that will help.
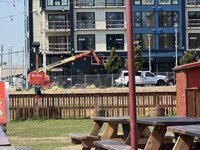
IMG_5990.jpeg
Oh and here is a view from the trackside beer garden of the space. The beer garden is right next to one of the largest pump tracks in the country and is a super popular post Galbraith ride watering hole for both locals and out of towners visiting bellingham. The city has turned into a major mountain bike destination, so hopefully the demand is there to support the dedicated suspension / ebike motor repair shop and then the ski / snowboard service in the winter months. It’s a bit scary making such a massive capital investment coming from working out of my home garage. All I know is there is no rewards without risk. So here goes jumping in with both feet, sink or swim.
 
To avoid these ads, REGISTER NOW!

LXCam

ALLIANCE MEMBER
Joined
Apr 23, 2013
Messages
19,204
Location
AZ
Excellent news Grant. Having owned an industrial condo I’ll offer this. One of the issue we ran into from the start was insurance covering the space verses the common areas and shared / adjacent building envelope. If you haven’t checked into this yet I’d suggest you do. Granted this was 25yrs ago but it did take some effort coordinating the coverage.

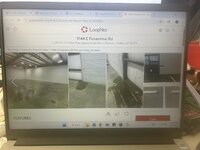
Past that I thought you’d get a kick out of this. I’ve been on a hunt for leasing a shop close to the house. It’s a battle up here and last week came across this listing which had me thinking of your situation.

Looks like I could have my own guard frogs in this joint to
IMG_4634.jpeg
 
OP
G

Grant Gunderson

Well-known member
Joined
May 17, 2013
Messages
2,331
Location
Bellingham, WA
Excellent news Grant. Having owned an industrial condo I’ll offer this. One of the issue we ran into from the start was insurance covering the space verses the common areas and shared / adjacent building envelope. If you haven’t checked into this yet I’d suggest you do. Granted this was 25yrs ago but it did take some effort coordinating the coverage.

Past that I thought you’d get a kick out of this. I’ve been on a hunt for leasing a shop close to the house. It’s a battle up here and last week came across this listing which had me thinking of your situation.

Looks like I could have my own guard frogs in this joint to
IMG_4634.jpeg
Jamie just went through that with another commercial property she owns, took forever to get the insurance dealt with. What we learned from that is the property needs to be in its own corporate (for a variety of reasons) then it’s insured as an investment property and the insurance only covers the shell of the space. The building HOA covers the building envelope / exterior and the corporation that then leases the space has its own insurance on the convents of the space.

After having dealt with two building water damage issues in the past, anytime I see evidence of it on an inspection it’s a hard no for me. Not with the headache!
 

tyyost

Well-known member
Joined
Jan 14, 2009
Messages
807
Location
Tunkhannock, PA
Originally I planned on just epoxy coating the slab and placing the machines on it, however the slab is 12” bellow the exterior grade / door jambs so at a minimum I’ll need a sub floor under the customer area. City most likely would require ramps instead of steps, so thinking a full sub floor is best.

So need to figure out options for flooring as I’ll have the mill, lathe and ski tuning machine on it. Plus it needs to be good for easy wipe up of suspension oils, etc.

Once I have final dimensions from the builder I’ll need to figure out the layout. Idea is to have a service counter / small retail area up front then a full open shop layout so customers can see the workshop space.
Grant, it looks like a great space for what you envision! I assume the step in was planned by the builder, any ideas on the why and how they would plan to address it for other sites? That may give you a starting point. Here we just ”trench” existing slabs for new utilities in commercial buildings, not something a post tensioned slab makes easy. How is you access to water/sewer in your space? Electric is easy as it can come overhead, but sewer not so much.
 
Last edited:
OP
G

Grant Gunderson

Well-known member
Joined
May 17, 2013
Messages
2,331
Location
Bellingham, WA
Finally getting back to the bench test rod for the Shimano motors. Bearings finally arrived today, so gotta get it finished up.
IMG_6101.jpeg
I need to be able to connect the speed sensor to avoid error codes when testing so that means I need to mock up a drive train of at least a hub, rotor and magnet. Cheapest hub I found was a 135mm width shimano. So first I machined some 6061 to exactly 135mm long.
IMG_6102.jpeg
The uprights need a 10mm slot for the axle. I’m going with a slot instead of a drop in so I can adjust chain tension without having a derailleur. Problem is a 10mm end mill won’t fit any of my ER collets. So while I know you should never use an end mill in a drill collet I had no choice but to. It held in my large Jacob chuck on the first upright but pulled out on the second.
IMG_6103.jpeg
Luckily it didn’t drift and damage the work so rechecked it and finished the slots.
IMG_6105.jpeg
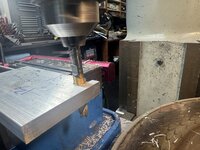
The ½” bar is too thick for the QR axle system so I need to machine each side down to .250 a 1” carbide end mill made quick work this.
IMG_6106.jpeg
Damn, that looks like a drop out to me and took less than 5 minutes. Since I’m using a stop on the vise I just dropped the other side in and fed in from the opposite direction
IMG_6114.jpeg

Bumped the mill over to remove the flange that was left. I got two drop outs.
IMG_6113.jpeg
Test fit looks good. Since I’ll need to make a bench test rig for each model of motor I service my plan is to make this modular to work with each system. Eventually I’ll replace this end with something that will allow me to load test the motors, but that will need to wait till I have more time to think about the best way of doing it.
 

LXCam

ALLIANCE MEMBER
Joined
Apr 23, 2013
Messages
19,204
Location
AZ
There are times with your projects I have a hard time figuring out what you’re doing Grant. This is one of them 🤨

However I do know given some time and progress it’ll make sense to this simpleton 🤞

Anyhow..I know it’s a bit late but all my metric end mills from 12mm down have a 3/8” shank. That sure makes it simpler than buying another set of collets.
 
OP
G

Grant Gunderson

Well-known member
Joined
May 17, 2013
Messages
2,331
Location
Bellingham, WA
There are times with your projects I have a hard time figuring out what you’re doing Grant. This is one of them 🤨

However I do know given some time and progress it’ll make sense to this simpleton 🤞

Anyhow..I know it’s a bit late but all my metric end mills from 12mm down have a 3/8” shank. That sure makes it simpler than buying another set of collets.
Yeah, I have a habit of starting a project, getting side tracked and then picking it back up latter, so the thread jumps around a bit. This project will become more clear soon, with the next series of posts. I guess you can blame that on my ADHD. Jamie can get frustrated with me at times when we are working on a project and discussing the steps, and my mind is on step 100 when we are currently only on step 2. She wants me to try ritalin at some point, but I think I like how my brain works... so we will see. She's told me that for people with ADHD stimulants actually help them calm down and think more clearly. Seems *** backwards to me, but She's the DR and knows her stuff. I guess thats why I feel like I need coffee before I start working on anything that requires actually thought and why I seem to do okay with having it even late in the day.
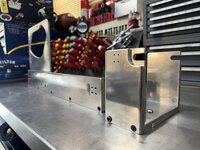
I've figured out how to fix most problems with the Shimano E-bike motors. However in order to run the diagnostic software I need to power them up, and thats difficult when shops or customers are just shipping you the motors. So I am building a bench test rig for these. To the best of my knowledge as of now there is one guy in the UK fixing these, one guy in Polland and one shop in Tennessee thats repairing E-biek motors, but it's unclear of they are actually working on Shimano. So I'm launching an E-bike repair service to compliment the suspension work. If you own a bike with Shimano's EP8 motor, and it has issues after the two year warranty, the only recourse Shimano offers is to buy a new 801 series motor, that requires an entire new wiring harness and new battery so your looking at close to $2k. Shimano refuses to service their motors or sell any parts.

I rarely use the Metric end mills but it would be nice to invest in a set that uses standard shanks. What brand are you using? My ER collets are the Grizzly South Bend's. They have worked surprisingly well. I bought them when I was having trouble with the R8's holding securely and needed a quick solution and Grizzly is just down the road. However I'd like to invest in a much better set at some point. No idea what to get.
 
OP
G

Grant Gunderson

Well-known member
Joined
May 17, 2013
Messages
2,331
Location
Bellingham, WA
There are times with your projects I have a hard time figuring out what you’re doing Grant. This is one of them 🤨

However I do know given some time and progress it’ll make sense to this simpleton 🤞

Anyhow..I know it’s a bit late but all my metric end mills from 12mm down have a 3/8” shank. That sure makes it simpler than buying another set of collets.
Yeah, I have a habit of starting a project, getting side tracked and then picking it back up latter, so the thread jumps around a bit. This project will become more clear soon, with the next series of posts. I guess you can blame that on my ADHD. Jamie can get frustrated with me at times when we are working on a project and discussing the steps, and my mind is on step 100 when we are currently only on step 2. She wants me to try ridulin

I've figured out how to fix most problems with the Shimano E-bike motors. However in order to run the diagnostic software I need to power them up, and thats difficult when shops or customers are just shipping you the motors. So I am building a bench test rig for these. To the best of my knowledge as of now there is one guy in the UK fixing these, one guy in Polland and one shop in Tennessee thats repairing E-biek motors, but it's unclear of they are actually working on Shimano. So I'm launching an E-bike repair service to compliment the suspension work. If you own a bike with Shimano's EP8 motor, and it has issues after the two year warranty, the only recourse Shimano offers is to buy a new 801 series motor, that requires an entire new wiring harness and new battery so your looking at close to $2k. Shimano refuses to service their motors or sell any parts.
 
OP
G

Grant Gunderson

Well-known member
Joined
May 17, 2013
Messages
2,331
Location
Bellingham, WA
I absolutely love that you are adding e-bike motor repair to your service line, including the Shitmano. Brilliant!

Make sure to market it and get the word out. What is your marketing plan for the business?
Thanks. I need to work on that. So far it's been limited regional social media advertising. I'm lucky I have a pretty good following on social form my photo business, so trying to transfer that to this. Most of my clients so far have been word of mouth, its the typical, I Gott guy that does good suspension work out of his garage...combined with Transition bikes and a few other shops in town sending me the work they dont do or dont want to do. Once I'm fully setup in the new spot, I'll expand the marketing quite a bit. The new shop is located next to the trackside pump track on the waterfront in Bellingham. Thats the site of the Tune-up festival which has grown to be northern version of Sea Otter, but with better riding and good music.
 

LXCam

ALLIANCE MEMBER
Joined
Apr 23, 2013
Messages
19,204
Location
AZ
Grant, I’ll have to look…..


Oh a squirrel 😳..


Oops I mean the manufacturer. It’s been a long time since I bought those and they must be decent quality as they have served me well in over a decade.

But might be it also helps they don’t get used all that much either 😆
 
OP
G

Grant Gunderson

Well-known member
Joined
May 17, 2013
Messages
2,331
Location
Bellingham, WA
Grant, I’ll have to look…..


Oh a squirrel 😳..


Oops I mean the manufacturer. It’s been a long time since I bought those and they must be decent quality as they have served me well in over a decade.

But might be it also helps they don’t get used all that much either 😆
Thanks!


IMG_6115.jpeg
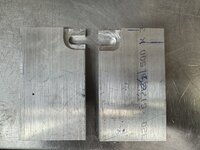
I drilled and chamfered the lower plate for the speed sensor end.
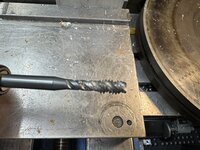
IMG_6117.jpeg
Since all 4 of the holes are blind, I used a spiral flute bottom tap.
IMG_6119.jpeg
these cut way better than standard taps, and the spirals help evacuate the chips, so you are less likely to break a tap.
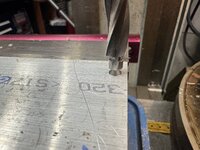
IMG_6122.jpeg
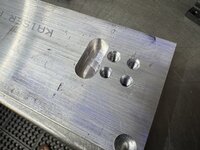
I then drilled the through holes for the upright plates and then used a counter bore for the SHCS.
IMG_6124.jpeg
test fit for screw head.
IMG_6126.jpeg
IMG_6127.jpeg
I still need to add the holes to mount it to the rest of the figure... gotta check the chain line first, and locate the holes for the speed sensor, ill get to that after I get the rest done.
 
OP
G

Grant Gunderson

Well-known member
Joined
May 17, 2013
Messages
2,331
Location
Bellingham, WA
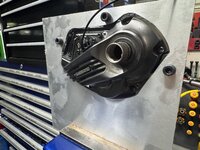
IMG_5609.jpeg
I used the bridgeport to machine out a plate to mount the motor too.
IMG_5586.jpegNext I need to make a bracket for the battery. These bikes use a smart battery system. I know it's a BUS system, and it's more than just a low-voltage control wire that controls it as it transmits battery data to the rest of the system. I could be wrong, but I dont think a bench power supply will work in place of it.
IMG_5591.jpeg
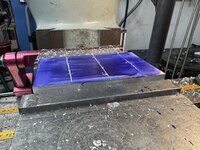
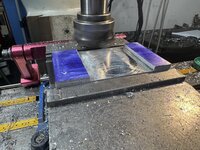
I used some Dykem layout fluid to locate all of the holes using transfer punches. I then drilled and taped the mounting holes. I then drilled a pocket hole for the latch side bracket.
IMG_5593.jpeg
and then used an end mill to mill it out.
IMG_5590.jpeg
mounted up the brackets and then the latches.
IMG_5595.jpeg
IMG_5603.jpeg
Battery mount is done, but I then realized I didnt take into account the width of the cover plate on some batteries, so I'll have to move the mount holes over In another step.
 
OP
G

Grant Gunderson

Well-known member
Joined
May 17, 2013
Messages
2,331
Location
Bellingham, WA
Next, I need to make a bracket to connect it all together.
IMG_6129.jpeg

This part is pretty long, so I supported both ends with machinist jacks.
IMG_6133.jpeg
I dont use the auto feed often on the mill, but when drilling multiple holes is saves a ton of time!
IMG_6131.jpeg
Drilled and tapped.
IMG_6135.jpeg
I then drilled and counterbored the corresponding holes on the battery bracket.
IMG_6136.jpeg
test fit.
IMG_6137.jpeg
I then drilled the mounting holes for the motor bracket and used a gun tap to tap them since they are all through holes.
IMG_6139.jpeg
Thats a bunch of counter bored holes!
IMG_6140.jpeg
I moved the battery mount over and then elongated the slot for its mount bracket.
IMG_6142.jpeg
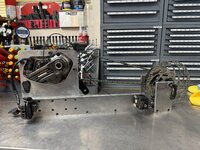
Rough mock up. Still gotta mount the speed sensor assembly.
IMG_6145.jpeg
I still need to make the mount for a display and power button. I ordered the new power button, but turns out it only works on the 801, so had to order the old EP8 style and even those are hard to come by at the moment, but will be here Monday.
 

zanyad

ALLIANCE MEMBER
Joined
Apr 26, 2018
Messages
2,841
Location
NE Ohio
McMaster generally has quality tools. They'll usually tell you the brand before buying if you ask.

Rego-fix originated the ER collet style. They're always good. Lyndex Nikken are good, too. Both are more expensive brands though. I've had good luck with Techniks and Parlec as middle-of-the-road tooling brands.
 
OP
G

Grant Gunderson

Well-known member
Joined
May 17, 2013
Messages
2,331
Location
Bellingham, WA
McMaster generally has quality tools. They'll usually tell you the brand before buying if you ask.

Rego-fix originated the ER collet style. They're always good. Lyndex Nikken are good, too. Both are more expensive brands though. I've had good luck with Techniks and Parlec as middle-of-the-road tooling brands.
Thanks! Those are go-fix and Lyndex are pricey new. Hopefully I can keep an eye out for a used set. My Only complaint about the south bend ones is the lack of metric sizes which I find odd bring that they are Chinese.
It’s always a great a day when we get follow along with one of your adventures!

Thank you for sharing & bringing us all along for the ride
Thanks! Glad you enjoyed following along.
 
OP
G

Grant Gunderson

Well-known member
Joined
May 17, 2013
Messages
2,331
Location
Bellingham, WA
IMG_6149.jpeg
I was over at Jamie's place last night and forgot to lock the truck. Normally I'm really good about that, but post ride and dealing with the kids sometimes I forget, and evidently we had yet another car prowler.. it's a pandemic of tweakers here. They stole my riding bag along with my kids.... and an old bottle of pain meds from my last surgery, but after the last car prowl, I had replaced the pills in that bottle with Laxatives. End up finding the kids riding bag down the street, and the inter tube, first aid kit and roll of Mountian money out of mine, but my bag and my bike tools are gone.... I got a good laugh thinking about the fact he ditched the TP and knowing he's going to be shitting his brains out.
IMG_6152.jpeg
figured out the offset I needed for the chain line
IMG_6153.jpeg
and then milled out the recess in the spreader for the speed sensor assembly
IMG_6156.jpeg
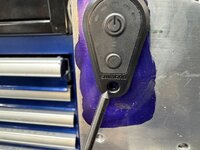
I need to make a mount location for the power switch. This is for an EP801 and of course it wont work with the older EP8 as it doesn't have a batter in it... dumb. At least they are the same dimensions.
IMG_6159.jpeg
I used some dykem to lay it out, then drilled the holes at both ends.
IMG_6160.jpeg
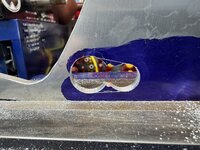
The sawed out the center piece, and filed the remains down to my layout line.
IMG_6168.jpeg
Having a set of files specifically for AL makes quick work of this, and it keeps my standard files from getting gummed up.
IMG_6163.jpeg
Test fit, and then marked the screw location with a transfer punch.
IMG_6164.jpeg
A tap guild in the drill chuck makes quick work of finding the location accurately.
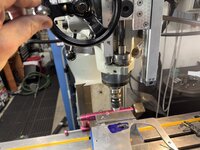
IMG_6165.jpeg
The fine feed wheel on the Bridgeport is perfect for not snapping these tiny tap drills. Its a M3 thread.
 
OP
G

Grant Gunderson

Well-known member
Joined
May 17, 2013
Messages
2,331
Location
Bellingham, WA
IMG_6170.jpeg
I then drilled and tapped a set of 4 holes for the speed sensor. This gives me options to fine tune the location based upon chain tension, plus gives me the option to use both the new and older speed sensors.
IMG_6171.jpeg
I then faced everything and rounded all of the edges.
IMG_6173.jpeg
IMG_6174.jpeg
IMG_6176.jpeg
That was a bit of milling time!
IMG_6175.jpeg
Added a spot to store the motor mount bolts too.
IMG_6177.jpeg
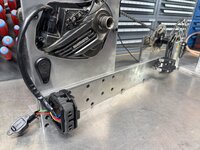
electronics added.
IMG_6180.jpeg
IMG_6183.jpeg
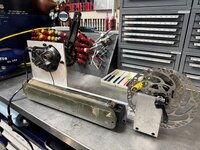
All done.
 

LXCam

ALLIANCE MEMBER
Joined
Apr 23, 2013
Messages
19,204
Location
AZ
Grant, ya can’t mix pissedoffedness stuff with rockstar stuff. We only got one choice of emoji’s.

Thats screwed you got burned like that. I really hope that pos popped a bunch of those laxatives in one shot and mom has locked him out of the basement.

And everything else, well as usual 👍👍👍
 
To avoid these ads, REGISTER NOW!
Top Bottom