To avoid these ads, REGISTER NOW!

Real men change their own tires

Outlawmws

Well-known member
Joined
Aug 9, 2011
Messages
39,326
Location
The Badlands
And patch them too! :)

We picked up a flat, so my son was getting some additional tire repair practice and training this AM, so we broke out the tire tools and I thought I'd show them in action...


Not really that many tools needed, and it's really not that hard once you know a couple of tricks and have the right tools, which don't have to be expensive!


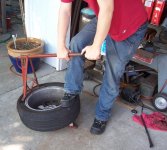
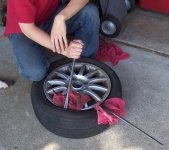
Step 1; Breaking the bead. be sure to let the air out first by removing the valve stem core. This can also be done with a bead breaker from HF, or a tire hammer, but I don't recommend that unless you are already expert, especially with an alloy rim... My breaker is probably older than I am...

Also, don't forget to break both sides.

Note! before breaking the bead, mark where the tire stem is on the tire (Lumber crayon) This allows you to remount the tire in the same position and for a patch job like this, re-balancing should not be needed...


attachment.php


Get your back into it Justin!

attachment.php


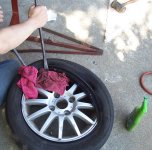
Step two is roiling the tire off the rim. The trick here is to get the tire bead DEEP into the rim "well"; This well is usually towards the outside of the rim, but a few rims have the well offset to the inside...

I like to use three spoons (Since I have them), as it's easier to pull the middle one out. It can be done with two however. Also wet the rubber tire bead with a liquid spray soap; 409, or simple green work fine.


attachment.php


After the first bead is off, you can completely remove the tire from the rim if you want (we didn't need to here) I will use one spoon, lever it under the inside bead from the back of the rim and lever that HARD over so the tire actually collapses. This exposes the rim a bit and I use a heavy rawhide Hammer (Steel Body, 3 lb..) to hit the tire bead next to the rim. a few whacks and the tire will soon be past full tension and the rim will likely pop out, or can be easily tugged out.

I do nearly the same getting the first bead over when reinstalling, but without any need for a sppon. The second bead however needs more spoon work (See below).

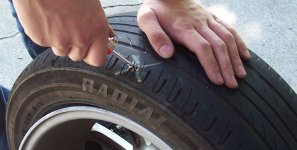
This was the nasty culprit!

attachment.php


Step 3 is taking out the "object" and it screwed right out. usually I'm using vise grips to get a nail out...

It turned out to be a sheet rock screw, so this may have been self inflicted, as we use them a lot around here for many things...

attachment.php


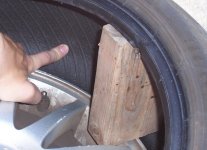
We always mark it on the outside so we can find the hole on the inside as sometimes its hard to spot. A short piece of 2x4 comes in handy to keep the tire spread for easy working access.


attachment.php


The next steps are to:

  • clean the tire mold release off the area with 90% Isoprop alcohol, and to rough the surface where the patch will go. I use an air die grinder with a rounded stone, but coarse sand paper will also work.
  • Goop the area with tire patch cement
  • and after the rubber cement dries a bit, apply the "self" adhesive patch. My patch roller went missing so we substituted a screen door bead roller.


Step five is to get the tire back on. again, the key is to get the tire edge deep into the "well" in the rim.

attachment.php


After that, align the tire to the stem again, and air it up. setting the bead on some tires, especially larger truck tires can be tedious., but it is doable.

Verify the patch actually sealed the hole, and remount it on the vehicle!

Tools needed for tire removal and re-mounting:

  • 2 (or 3) tire spoons
  • Bead breaker (HF sells one)
  • Valve stem removal tool
  • Lubricant for the rubber, to ease getting it on and off.
  • Heavy rawhide hammer for some things. :lol_hitti
  • tire spreader (Short 2x4)

Supplies for patch:

  • Rubber cement (use the stuff for tire patches, not the office stuff)
  • Self adhesive patch suitably sized for the damage (Sometimes you have several holes and the patch need to be bigger)


Something to rough up the patch area, and of course, a compressor/tank. (You are unlikely to be able to re-seat a bead with just a small "Coleman" portable type)
 

Attachments

  • Breaking the bead loose sm.jpg
    Breaking the bead loose sm.jpg
    142.6 KB · Views: 913
  • Getting it back on sm.jpg
    Getting it back on sm.jpg
    145.2 KB · Views: 901
  • Right there sm.jpg
    Right there sm.jpg
    124.6 KB · Views: 914
  • Screwed right out.jpg
    Screwed right out.jpg
    110.3 KB · Views: 903
  • The culpirt.jpg
    The culpirt.jpg
    138.8 KB · Views: 903
  • Rolling the tire off the rim sm.jpg
    Rolling the tire off the rim sm.jpg
    132.4 KB · Views: 908
  • Put some weight into it justin! sm.jpg
    Put some weight into it justin! sm.jpg
    141.3 KB · Views: 909
Last edited:
To avoid these ads, REGISTER NOW!

ekeller

Well-known member
Joined
Mar 8, 2011
Messages
164
I do all mine as well, but I have a home made slide hammer for the beads. Its alot easier than anything else. For the patch, I rough up the area with the die grinder and the roll lock wheels(look like scotch brite), wipe down with cleaner and apply patch.
 

FoMoCoPower

Well-known member
Joined
Feb 12, 2009
Messages
1,370
Location
Lombard,IL
You are over-woking yourself putting the tire back on the rim. It helps if you push down on the sidewall of the part of tire that is already partially mounted.If you don`t do that you can stretch/tear the tire.

I do all of my own tires this way BTW.
 
OP
O

Outlawmws

Well-known member
Joined
Aug 9, 2011
Messages
39,326
Location
The Badlands
you are not supposed to patch that close to the edge , but hell , I have patched sidewalls

A little close maybe, but I figured it was in the main belts.

Did you note the tread depth? in a few weeks these tires get replaced anyway (Before the winter rains set in..); I just didn't have the time/patience to deal with a tire shop today. :ninja:
 
OP
O

Outlawmws

Well-known member
Joined
Aug 9, 2011
Messages
39,326
Location
The Badlands
You are over-woking yourself putting the tire back on the rim. It helps if you push down on the sidewall of the part of tire that is already partially mounted.If you don`t do that you can stretch/tear the tire.

I do all of my own tires this way BTW.


I noted that in the text, The pic was taken before we seated the bead down in the well.

I'm not sure it's possible to actually stretch the bead... Damage it, definitely
 

eddyyy302

Well-known member
Joined
Jan 14, 2009
Messages
415
Location
North Jersey
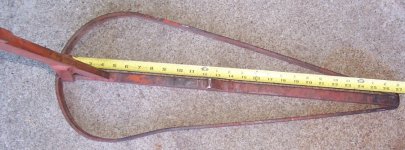
Would you be so kind to add a couple of pictures of your bead breaker? It looks similar to one I have and I need to add a base to it, pictures would help BIG TIME.

Thanks,
Dan
 
OP
O

Outlawmws

Well-known member
Joined
Aug 9, 2011
Messages
39,326
Location
The Badlands
I do all mine as well, but I have a home made slide hammer for the beads. Its alot easier than anything else. SNIP.

Hmmm, Can you post a pic? This give me an idea that with a wide blunt bit, an Air chisel might do the job...

I've seen, (And actually have one for steel rims) a deal that latches onto the rim, and levers the bead loose. We used to use them on race car wheels not long before I retired from racing.
 
OP
O

Outlawmws

Well-known member
Joined
Aug 9, 2011
Messages
39,326
Location
The Badlands
Would you be so kind to add a couple of pictures of your bead breaker? It looks similar to one I have and I need to add a base to it, pictures would help BIG TIME.

Thanks,
Dan

I can do that, but not right away. It hangs in the rafters, and while my shoulder is about 90% or so, reaching and lifting over my head is something I leave for my kids to do for me! :pimpflash

Between his College schedule and his GF, it's iffy to know when he will be around...

Definitely can do in the next couple of days.
 

theoldwizard1

Well-known member
Joined
Feb 22, 2011
Messages
43,275
Location
SE MI
Nice write up and pictures !

Check the Nomar Tire Changer website under Accessories for some "special" tools that hold the bead down in the "bead relief valley". IMO, their spoons aren't long enough, but they are for 'cycle tires, not car or truck tires.

If you watch their videos, have of their trick to easy unmount/mount is their Tire Lube Paste. Might might be worth the $15 if you think your going to be doing more. It can be diluted with water and put in a spray bottle. The paste is sold in their Supplies section along with a good assortment of valve stems and tire plug kits,
 

Az Scooter

Well-known member
Joined
Dec 30, 2009
Messages
1,500
To help seat the tire you can wrap a strap around the center of the tread, soap the bead for a seal and cinch it up so it is tight. Then just about any compressor can seat the tire without major effort.
 

SWT Racing

Well-known member
Joined
Jun 13, 2009
Messages
137
Location
South Carolina
I always mount my own slicks and front runners on the drag car. I've never tackled a standard radial tire though.
 

Attachments

  • DSC00913.JPG
    DSC00913.JPG
    61.3 KB · Views: 27
OP
O

Outlawmws

Well-known member
Joined
Aug 9, 2011
Messages
39,326
Location
The Badlands
Indeed, as seen in picture 6, right next to the wood block; the bead on that tire is already pretty well damaged, missing some chunks of rubber.

Yep, that's why it's good to do training on tires where if the trainee screws it up totally, there is not much to lose. The good news in you have to really tear up a bead before they start leaking. A lot of surface there.

So far so good, it's holding air just fine.
 
To avoid these ads, REGISTER NOW!

greasemonkey44

Well-known member
Joined
Mar 30, 2011
Messages
1,625
Location
memphis
this is why i like working in a shop
i can use the tire machine and balancer
during the summer i work without the machine though for trailer tires and the like; a couple spoons goes a long way and a old school tire machine to hold the rim is fantastic
sometimes beads dont seat and you end up ethering them, a good compressor keeps that from occuring
 
OP
O

Outlawmws

Well-known member
Joined
Aug 9, 2011
Messages
39,326
Location
The Badlands
To help seat the tire you can wrap a strap around the center of the tread, soap the bead for a seal and cinch it up so it is tight. Then just about any compressor can seat the tire without major effort.

I've tried "ordinary straps" and the are near useless, especially on truck tires. the inflatable straps help a bit.

The problem there, especially with new tires, is they collapse while stacked from the weight of the tires above.

What I finally figured out for that was after getting the first bead on, was to stand in the middle of the rim grab hold of the unmounted bead, and pull it up as hard as I could. Then get the second bead on quickly before it had time to re-settle. Nine times out of ten I could then set the bead pretty easily.
 

e-tek

Well-known member
Joined
Dec 19, 2007
Messages
10,690
Location
Saskatoon, SK
Thanks for the tutorial - I'm gonna get started on this skill this weekend. Mrs E-tek just got a flat on her Mini Cooper.
 

Altec

Well-known member
Joined
Jun 17, 2011
Messages
1,011
Location
SoCo, MD
I only plug if I get one up in the mountains in a truck tire and the spare has issues...

Why? Granted, that location is pushing where I'd run a plug, but you said yourself that the tire will be replaced soon. So why go through so much hassle? Unless you're trying to teach the boy?

Either way, I have no issues running plugs. Done it on everything from compacts, to big trucks. They have always lasted the life of the tire... Unless you count the four wheeler I did once. That held for a few months of trail cutting...
 
OP
O

Outlawmws

Well-known member
Joined
Aug 9, 2011
Messages
39,326
Location
The Badlands
Why? Granted, that location is pushing where I'd run a plug, but you said yourself that the tire will be replaced soon. So why go through so much hassle? Unless you're trying to teach the boy?

Either way, I have no issues running plugs. Done it on everything from compacts, to big trucks. They have always lasted the life of the tire... Unless you count the four wheeler I did once. That held for a few months of trail cutting...


Plugs work well when the work well, but plugs have also been known to damage the belts (more) and cause blowouts downstream. Just being conservative.
 

dwm

Well-known member
Joined
Aug 28, 2010
Messages
861
Location
Southeast Michigan
Combo patch/plugs are available and that's what I prefer if I'm going to have the tire unmounted for a repair (versus just plugging it with my roadside kit to get home). I've used them multiple times, I seem to have a penchant for getting a puncture in the first couple thousand miles of mounting new tires. Last one was a finish nail on I-40 almost in the middle of nowhere on the Sunday of Labor Day weekend a few years ago. Tires were literally just a few days old. That plug/patch lasted the life of the tire (Bridgestone RE-01R), which included some track days. I've not used one on a Hoosier autocross or road course tire, but I know people that have done it with great success (even though Hoosier will tell you it's a bad idea).
 
OP
O

Outlawmws

Well-known member
Joined
Aug 9, 2011
Messages
39,326
Location
The Badlands
Would you be so kind to add a couple of pictures of your bead breaker? It looks similar to one I have and I need to add a base to it, pictures would help BIG TIME.

Thanks,
Dan

Well, if I were you, go buy a lottery ticket tonight! He came home directly from school, and his GF has a night class or something so he will be here all night, and helped me get it setup for a couple of pics! :thumbup:

The bottom from a "Plan view"

attachment.php


From the side
attachment.php


And in case you were interested, the top of the post:

attachment.php


If I were building or rebuilding from scratch, I would do the following:

make the top post extendable (sliding tubes and pins...), so wider wheels could be accommodated if needed. The top lever adjustments are somewhat useful, but I will often use that just to get a better "bite" on a reluctant bead/rim.

The "rim hook" on the bottom rail, I'd also make that adjustable, (Sliding U channel over the bottom rail and again a pin...) and make a couple, one taller to go through alloy rims, "Holes" and possibly even cover it with some hose so it does not scratch.

Finally keep a scrap of carpeting around to lay over the base for when you have to lay an alloy rim face down.

:beer:
 

Attachments

  • From the top sm.jpg
    From the top sm.jpg
    139 KB · Views: 277
  • From the side sm.jpg
    From the side sm.jpg
    122.7 KB · Views: 277
  • The top sm.jpg
    The top sm.jpg
    112.3 KB · Views: 276

gorilla

Well-known member
Joined
Dec 13, 2007
Messages
1,656
It's my understanding that the correct way to repair a punctured tire is to both plug and patch. Any comments?
 

Altec

Well-known member
Joined
Jun 17, 2011
Messages
1,011
Location
SoCo, MD
It's my understanding that the correct way to repair a punctured tire is to both plug and patch. Any comments?

Sounds like something Jethro would do. "Two naught must be better then naught!"

Haha.

Short answer is no. Long answer is a proper tire patch has a plug built into it.
 

eddyyy302

Well-known member
Joined
Jan 14, 2009
Messages
415
Location
North Jersey
Well, if I were you, go buy a lottery ticket tonight! He came home directly from school, and his GF has a night class or something so he will be here all night, and helped me get it setup for a couple of pics! :thumbup:

The bottom from a "Plan view"

attachment.php


From the side
attachment.php


And in case you were interested, the top of the post:

attachment.php


If I were building or rebuilding from scratch, I would do the following:

make the top post extendable (sliding tubes and pins...), so wider wheels could be accommodated if needed. The top lever adjustments are somewhat useful, but I will often use that just to get a better "bite" on a reluctant bead/rim.

The "rim hook" on the bottom rail, I'd also make that adjustable, (Sliding U channel over the bottom rail and again a pin...) and make a couple, one taller to go through alloy rims, "Holes" and possibly even cover it with some hose so it does not scratch.

Finally keep a scrap of carpeting around to lay over the base for when you have to lay an alloy rim face down.

:beer:

Thank YOU soo much! I literally have everything down to the weld mounting the upright to the base. I have seen plenty of bead breakers, but yours is the first that resembles mine. I will likely make a base very similar to yours from scrap I have laying around and weld it all together. The breaker cost me $1, so hopefully that will be all I have in it!

Thanks again,
Dan
 

davesnothere

Well-known member
Joined
Nov 1, 2010
Messages
3,764
Location
phoenix, az
Man, I guess I really take advantage of the tire machine and balancer at the shop. Wouldn't even think of patching a tire without one.
 

Griff93

Well-known member
Joined
Jul 25, 2009
Messages
1,121
Location
Huntsville, AL
I much prefer plug patches to just about anything else when fixing a tire. I have done several on my wife's jeep that have held up to years of riding in the mountains with about 8 lbs of air in the tires. A high lift jack under the bumper of a full sized truck works well as a bead breaker if you don't have one. I've changed dozens of tires this way. I need to score a balancer. I have actually seen diesel techs race changing tires. The guys were down to about 1:20/tire. That's when you know you have changed too many by hand.
 

Stick

Well-known member
Joined
Dec 12, 2007
Messages
2,302
Location
Alaska
It's my understanding that the correct way to repair a punctured tire is to both plug and patch. Any comments?

That one I've NEVER seen or heard of. :headscrat

According to the Rubber Manufacturer's Association and most tire manufacturers, a proper tire repair needs to have the hole in the tire both *plugged and patched*. They even produce wall charts that show the exact procedures you need to follow. (PDF file)

Considering most of our light duty fleet at work is emergency equipment, proper tire repair is a must, especially if you are talking about speed rated tires like on a police vehicle. Not to mention the liability involved with improper tire repair and the recent lawsuit that was settled for $14.4 million dollars. Seems that poor Mossy Ford has set a precedent for monetary damages resulting in injuries from improper tire repair.

Now how you plug/patch is up to you, but we use these nifty one piece plug/patch combos that Rema TipTop sells. Every damaged tire in our shop is broken down and demounted to check for damage, and then repaired or replaced accordingly. In the last three months, out of fifteen damaged tires I demounted, four of them were damaged beyond repair. Simply plugging the tire would not have found damaged cords or sidewalls that had started to come apart.

So anyway, some of you guys can plug tires if you want, but I'll stick with what I consider a proper repair.
 
To avoid these ads, REGISTER NOW!
Top Bottom