Outlawmws
Well-known member
And patch them too! 
We picked up a flat, so my son was getting some additional tire repair practice and training this AM, so we broke out the tire tools and I thought I'd show them in action...
Not really that many tools needed, and it's really not that hard once you know a couple of tricks and have the right tools, which don't have to be expensive!
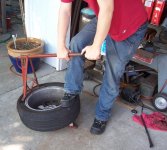
Step 1; Breaking the bead. be sure to let the air out first by removing the valve stem core. This can also be done with a bead breaker from HF, or a tire hammer, but I don't recommend that unless you are already expert, especially with an alloy rim... My breaker is probably older than I am...
Also, don't forget to break both sides.
Note! before breaking the bead, mark where the tire stem is on the tire (Lumber crayon) This allows you to remount the tire in the same position and for a patch job like this, re-balancing should not be needed...

Get your back into it Justin!

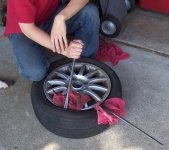
Step two is roiling the tire off the rim. The trick here is to get the tire bead DEEP into the rim "well"; This well is usually towards the outside of the rim, but a few rims have the well offset to the inside...
I like to use three spoons (Since I have them), as it's easier to pull the middle one out. It can be done with two however. Also wet the rubber tire bead with a liquid spray soap; 409, or simple green work fine.

After the first bead is off, you can completely remove the tire from the rim if you want (we didn't need to here) I will use one spoon, lever it under the inside bead from the back of the rim and lever that HARD over so the tire actually collapses. This exposes the rim a bit and I use a heavy rawhide Hammer (Steel Body, 3 lb..) to hit the tire bead next to the rim. a few whacks and the tire will soon be past full tension and the rim will likely pop out, or can be easily tugged out.
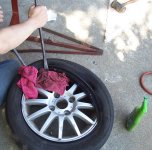
I do nearly the same getting the first bead over when reinstalling, but without any need for a sppon. The second bead however needs more spoon work (See below).
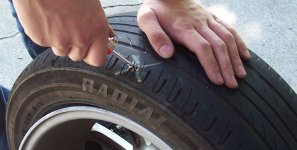
This was the nasty culprit!

Step 3 is taking out the "object" and it screwed right out. usually I'm using vise grips to get a nail out...
It turned out to be a sheet rock screw, so this may have been self inflicted, as we use them a lot around here for many things...

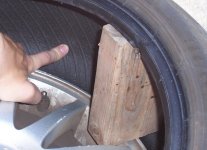
We always mark it on the outside so we can find the hole on the inside as sometimes its hard to spot. A short piece of 2x4 comes in handy to keep the tire spread for easy working access.

The next steps are to:
Step five is to get the tire back on. again, the key is to get the tire edge deep into the "well" in the rim.

After that, align the tire to the stem again, and air it up. setting the bead on some tires, especially larger truck tires can be tedious., but it is doable.
Verify the patch actually sealed the hole, and remount it on the vehicle!
Tools needed for tire removal and re-mounting:
Supplies for patch:
Something to rough up the patch area, and of course, a compressor/tank. (You are unlikely to be able to re-seat a bead with just a small "Coleman" portable type)
We picked up a flat, so my son was getting some additional tire repair practice and training this AM, so we broke out the tire tools and I thought I'd show them in action...
Not really that many tools needed, and it's really not that hard once you know a couple of tricks and have the right tools, which don't have to be expensive!
Step 1; Breaking the bead. be sure to let the air out first by removing the valve stem core. This can also be done with a bead breaker from HF, or a tire hammer, but I don't recommend that unless you are already expert, especially with an alloy rim... My breaker is probably older than I am...
Also, don't forget to break both sides.
Note! before breaking the bead, mark where the tire stem is on the tire (Lumber crayon) This allows you to remount the tire in the same position and for a patch job like this, re-balancing should not be needed...
Get your back into it Justin!
Step two is roiling the tire off the rim. The trick here is to get the tire bead DEEP into the rim "well"; This well is usually towards the outside of the rim, but a few rims have the well offset to the inside...
I like to use three spoons (Since I have them), as it's easier to pull the middle one out. It can be done with two however. Also wet the rubber tire bead with a liquid spray soap; 409, or simple green work fine.
After the first bead is off, you can completely remove the tire from the rim if you want (we didn't need to here) I will use one spoon, lever it under the inside bead from the back of the rim and lever that HARD over so the tire actually collapses. This exposes the rim a bit and I use a heavy rawhide Hammer (Steel Body, 3 lb..) to hit the tire bead next to the rim. a few whacks and the tire will soon be past full tension and the rim will likely pop out, or can be easily tugged out.
I do nearly the same getting the first bead over when reinstalling, but without any need for a sppon. The second bead however needs more spoon work (See below).
This was the nasty culprit!
Step 3 is taking out the "object" and it screwed right out. usually I'm using vise grips to get a nail out...
It turned out to be a sheet rock screw, so this may have been self inflicted, as we use them a lot around here for many things...
We always mark it on the outside so we can find the hole on the inside as sometimes its hard to spot. A short piece of 2x4 comes in handy to keep the tire spread for easy working access.
The next steps are to:
- clean the tire mold release off the area with 90% Isoprop alcohol, and to rough the surface where the patch will go. I use an air die grinder with a rounded stone, but coarse sand paper will also work.
- Goop the area with tire patch cement
- and after the rubber cement dries a bit, apply the "self" adhesive patch. My patch roller went missing so we substituted a screen door bead roller.
Step five is to get the tire back on. again, the key is to get the tire edge deep into the "well" in the rim.
After that, align the tire to the stem again, and air it up. setting the bead on some tires, especially larger truck tires can be tedious., but it is doable.
Verify the patch actually sealed the hole, and remount it on the vehicle!
Tools needed for tire removal and re-mounting:
- 2 (or 3) tire spoons
- Bead breaker (HF sells one)
- Valve stem removal tool
- Lubricant for the rubber, to ease getting it on and off.
- Heavy rawhide hammer for some things.

- tire spreader (Short 2x4)
Supplies for patch:
- Rubber cement (use the stuff for tire patches, not the office stuff)
- Self adhesive patch suitably sized for the damage (Sometimes you have several holes and the patch need to be bigger)
Something to rough up the patch area, and of course, a compressor/tank. (You are unlikely to be able to re-seat a bead with just a small "Coleman" portable type)
Attachments
-
 Breaking the bead loose sm.jpg142.6 KB · Views: 913
 -
 Getting it back on sm.jpg145.2 KB · Views: 901
 -
 Right there sm.jpg124.6 KB · Views: 914
 -
 Screwed right out.jpg110.3 KB · Views: 903
 -
 The culpirt.jpg138.8 KB · Views: 903
 -
 Rolling the tire off the rim sm.jpg132.4 KB · Views: 908
 -
 Put some weight into it justin! sm.jpg141.3 KB · Views: 909
Last edited: