To avoid these ads, REGISTER NOW!

Between 265 & 485 SQ/FT 1950s Craftsman Garage retro remodel

Workspaces sized between 265 and 485 squarefeet.
To avoid these ads, REGISTER NOW!

Jack Olsen

Super Moderator
Staff member
Joined
Mar 22, 2009
Messages
6,678
Location
Los Angeles
Congrats on the flooring win, Dave. That's huge! And as a writer, I've got to congratulate you on winning the contest with an essay. (Also speaking as a writer, I want to thank you for dropping the apostrophe from your logo. Looks much better.)
 

flybefree

Well-known member
Joined
May 18, 2008
Messages
1,111
Location
Ohio/Kentucky
Dave, speaking as a reader...I have no idea what on earth you were writing about...but CONGRATS! (Insert smiley face here)

Shaun
 

Omphaloskeptic

Well-known member
Joined
Oct 11, 2008
Messages
2,346
Location
Ultima Ratio, Wa.
Dave, speaking as another contestant, congratulations on the win; however, Millicent MacGyver may never get over it. This could end her mud wrestling career! LOL
 
OP
R

Red Leader

Well-known member
Joined
May 15, 2011
Messages
2,689
Location
Denver, CO
Thanks guys, I really appreciate your congrats and support. This will definitely transform the 50s Craftsman Garage.

I am going to try to call Epoxy-Coat on Monday to discus what I'd like to do with the floor (checker pattern and border) along with some special needs/circumstances of the garage, such as the larger cracks and uneven-ness in the concrete.

Who knows, maybe this winter/next spring will be some good down time to grind the floor. Here is my never ending list of epoxy floor questions.

1. How long can I wait between prepping the floor (acid or grinding) and the actual application of the epoxy.

2. Should I mix with a drill and risk bubbles or mix slowly with a stick and risk a not thorough mix?

3. Can I grind and apply the epoxy to one side only so that I can story everything on the other side and when its dry just switch? (I don't really have the ability to move things out for 5 days)

4. Is it better to apply with a squeegee thing or a roller brush?

5. Do you epoxy just up to where the weather strip is? Or where the weather strip covers?

6. Do you have to power wash the floor after you grind it?

7. One spot of concrete is about 1/4" higher than the rest - is it possible to grind that down with a diamond grinding cup or do I need something more heavy duty?

I've got a ton more questions, but that is what I can think of off the top of my head.

Since the weather is starting to turn, I'll probably tackle this project when the weather starts turning around in the spring/summer of 2012.
 
OP
R

Red Leader

Well-known member
Joined
May 15, 2011
Messages
2,689
Location
Denver, CO
RL,

Our openers are different so take this for what its worth.

That bolt is the ultimate stop and it merely protects the motor head against over-travel. There are normally limit switch screw adjusters inside the motor housing that are intended to stop the traveler at the proper time, up and down. If it's hitting that bolt, the limit switches are out of adjustment and the motor head is now relying on the torque limiting feature to shut things down - not really a good thing. That is only supposed to be used when something obstructs the door from moving.

Do you have an operator's manual for the door? It will tell you where the adjusters are on the motor head and how to set them. Most are available online if the opener is not too old.

Good luck.

Neither can He! And neither can the rest of us... I agree, great shot!

Dave, mine GDO is also different then yours and it has the limiting sensors that shopnut was talking about. My homework assignment tonight will be to analyze the operational procedures of the actual opening feature of the garage door opener and see what happens. I just thought that when I pushed a button, I got more light and fresh air in the garage.

BTW, what door opener do you have (make, model...)?

Guys, thanks for your thoughts on this. Looks like I've been trying to come up with a solution the wrong way around by trying to adjust the chain and the tracking to get it to open in the right spot. Maybe I'll get a chance to play around with it this weekend. I don't know the exact model, but it is a Craftsman. What coincidence:D

In regards to the flooring contest - they are probably still trying to make the first pass through your story (j/k, of course) :)

Haha
 
OP
R

Red Leader

Well-known member
Joined
May 15, 2011
Messages
2,689
Location
Denver, CO
Dave,

Dumb question...is an Atlas DP made by Craftsman? I am on CL looking...always looking.

Shaun
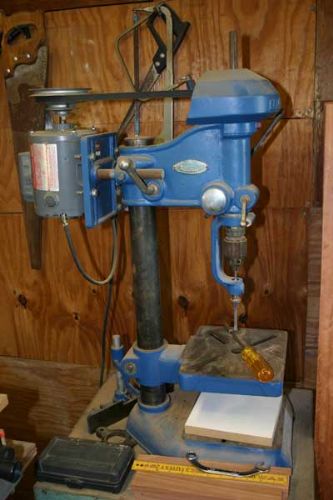
Not a dumb question at all! If you look at all the Craftsman power tool tags, they follow the same format which is:

***.xxxxx

...or something similar. Those first 3 numbers create a code that denotes the manufacturer.

Atlas made tools for Craftsman under the manufacturer code 101. So when you see an old 'Craftsman' badged table saw and you find the tag and is says 101.xxxx that means it was made by Atlas. My drill press was made by Atlas, and pretty much the exact same model was also marketed under Craftsman using slightly different parts:

5630-A.JPG

p5262080.jpg

By daveamy at 2011-05-27

A tool I wouldn't mind having is the Atlas-made 1930s 9" cabinet saw (model # 101.02180):

10261-C.jpg
 

BUGTHUG

Well-known member
Joined
Nov 12, 2010
Messages
2,960
Location
Kansas
OK, on your floor, here is my recomendations. Jack hammer the old floor out and pour new, you will have a much happier outcome. My saying is something FREE always cost you money.
I just painted my floor about 6 months ago, and it was a new floor but the guy who poured it was an amature and cheaper than the others, and of course it had high and low spots and a waste of money and time. I grinded it down the best it could be done, and once the new epoxy paint went on, it magnafied the imperfections by 100.
I'm sure money is an issue , but you won't be sorry on a smooth floor. The epoxy needs to be done all at once for the best looks, but I'm sure you can do in 2 parts if no other way. But its your baby, just my 2 cents.
Back to work.
 
OP
R

Red Leader

Well-known member
Joined
May 15, 2011
Messages
2,689
Location
Denver, CO
OK, on your floor, here is my recomendations. Jack hammer the old floor out and pour new, you will have a much happier outcome. My saying is something FREE always cost you money.
I just painted my floor about 6 months ago, and it was a new floor but the guy who poured it was an amature and cheaper than the others, and of course it had high and low spots and a waste of money and time. I grinded it down the best it could be done, and once the new epoxy paint went on, it magnafied the imperfections by 100.
I'm sure money is an issue , but you won't be sorry on a smooth floor. The epoxy needs to be done all at once for the best looks, but I'm sure you can do in 2 parts if no other way. But its your baby, just my 2 cents.
Back to work.

BUGTHUG,

Thanks for your thoughts and recommendations. I'll have to see if there is a way to get around some of the issues with the concrete. There is no way I'd be able to budget in tearing out the old floor and putting in a new one. However, I don't want it looking terrible, either. I'll get some thoughts from Christine when I call on Monday. It might take a lot of work to get it where I want it, but if it comes down to elbow grease, I can swing it. I hear you though.
 

shopnut

Well-known member
Joined
Feb 22, 2006
Messages
4,237
Location
Florida
RL - concerning the floor epoxy...

I did my own, but it was on a new slab so I'm not much help - there's a whole flooring section I will refer you to that I'm sure you know about. BUT, since I didn't see it in you first list of questions, I thought I would bring it up so you can add it to the all inclusive list.

If doing a checkered pattern, it seems the easiest way to do it is apply a base coat of one color and follow up with the second color on top of the first. This, of course, will require roughly 150% of your actual garage sq footage in raw epoxy material. So you will want to buy the extra material when you order the free stuff.

Applying the colors in two separate patterns of squares could get you close to raw material matching 100% of your floor area, but it will take just a bit more planning/measuring up front.

So you might ask how guys are doing the checkered patterns.

Have fun!
 

Bobcat719

Member
Joined
Nov 15, 2010
Messages
23
Location
Colorado Springs, CO
Congrats on the flooring win! Huge score, to a deserving contestant. The last pics are just great. I have been looking for vintage power tools everywhere now, and I have you to thank. I am not sure what tool to start with, as to my space requirements, but I think that if I find the right one, that I will just change some things around. I am also trying to keep it to a budget, so that is making it a little more difficult. My mom grew up in Athol, Mass, where the Athol vise was made, (also where Starrett's tools are made) so I was thinking about one of those. A guy has one here, it is 4 or 5 inch, and about 60lbs, he wants $135.00, Thoughts???

Congrats again on your big win!
BK
 

Zengineer

Well-known member
Joined
Apr 10, 2010
Messages
781
Location
British Columbia, Canada
A comment RL, have you considered putting some very fine black lines on either side of the painted wall lines? I think you could use 1/8" wide vinyl and it would just make the design "pop" that much more.

As for the floor... you're a glutton for punishment if your planning an epoxy checkered floor!
 

Jack Olsen

Super Moderator
Staff member
Joined
Mar 22, 2009
Messages
6,678
Location
Los Angeles
I've never done epoxy, but what about a 1/4" or so layer of self-leveling concrete?

If I had the photoshop skills, I'd show you what a checkerboard pattern would look like with those walls. I would think about other options that would tie in with the 'look' of the walls.

Can Epoxy-Coat color match? Something as simple as the tan color from the walls might look great with the subtle effect of chips in the teal color. (Two patterns in one room is usually one pattern too many.)
 

rickairmedic

Well-known member
Joined
May 31, 2005
Messages
4,165
Location
louisville ,Ky
I gotta go with JAck on this one I think a nice tan floor with teal chips would work better with what you have than the checkerboard would :D. Dont get me wrong I like checkerboard and have considered doing VCT checkerboard style in my garage buuuut with the metal kitchen cabinets and somewhat of a diner vibe goin in my shop it would work . Your place is more um " classy " and I think the checkerboard pattern would be to busy against the rest of the place.


Rick
 

shopnut

Well-known member
Joined
Feb 22, 2006
Messages
4,237
Location
Florida
What Jack said got me thinking (everyone needs to starting running now! :)).

First off, I'm not an interior designer by any means and I DO like checkered patterns, BUT I think if Epoxy-Coat can match your wall colors, it would look really good having the floor pattern match the walls. What I mean is you would maybe have a one foot perimeter match the lower section of wall and the large middle section would match the upper part of the walls. And, of course, it would include the correct width stripe. This perimeter striping would be much easier to do than a checkered pattern. My $.02.

Alright - maybe I can answer some of your prior questions...

2. Should I mix with a drill and risk bubbles or mix slowly with a stick and risk a not thorough mix?
Our instructions told us to mix for several minutes with a power mixer. You don't really get any bubbles. You want it mixed good so I don't see mixing it by hand being an option.

3. Can I grind and apply the epoxy to one side only so that I can story everything on the other side and when its dry just switch? (I don't really have the ability to move things out for 5 days)
We rolled the Asylum in three big sections - side bay, left main bay, and right main bay. I went first, Mrs. Shopnut did the middle and I followed up with the last section. It was an all-out sprint because once mixed, you need to get it down on the concrete before it starts to thicken (YMMV). Our epoxy dried very quickly and you can see where the overlap of sections is. But you have to look closely to see it, so I don't think this would be a problem for you. I would be more worried about color matching because they say you are supposed to mix all the individual can together because they can vary from can to can.

4. Is it better to apply with a squeegee thing or a roller brush?
We used a roller and the results were good.

5. Do you epoxy just up to where the weather strip is? Or where the weather strip covers?
We went underneath, but the concrete crew did our door opening a bit different than usual. You should pick the natural break line in your concrete (step down is a good defining line)
 

Jack Olsen

Super Moderator
Staff member
Joined
Mar 22, 2009
Messages
6,678
Location
Los Angeles
Also, by the looks of this picture:

p9164156.jpg


- it appears as though the left-side-of-picture piece hasn't heaved up so much as the right-side-of-picture piece has cracked and sunk down. I think there is a process where you can raise up a sunken piece like that and fill underneath it with pumped-in mix. I've got to emphasize 'think' on that, as I'm not a concrete expert by a long shot, and it might be more expensive to lift the section than it would to just pour some self leveling mix on top of the sunken piece.

Can you take some pictures with a level showing some more details on the mis-matched sections?
 
To avoid these ads, REGISTER NOW!
OP
R

Red Leader

Well-known member
Joined
May 15, 2011
Messages
2,689
Location
Denver, CO
Thanks everyone for your thoughts. I'll definitely re-consider the color of the floor and be thinking about that one. I do like the idea of matching the wall by somehow doing a teal border or stripe near the outside perimeter.

No matter what, I'd have to do it in 2 sections, no question about it. There is no way I'd be able to store the tools outside for more than a day. I could probably get away with doing a border stripe all at once by putting everything in the center of the garage.

Now, about the unevenness, here is what I am working with:

p9164174.jpg

By daveamy at 2011-09-16
p9164173.jpg

By daveamy at 2011-09-16
p9164172.jpg

By daveamy at 2011-09-16
p9164170.jpg

By daveamy at 2011-09-16
p9164166.jpg

By daveamy at 2011-09-16
p9164164.jpg

By daveamy at 2011-09-16
p9164161.jpg

By daveamy at 2011-09-16

Now, keep in mind that these pictures show the absolute worst of it. Still, 1/3" in height difference is pretty big. Now, at the other end of these slabs, they are all pretty even, so it is only in this one corner that it is raised up some.

I don't have the option to do a repour - and if I did, it would defeat the purpose of a free epoxy-coat:D, so that one is out.

There are also the options of the grinding and the concrete patching - I may have to do both.

What I'm thinking is to feather out the grinding to the point where the slabs pretty much line up again (which probably is about 3 feet out on each side from that bad corner). If I take down most of it with the grinding, then I can fill in the cracks with the sikaflex or whatever it is called, then maybe use some mapei quickpatch to smooth out any imperfections. I haven't quite figured out how to balance out the use of the sikaflex and the quickpatch though, since the quickpatch would be the easiest/best way to transition from the higher slab to the lower slab, but I cannot run over expansion joints with it, so I'm stuck right now on how to make those work together. I can't blend them together and compromise the joint, so I'd have to use the sikaflex and then somehow figure out a way to feather the quickpatch up against the sikaflex and then once everything is cured, maybe grind over all of it to smooth out. Any ideas or thoughts?

I know its gonna be tough, but I'm up for a challenge.
 

shopnut

Well-known member
Joined
Feb 22, 2006
Messages
4,237
Location
Florida
No matter what, I'd have to do it in 2 sections, no question about it.
No problem doing it this way, but plan to waste a bit more material. Once part A and B are mixed, it has to be used. Unfortunately, you must tend towards the over-estimating side on what you mix up so you don't run out with 3 sq ft to go. This happens twice now. A two color job will be even more waste. Point is, it's not like regular paint - you can't just put the lid back on what is left over.

Just making sure you think it through good.
 

shopnut

Well-known member
Joined
Feb 22, 2006
Messages
4,237
Location
Florida
I could probably get away with doing a border stripe all at once by putting everything in the center of the garage.
And, if the border stripe is wide enough, it will give you a place to set things while doing the center.

BTW, what is wrong with storing the equipment in the living room for a few days? :)
 
OP
R

Red Leader

Well-known member
Joined
May 15, 2011
Messages
2,689
Location
Denver, CO
EDIT: Nevermind:)

Check it out - it looks like epoxy-coat has a color similar to my walls, called 'Smoke Blue':

http://www.epoxy-coat.com/epoxy_basecoat_colors.php

At least, its as close as I would get. Don't know how much extra it would be since it is a custom color, but I could ether do a blue border + 4" stripe, or just a 4" stripe about 4" away from the border. I bet it would even really use a whole lot. 4" per every 3ft would account for 1 sq foot, and my garage is 19x21. So lets say that is even 19 + 19 + 21 + 21: 80, then 80/3 = 26.6.

So I'd be looking at 27 sq ft of coverage if I wanted to just to the bare minimum stripe.

1.5 gallons of epoxy-coat covers 250 sq ft. If I wanted, lets say, 50 sq ft of the color, it would be 1/5 of the epoxy coat half kit.

I'll try to talk to Christine on Monday to see if I can order epoxy-coat in a smaller quantity than just the half-kit.

Then again, I could just do half-tan, half-blue, and plan on doing the border + stripe and have that combo take up roughly half the floor sq ft. That would probably make things the easiest.

What do ya'll think?

-RL
 
Last edited:

Bob Heine

ALLIANCE MEMBER
Joined
Oct 24, 2009
Messages
10,708
Location
Boca Raton, Florida
Congratulations on winning the contest! Well deserved and it solves the flooring problem.

I did some grinding of the concrete floor inside my house. It was just minor leveling and thinset removal. Still took two days and left a layer of dust on everything but the inside of the refrigerator. It's going to be quite a job getting that floor leveled but if you are going to do it, rent a floor grinder. A unit like this rents for about $75 a day but I'm not sure you can level that large an area in one day.
0320040.jpg


This is my 'inside the bag' (as opposed to outside the box) thought. You have a four section floor with intentional joints along with a couple of unintentional cracks. If you fixed the unintentional cracks and epoxy a four-square pattern with your two colors (NE and SW in green and NW and SE in tan) it wouldn't be overly busy and might hide the floor's unevenness.
 

rickairmedic

Well-known member
Joined
May 31, 2005
Messages
4,165
Location
louisville ,Ky
Dave I like Shopnuts idea of doing the border as wide as your widest machine plus a few inches for tape :D. This would let you move all the machines into the center do the border . Then let it set up and then move all the machines against the walls tape off the border and then do the center .


Rick
 

Bob Heine

ALLIANCE MEMBER
Joined
Oct 24, 2009
Messages
10,708
Location
Boca Raton, Florida
Andy,

Thank you very, very much! I appreciate your compliment! Do you have a build on here? Let me know if you do and I'll check it out!

Andy describes his garage as follows:

"The separate garage is a a simple shoebox, about 7 meters deep and 20 meters wide, built to fit the terrain and the constraints of a built house. The rear consists of glass windows that look out into a small pond and a hill."

Frank Lloyd Wright described the garage at Falling Water in similar terms.

Check out Andy's Modern Garage in Far East:
http://www.garagejournal.com/forum/showthread.php?t=71002
 

shopnut

Well-known member
Joined
Feb 22, 2006
Messages
4,237
Location
Florida
Everyone needs to check out Andy's place when they get a chance - it is simply wonderful!
 

shopnut

Well-known member
Joined
Feb 22, 2006
Messages
4,237
Location
Florida
Dave I like Shopnuts idea of doing the border as wide as your widest machine plus a few inches for tape :D. This would let you move all the machines into the center do the border . Then let it set up and then move all the machines against the walls tape off the border and then do the center .


Rick
You could always make the border a bit smaller if you want by blocking things up enough to allow the roller to pass under one edge of the machine bases. I'm thinking 4x4s would do it, and maybe let you get 8 to 10" closer to the wall with the center color.

Oh wait, you haven't even decided to do this color scheme yet - we're getting ahead our ourselves, aren't we. :)
 

atl_architect

New member
Joined
Sep 12, 2010
Messages
2
Rather than grinding down the high spots, my suggestion is to pour a self-leveling topping over the entire slab and then put the epoxy coating on that. Something like Ardex K 500 would work.

I've used a similar product (Ardex K15) to level concrete so that tile could be installed in a building lobby and it worked great.
 
OP
R

Red Leader

Well-known member
Joined
May 15, 2011
Messages
2,689
Location
Denver, CO
Rather than grinding down the high spots, my suggestion is to pour a self-leveling topping over the entire slab and then put the epoxy coating on that. Something like Ardex K 500 would work.

I've used a similar product (Ardex K15) to level concrete so that tile could be installed in a building lobby and it worked great.

These products look great, but at the end of the day they seem to be extremely expensive as well. With the budget of the garage that I am working with, it would be kind of pointless to get $500 worth of free epoxy just to have to spend $500 on something to go under the concrete.

I don't mind if it takes me a while...I'll go out there and grind a little each day over winter:)

I just need it done on the cheap. Do I need it to be absolutely 100% professional and perfect? No, it will be a working garage. It if is a little un-level, that is okay. If I can get it close to being near flat or blended in so it is real hard to tell, then I'll be okay with it. I figure I'll do the best I can given the budget I have for the floor (right now, pretty much $0 haha) and we'll just see how things progress!

Really, the big question for me is...is it even possible to grind 1/3" off of concrete?:D
 

Omphaloskeptic

Well-known member
Joined
Oct 11, 2008
Messages
2,346
Location
Ultima Ratio, Wa.
Red Leader, good luck on the floor rehab. If it were my garage, I would opt for the KISS approach. I would check the floor for level to see how much slope I was dealing with, and then I would prep the highest section for a layer for self-leveling concrete after rigging some form boards around a section. Do a section at a time, dance the equipment around until all sections are filled to minimize the differences of the existing slab. As far as color/pattern selection, I'd go the path of least hassle. Pick the color closest to the lower wall color and lay it down with no border or pattern. The reason being when a color extends from the floor up the walls, it fools the eye; the space appears much larger than it actually is. Anyway, that my $0.02. Have fun!
 
OP
R

Red Leader

Well-known member
Joined
May 15, 2011
Messages
2,689
Location
Denver, CO
Red Leader, good luck on the floor rehab. If it were my garage, I would opt for the KISS approach. I would check the floor for level to see how much slope I was dealing with, and then I would prep the highest section for a layer for self-leveling concrete after rigging some form boards around a section. Do a section at a time, dance the equipment around until all sections are filled to minimize the differences of the existing slab. As far as color/pattern selection, I'd go the path of least hassle. Pick the color closest to the lower wall color and lay it down with no border or pattern. The reason being when a color extends from the floor up the walls, it fools the eye; the space appears much larger than it actually is. Anyway, that my $0.02. Have fun!

Wait, the highest part with self-leveling concrete? Wouldn't that make the highest part even higher than the low parts?

I might need a picture:D
 

rickairmedic

Well-known member
Joined
May 31, 2005
Messages
4,165
Location
louisville ,Ky
I would say grinding it would be the " cheapest /easiest " way to go . Figure out what the grinder costs per day and then plan for at least a 3 day weekend and grinding every day until done . I will add here you usually have to pay for the cutters for the grinder so find out that cost as well. I would think 1/3" would be doable . Granted you might talk to the crew at epoxycoat as the sikaflex or whatever its called may work to level the joints " close enough for guberment work " :D.


Rick
 

Omphaloskeptic

Well-known member
Joined
Oct 11, 2008
Messages
2,346
Location
Ultima Ratio, Wa.
Red Leader, I suggested beginning with the highest section because I'm assuming that no section is flat and level. By doing the highest section first, you establish the amount all sections must come up to arrive at a flat, level floor. Make sense? I suggest this method to save you an inordinate amount of grinding, which by the way will not be flat and level as you can achieve with a good application of a self-leveling concrete layer. Again, good luck with whatever method you choose.
 
OP
R

Red Leader

Well-known member
Joined
May 15, 2011
Messages
2,689
Location
Denver, CO
...close enough for guberment work " :D.


Rick

Haha I actually laughed out loud at that one. 'Course ya know for that type of work I'd probably have to get a huge prybar and actually lift the highest slab out a few inches higher before it could meet approval:lol_hitti
 
OP
R

Red Leader

Well-known member
Joined
May 15, 2011
Messages
2,689
Location
Denver, CO
Congrats on the flooring win! Huge score, to a deserving contestant. The last pics are just great. I have been looking for vintage power tools everywhere now, and I have you to thank. I am not sure what tool to start with, as to my space requirements, but I think that if I find the right one, that I will just change some things around. I am also trying to keep it to a budget, so that is making it a little more difficult. My mom grew up in Athol, Mass, where the Athol vise was made, (also where Starrett's tools are made) so I was thinking about one of those. A guy has one here, it is 4 or 5 inch, and about 60lbs, he wants $135.00, Thoughts???

Congrats again on your big win!
BK

Thanks Bobcat!

Probably the most used tool in my shop is the table saw - you can rip, crosscut, dado, there is just so much you can do with it. The second would probably be a bandsaw. You can find both types of tools in the vintage arena with small shop footprints. I would recommend a 10" bench saw to start out with, and maybe a 12-14" wood/metal bandsaw.

There are lots of good pickins 'round these parts. I see a LOT of vintage Craftsman table saws. for $50-$100 you could find a relatively complete 1950s 10" table saw, good condition. Don't write these little saws off either - I regularly hear about these little guys (even the smaller 8" saws) building houses for most of their former life. Cabinet saws are a little harder to come by. Then again, if you get involved with other old tool nuts, frequently someone gets a hold of something that they don't need but someone else does. Just today one of the gentleman who came to the old tool gathering was remarking about how he found a few Unisaws a while back at a really good price and knew his neighbor needed a table saw and sold it to him for $100.

I would say that the ability of some of these folks to find/purchase old tools extends FAR beyond my capabilities. My best advice is to start getting active in the community! They are very friendly towards guys like us that are just starting down this path and will probably keep you in mind if they know you need something.


Whoops, I didn't even answer your question. Personally, for me, I would pass on a vice for $135, unless it was a vintage Emmert. Then again, you get some of these old vises (like Parkers and others) that fetch good money. But I don't buy tools primarily to re-sell them. Sometimes the small purchases can be re-sold and that helps with the garage budget, but I don't go looking for tools just to sell them again, so I would buy something if the price to me was worth it. If that was a vice that you had been looking for for years, I'm sure the $135 price tag would be worth it to you.

It is hard to put a value on a lot of these old tools, especially because so many people can either look at them and try and sell them for $800, while the next guy is taking it to the dump, and the next guy is giving it to you for free. Its so all over the place, so it kinda boils down to a personal perspective. Is it worth it to you? If not, keep looking, as there will be more:)
 
Last edited:

rickairmedic

Well-known member
Joined
May 31, 2005
Messages
4,165
Location
louisville ,Ky
Here Dave heres another push for a metal lathe . :D I was playing with the lathe earlier and made a forming die . Not a perfect radius but perty dang close without a ball turning attatchment :D.


Rick
 

Attachments

  • 001.jpg
    001.jpg
    141.3 KB · Views: 61
  • 002.jpg
    002.jpg
    138.7 KB · Views: 58
To avoid these ads, REGISTER NOW!
Top Bottom