To avoid these ads, REGISTER NOW!

Reorganization, it's like a renovation.

Status
Not open for further replies.

Outlawmws

Well-known member
Joined
Aug 9, 2011
Messages
39,236
Location
The Badlands
Looking good Girl.

To have leverage for the wider stuff, you will need some handles. about 30" (How much room from the angle to the floor?) of 3/4 inch pipe on each end at the hinges, so they don't interfere with the materials being bent should do it. On heavy bends you often need two people, one on each side. Otherwise the angle can actually flex and give an uneven bend to the metal.
 
To avoid these ads, REGISTER NOW!
OP
G

GirlnAgarage

Well-known member
Joined
Jan 21, 2011
Messages
4,668
Location
Texas
Good catch. I still need to to put the big handle on there. The table is about 36" tall. I wasn't sure which leg of the angle the handle should be on, the vertical or the horizontal? I was initially thinking the vertical so I have good leverage throughout the bend. I'm a shorty at 5'3" so a lower angle of attack would do me well. Allows me to bend my knees and get my legs under it so I can apply my bigger power. Plus I think applying the torque to the vertical would keep the angle more in tact and not distort it at the attachment point.


What do you think? Am I on the right track?

Oh thinking about a bend in the center of the angle under high stress, do you think a couple gussets would be beneficial?
 

Outlawmws

Well-known member
Joined
Aug 9, 2011
Messages
39,236
Location
The Badlands
Good catch. I still need to to put the big handle on there. The table is about 36" tall. I wasn't sure which leg of the angle the handle should be on, the vertical or the horizontal? I was initially thinking the vertical so I have good leverage throughout the bend. I'm a shorty at 5'3" so a lower angle of attack would do me well. Allows me to bend my knees and get my legs under it so I can apply my bigger power. Plus I think applying the torque to the vertical would keep the angle more in tact and not distort it at the attachment point.


What do you think? Am I on the right track?

Oh thinking about a bend in the center of the angle under high stress, do you think a couple gussets would be beneficial?

In the 'unbent" position, the handles should point down as you suggest. That was why I asked about bench height. Longer is better, (Archimedes lives!).

The gussets are of less issue, and won't really affect twisting. If that is a problem, and you cant get someone to help, boxing in the angle to a full triangle will do more. you don't even have to weld it full length, and inch or weld at each end and about every 8-10 inches or so should do fine.

Watch the angle as you work with it. the twist is a concern if all the leverage is from one side or the other. (So if bending something narrow, place it nearest the handle you are using)

The other possible issue is the center "bowing" while you bend. That is what the Flat "V" and bolt tensioner we discussed earlier is for. You can also stiffen it with a flat plate, if the flat plate in the same plane as the handles, it will resist the bowing effect.

Here is an industrial SM brake; notice the structures we already discussed. The big weights on the upper arms are s to counterbalance the weight of the bending arm structure, and are adjustable up and down so it can be "Tuned" for near static weight for the operator. In use an operator actually pushes on the weight, and not the handles found on smaller brakes. A small brake like yours should not need this unless you get steel crazy on the bending bar.

attachment.php
 

Attachments

  • Dreis-Krump-Brake.jpg
    Dreis-Krump-Brake.jpg
    8.4 KB · Views: 2,826
OP
G

GirlnAgarage

Well-known member
Joined
Jan 21, 2011
Messages
4,668
Location
Texas
Since it's only me out there working I'm leaning towards a handle shaped like this: \_/

I can grab the bar in the center and it will apply the force to both ends of the bending piece. It's a little more material for the handle, but that is what'll do the job right for me. I've got some 3/16" flat strap that I'll put to use if I pin point any twisting in the bender. Hopefully it won't be the case but, nothing that can't be adjusted.

I need to go look at a top tensioner support up close. I understand why its there but I need to go see the little details up close.


I appreciate the thinking on this :beer:
 

Outlawmws

Well-known member
Joined
Aug 9, 2011
Messages
39,236
Location
The Badlands
you are very welcome. Whenever I see someone that really tries, and is willing to work at something, If I can help them with any knowledge I might have on the subject, I like to help them. After all, I learned from others often, or from resources others have documented.

Here is maybe a better pic of the tension adjuster. All it is doing is applying tension to the center and making it so the bending force is in effect, transferred to the corners.


sheetmetal%20brake.jpg
 

Red Leader

Well-known member
Joined
May 15, 2011
Messages
2,689
Location
Denver, CO
The press brake looks so cool...but I have a question...can you stick the piece that you bent in it back in it and take a picture with it? I am SO trying to wrap my head around how you did it, but all I keep thinking is that the hinged part gets in the way of what your trying to bend. I'm sure it works fine, but I'd love to see an action shot.

Sorry...totally selfish posting/question:D
 

rickairmedic

Well-known member
Joined
May 31, 2005
Messages
4,165
Location
louisville ,Ky
Ok Dave just for you :D. You slide the sheet metal under the top piece of angle iron and clamp it down . The bottom piece of angle iron ( with the swoopy handle ) gets lifted up against the sheet metal and as it does it creates the bend in the metal. On these brakes as much as a 90* bend . There are brakes out there that will go past 90* but for simple drawers " boxes " 90* is all you need. Put your left hand pointing up and your right hand pointing out at 90* ( or as close as you can get ) :D. put your wrists together like this . Then bring your right hand up towards your laft " unbending your right wrist and you will see how these brakes work :D.

Rick
 

Red Leader

Well-known member
Joined
May 15, 2011
Messages
2,689
Location
Denver, CO
Ok Dave just for you :D. You slide the sheet metal under the top piece of angle iron and clamp it down . The bottom piece of angle iron ( with the swoopy handle ) gets lifted up against the sheet metal and as it does it creates the bend in the metal. On these brakes as much as a 90* bend . There are brakes out there that will go past 90* but for simple drawers " boxes " 90* is all you need. Put your left hand pointing up and your right hand pointing out at 90* ( or as close as you can get ) :D. put your wrists together like this . Then bring your right hand up towards your laft " unbending your right wrist and you will see how these brakes work :D.

Rick

haha you're a jerk;)

Actually on wikipedia, they have a neat little animation of it. That's when the light bulb went off. But from the pictures, I couldn't tell where you slide the work piece in on her design. I know, totally my issue here:D

EDIT: after looking at her press brake, do you slide the work piece through that little slit where they hinge together?
 
Last edited:

rickairmedic

Well-known member
Joined
May 31, 2005
Messages
4,165
Location
louisville ,Ky
Ok look back at the first picture in post 152 . Theres an extra piece of angle iron laying on the table . Now look at the last picture in post 160 :D. That extra piece of angle iron gets bolted down ontop of the other one thats already bolted to the table . In the case of this brake once you have the metal where you want it between the two pieces bolted to the table . The third piece thst is hinged to the lower piece bolted to the tsble is lifted and makes your bend . I see some spring clamps in Girlngarages future as tightening and loosening those bolts to move the metal is goingto get old quick :D.


Rick
 

Outlawmws

Well-known member
Joined
Aug 9, 2011
Messages
39,236
Location
The Badlands
Ok look back at the first picture in post 152 . Theres an extra piece of angle iron laying on the table . Now look at the last picture in post 160 :D. That extra piece of angle iron gets bolted down ontop of the other one thats already bolted to the table . In the case of this brake once you have the metal where you want it between the two pieces bolted to the table . The third piece thst is hinged to the lower piece bolted to the tsble is lifted and makes your bend . I see some spring clamps in Girlngarages future as tightening and loosening those bolts to move the metal is goingto get old quick :D.


Rick

A nice thought, but it won't work as spring clamps don't have the force required. Even vise grips might be iffy. The metal being bent has to be held vise tight. They use a cam clamp with long handles on "real" brakes, and those have adjusters for different thicknesses of metal.
 

Outlawmws

Well-known member
Joined
Aug 9, 2011
Messages
39,236
Location
The Badlands
EDIT: after looking at her press brake, do you slide the work piece through that little slit where they hinge together?

Not exactly sure what you are describing but the metal goes in flat (horizontal between the two angles on the bench. The bolts then tighten down on them to clamp the metal. When she lifts on the hinged front angle, it swings the metal up and bends it in the process.
 

rickairmedic

Well-known member
Joined
May 31, 2005
Messages
4,165
Location
louisville ,Ky
I didnt really mean spring clamps so to speak as they wouldnt get things tight enough more like a spring under the bolt heads and permanent handles on the bolt heads so you didnt need a wrench to tighten or loosen them .


Rick
 

Outlawmws

Well-known member
Joined
Aug 9, 2011
Messages
39,236
Location
The Badlands
I didnt really mean spring clamps so to speak as they wouldnt get things tight enough more like a spring under the bolt heads and permanent handles on the bolt heads so you didnt need a wrench to tighten or loosen them .


Rick

Now you are on the right track, only there is no place under the bolts to put a spring.

If there is space, a hole could be drilled outside the bolt and a "spring cup" welded in place capture a spring to do the job, or a larger spring cup could be made so the bolt cleared the ID of the spring and there was a hole in the cup for a longer bolt.
 

Red Leader

Well-known member
Joined
May 15, 2011
Messages
2,689
Location
Denver, CO
I must be a big dummy haha. I understand the concept but I think everything 'clicks' when I see the picture.

Sorry GirlinAGarage for littering your thread with my lack of understanding:lol:
 
OP
G

GirlnAgarage

Well-known member
Joined
Jan 21, 2011
Messages
4,668
Location
Texas
you are very welcome. Whenever I see someone that really tries, and is willing to work at something, If I can help them with any knowledge I might have on the subject, I like to help them. After all, I learned from others often, or from resources others have documented.

Here is maybe a better pic of the tension adjuster. All it is doing is applying tension to the center and making it so the bending force is in effect, transferred to the corners.


sheetmetal%20brake.jpg


Thank you. I guess since I used angle iron sitting on a flat instead of upside down V, I'm not certain where I need to place the support. Does it need to be on the flat? That sounds like a dumb question. :eek: But I drew a picture


The press brake looks so cool...but I have a question...can you stick the piece that you bent in it back in it and take a picture with it? I am SO trying to wrap my head around how you did it, but all I keep thinking is that the hinged part gets in the way of what your trying to bend. I'm sure it works fine, but I'd love to see an action shot.

Sorry...totally selfish posting/question:D

Sure!


Ok look back at the first picture in post 152 . Theres an extra piece of angle iron laying on the table . Now look at the last picture in post 160 :D. That extra piece of angle iron gets bolted down ontop of the other one thats already bolted to the table . In the case of this brake once you have the metal where you want it between the two pieces bolted to the table . The third piece thst is hinged to the lower piece bolted to the tsble is lifted and makes your bend . I see some spring clamps in Girlngarages future as tightening and loosening those bolts to move the metal is goingto get old quick :D.


Rick


Rick, it's scarey how much you can figure out how I'm thinking before I post :p I have been thinking of a method to lift the top plate as a whole to easily and quickly adjust the workpiece underneath. I did think about springs like on a hydraulic mounted brake but like Outlaw said there's not space underneath to do that. So I'm still throwing around "maybe I's" until something sticks as viable. There is room behind the top piece against the vertical leg. I wonder if it would work to use a piece of C channel with the C opening facing the vertical of the top. The Cs would be placed at the ends to correspond with the space already used by the hinges so it doesn't take away useful space). The bottom of the C I'd **** weld to the bottom plate. The top of the C I'd weld to the top plate. In the middle I'd put a guide and a spring like on a hyd. press. IF The top plate actuated up and down smooth and straight it would work. If it does not, no good.


"Hi my name is Simon, and I like to do drawrings."

I think I'm also going to install a second set of threaded bolts to the bottom plate and have them point up and go through the top plate. I can plug weld them to the bottom plate so they don't interfere with the table mount or flatness of the top plate. That way I only need one nut/ratchet on each end instead of a ratchet and a wrench to undo the top plate each time. I also need to modify the bolt holding the plates to the table. One option is to cut the bolt head off and plug weld the bolt in the existing hole, grind it smooth and I'm in business. If I'm creative enough I might be able to use one threaded bolt in each existing hole and not have to drill another set. Think think think think think...

It's likely I'll eventually move this to a stand of its own. Probably when I'm tired of tripping on it, or it taking up an edge of my table or smash my fingers one time to many as I move it around.
 
Last edited:

Outlawmws

Well-known member
Joined
Aug 9, 2011
Messages
39,236
Location
The Badlands
Girl, I think the spring mounted in back like that won't hold the weight of the angle up (Unless its and incredibly powerful spring...) you need a more centered lift. The weight of the angle will lean down and interfere with loading material.

Below is the bolt mounted spring cup I had in mind. some pipe or heavy tubing (check the black pipe ****** rack at the hardware store) a heavy duty washer (you can make your own using a metal cutting hole saw and a drill press. surely you can borrow the use of one?) and whatever piece of scrap the appropriate thickness.

You might also make do with a couple of washers stacked, but if they are galvanized, use some muratic acid (swimming pool acid) to remove the galvanize. (Welding galvanize produces poisonous/toxic gas, and grinding it is not much better...) the resulting remaining acid will be a mix of muratic, and zinc chloride. if you complete the "process", in the acid, (keep aiding galvanize (Parts) until the acid stops reacting) you get only zinc chloride, which is a great soldering acid for copper and brass. (learned this repairing radiators from an old friend)

attachment.php


No need to get fancy for the nut below. make two more of your "leveler" nuts, and use those, down below.

A pair of springs need to be found. I'm assuming your bolts are 1/2" and this is what I have to give as an example. you want the springs to be in tension in the "Clamp open" state, and I'd estimate about 3/8" compression or so should do it, using my springs as an example. If you can't find any locally, and your bolts are 1/2", I'll send you these if you want. They are out of my "spring bin" so won't cost you anything, as they didn't cost me anything either.

attachment.php


For the tension bar, your yellow markup is correct, but do lean it back to the top of the angle as well, and you can tack the tension bolt assy to the angle.

attachment.php


After looking at the other pic I posted, you can use a long bolt with the head cut off, a piece of pipe that is a slip fit to the bolt, threads, and a simple jam nut.

attachment.php
 

Attachments

  • tension bolt.jpg
    tension bolt.jpg
    9.3 KB · Views: 2,713
  • Tens for brake.jpg
    Tens for brake.jpg
    48.3 KB · Views: 2,719
  • Clamp for brake.jpg
    Clamp for brake.jpg
    49.7 KB · Views: 2,720
  • springs.jpg
    springs.jpg
    67.2 KB · Views: 2,717
OP
G

GirlnAgarage

Well-known member
Joined
Jan 21, 2011
Messages
4,668
Location
Texas
Outlaw, the spring and cup looks like a viable idea. I'll go through my garage buckets in the coming days for usable pieces and see what I need to get this implemented. Thanks!
 

Outlawmws

Well-known member
Joined
Aug 9, 2011
Messages
39,236
Location
The Badlands
Ok how about a set of these to take the place of the bolts . This is what I was thinking originaly.


http://www.harborfreight.com/hand-tools/clamps/9-inch-drill-press-locking-clamp-36221.html


Rick

As I mentioned before, I'm not sure you can get enough pressure with Vise Grips. The lever on those is in the 6" range; the cam clamps a commercial brake uses has 1-1/2 to 2 feet, and take some effort even then. GirlnAgarage mentioned using a ratchet wrench. Once those nuts are captured, and there is something lifting the top clamping bar, one to one and a half turns should provide enough clearance assuming a 1/2" bolt with coarse thread.
 
To avoid these ads, REGISTER NOW!
OP
G

GirlnAgarage

Well-known member
Joined
Jan 21, 2011
Messages
4,668
Location
Texas
Worked on the handle today after running to Lowes for some stuff. I used 1/2" black pipe. Maybe should have gone to 3/4" but think this should work. I went with a 24" length as I just didn't want to reach all the way down to the floor.

Cut and welded up the center piece first. I mitered the corners to 45* and stuck them together. It was my first work with pipe so it was nice to get the corners fit like they did. Welding it was ok, I was hoping for a bit better but it'll work. I'll grind the welds all down once my other stuff from Amazon gets here :bounce:

Next I welded the handle to the bender angle. This was tricky getting in there on the backhand. I think that's the term. But I kept the nozzle stuck in there was able to get the bead complete. They look better than the other two. I got a little undercutting on those. I didn't weld the threaded area because I didn't/couldn't clean out the oil coating in the threads. Didn't want to contaminate that weld so I left it out.


Next I'm working on the piece of strap to run the length of the bender. This will box the angle so it does not twist. Should be strong in conjunction with the four point attachment. I'll stitch weld this in place.

The two outside diagonals need to be mitered and welded into place. Just placed them to show where they'll go.


I had to run out in a hurry, I forgot the dog had a vet appointment. Lost an hour of good work time. But things are coming along.
 

Attachments

  • handle6.jpg
    handle6.jpg
    82.5 KB · Views: 284
  • handle5.jpg
    handle5.jpg
    74.4 KB · Views: 222
  • handle4.jpg
    handle4.jpg
    69.4 KB · Views: 218
  • handle3.jpg
    handle3.jpg
    70 KB · Views: 230
  • handle2.jpg
    handle2.jpg
    72.3 KB · Views: 241
  • handle1.jpg
    handle1.jpg
    82.6 KB · Views: 275
Last edited:

rickairmedic

Well-known member
Joined
May 31, 2005
Messages
4,165
Location
louisville ,Ky
Looking good . On the threads just hit them with a little brake cleaner " outside " and then rinse them off and dry before bringing them inside to weld . Brake cleaner and welding dont mix thats why you want to rinse them off with water and dry before bringing them inside .


Rick
 

couchmechanic

Well-known member
Joined
Jul 29, 2011
Messages
104
Location
Bakersfield
That is one awesome Pan Brake you have there! Do you have plans that you are using to construct it? Or, is it an invention of necessity?
 
OP
G

GirlnAgarage

Well-known member
Joined
Jan 21, 2011
Messages
4,668
Location
Texas
Looking good . On the threads just hit them with a little brake cleaner " outside " and then rinse them off and dry before bringing them inside to weld . Brake cleaner and welding dont mix thats why you want to rinse them off with water and dry before bringing them inside .


Rick


Thanks Rick. Wasn't sure what chemical I'd need to strip the stuff (something easy to spray or an acid I'd have suit up for).


That is one awesome Pan Brake you have there! Do you have plans that you are using to construct it? Or, is it an invention of necessity?

Thanks :thumbup: I'm using other breaks I've seen online as my guide. As for necessity, yes and no. I need it to build my drawers on my workbench, which I wanted to put up in the garage :D After building the drawers I'm sure I'll build more things. I've already got a few other projects in mind after this.
 

Outlawmws

Well-known member
Joined
Aug 9, 2011
Messages
39,236
Location
The Badlands
I wouldn't worry overmuch on not getting the threaded section welded, as in this application it would add almost nothing to the strength of the weld joint. Probably 90% of the strain will be taken by the first 1/4" or so of weld nearest the edge of the angle.

Edit: A weld from the bottom of the pipe to the edge of the angle would be the most significant improvement to the structure you could do, but probably not absolutely needed.

As always, you are doing great! The welds look good! Is your welder 120 or 220?
 
Last edited:

Outlawmws

Well-known member
Joined
Aug 9, 2011
Messages
39,236
Location
The Badlands
Girl,

I was thinking about your earlier comment about using a dremel for your grinding, and something that might have a little more power, but still be manageable with one hand might be the new generation of oscillating sanding/cutting tools. I'm seeing weights of only 2 lb's or so.

You would want one with blades and pads capable of dealing with steel, but I think some have that capability:

http://www.google.com/#q=Oscillatin...gc.r_pw.&fp=2630853df75badfa&biw=1366&bih=601
 
OP
G

GirlnAgarage

Well-known member
Joined
Jan 21, 2011
Messages
4,668
Location
Texas
Now that I got the strap welded in place, I don't feel like putting on the diagonals


These were the welds I really wanted to get in. Not as nice as the first pipe welds (spool issues)


Some of these were run really cold n' fast due to switching spools. Couldn't lay it down like I wanted. I ran out of my 1lb spool and my machine won't run the 10lb (even though it fits). So halfway through welding this ******** I swap out to the 10lb and decide to run it if I can at least keep the bacon frying. I was mostly able to do that (but dropped my duty cycle way down and you could tell in how it fed too). Layed 'ok' bead at the beginning of duty cycle but the wfs was too fast once the duty cycle dropped off. Not enough heat and too much wfs gave me wire popping, which was my sign to stop the bead to let the machine rest. Even with wfs adjustments the machine won't regulate it, the drivers can't handle the weight of the 10lb roll. Anyway, good enough for govt work. I'll transfer more wire to my 1lb spool. I just wanted to finish this now and make the brake useable.


Next order of business, double check my sheet metal measurements and go for the cuts. I grabbed two Dewalt 6" abrasive cutting discs to run in my circular saw (takes 7 1/4" blades but the smaller 6" should give me a little more rpm). We'll see how that goes. I know abrasive discs are frowned upon in circ saws, especially wood saw since the metal dusts gets in the important parts and kills the saw. But I'm running a cheap $29 Skil saw from Lowes (which btw is now $39 new). If it dies I'm going to bite the bullet and buy an Evolution do-it-all circ saw. If my Skil saw lives, I'll be impressed and won't have to buy a new saw and I'll get my project done.


Outlaw, appreciate the suggestions. For light coating I have been using my little B&D Mouse orbital. That's a good little sander. For prepping parts for weld I use the edge of an EZ cutting disc in the way you'd use an angle grinder. It does a pretty good job beveling edges too. That order I have on the way from Amazon is a bulk pack of EZ lock cutting discs, the right angle attachment and a couple of the EZ lock grinding discs (two for $11!!!! They better be worth it or I'm staying with the cutting discs for grinding). I'm excited to try this stuff out. I have in my mind how I think they should perform. I'm going to be real disappointed if they don't. I'm just using a 110v Lincoln WeldPak so I'm in way over the capabilities with it on this project. The only consolation is I'm joining the pipe which is lighter than my angle so I can really burn into the angle and not worry too much about warpage. I want a 220v MIG/FC but for now I'm making due with my stick and the small 110v. I am noticing the progress in skill though, in all my metal work stuff. Especially this project I'm being smarter and using the tools I do have a little more efficiently. I'm pleased about that.

This one has been the workhorse cutting everything
 

Attachments

  • Ridgid Fuego.jpg
    Ridgid Fuego.jpg
    65.6 KB · Views: 260
  • strap2.jpg
    strap2.jpg
    62.9 KB · Views: 263
  • strap1.jpg
    strap1.jpg
    55.6 KB · Views: 283
  • Press Brake96.jpg
    Press Brake96.jpg
    75.3 KB · Views: 318
  • Press Brake95.jpg
    Press Brake95.jpg
    62.7 KB · Views: 338
Last edited:
OP
G

GirlnAgarage

Well-known member
Joined
Jan 21, 2011
Messages
4,668
Location
Texas
Here's the plans for cutting my sheet metal today. Gonna stack 'em, run cuts and see what happens.
 

Attachments

  • sheetmetalplans.jpg
    sheetmetalplans.jpg
    63.5 KB · Views: 143
Last edited:

Outlawmws

Well-known member
Joined
Aug 9, 2011
Messages
39,236
Location
The Badlands
Before you cut, since you are stacking them, use a couple of 2x4's or angles and a couple of vise rips or C-Clamps to keep the stack from rattling and shifting. you might also be able to use the "bar clamps" as a cutting guide.

Where are you bend lines going to be? (Measure twice, cut once...)
 
OP
G

GirlnAgarage

Well-known member
Joined
Jan 21, 2011
Messages
4,668
Location
Texas
Ok, got six of the ten drawers cut from the main sheet. Boy that was a workout and I adjusted a few things along the way. My neighbor came over with her beer and wanted to chat just when I got on my roll so lost some work time. (Gah, its always something, isn't it?).

I started out jigged up like this with the sheets stacked. I made the first cross cut and it took for-freakin'-ever and the blade & workpiece got kinda hot...and mostly took forever and was a lot of work.

So I uncomplicated everything after I wised up, kept two 2x4s, unstacked the sheets. Much better cuts. Faster, easier, good.


I found the 16ga sheet does not vibrate or move too much when it is cut. I kept the cut pieces as level as I could so the edges wouldn't move around up or down and rub on the blade, but other than that, it wasn't hard to keep it still at all.


The lure of attempting a 30" piece was too much. So I stuck it in the brake.


No go. Probably could have broken something if I hadn't have lifted the workbench. Got to love good squat technique. Looks like I need to groove my bend lines.

Walked the piece over and gave it an ugly run with the circ saw; a crude groove. A few bends to walk it up and it went. 16ga is the max that will FIT since I used the 1/16" bit at the beginning when I spaced my top plate edge (remember that?)


That'll do pig, that'll do. Oh, up to this point the 6" abrasive blade has gone down to 5". The mess was amazing. I'm secretly hoping my Skil saw will die so I can buy an entry level Evolution.


Today I need to cut two more big drawers and the small two. I'd like to clamp a straight edge on each piece and fine finish the edges. Even though I used a jig it isn't 100% straight (way to go me).

I haven't installed any support on that top press brake piece. I was impressed how that one strap did so well on the bender piece to add support I'm thinking I'll do the same/similar on the top piece an lay a piece of angle iron across it (upside down V) and stitch weld it into place. I think the tension idea is just fine but this one I don't have to really cut or fit anything. Just prep my weld spots. lay it down and down. What do you think?
 

Attachments

  • 30bend4.jpg
    30bend4.jpg
    85.1 KB · Views: 231
  • 30bend3.jpg
    30bend3.jpg
    96.4 KB · Views: 225
  • 30bend2.jpg
    30bend2.jpg
    91.8 KB · Views: 226
  • 30bend1.jpg
    30bend1.jpg
    146.2 KB · Views: 228
  • cutting sheet2.jpg
    cutting sheet2.jpg
    64.4 KB · Views: 233
  • cutting sheet1.jpg
    cutting sheet1.jpg
    71.5 KB · Views: 249
  • 30bend5.jpg
    30bend5.jpg
    90.8 KB · Views: 226
Last edited:

Outlawmws

Well-known member
Joined
Aug 9, 2011
Messages
39,236
Location
The Badlands
Looking good! you have done a good job analyzing the different tool limits and adjusting!

On the bend, you may not need to groove it. There are two factors on bending. One, the bend resistance of the metal, and two, FRICTION!

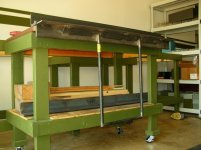
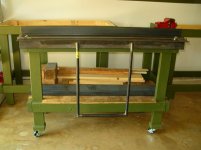
Even on factory made brakes,and even with lighter material, unless the brake is both damn strong and hydraulically powered, you bend and back off, bend and back off, bend and back off, bend and back off... Put some tool boxes or other heavy stuff on the bottom shelf of the bench to help keep it on the ground.

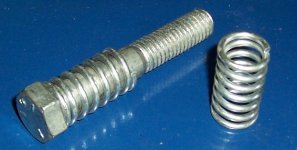
You can also put in two carriage bolt "pins" from the outside and extending inside on the bottom of the legs, drill a couple of matching hols on a piece of scrap 2X4 and stand on it as you lift. If that puts you too far off center, do one on each side, and another cross piece laying on top of the two extenders; that should plant the bench with your own weigh.

The only thing you should have to watch for after that is twisting the bench apart. a couple of 1/4" plywood side on the bench should take care of that as a sheer wall" to keep the frame from flexing.

If it still turns out you have to groove, set up the 2X4 guide, and take the saw's height adjuster and leave it loose. Once you get setup for the "cut" you can use hand pressure to determine the "weight" of he blade, and this should give you more control.

I learned that trick from a mason for cutting a concrete block by taking many passes instead of trying to cut straight through. I did exactly as you are, using a cheap plastic case circular saw and not worrying over much if I wore it out. 23 years later, its still running strong and all I have used in it is abrasive blades, mostly for tile, adobe pavers, etc.

Again, excellent work and looking good!
 

Outlawmws

Well-known member
Joined
Aug 9, 2011
Messages
39,236
Location
The Badlands
SNIP
I haven't installed any support on that top press brake piece. I was impressed how that one strap did so well on the bender piece to add support I'm thinking I'll do the same/similar on the top piece an lay a piece of angle iron across it (upside down V) and stitch weld it into place. I think the tension idea is just fine but this one I don't have to really cut or fit anything. Just prep my weld spots. lay it down and down. What do you think?

If you go that route, use the same diagonal plate technique you used on the bender bar. In my experience, an upside down "V" angle doesn't provide much stiffening. With the narrower plate you used, you would still have room for a tensioner later if you feel the need.
 
OP
G

GirlnAgarage

Well-known member
Joined
Jan 21, 2011
Messages
4,668
Location
Texas
Great feedback Outlaw! I will try that trick with the circ saw and leaving the leveler loose. Also, will do on strapping the top plate and leaving room for the tensioner. I think what will end up happening is I'll run the brake just about as it is (after I get the strap welded in) and finish my drawers. Then once I get the blood lust for my workbench drawers out of the way I will go back and mod the brake. Install those spring for the top plate, get the tensioner in, etc. All those little things that make it swanky you know?

I'm really liking the work right now. I am learning a ton. I've read about the things I'm running into or experiencing but never worked through them. This is cool that I recognize what is happening as I come to it.

Good idea on the 2x4 to keep the bench on the ground. I've been stacking extra stock on the bottom shelf to help add weight. I think what I can do is clear that stuff off and restack the cut sheets down there. Right now they're sitting on top deck which does nothing for weighting where I need it. I can also get my Lyon unit down there. That thing with the drawers in it weights 70lbs alone. I think my squat max is 400lbs and I think my wheels on the bench max at 125lb each so, the limits all crash really close [laugh]

I can smell blood in the water. My bench will have drawers. heeheehee!
 

Outlawmws

Well-known member
Joined
Aug 9, 2011
Messages
39,236
Location
The Badlands
Girl,

I just noticed something in your pics. Roll the brake bench back to the bench in the background. then clamp he lower legs together. This should have the effect of doubling the bench depth for the brake's use, and any weight added to the front brake bench will for practical purposes be multiplied....
 
OP
G

GirlnAgarage

Well-known member
Joined
Jan 21, 2011
Messages
4,668
Location
Texas
Girl,

I just noticed something in your pics. Roll the brake bench back to the bench in the background. then clamp he lower legs together. This should have the effect of doubling the bench depth for the brake's use, and any weight added to the front brake bench will for practical purposes be multiplied....


:thumbup: Will do and all pretty simple too.
 

tinbender 66

Well-known member
Joined
Mar 23, 2011
Messages
2,294
Location
Western Washington State
I've been a sheet metal worker for 30 years and I'm impressed with your creativity and determination. I've always had good equipment at my disposal, from simple hand brakes to CNC monsters. I'm spoiled I guess. I never would have thought to do it like you have.
 
Status
Not open for further replies.
To avoid these ads, REGISTER NOW!
Top Bottom