Wills.WindowsAndWheels
Well-known member
Hey everyone,
I'm pretty new to the forum but and am not sitting with a nice house or garage of my own to share some 'how to' or 'what i did' info with everyone, but i do have a different set of skills that every 'garage guy' would probably be very interested in, so i wanted to 'contribute' to the forum and share some of what i know with everyone.
There is a LOT more to car care than most people realize, so i made this walk through to hopefully shed some light on the potential of your ride
I tried to cover quite a few bases in this write up so it is a little lengthy, but i wanted to be 'detailed' in what i was explaining and hopefully shine a little light onto some techniques ive learned over there years...some are even very simple...that can really make a BIG difference. So...opcorn: ...lets begin
I figured I'd start from the very basics of washing and doing tires etc....and then go into surface prep (clay bar), then paint polishing (swirl removal) and applying your final product (wax or sealant) and then smart things to do to help MAINTAIN that beautiful finish that you just put hours and hours of time into. And of course, there will be pictures oh yes, many pictures :bananaparty: :coool:
So first lets start with the basics - washing - simple right? Well, maybe not SO simple as there are many variables to consider to make sure you're doing the job right.
First off, what products are you using...are you using some dish soap from the kitchen, some old terry towels laying around in the garage to wash with and a big cruddy beach towel to dry off with? Lets look at common sense, you dropped what...25,30,50 THOUSAND dollars or more on your car...I'd say its worth a few extra bucks to get some decent car washing supplies to help preserve your investment.
STEP 1: WASHING
I START WITH TIRES:
The reason I do this is because they are usually pretty nasty and I don't want to wash my car and then go and do the tires and end up slinging the dirt from the RIGHT back onto the paint that I just spent time so carefully cleaning.
There are several good products to use, but for me i like Meguiars All Purpose Cleaner - spray it onto your tires when they are dry and you can literally see the grime/dirt roll off. Be careful not to hit your rims...some chemicals can stain certain types of rims. APC USUALLY is ok on rims, but still be careful. I usually like to use good ole soap and water as even designated rim cleaners often times contain some sort of acids.
Depending on how bad they are you may want either scrub them with a tire brush (the tires not the rims being careful not to hit your rims with the brush), or wipe them down with an old terry towel and then rinse the tire clean. If I do scrub them or wipe them...i prefer to have a bucket of soapy water with me....dunk the brush/towel in the soapy water and then work on the tires. If they aren't horrible, and you keep on top of them - then letting the tire cleaner sit for a minute (not allowing it to dry) and then rinsing clean should be all you need - especially if you're using a pressure washer
Please note when you're finished washing your tires....DUMP THAT DIRTY WATER. You don't want that nasty grungy water anywhere NEAR your paint when you start washing. You'd be surprised how many people will use that same water to wash their paint....this makes me go :jd
TECHNIQUE:
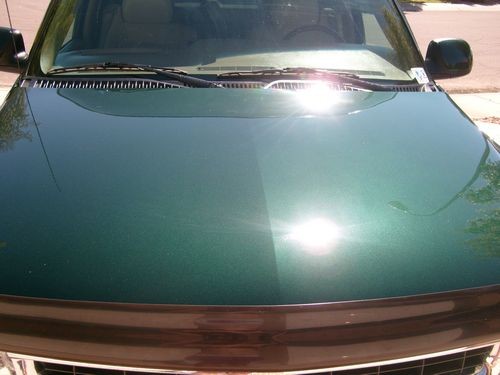
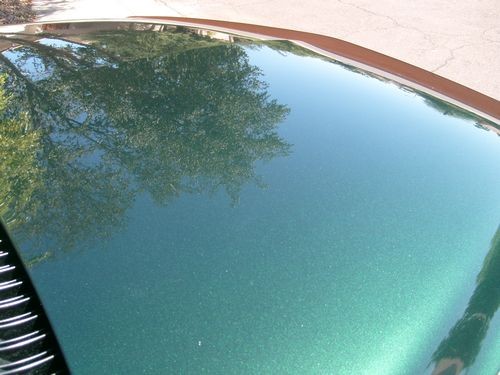
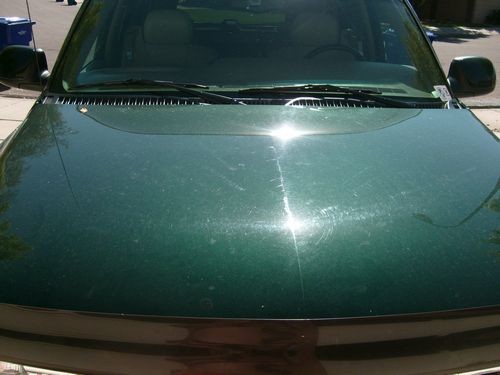
Probably the most important aspect that is the most ignored. A nice warm sunny day out in direct sun washing your car is about one of the worst things you can do - especially in Arizona. We have SUPER hard water in AZ, and once the water evaporates it leaves mineral deposits on your paint they will actually ETCH into your paint if not attended to. That is how you develop 'water spots'...Look to the left of the center of the hood...see the spots that look like rain drops...those are called water spots
Wash in the shade...when your panels are cool and you don't have to rush around like a bat out of hell trying to rinse/wash/rinse again/dry in 8.2 seconds. The cooler...the better.
RINSE the whole car down first. It's best to rinse off all the loose dirt and then wash off the rest that is left over.
Wash top to bottom - Most times where is the dirtiest area of your car? Well usually...unless a few birds had a party on top of your car - it's the bottom where all the dirt and mud and tar fling up to. Start at the top and wash the dirt DOWN the car...and finish by washing the dirtiest area last.
USE TWO BUCKETS - I love this method.
Most people who wash their car do it like this: You have one bucket....wash some dirt off of your car with your mitt - rinse that dirt out into the SAME WATER you're washing with...and then have a nice fresh swirl job on your car because your wash water was filthy.
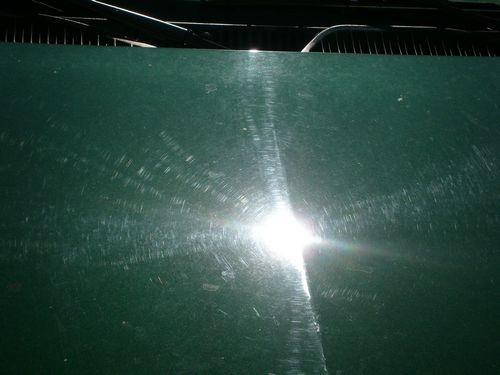
Try this - have one bucket of your nice sudsy soap water...and a second bucket of plain water that you will rinse your mitt in. That way the dirt stays with the dirt and the suds stay with the suds. If your car is extremely dirty...you may even want to change out the rinse water half way through your wash :thumbs
THE SOAP:
You don't want to use dish soap...why? Dish soaps are degreasers - thus it cuts and removes oils. If you have a coat of wax or sealant on your car, what do you think a degreaser will do to it...strip it away! Now, in cases where you are TRYING to strip away old wax and prep the surface, some Dawn soap can be your best friend. But when you are just doing a maintenance wash...use a designated car soap. There are plenty available somewhere as local as a Wally world. Meguiars makes a great over the counter soap called Gold Class. Or you can opt to buy from many of the online detailing stores for more 'professional' products. The main thing you want is for the soap to be mild and slippery...if it's not slippery enough you could just end up dragging dirt across your paint and instilling swirls/scratches all over it.
THE WASHING/DRYING:
There are many different options here, Microfiber mitts, sheep skin mitts and sponges just to name a few. Which to choose? Well really, all can be good choices just as long as they are soft, taken care of and kept CLEAN. If you scrub some tar and bugs and a pound of lovely AZ dirt off your car and then just leave your mitt to dry and go out to use it the next time without having ever cleaned it...all that grime is just going to be rubbed all over your finish...not a good thing!
For drying, personally I don't think you can beat a good soft Microfiber towel. They have a lesser chance of scratching your finish than a terry cloth and hold an abundance of water making your job of drying much easier. Again, quality MF towels are available in places like wally world or target, go on ahead and splurge and get yourself a couple nice ones for your bulk drying - and having a few beat up ones around for doing your rims is always a good idea too, but still keep them as clean as possible, as you don't want to mar your rims either (obviously!). I also like to keep some designated windows MF towels...as I'm sure you all have experienced the frustration of window streaks...if you use a couple clean MF towels to do your windows - and only your windows - I'm sure you'll see an improvement
STEP 2 - SURFACE PREP:
So you have a nice clean ride now but you're feeling ambitious and want to give ole baby a fresh coat of wax. Well you just washed it so it should be ready to lay on a coat of wax, right? Well maybe not. You see some things don't just wash right off. Things like bird dropping, tree sap, industrial fall out or paint over spray will actually BOND to your paint over time. Now you could go over every square inch, scrubbing your brains out and hope this will remove the bonded contaminants - but that isn't exactly 'paint friendly' and plus..your arms would fall off :banghead
This is when we break out the clay bar. This is one of your best friends for surface prep. Using it, along with a detail spray will help you to GENTLY remove those contaminants and greatly minimize your risk or adding more swirls to your paint. There are now also alternatives to actual clay...one being the Hi-Tech Magna Sponge... AutoDetailingSolutions.com sells them...it's a local detaling supply distributor and that is where i get my Magna Sponge from. Clay bars are available again at places like Wally world. The clay is usually smaller but will still work. I think Mothers clay bar kit is pretty decent. Here is an example of what I got off of the surface AFTER washing:
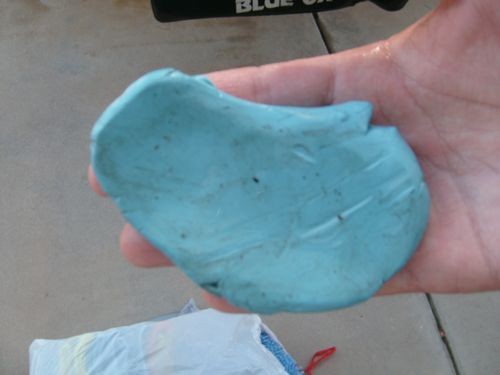
Not pretty right? Imagine if you had been putting a coat of wax on and some of that came off onto your wax pad...and then you ended up dragging it across the entire surface of your car while waxing :facepalm:
I LOVE how the surface of a car feels after claying...it is smooth as glass and a 'must do' before i ever do any polishing or even waxing. The horizontal panels (hood,trunk,roof) are often the worst because the contaminants have a better chance of landing on those surfaces than they do of landing on a vertical surface like a door. Nevertheless, I still recommend doing the ENTIRE car...trust me, it's worth it.
(continued below)
I'm pretty new to the forum but and am not sitting with a nice house or garage of my own to share some 'how to' or 'what i did' info with everyone, but i do have a different set of skills that every 'garage guy' would probably be very interested in, so i wanted to 'contribute' to the forum and share some of what i know with everyone.
There is a LOT more to car care than most people realize, so i made this walk through to hopefully shed some light on the potential of your ride
I tried to cover quite a few bases in this write up so it is a little lengthy, but i wanted to be 'detailed' in what i was explaining and hopefully shine a little light onto some techniques ive learned over there years...some are even very simple...that can really make a BIG difference. So...
opcorn: ...lets beginI figured I'd start from the very basics of washing and doing tires etc....and then go into surface prep (clay bar), then paint polishing (swirl removal) and applying your final product (wax or sealant) and then smart things to do to help MAINTAIN that beautiful finish that you just put hours and hours of time into. And of course, there will be pictures oh yes, many pictures :bananaparty: :coool:
So first lets start with the basics - washing - simple right? Well, maybe not SO simple as there are many variables to consider to make sure you're doing the job right.
First off, what products are you using...are you using some dish soap from the kitchen, some old terry towels laying around in the garage to wash with and a big cruddy beach towel to dry off with? Lets look at common sense, you dropped what...25,30,50 THOUSAND dollars or more on your car...I'd say its worth a few extra bucks to get some decent car washing supplies to help preserve your investment.
STEP 1: WASHING
I START WITH TIRES:
The reason I do this is because they are usually pretty nasty and I don't want to wash my car and then go and do the tires and end up slinging the dirt from the RIGHT back onto the paint that I just spent time so carefully cleaning.
There are several good products to use, but for me i like Meguiars All Purpose Cleaner - spray it onto your tires when they are dry and you can literally see the grime/dirt roll off. Be careful not to hit your rims...some chemicals can stain certain types of rims. APC USUALLY is ok on rims, but still be careful. I usually like to use good ole soap and water as even designated rim cleaners often times contain some sort of acids.
Depending on how bad they are you may want either scrub them with a tire brush (the tires not the rims being careful not to hit your rims with the brush), or wipe them down with an old terry towel and then rinse the tire clean. If I do scrub them or wipe them...i prefer to have a bucket of soapy water with me....dunk the brush/towel in the soapy water and then work on the tires. If they aren't horrible, and you keep on top of them - then letting the tire cleaner sit for a minute (not allowing it to dry) and then rinsing clean should be all you need - especially if you're using a pressure washer
Please note when you're finished washing your tires....DUMP THAT DIRTY WATER. You don't want that nasty grungy water anywhere NEAR your paint when you start washing. You'd be surprised how many people will use that same water to wash their paint....this makes me go :jd
TECHNIQUE:
Probably the most important aspect that is the most ignored. A nice warm sunny day out in direct sun washing your car is about one of the worst things you can do - especially in Arizona. We have SUPER hard water in AZ, and once the water evaporates it leaves mineral deposits on your paint they will actually ETCH into your paint if not attended to. That is how you develop 'water spots'...Look to the left of the center of the hood...see the spots that look like rain drops...those are called water spots
Wash in the shade...when your panels are cool and you don't have to rush around like a bat out of hell trying to rinse/wash/rinse again/dry in 8.2 seconds. The cooler...the better.
RINSE the whole car down first. It's best to rinse off all the loose dirt and then wash off the rest that is left over.
Wash top to bottom - Most times where is the dirtiest area of your car? Well usually...unless a few birds had a party on top of your car - it's the bottom where all the dirt and mud and tar fling up to. Start at the top and wash the dirt DOWN the car...and finish by washing the dirtiest area last.
USE TWO BUCKETS - I love this method.
Most people who wash their car do it like this: You have one bucket....wash some dirt off of your car with your mitt - rinse that dirt out into the SAME WATER you're washing with...and then have a nice fresh swirl job on your car because your wash water was filthy.
Try this - have one bucket of your nice sudsy soap water...and a second bucket of plain water that you will rinse your mitt in. That way the dirt stays with the dirt and the suds stay with the suds. If your car is extremely dirty...you may even want to change out the rinse water half way through your wash :thumbs
THE SOAP:
You don't want to use dish soap...why? Dish soaps are degreasers - thus it cuts and removes oils. If you have a coat of wax or sealant on your car, what do you think a degreaser will do to it...strip it away! Now, in cases where you are TRYING to strip away old wax and prep the surface, some Dawn soap can be your best friend. But when you are just doing a maintenance wash...use a designated car soap. There are plenty available somewhere as local as a Wally world. Meguiars makes a great over the counter soap called Gold Class. Or you can opt to buy from many of the online detailing stores for more 'professional' products. The main thing you want is for the soap to be mild and slippery...if it's not slippery enough you could just end up dragging dirt across your paint and instilling swirls/scratches all over it.
THE WASHING/DRYING:
There are many different options here, Microfiber mitts, sheep skin mitts and sponges just to name a few. Which to choose? Well really, all can be good choices just as long as they are soft, taken care of and kept CLEAN. If you scrub some tar and bugs and a pound of lovely AZ dirt off your car and then just leave your mitt to dry and go out to use it the next time without having ever cleaned it...all that grime is just going to be rubbed all over your finish...not a good thing!
For drying, personally I don't think you can beat a good soft Microfiber towel. They have a lesser chance of scratching your finish than a terry cloth and hold an abundance of water making your job of drying much easier. Again, quality MF towels are available in places like wally world or target, go on ahead and splurge and get yourself a couple nice ones for your bulk drying - and having a few beat up ones around for doing your rims is always a good idea too, but still keep them as clean as possible, as you don't want to mar your rims either (obviously!). I also like to keep some designated windows MF towels...as I'm sure you all have experienced the frustration of window streaks...if you use a couple clean MF towels to do your windows - and only your windows - I'm sure you'll see an improvement
STEP 2 - SURFACE PREP:
So you have a nice clean ride now but you're feeling ambitious and want to give ole baby a fresh coat of wax. Well you just washed it so it should be ready to lay on a coat of wax, right? Well maybe not. You see some things don't just wash right off. Things like bird dropping, tree sap, industrial fall out or paint over spray will actually BOND to your paint over time. Now you could go over every square inch, scrubbing your brains out and hope this will remove the bonded contaminants - but that isn't exactly 'paint friendly' and plus..your arms would fall off :banghead
This is when we break out the clay bar. This is one of your best friends for surface prep. Using it, along with a detail spray will help you to GENTLY remove those contaminants and greatly minimize your risk or adding more swirls to your paint. There are now also alternatives to actual clay...one being the Hi-Tech Magna Sponge... AutoDetailingSolutions.com sells them...it's a local detaling supply distributor and that is where i get my Magna Sponge from. Clay bars are available again at places like Wally world. The clay is usually smaller but will still work. I think Mothers clay bar kit is pretty decent. Here is an example of what I got off of the surface AFTER washing:
Not pretty right? Imagine if you had been putting a coat of wax on and some of that came off onto your wax pad...and then you ended up dragging it across the entire surface of your car while waxing :facepalm:
I LOVE how the surface of a car feels after claying...it is smooth as glass and a 'must do' before i ever do any polishing or even waxing. The horizontal panels (hood,trunk,roof) are often the worst because the contaminants have a better chance of landing on those surfaces than they do of landing on a vertical surface like a door. Nevertheless, I still recommend doing the ENTIRE car...trust me, it's worth it.
(continued below)