To avoid these ads, REGISTER NOW!

Car Detailing - A "How To" write up/walk through WITH PICS

Wills.WindowsAndWheels

Well-known member
Joined
Sep 29, 2011
Messages
348
Location
Gilbert,Az
Hey everyone,

I'm pretty new to the forum but and am not sitting with a nice house or garage of my own to share some 'how to' or 'what i did' info with everyone, but i do have a different set of skills that every 'garage guy' would probably be very interested in, so i wanted to 'contribute' to the forum and share some of what i know with everyone.

There is a LOT more to car care than most people realize, so i made this walk through to hopefully shed some light on the potential of your ride :)


I tried to cover quite a few bases in this write up so it is a little lengthy, but i wanted to be 'detailed' in what i was explaining and hopefully shine a little light onto some techniques ive learned over there years...some are even very simple...that can really make a BIG difference. So... :popcorn: ...lets begin

I figured I'd start from the very basics of washing and doing tires etc....and then go into surface prep (clay bar), then paint polishing (swirl removal) and applying your final product (wax or sealant) and then smart things to do to help MAINTAIN that beautiful finish that you just put hours and hours of time into. And of course, there will be pictures oh yes, many pictures :bananaparty: :coool:

So first lets start with the basics - washing - simple right? Well, maybe not SO simple as there are many variables to consider to make sure you're doing the job right.

First off, what products are you using...are you using some dish soap from the kitchen, some old terry towels laying around in the garage to wash with and a big cruddy beach towel to dry off with? Lets look at common sense, you dropped what...25,30,50 THOUSAND dollars or more on your car...I'd say its worth a few extra bucks to get some decent car washing supplies to help preserve your investment.

STEP 1: WASHING


I START WITH TIRES:

The reason I do this is because they are usually pretty nasty and I don't want to wash my car and then go and do the tires and end up slinging the dirt from the RIGHT back onto the paint that I just spent time so carefully cleaning.

There are several good products to use, but for me i like Meguiars All Purpose Cleaner - spray it onto your tires when they are dry and you can literally see the grime/dirt roll off. Be careful not to hit your rims...some chemicals can stain certain types of rims. APC USUALLY is ok on rims, but still be careful. I usually like to use good ole soap and water as even designated rim cleaners often times contain some sort of acids.

Depending on how bad they are you may want either scrub them with a tire brush (the tires not the rims being careful not to hit your rims with the brush), or wipe them down with an old terry towel and then rinse the tire clean. If I do scrub them or wipe them...i prefer to have a bucket of soapy water with me....dunk the brush/towel in the soapy water and then work on the tires. If they aren't horrible, and you keep on top of them - then letting the tire cleaner sit for a minute (not allowing it to dry) and then rinsing clean should be all you need - especially if you're using a pressure washer :)
Please note when you're finished washing your tires....DUMP THAT DIRTY WATER. You don't want that nasty grungy water anywhere NEAR your paint when you start washing. You'd be surprised how many people will use that same water to wash their paint....this makes me go :jd


TECHNIQUE:

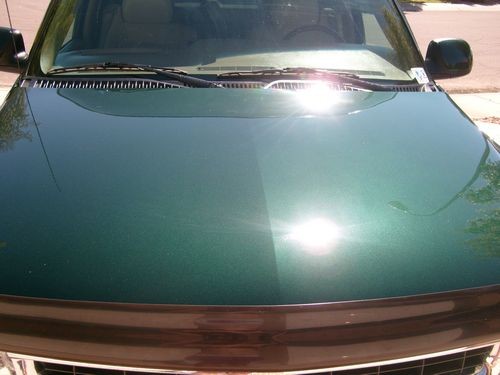
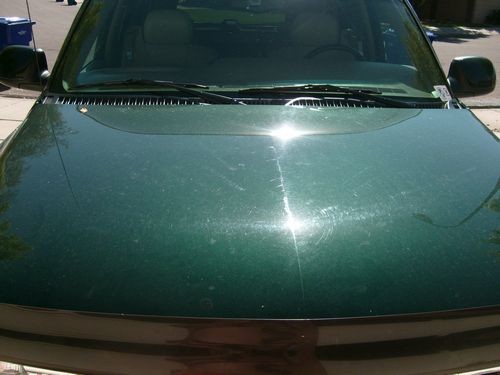
Probably the most important aspect that is the most ignored. A nice warm sunny day out in direct sun washing your car is about one of the worst things you can do - especially in Arizona. We have SUPER hard water in AZ, and once the water evaporates it leaves mineral deposits on your paint they will actually ETCH into your paint if not attended to. That is how you develop 'water spots'...Look to the left of the center of the hood...see the spots that look like rain drops...those are called water spots
Hood_Before2.JPG


Wash in the shade...when your panels are cool and you don't have to rush around like a bat out of hell trying to rinse/wash/rinse again/dry in 8.2 seconds. The cooler...the better.

RINSE the whole car down first. It's best to rinse off all the loose dirt and then wash off the rest that is left over.

Wash top to bottom - Most times where is the dirtiest area of your car? Well usually...unless a few birds had a party on top of your car - it's the bottom where all the dirt and mud and tar fling up to. Start at the top and wash the dirt DOWN the car...and finish by washing the dirtiest area last.

USE TWO BUCKETS - I love this method.

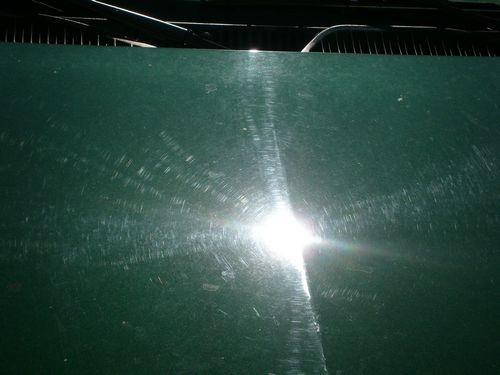
Most people who wash their car do it like this: You have one bucket....wash some dirt off of your car with your mitt - rinse that dirt out into the SAME WATER you're washing with...and then have a nice fresh swirl job on your car because your wash water was filthy.
Hood_Before_2.JPG


Try this - have one bucket of your nice sudsy soap water...and a second bucket of plain water that you will rinse your mitt in. That way the dirt stays with the dirt and the suds stay with the suds. If your car is extremely dirty...you may even want to change out the rinse water half way through your wash :thumbs

THE SOAP:
You don't want to use dish soap...why? Dish soaps are degreasers - thus it cuts and removes oils. If you have a coat of wax or sealant on your car, what do you think a degreaser will do to it...strip it away! Now, in cases where you are TRYING to strip away old wax and prep the surface, some Dawn soap can be your best friend. But when you are just doing a maintenance wash...use a designated car soap. There are plenty available somewhere as local as a Wally world. Meguiars makes a great over the counter soap called Gold Class. Or you can opt to buy from many of the online detailing stores for more 'professional' products. The main thing you want is for the soap to be mild and slippery...if it's not slippery enough you could just end up dragging dirt across your paint and instilling swirls/scratches all over it.

THE WASHING/DRYING:

There are many different options here, Microfiber mitts, sheep skin mitts and sponges just to name a few. Which to choose? Well really, all can be good choices just as long as they are soft, taken care of and kept CLEAN. If you scrub some tar and bugs and a pound of lovely AZ dirt off your car and then just leave your mitt to dry and go out to use it the next time without having ever cleaned it...all that grime is just going to be rubbed all over your finish...not a good thing!

For drying, personally I don't think you can beat a good soft Microfiber towel. They have a lesser chance of scratching your finish than a terry cloth and hold an abundance of water making your job of drying much easier. Again, quality MF towels are available in places like wally world or target, go on ahead and splurge and get yourself a couple nice ones for your bulk drying - and having a few beat up ones around for doing your rims is always a good idea too, but still keep them as clean as possible, as you don't want to mar your rims either (obviously!). I also like to keep some designated windows MF towels...as I'm sure you all have experienced the frustration of window streaks...if you use a couple clean MF towels to do your windows - and only your windows - I'm sure you'll see an improvement :)


STEP 2 - SURFACE PREP:


So you have a nice clean ride now but you're feeling ambitious and want to give ole baby a fresh coat of wax. Well you just washed it so it should be ready to lay on a coat of wax, right? Well maybe not. You see some things don't just wash right off. Things like bird dropping, tree sap, industrial fall out or paint over spray will actually BOND to your paint over time. Now you could go over every square inch, scrubbing your brains out and hope this will remove the bonded contaminants - but that isn't exactly 'paint friendly' and plus..your arms would fall off :banghead

This is when we break out the clay bar. This is one of your best friends for surface prep. Using it, along with a detail spray will help you to GENTLY remove those contaminants and greatly minimize your risk or adding more swirls to your paint. There are now also alternatives to actual clay...one being the Hi-Tech Magna Sponge... AutoDetailingSolutions.com sells them...it's a local detaling supply distributor and that is where i get my Magna Sponge from. Clay bars are available again at places like Wally world. The clay is usually smaller but will still work. I think Mothers clay bar kit is pretty decent. Here is an example of what I got off of the surface AFTER washing:
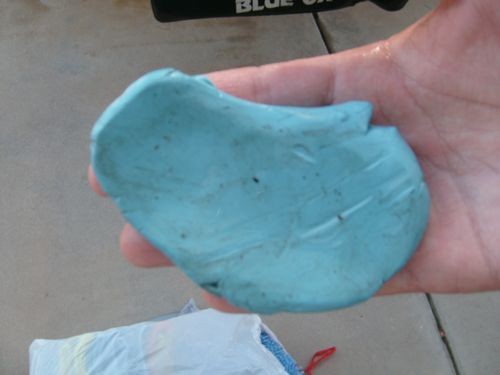
Dirty_Clay.JPG


Not pretty right? Imagine if you had been putting a coat of wax on and some of that came off onto your wax pad...and then you ended up dragging it across the entire surface of your car while waxing :facepalm:

I LOVE how the surface of a car feels after claying...it is smooth as glass and a 'must do' before i ever do any polishing or even waxing. The horizontal panels (hood,trunk,roof) are often the worst because the contaminants have a better chance of landing on those surfaces than they do of landing on a vertical surface like a door. Nevertheless, I still recommend doing the ENTIRE car...trust me, it's worth it.

(continued below)
 
To avoid these ads, REGISTER NOW!
OP
W

Wills.WindowsAndWheels

Well-known member
Joined
Sep 29, 2011
Messages
348
Location
Gilbert,Az

STEP 3: CORRECTION


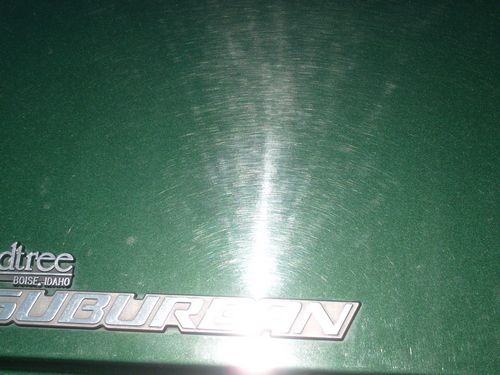
So after claying your car and seeing the horrible swirl marks all over you decide rather than going straight to wax and just having shiny swirls you'd like to get rid of that unsightly horror. Lets first look at what the problem is...what type of defects are we dealing with?

Paint defects come in a few different shapes and sizes and the first step is 'detection'. What I mean by that is, you need to be able to SEE what you're working with, and looking at your car in the shade...or in poor lighting is only going to deceive you in what condition your paint is REALLY in. In order to really see the condition of your paint, DIRECT sun light is best:
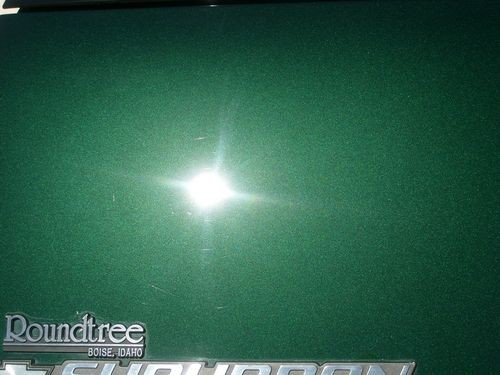
Rear_Before.JPG


As you can see...that paint is horribly swirled. This in the shade would be all but undetectable, but under direct light..well, thats what you get! Now of course the problem is when polishing you should always work in the shade, so the question is how do you get direct light in the shade, can't have sun in there now can you? Well Halogen lights as well as lights such as a Brinkmann Xenon light provide a very bright light that really helps detect swirls:
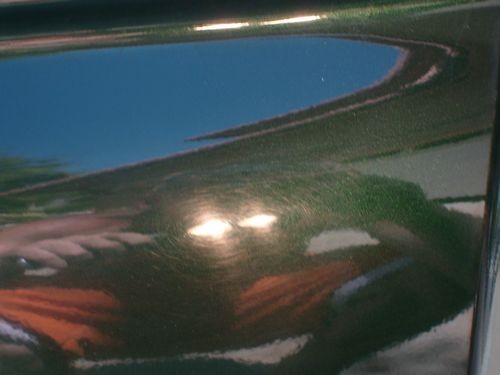
Swirl_Picture.JPG


...swirl marks (as shown above), water spots (as shown above in the hood picture), bird dropping etchings (yes, their 'waste' will actually eat into your paint) and 'buffer trails' or 'holograms', which are rotary marks cause simply by someone using a rotary who doesn't really know what they're doing, are the several types of paint defects that you may come cross. These however, are usually correctable. One of the best visual diagrams I've ever come across to depict these defects can be found here: http://truthindetailing.com/Forum/showthread.php?t=1590

On the other hand there are SOME scratches that may be so deep into the clear that it would not be safe to correct them. Why? Because correcting paint is actually LEVELING the paint. You are actually going to be removing a very small amount of the clear coat to leave it all at the same level. Think of it as a piece of wood that has a scratched up finish. You can either put something in it to fill it, sand it all the way down and refinish it or lightly sand/polish the surrounding finish down to the same level as the scratch. Polishing paint is the same as the last option listed. If the scratch is too deep however, it would be unsafe and foolish to attempt to polish all of the surrounding clear down to the level of the deep scratch, because that would leave ALL of your clear on the thin side.

In cases like this you have a couple options...live with it, try using a product with 'fillers' which will help to hide the defect (not permanently), use some touch up paint (it won't make the scratch look like new but it will look MUCH better) or have the entire panel re-cleared. In some cases the scratches (or rock chips) are so deep they have broken through the clear, to the base coat or even primer...in which case touch up paint or having the panel repainted are really your only options.

The general rule of thumb is, if you can catch your finger nail in the scratch, it's probably too deep to try to safely correct. You can however make it look BETTER.

So...now that we know what we're working with...we have to do something about it. There are several things you will be working with now.

1. Type of polisher/buffer

There are Rotaries such as a Makita 9227, Dewalt 849 or Flex 3404 to name a few, which spin in one direction. They are excellent for defect removal but have a serious learning curve. If you don't know what you're doing with one, you can mar the paint, leave buffer trails or in a really bad case you can actually burn THROUGH the clear and end up with only one option...a repaint.

There are also several 'dual action' polishers. Popular ones are the Porter Cable 7424XP, Meguiars G110, and the Griots Garage DA (dual action) polisher. These are much more user friendly. They rotate, but also oscillate when pressure is applied to it. This makes it much more safe because the oscillating motion will move the pad so that it will not stay in one place long enough to generate enough heat to burn the paint. These are slower than rotaries being that you have to move them slower, but you can surely use them to get excellent correction.

2. Type of pads

There are TONS of pads to choose from. Foam, wool and now even microfiber pads are available, ranging in sizes from 3" all the way up to 8+" wool pads. Personally, 5.5"-6" pads work best for me. You have better control over what you're doing and can concentrate on the area at hand much easier. Foam are the most popular and range from cutting pads (used for compounds), polishing pads (used for finishing polishes, big surprise right?) and finishing pads (used for final waxes or sealants). Wool pads are only used for heavy oxidation and swirl removal. They work quickly to cut the paint but will leave many lighter swirls and will need to be followed up with a foam cutting pad and compound. Microfiber pads are much newer to the market. Meguiars actually has come out with a Dual Action Microfiber SYSTEM featuring MF pads. Surbuff also offers MF pads that work quite well but do leave a slight haze and are best followed up with a designated polish to clear up the haze.


3. Types of product


There are many different compounds (used for heavy swirl/defect removal), polishes (used for light swirl/haze removal) and waxes/sealants (used to protect your paint from UV rays and other harmful contaminants) on the market. Meguiars, Pinnacle, Optimum and Wolfgang to name a few. There are obviously many different types of pad/product combos and it can be confusing on where to start, but it's best to follow the 'least aggressive method' theory.

The lease aggressive method means that...rather than start with the HEAVIEST cutting compound on the HEAVIEST cutting pad and just going at the paint with the biggest guns you've got, it is usually best to start with either a lesser aggressive pad or compound or both. Then, do a TEST SPOT. Do a small 20"x20" section...work that spot and then wipe away the compound/polish and then evaluate your results. If you got good results, then you can pretty much assume that whatever combo you used on that spot, will work on the rest of the car. On the other hand, if it DOES NOT work, it's better to find out NOW, after doing only a small spot, rather than doing the whole car and THEN finding out "oh **** my car still doesn't look as good as i wanted it" :banghead

It is usually smart to TAPE OFF all emblems, plastic or rubber trim due to the fact that polish will stain your rubber trim and is a PAIN to remove and it is an equal PAIN to remove from the small cracks of emblems. (note in the future pictures i removed the tape between photos but when i was actually polishing they were taped up).

(Last Part Below)...
 
Last edited:
OP
W

Wills.WindowsAndWheels

Well-known member
Joined
Sep 29, 2011
Messages
348
Location
Gilbert,Az
In the case of the SUV I've been showing, i went with a Meguiars Polishing pad, using a PC (porter cable) 7424 Dual Action polisher and some Pinnalce XMT Swirl Remover #2. Being that Pinnacles product line ranges from 1-4 in their XMT product line (4 being most aggressive) this is a fairly mild polish being used with a polishing, not a cutting pad. I did a test spot and it came out very well. Typically you would compound (first step), polish (second step) and then wax or seal (Last Step). This customer however only wanted a single polishing pass, as he was trying to sell the SUV and wanted to save money...so I wanted a combo of GOOD correction but with a GOOD, BRIGHT and CLEAR finish as well. A cutting pad and heavy compound will give you good correction, but can leave a slight haze and slightly duller finish compared to what it would look like if you went with a polishing pad, or did an entire second step with a polishing pad and designated polish.

So here is what where were looking at (just as a reminder):
Hood_Before2.JPG


and then, after a single pass, doing about a 20"x20" section at a time and doing 5 to 6 SLOW 'section passes' while applying light to moderate pressure. You want to move at about an inch per second as a baseline for how slow you should move (a section pass is going in a vertical patter across the entire 20", using overlapping passes followed by going in a horizontal pattern using over lapping passes, doing both would count as TWO section passes, hope this isn't confusing) and then wiping the polish away with a clean, soft microfiber cloth (again, using a good towel means the world, if you use something that is cheap or in bad shape, you could THAT QUICKLY put back in swirls you just removed!)
Here were my results:
Hood_After.JPG


As you can see, even with only a single pass, this came VERY close to 100% correction.

Priming your pad is very important. Before you start polishing...apply a good amount of polish evenly ALL over your pad and then use your fingers to gently massage it evenly into the surface of the pad. You don't want to SOAK it but this will help the pad and polish work more evenly. After this, you will only need a small amount of polish (3 or 4 dime size drops) per section pass.

Here is another before and after

Before of the back hatch:
Rear_Before.JPG


After of the same spot:
Rear_After1.JPG


Again, very close to 100% correction, using a DA...and only with a single pass. It takes time and patience (this SUV took close to 9 hours with 2 people working on it, but to be fair we did a basic interior detail and engine detail too...id say out of the 18 man hours 15 were designated to JUST the paint) and concentration but it is worth it in the end.

Cleaning your pad is extremely important. Remember, when you are polishing you are actually removing a very thin layer of paint...this paint is being transferred to your pad. You need to either take a nylon stiff bristle brush, a clean terry towel or a clean MF towel and 'clean on the fly' after every 1 or 2 section passes. This cleans away any oxidation, dried product or removed clear from your pad...so that way you're not dragging it across the paint on the next section you polish.


Step Four: Protection (Wax/Sealant)

This is the fun part. You've just dropped several hours washing, claying and polishing your vehicle. It looks GREAT...and you want it to STAY that way, but it's missing the icing on the cake so to speak.

Again, there are SEVERAL types of waxes and sealant available. Carnauba waxes such as Pinnacle Souvourn Wax or Wolfgang Fuzion provide more of a POP to your finish. These are very expensive waxes but you DONT have to drop $100+ to have a good wax. Meguiars #26 is a very good wax and there are other equivalent waxes available for $20 or less that will last you a very long time. Carnauba waxes are great for show cars or for someone who really wants their ride to blind some people lol :partydance: These Carnauba waxes however usually only provide 2-3 months of protection from UV rays, water spots and other harmful contaminants. (Note that this is not a magic bullet...if you go out and have rain or sprinklers or bird droppings hit your car..and you just LEAVE it, it will eventually eat through your wax and could also etch into your paint, this DOES however give you more time to deal with these contaminants).

Paint sealants such as Meguiars #20 Polymer Paint Sealant or Wolfgang Deep Gloss Paint Sealant are actually SYNTHETIC waxes that typically provide a longer time frame of protection. It WILL also add more pop and gloss to your paint, but not as much as a designated Carnauba wax. Synthetic waxes, aka sealants on as a trade off, provide 5-6 months of protection...sometimes longer.

The other option is to first put on a sealant for long term protection, but then add a layer of Carnauba wax to give it more pop.

Applying a wax or sealant is MUCH MUCH easier than polishing paint.
You only want to apply a thin layer of wax or sealant. You can do this either by hand with a foam or microfiber pad or by DA polisher with a finishing pad. You will want to make much quicker section passes and apply no pressure. You are just SPREADING the wax...remember...it's the icing...you are not longer trying to remove any defects. Some waxes/sealants you should apply one section at a time and then remove, others you should do the entire car and then allow it to sit 45 minutes or so....and then remove it.

You can use wax on paint, chrome, headlights or even emblems...but again STAY AWAY from rubber and plastic trim...as it too will stain it and will cost you more time to remove it.

I use two microfiber towels to remove the wax. I remove it by making a circular motion (wax off Daniel son) over a panel....and then go over it in a back and fourth motion with a second MF towel to remove and left over residue or streaks left. FLIP your towel every panel or two. I fold my Mf towels two times, thus giving me 8 'sides' to work with (hope that isnt' too confusing). That way you have several clean surfaces on one towel to flip to and work with and don't have to worry about smearing removed wax onto a panel you're trying to wipe clean.

MAKE SURE to check all cracks and body lines....waxes LOVE to hide in those areas. If you miss it and have to remove it later it isn't the end of the world, it's just a lot harder to deal with.

LASTLY - MAINTAIN THAT SHINE!

Proper maintenance is very important. Wash your car yourself using the guide lines listed earlier or take it to someone who will (preferably) do a hand wash or a touchless wash. Note these can STILL be problems...even if it's a hand wash the could use bad or dirty washing supplies and a touchless wash often time will use heavy degreasers and can strip away the protection you applied. Tunnel washes are NOT your friend, harsh dirty brushes are sure to mar up your paint in no time. Take the time to tend to it yourself or pay a little extra to someone who will do it RIGHT. This is why many of my customers hire me for at least a monthly maintenance wash as they know I will be extra careful in caring for their car.

Also, products like a spray wax applied after a wash will add a little extra protection and help keep that 'pop' in the paint fresh and glossy. I'd advise AGAINST dusters since they just drag the dust across the surface, however there are products like Optimum No Rinse that is a nice substitute to cars that are dirty but not FILTHY. No hose is needed...you just mix it with water...wash 1 panel at a time...and then wipe it dry and move to the next.

Don't forget, when you've finished with all this work pull it out and enjoy your work....you've earned it. With anything else, practice and experience count for a lot. I've done this many many MANY times and I'm STILL learning, and hopefully always will be :)...and thats the fun part. There of course are many other variables to detailing and this is just general over view but still giving some insight of things ive learned over the years.

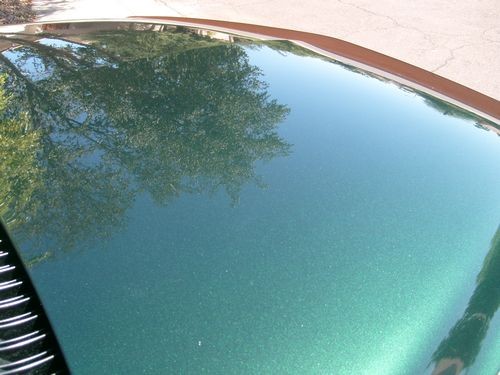
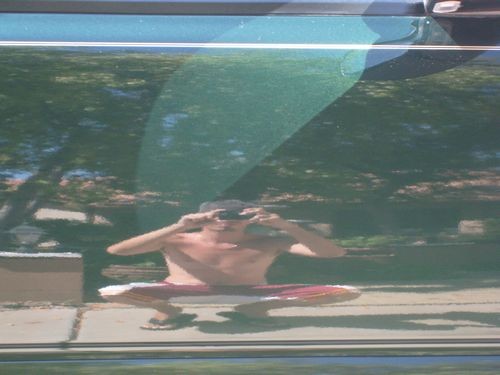
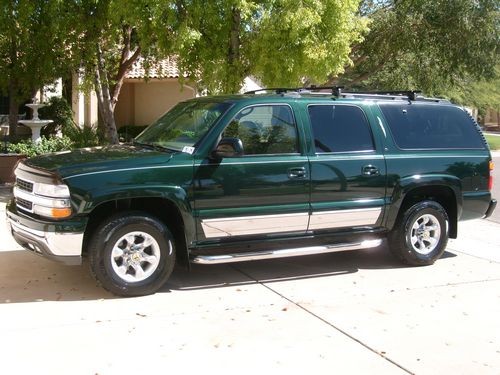
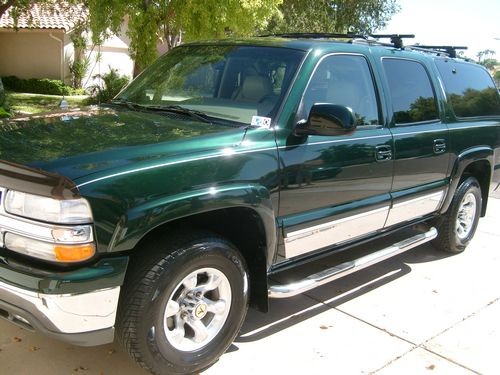
Here are a few more pictures of the Suburban when i was done (by the way i topped it with Meguiars NXT 2.0 AND for a happy ending to this story, the SUV sold 2 weeks later hahaha :thumbs )

Tree_Reflection.JPG

Reflection_Shot_1_.JPG


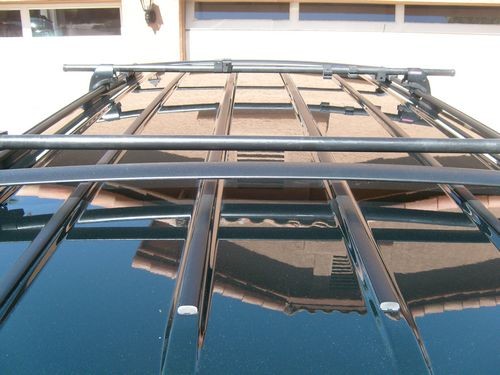
I loved this shot, this roof was a pain to do but came out awesome:
Roof_After.JPG

Driver_Side_After.JPG

Driver_Angle_After.JPG

Back_Angle_After.JPG


So thanks everyone for reading. Questions and comments are SURELY welcome. I love what i do and i love sharing it with others. I hope you enjoyed the write up, and if you did maybe (if prompted to) i could do a few others on things like interiors or engines or headlight restorations etc. I hope that I wasn't too long winded and that it was worth the time you took to read it.

Take care all!
 

Az Scooter

Well-known member
Joined
Dec 30, 2009
Messages
1,500
Well done. I have been where you are in your business. I changed course, because, frankly, I sucked at detailing. I am very good at what I am doing now, though, and much happier.
What part of Gilbert are you in? Do you only do mobile work?
 

thelews

Well-known member
Joined
Nov 19, 2009
Messages
246
Location
Wisconsin
It's worth it to learn how to use a direct drive buffer. Will cut that 9 hours way down.

Nice results, you can do my car anytime.
 
OP
W

Wills.WindowsAndWheels

Well-known member
Joined
Sep 29, 2011
Messages
348
Location
Gilbert,Az
Great thread post. Thanks!

Your welcome, glad you liked the write up...hope it helps you out some :)

Well done. I have been where you are in your business. I changed course, because, frankly, I sucked at detailing. I am very good at what I am doing now, though, and much happier.
What part of Gilbert are you in? Do you only do mobile work?

lol well...to your defense...i do have the advantage of coming along into the detailing world at a time when products are a lot easier to use than back in the day...dont get me wrong, it still takes skill and PATIENCE but tools and products are a little bit better these days than say 10 years ago or more....what is it that you do now anyway?

As far as where in Gilbert I'm at...I'm on the SW side on the border of Chandler. We usually do mobile work since most houses out here have garages and we just bring all of our equipment to the job...we just need a place to hook up our hose and plug in an extension cord...but we have had a couple situations where doing the job at someones house wouldn't work for them so we just come pick the car up, drive it to our house...do our thing and then return it. So if you're interested we can work something out for you either way.

It's worth it to learn how to use a direct drive buffer. Will cut that 9 hours way down.

Nice results, you can do my car anytime.

I know thats true...ive heard many people say learning a rotary really helps cut time with correction...i got myself a Makita a month or so back but haven't had time to practice with it and im NOT going to give it a go on a customers car first lol. The DA has come a long ways with correction ability though, more time yes, but i'd rather spend the extra time to do it the RIGHT way the first time, rather than spend the same amount of time (or more) having to REDO the job because i cause holograms in the paint with a rotary.

If you ever make a road trip down to AZ hit me up :)
 
OP
W

Wills.WindowsAndWheels

Well-known member
Joined
Sep 29, 2011
Messages
348
Location
Gilbert,Az
Hey man, thanks for tips...as a mini-van driving joe I would have no idea how you guys do that.

Shaun


No problem...glad i could offer a little something to the forum :).
And now you DO have an idea as to how we do it...we've even done some mini vans... like the Toyota Sienna Swagger Wagon ! http://www.youtube.com/toyotaUSA/?x=1sienna <<< too funny
 

iron_worker

Well-known member
Joined
Mar 15, 2011
Messages
102
Great post! I would enjoy reading about engine/interior detailing.

I drive an '08 Mitsubishi Lancer Evolution GSR... it's black .. and it drives me crazy! Every bit of dust/dirt shows up and the Brembo brakes PUMP out dust like no other. I try to wash it as much as I can but I don't have a garage space... ( I REALLY want one... hence why I visit this site) so regular hand power washing will have to do for now.

Again, great thread. I enjoyed it a lot. Very informative with great pictures too.

IW
 
OP
W

Wills.WindowsAndWheels

Well-known member
Joined
Sep 29, 2011
Messages
348
Location
Gilbert,Az
Great post! I would enjoy reading about engine/interior detailing.

I drive an '08 Mitsubishi Lancer Evolution GSR... it's black .. and it drives me crazy! Every bit of dust/dirt shows up and the Brembo brakes PUMP out dust like no other. I try to wash it as much as I can but I don't have a garage space... ( I REALLY want one... hence why I visit this site) so regular hand power washing will have to do for now.

Again, great thread. I enjoyed it a lot. Very informative with great pictures too.

IW

I might have a little something to help you out. I really like this product...a little pricey but if you're smart with it it'll last you a long time.

its called Optimum No Rinse. Instead of having to drag out the hose every time the car gets dusty...hose it down...wash it...hose it down again...then dry it and check for runs...ONR (optimum no rinse) is really quick to use.

You just need 2 buckets...a wash mit and a few microfiber towel (the better quality the better the results). Put 2 gallons in one bucket and add an ounce of ONR...then fill your other bucket about 3 gallons up and it will be your rinse water.

Dunk your mit in the ONR bucket, wash a panel...rinse the mit out in the 'rinse water bucket' and then take your MF towels and dry off that panel you just did (i use one MF to bulk dry then a second to pick up any streaks)...and boom, you're done..move to the next panel. Start from the top and work your way down....dont wash a lower section and then go to the top...make sure you always rinse the mit after doing a lower section..and you'll get great results.

If you want a whole kit to get started http://autogeek.commerce-search.net...ww.autogeek.net/optimum-no-rinse-buckets.html

If you want JUST the ONR http://autogeek.commerce-search.net/redirect?url=http://www.autogeek.net/optimum-no-rinse.html

it also comes in a gallon.

what a lot of people do is save the wash water (as long as you dont get it dirty during washing...if you rinse your mit real well then the wash water should stay clean) and use it for a week or two...if you bring the car home and its getting a little dusty...do a quick wipe down...15 min later you're looking like new again.

As for some engine/interior info...i dont have a full 'how to' write up done yet...but here are a couple write ups i did of some details that included engine and interior and it gives a 'general' description of what i did.

http://www.autogeekonline.net/forum/show-n-shine/34892-engine-detail-mercury-grand-marquis.html <Just engine detail

Quick tip...stay away from the alternator and spark plugs when washing the engine down (also any other electrical connections as much as possible, but MOST of all alternator and plugs) I put plastic bags ofter the alternator and fuse box (if its not sealed well) just to be safe. Ive never had a problem but have heard stories of people who HAVE.

For interiors this should give you a little help http://www.autogeekonline.net/forum/show-n-shine/28350-nasty-dodge-durango-interior-lots-pics.html

That was one of the craziest interiors we ever did...look at the link and you'll see...but as a sneak peak...the guy was rebuilding the engine and kept the parts he took out INSIDE the truck lol...so you can imagine how it looked. Ill try to get more of a HOW TO write up done soon
 

cjbcpa

Member
Joined
May 3, 2007
Messages
22
Excellent write-up. Now if I can only find the time to do all that. Goodness knows my cars need it.

One question - How about using compressed air to dry the car? I've never done it but always thought it would be a great way of removing the water and would eliminate the chance of scratching the surface with the dry cloth.

Thanks again.

CB
 

buening

Well-known member
Joined
Dec 17, 2007
Messages
1,338
Location
Decatur, IL
I have a little tip to avoid water spots on a car that has been waxed already. Rather than using the sprayer to rinse the car, take the sprayer nozzle off the hose and let a lot of water flow on the car. The "sheet flow" of the large amount of water will pull most of the remaining droplets with it (with help of the wax) and you will have less drying with a towel when compared to using a sprayer.

Good writeup BTW!
 
OP
W

Wills.WindowsAndWheels

Well-known member
Joined
Sep 29, 2011
Messages
348
Location
Gilbert,Az
Excellent write-up. Now if I can only find the time to do all that. Goodness knows my cars need it.

One question - How about using compressed air to dry the car? I've never done it but always thought it would be a great way of removing the water and would eliminate the chance of scratching the surface with the dry cloth.

Thanks again.

CB

Yes compressed air is a great way to knock some of the water out if you have it available ESPECIALLY in body panel line, handles, tight spaces etc where water builds up and you cant reach with a towel. Then just use a MF to 'dab' it dry or gently move it over the surface.

Or as Buening said just use a straight stream of water without a nozzle on it which is called 'sheeting' the water off. I like it when i have a second person there lol, but if i dont i hate having to turn the water off...take the nozzle off, turn the water back on and do the sheeting, then turn the water back off. Too much back n fourth for me.

Another cool thing to use is leaf blower. There are some 'special' blowers made for detailing, rather pricey, but i think if you get a cheap one for $20 it'll work fine (i have the weedeater one that does great when i need it).

Just be sure to do it all in the shade as always :)

I have a little tip to avoid water spots on a car that has been waxed already. Rather than using the sprayer to rinse the car, take the sprayer nozzle off the hose and let a lot of water flow on the car. The "sheet flow" of the large amount of water will pull most of the remaining droplets with it (with help of the wax) and you will have less drying with a towel when compared to using a sprayer.

Good writeup BTW!

Yes thats a good tip thanks for putting that up :) And glad you liked the write up
 

Lawson4450

Well-known member
Joined
Apr 2, 2010
Messages
419
Location
somerset NJ
not bad im glad you did mention about the two bucket method i would suggest a grit guard in the bucket to keep from swirling dirt around the buckets and getting back on your wash mitts. I do suggest a second wash mitt for the bottom and the pinnacle stuff isnt bad stuff I myself prefer Adams polishes for ease of use and customer service. But this is what I use and in no way will put down anything you use I hope you understand im not bashing. I use the PC and the flex 3401vg and both work great. and arizona is very tough to work in getting a tent or someplace shady is a definate thats for sure.
 
To avoid these ads, REGISTER NOW!

38Chevy454

Well-known member
Joined
Dec 26, 2006
Messages
4,038
Location
Cincinnati, OH
Nice write-up. I really need to do some work on my cars, it is getting winter soon and not good for the work unless it is a warmer day.
 

tuner4life

Well-known member
Joined
Aug 24, 2011
Messages
266
Location
Indiana
Very good write up! I am guilty of "letting my cars go" so to speak. This is motivating me to clean them back up. Thanks!
 

mishenka

Member
Joined
Aug 10, 2011
Messages
19
Very nice write up. Thank you very much! A similar write up along with a very nice and professional products related to car detailing can be found at this website: http://www.detailedimage.com. I am in no way affiliated with it - I only used it recently to buy a bunch of things from them and all I got there helped me greatly in detailing my car.
 

plain2car

Well-known member
Joined
Nov 27, 2008
Messages
514
Location
Gilbert, Arizona
will,
i am wondering if you can do anything about very hard water spots (stains?) in/on glass?? i am in the process of finishing a '72 chevy truck & i tried the headlamp restorer kits to not much improvement :( the door glass & rear glass need to be addressed better.....
any thoughts??

thanks!! (from a fellow gilbertian ?) LOL!!!
 

Az Scooter

Well-known member
Joined
Dec 30, 2009
Messages
1,500
I remember back in the day, I had a minivan to detail. We actually took all of the carpeting out of the mini van and pressure washed it. It was some of the filthiest stuff I have ever seen. You could not even see the nap of the carpeting. It came out good, but stained. It was really gross.
 
OP
W

Wills.WindowsAndWheels

Well-known member
Joined
Sep 29, 2011
Messages
348
Location
Gilbert,Az
not bad im glad you did mention about the two bucket method i would suggest a grit guard in the bucket to keep from swirling dirt around the buckets and getting back on your wash mitts. I do suggest a second wash mitt for the bottom and the pinnacle stuff isnt bad stuff I myself prefer Adams polishes for ease of use and customer service. But this is what I use and in no way will put down anything you use I hope you understand im not bashing. I use the PC and the flex 3401vg and both work great. and arizona is very tough to work in getting a tent or someplace shady is a definate thats for sure.

Since this detail (this was done last year) ive got the 3401 and its a great machine.

Never used Adams so can't say good or bad about it but have seen good work from it. Price is too high for me, Meguiars is my go to for most things.

BTW, got the pop up tent since then too ol :)
 

TheGunCollector

Well-known member
Joined
Nov 24, 2009
Messages
275
What are your thoughts on using a pressure washer?

I think that by using the PW to give the vehicle a good rinsing, before using soap, cuts down on scratches tremendously.

Also, have you used Ziano products? How do you feel about them?

Thanks for the thread - I need to clay bar both my Civic and my F250 - just need to find the time...
 
OP
W

Wills.WindowsAndWheels

Well-known member
Joined
Sep 29, 2011
Messages
348
Location
Gilbert,Az
What are your thoughts on using a pressure washer?

I think that by using the PW to give the vehicle a good rinsing, before using soap, cuts down on scratches tremendously.

Also, have you used Ziano products? How do you feel about them?

Thanks for the thread - I need to clay bar both my Civic and my F250 - just need to find the time...

I absolutely love pressure washing and advise it to anyone who has one. The No Rinse wash is great for touch up if its just lightly dirty or dusty, but if its in bad shape....break out the PW for sure. Rinse it down first...hit the wheel wells and the tight areas mits dont get that well and it does make tings much better.

Ziano ive only used their clay bar once, didnt like it...it would 'stick' to the paint and would leave clay traces that were a bi*** to get off...ive read good stuff about their wax products but never sued them personally.

There is an alternative to claying by using this http://www.autodetailingsolutions.net/bhs-212.html

I like it personally just have to be careful to clean it out if you feel or hear 'dragging'. Ive used it on a number of cars and its still going...can clean it out and saves me # and TIME. Plus clay bars are a pain to remold in cold weather lol...which is unfortunately just around the corner
 

mmarvinn

Member
Joined
Sep 25, 2011
Messages
18
It's really nice of you to share this info. Thanks for taking the time it took to get all the info in writing.
 
OP
W

Wills.WindowsAndWheels

Well-known member
Joined
Sep 29, 2011
Messages
348
Location
Gilbert,Az
Great free advertising, this is all available on Autogeek if you search it.

Really? Yeah this is an nation wide forum and im really gonna pick up a lot of work in state from this huh? Yeah a lot of it is available on autogeek...but how many people on here go on there...or want to search a thousand threads trying to piece together where point A is and where point B is and how to thread it all together? Isn't a simple 'how to' write up easier to understand than having to piece together 20 different threads of scattered info? Don't worry though, i aint mad atcha, your forum name says it all :thumbup:

It's really nice of you to share this info. Thanks for taking the time it took to get all the info in writing.

Glad you enjoyed it and hope it helps (which is the point of this...NOT free advertising)

Put your shirt on.

I was totally naked doing the detail so consider yourself lucky i at least put something on before snapping the pictures...didn't want to embarrass ya :lol:
 
Joined
Jun 30, 2011
Messages
1,080
Location
AZ
Really? Yeah this is an nation wide forum and im really gonna pick up a lot of work in state from this huh? Yeah a lot of it is available on autogeek...but how many people on here go on there...or want to search a thousand threads trying to piece together where point A is and where point B is and how to thread it all together? Isn't a simple 'how to' write up easier to understand than having to piece together 20 different threads of scattered info? Don't worry though, i aint mad atcha, your forum name says it all :thumbup:

Glad you enjoyed it and hope it helps (which is the point of this...NOT free advertising):

I'm a member of lots of forums, I pay to advertise my products on a few myself.

Most forum moderators and site owners frown upon links to your business websites if you're not a paying vendor. I'm not sure what the policies of The Garage Forum are as it pertains to advertising, or what they consider advertising?

If you're not advertising your business or services, then you should have no problem deleting the links to your business website, right? I clicked on it, I'm sure you're logging and tracking hits from this thread right?

I live in AZ so it's small world. There have been some other AZ members in the thread too. So the answer is yes, you could pick up some business from some on this forum. I have purchased a lot of services from businesses in AZ that legitimately advertise in forum's.

And here's the only link someone needs to detail their vehicles. all on one page, excellent detail, been on Autogeek for years. All you have to do is click.

http://www.autogeek.net/detailingtips.html

Good luck with your business, how many vehicles have you done so far? 6 or 7?

Not mad at ya or anything. :beer:
 
Last edited:

djd99

Well-known member
Joined
May 4, 2009
Messages
1,006
Location
Owosso,Michigan
Very nice step by step, definitely worth reading if you never been around detailing. Thanks for all the effort you put into this thread. oh and don't sweat A**holes there's always a few at every forum they just can't help themselves.
 
OP
W

Wills.WindowsAndWheels

Well-known member
Joined
Sep 29, 2011
Messages
348
Location
Gilbert,Az
I'm a member of lots of forums, I pay to advertise my products on a few myself.

Most forum moderators and site owners frown upon links to your business websites if you're not a paying vendor. I'm not sure what the policies of The Garage Forum are as it pertains to advertising, or what they consider advertising?

If you're not advertising your business or services, then you should have no problem deleting the links to your business website, right? I clicked on it, I'm sure you're logging and tracking hits from this thread right?

I live in AZ so it's small world. There have been some other AZ members in the thread too. So the answer is yes, you could pick up some business from some on this forum. I have purchased a lot of services from businesses in AZ that legitimately advertise in forum's.

And here's the only link someone needs to detail their vehicles. all on one page, excellent detail, been on Autogeek for years. All you have to do is click.

http://www.autogeek.net/detailingtips.html

Good luck with your business, how many vehicles have you done so far? 6 or 7?

Not mad at ya or anything. :beer:

And you assume that i DONT pay for advertising on other forums? So typical of someone like you to ASSume something, but again, its all in the name. When i ADVERTISE, first of all i target my own STATE...yes a couple have been from Az, but out of all the replies 99% so far, have been out of state.

Secondly, if i was going to ADVERTISE, why would i tell someone WHAT and HOW i do something? I mean really? This is a HOW TO, not a HOW TO PAY ME to do it for you. If i was going to ADVERTISE, id just post up a bunch of pictures of cars ive done and say hey look what i can do.

I love AG, ive learned a lot on there and ive helped a lot of people on there as well, which is all i was doing here.

And yes i have done 7 cars this week, how'd you know? If you wanted some help all you had to do is ask, not stalk me.

But like i said, i aint mad at ya, just chalk you up as another hater, my BIGGEST promoters of all.

Very nice step by step, definitely worth reading if you never been around detailing. Thanks for all the effort you put into this thread. oh and don't sweat A**holes there's always a few at every forum they just can't help themselves.

Yup yup there sure is, its usually the ones who are jealous that talk s***, which is fine by me. if out of all the replies so far he's the only one saying something bad, i think i'm doing alright :)

Now i'm off to go do a Benz, that would be #7 this week A**hole
 
Joined
Jun 30, 2011
Messages
1,080
Location
AZ
And you assume that i DONT pay for advertising on other forums? So typical of someone like you to ASSume something, but again, its all in the name. When i ADVERTISE, first of all i target my own STATE...yes a couple have been from Az, but out of all the replies 99% so far, have been out of state.

Secondly, if i was going to ADVERTISE, why would i tell someone WHAT and HOW i do something? I mean really? This is a HOW TO, not a HOW TO PAY ME to do it for you. If i was going to ADVERTISE, id just post up a bunch of pictures of cars ive done and say hey look what i can do.

I love AG, ive learned a lot on there and ive helped a lot of people on there as well, which is all i was doing here.

And yes i have done 7 cars this week, how'd you know? If you wanted some help all you had to do is ask, not stalk me.

But like i said, i aint mad at ya, just chalk you up as another hater, my BIGGEST promoters of all.


Yup yup there sure is, its usually the ones who are jealous that talk s***, which is fine by me. if out of all the replies so far he's the only one saying something bad, i think i'm doing alright :)

Now i'm off to go do a Benz, that would be #7 this week A**hole

I don't really care if you advertise or are a vendor on other Forum's. Are you a paying vendor on this one? Seems like you know the rules on advertising in forum's based upon your response. And that's fine if The Garage Forum has lenient advertising rules. I'll start linking my sites if they allow it for free.

I've been doing internet sales for 10 years now and I started out like you, throwing some "how to's", "look at this product", knowing very well that very few readers have the skills, time or equipment to do what I made.

It draws attention to you and your site at zero cost, it's very effective free advertising and it works. I sold a lot of product that way.

However most forum's would lock down a thread like this and would consider it Spam.

I'm not a hater, you have a nice website, looks like you do good work, didn't say you didn't. I simply asked if you're not advertising your service, then simply remove the link to your site. So?......

The only reason I posted is that I'm a vendor on other sites as well and I perceived your post is a thinly veiled advertisement that's all.

And......don't flatter yourself thinking I'm stalking you...:wtf:
 

larry_g

Well-known member
Joined
Apr 28, 2007
Messages
16,899
Location
oregon
Great write up. I used to do that kinda stuff but no longer. It seems now that I wash a rig twice. Once shortly after I buy it, and once shortly before I sell it. Any way your doing good but one detail I always wondered about, how do you maintain your rags/towels/applicators? Do you just throw all of them in the wash at once, or do you do something special with the wax contaminated pads/cloths. In other words the final chapter to your story should be equipment maintenance.

Thanks
lg
no neat sig line
 

Matt M PA

Well-known member
Joined
Oct 21, 2008
Messages
3,174
Location
SE PA
As a detailer myself, I say nice job on the write up. That should help folks. We don't agree 100% on products, etc, but the end result it very nice.

I don't use a rotary often...but it's a good skill to learn. Perhaps pick up a decklid or hood at the salvage yard to practice with?

Some asked about drying. I use an Air Force Master Blaster, which is very helpful along with a water deionizing system to avoid spots. If you want to use a leaf blower...don't use a gas one.
 
To avoid these ads, REGISTER NOW!
Top Bottom