
You are using an out of date browser. It may not display this or other websites correctly.
You should upgrade or use an alternative browser.
You should upgrade or use an alternative browser.
Above 1200 Sq/FT Restored 1930's Auto Shop
- Thread starter BB767
- Start date
Wokspaces above 1200 squarefeet.
W_A_Watson_II
Well-known member
My fuel tank isn't that large (only 30 gal barrel) and I have a manual pump, but then again I have a smaller Deere as well. Nice work.
HOTFR8
Banned
The fuel drum is a good idea but not very practical as you have to have to fill it and move it about. This was my idea some time ago and to date it is working well >
http://www.garagejournal.com/forum/showthread.php?t=74661
I have not filled completely it as yet as I have not needed to but it has been more practical when needing to get and store Diesel fuel.
http://www.garagejournal.com/forum/showthread.php?t=74661
I have not filled completely it as yet as I have not needed to but it has been more practical when needing to get and store Diesel fuel.
Here's one for "Dug" the tool lover (one of several here I would guess) who has been so very patient waiting for more tools to show up here.


These are but a few of the hand tools that remained after the family removed all the ones they wanted.

As I've mentioned before they seemed to take the "newer" ones and left the older ones, thankfully for me.

Most of these wrenches are pretty big and beefy. Besides being large nut and bolt sizes, they are thick, heavily made. Look at the one on the far left for example, see how thick the shoulders are around the openings top and bottom. Maybe the nut and bolts they were made for were physically thick or wide. I suppose it's also possible with older metallurgy they needed to be thicker to compensate for poorer quality steel.I'm guessing they were used in tractor work mainly. Were automotive tools of the 30's and 40's made like this?

These two more modern specialty wrenches on the right are aluminum. Anyone recognize what they might have been used for? Prop shaft on an outboard motor??

Besides removing the rust not sure what might be the proper way to recondition them. Some of them show evidence of paint. If they're just left raw steel they'll rust again eventually. I think any surface protection that was on them originally is long gone. Any thoughts out there on what might be the best way to keep them in shape. While I don't plan on using them on a regular basis, if I need them, anything in the shop is there to work.

Some specialty hammers.
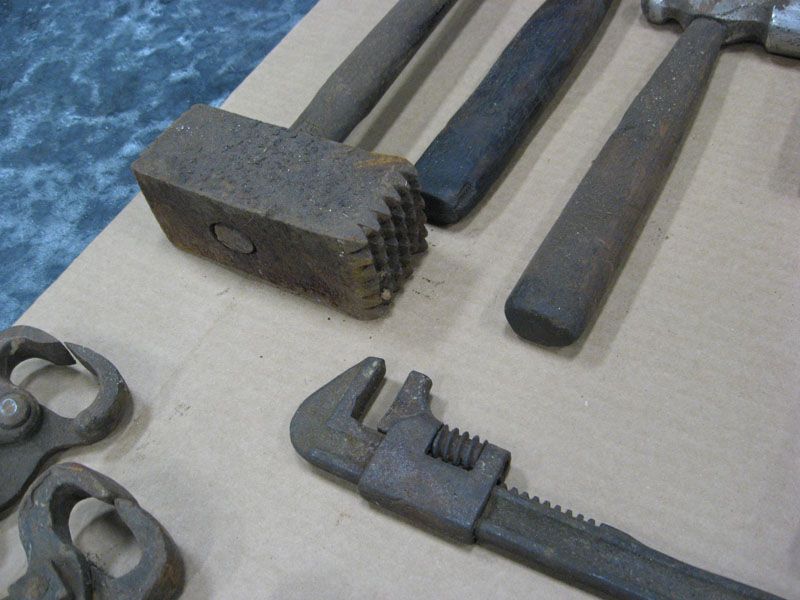
This one I really don't know what it was designed for? Both faces look like this.
Shrinking hammer.
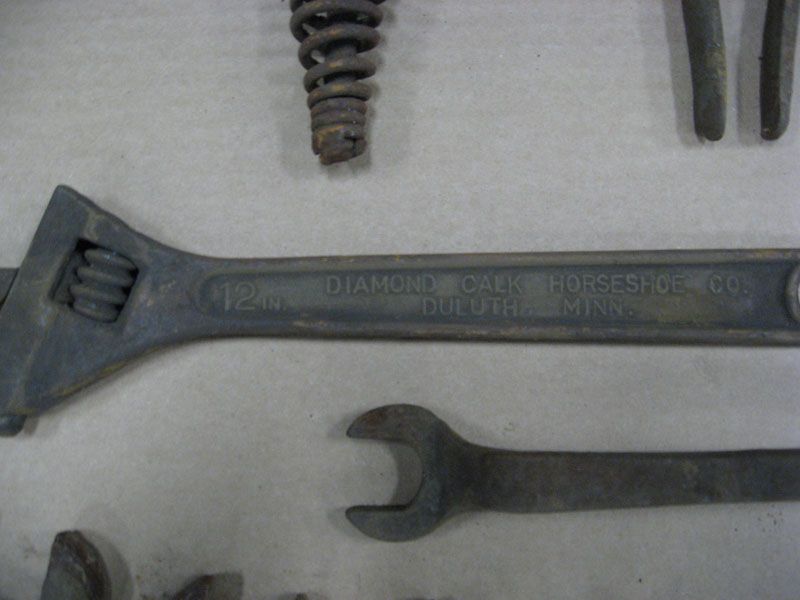
This wrench caught my eye. As you know Mr.Johnson was a blacksmith. This 12" adjustable wrench is made by the "Diamond Calk Horseshoe Co., Duluth Minn." That's a new manufacturer for me. Maybe they're quite famous, but I've never heard of them. Some of the other tools have manufactures names on them, just haven't really looked that close at them yet.

A specialized end on these pliers/cutters.
We used them to pick up hot metal and quench it in the huge water tank we had. The area that looks like it is designed for cutting it actually small so there is less heat transfer.

Anyone who can help out and identify the uses of any tools seen here, as always, feel free to please help us out.
Hog ring pliers, both for installing rings in the noses of pigs to keep them from rooting under the fence and getting out, and for upholstery work.


Anyone who has done "stick" arc welding has used these to chip the old slag off a new weld. Just looking at them brings back that distinctive sound to me. When a lot of work was going on in the shop years ago, the air would be filled with the sizzle of the welder, the smell of welding smoke, followed by the clinking sound of the weld being cleaned up with these hammers.
I do have a bunch more tools that I'm bringing back to light. As you've seen I'll get them posted on here as I am able. Thanks again for all of your interest and support as I continue with the history and resurrection of this shop.
Thomas
I'm not used to this type BBS, hope it worked.
Here's one for "Dug" the tool lover (one of several here I would guess
These are but a few of the hand tools that remained after the family removed all the ones they wanted.
As I've mentioned before they seemed to take the "newer" ones and left the older ones, thankfully for me.
Most of these wrenches are pretty big and beefy. Besides being large nut and bolt sizes, they are thick, heavily made. Look at the one on the far left for example, see how thick the shoulders are around the openings top and bottom. Maybe the nut and bolts they were made for were physically thick or wide. I suppose it's also possible with older metallurgy they needed to be thicker to compensate for poorer quality steel.
These two more modern specialty wrenches on the right are aluminum. Anyone recognize what they might have been used for? Prop shaft on an outboard motor??
Besides removing the rust not sure what might be the proper way to recondition them. Some of them show evidence of paint. If they're just left raw steel they'll rust again eventually. I think any surface protection that was on them originally is long gone. Any thoughts out there on what might be the best way to keep them in shape. While I don't plan on using them on a regular basis, if I need them, anything in the shop is there to work.
Some specialty hammers. The red-handled pliers were for fixing sheep fence. The "pincers" on the front were for digging staples out of the wooden fence posts. You could then hammer the staple back in with the edge (or side, depending upon your point of view) and cut the wire by slipping it into the slots on either side near the pivot point.
This one I really don't know what it was designed for? Both faces look like this.
Shrinking hammer.
This wrench caught my eye. As you know Mr.Johnson was a blacksmith. This 12" adjustable wrench is made by the "Diamond Calk Horseshoe Co., Duluth Minn." That's a new manufacturer for me. Maybe they're quite famous, but I've never heard of them. Some of the other tools have manufactures names on them, just haven't really looked that close at them yet.
A specialized end on these pliers/cutters.
We used them to pick up hot metal and quench it in the huge water tank we had. The area that looks like it is designed for cutting it actually small so there is less heat transfer.
Anyone who can help out and identify the uses of any tools seen here, as always, feel free to please help us out.
Fencing pliers on the left, hog ring pliers on the right.
Hog ring pliers, both for installing rings in the noses of pigs to keep them from rooting under the fence and getting out, and for upholstery work.
Anyone who has done "stick" arc welding has used these to chip the old slag off a new weld. Just looking at them brings back that distinctive sound to me. When a lot of work was going on in the shop years ago, the air would be filled with the sizzle of the welder, the smell of welding smoke, followed by the clinking sound of the weld being cleaned up with these hammers.
I do have a bunch more tools that I'm bringing back to light. As you've seen I'll get them posted on here as I am able. Thanks again for all of your interest and support as I continue with the history and resurrection of this shop.
Thomas
I'm not used to this type BBS, hope it worked.
Last edited:
hobbitss
Well-known member
Tools!!!! 
Hello there hkunz and many thanks for all that information. Shrinking hammer huh? When I first found that with all his other blacksmith tools I really didn't have a clue what it would have been used for. As for the others, I was hoping someone who was familiar with them would respond in time to help me I.D. them. Are you a blacksmith or have you done some smithing in the past?
I think we've got a pretty good handle on most of those tools, though there are still a couple that elude identification. I'm a patient fellow so I'm confident I'll eventually find out. Yup, I'm back home and plan on spending a good part of the day in the lean-to and tool shed sorting and moving. I'd still like to get those buildings cleared out before the snow flies.
Thanks again hkunz for taking the time to post here. We are all the better for it.
Thomas
thomas i have to say i have learned at least one thing about you while reading this thread , you do it right .
some times i have a hard time deciding whether i want to do some thing the right way or the easy way, now i say wwtd ...lol
omr, I have to tell you I was in my hotel room in Brazil when I read that last line. Talk abut laugh out loud funny!! Hope I didn't disturb any of the other guests.
 Many thanks for a day, well actually night, brightener!!
Thomas
it doesnt compare to the enjoyment ive gotten from this thread but you are welcome ..lolomr, I have to tell you I was in my hotel room in Brazil when I read that last line. Talk abut laugh out loud funny!! Hope I didn't disturb any of the other guests.
Thomas
My fuel tank isn't that large (only 30 gal barrel) and I have a manual pump, but then again I have a smaller Deere as well. Nice work.
Elementary Mr Watson, thank you. Originally I was going to use a manual pump also to keep it as simple as possible. However to watch the fuel level in the tractor I can't watch and pump at the same time, the tank opening is too high above eye level. So I went with a system that would allow me to add fuel while I was watching. It did seem to be more complex than I would have liked, but I can't argue with the results. Fueling is now so very easy, accurate and cleanly done.
Central Illinois huh? Please drop by should you pass close by sometime. Welcome mat is out.
Thomas
The fuel drum is a good idea but not very practical as you have to have to fill it and move it about. This was my idea some time ago and to date it is working well >
http://www.garagejournal.com/forum/showthread.php?t=74661
I have not filled completely it as yet as I have not needed to but it has been more practical when needing to get and store Diesel fuel.
HOTFR8 I have read about some of your projects. What great passion and skill you always exhibit. Very nice work indeed.
I think perhaps you misunderstood how my fuel drum is resupplied and used. Around here, fuel can be delivered to the premises via tanker truck. My supplier is a school friend I've know my whole life whose operation is but a 1/2 mile away. He drives his fuel tanker to my barn, unreels a hose and inserts a nozzle into the drum and fills it. Takes only a couple of minutes.

Note the wheeled dolly under the drum. I then wheel the drum on its dolly back into it's storage area. The resupply fuel comes to me, I don't have to take the drum to the resupply fuel. Also I don't need to fuel my equipment away from the barn so I'm not moving the drum more than a few feet. It would be completely different if I had to move the drum without concrete under it. As such this set up is extremely practical for my purposes.
Thanks for the link to your "Beast" project among others, what a treat!
Cheers - Thomas
HOTFR8
Banned
HOTFR8 I have read about some of your projects. What great passion and skill you always exhibit. Very nice work indeed.
I think perhaps you misunderstood how my fuel drum is resupplied and used. Around here, fuel can be delivered to the premises via tanker truck. My supplier is a school friend I've know my whole life whose operation is but a 1/2 mile away. He drives his fuel tanker to my barn, unreels a hose and inserts a nozzle into the drum and fills it. Takes only a couple of minutes.
Note the wheeled dolly under the drum. I then wheel the drum on its dolly back into it's storage area. The resupply fuel comes to me, I don't have to take the drum to the resupply fuel. Also I don't need to fuel my equipment away from the barn so I'm not moving the drum more than a few feet. It would be completely different if I had to move the drum without concrete under it. As such this set up is extremely practical for my purposes.
Thanks for the link to your "Beast" project among others, what a treat!
Cheers - Thomas
Point taken with your practicality. I suppose my fear about your set up would be the quantity of a fuel in a fire situation if you needed to move it out in a hurry. Here we have storeage limitations so my small trailer gets me round that law. Not sure how it would work with something like your set up here as the wheel may make it look like it is fixed and can not be removed from your workshop. The good thing about my trailer is I can have fuel delivered or go and get it.
Thanks also for the comments as even though I do not comment here much on your topic I have to say I always follow what is going on at your place.
Last edited:
some times i have a hard time deciding whether i want to do some thing the right way or the easy way, now i say wwtd ...lol
I've had the exact same thought many times since finding this thread.
I've also wondered if the thread has become a bit of a burden for poor ol' Thomas; can he ever leave a hidden screw unclocked again, fearing that if his craftsmanship slips even a little, will we pounce like a cat on an unsuspecting mouse?
I hope not.
This thread is proof to me that P.o'.T. has a history of unparalleled craftsmanship that could endure an occasional slip, should that day ever arrive.
I Love the Hard Rock Maple Barn Bench. (HRMBB). I'm sure the inhabitants of earth in the year 2300 and beyond will enjoy using it to work on hobby spacecraft and such. (Maybe you can stash an anvil deep inside, you know how useful that could be!)
As always, thanks a lot for sharing your great adventure!
Mike
Last edited:
Omphaloskeptic
Well-known member
Thomas, that barrel is begging for some stickers/labels/warnings/advertizing/nameplates; something! How about a fuel level sight glass? It's a cool tool that just needs a little something extra for show. Maybe a 'Good Gulf' logo; isn't it already that Gulf Co. blue? How are the airport fuel trucks done up?
It is a great idea well executed but this is the 'Restored 1930's Auto Shop' and quite frankly, you have spoiled us with the superb restoration work throughout, so we have come to expect the 'above and beyond' results. I mean, even if it can't be powder coated, it still deserves that extra 'Thomas Touch'!
It is a great idea well executed but this is the 'Restored 1930's Auto Shop'
and quite frankly, you have spoiled us with the superb restoration work throughout, so we have come to expect the 'above and beyond' results. I mean, even if it can't be powder coated, it still deserves that extra 'Thomas Touch'!-->
Well-known member
I think those two newer specialty wrenches are for hydraulic hoses and such. You don't need a ton of torque on them or they'll strip out so making something like that out of aluminum makes sense.
HOTFR8
Banned
HOTFR8 I have read about some of your projects. What great passion and skill you always exhibit. Very nice work indeed.
Thanks for the link to your "Beast" project among others, what a treat!
Cheers - Thomas
Thanks, I failed to add even though I do not comment much on what you have posted I enjoy the enthusiasm you also put into your projects
Your property is a credit to you.
onewaydave
Well-known member
OK, there are a couple of blacksmiths hammers, red handled pliers are fencing pliers.
One reason the wrenches are beefier, they had all the room they needed. Engines were not as compact on tractors, cars or equipment.
I don't recall seeing any painted wrenches. Prior to chrome, they were less meticulously cleaned. A little oil/grease left over.
The oil cans were usually painted and often had a makers label.
Some of the wrenches could have come as part of a tool kit with a vehicle.
Hi Thomas & Chris,
This thread is a monster! But it sure is a testament to the hard work put in on what is obviously a well-loved, historic property there in Philo.
I must say I am overwhelmed having read this thread over the course of the last few weeks, taking in the restoration of the shop and many of its tools, to a level of detail I would never have thought possible by such a humble, everyday guy like Thomas. In fact, it's inspired me with regards to my own personal projects - I find myself thinking of Thomas when presented with project time, and making the absolute most of the time and delivering high-quality results instead of "just good enough" efforts.
Thanks for this wonderful thread, guys, and keep up the good work!
I've had the exact same thought many times since finding this thread.
I've also wondered if the thread has become a bit of a burden for poor ol' Thomas; can he ever leave a hidden screw unclocked again, fearing that if his craftsmanship slips even a little, will we pounce like a cat on an unsuspecting mouse?
I hope not.
This thread is proof to me that P.o'.T. has a history of unparalleled craftsmanship that could endure an occasional slip, should that day ever arrive.
I Love the Hard Rock Maple Barn Bench. (HRMBB). I'm sure the inhabitants of earth in the year 2300 and beyond will enjoy using it to work on hobby spacecraft and such. (Maybe you can stash an anvil deep inside, you know how useful that could be!)
As always, thanks a lot for sharing your great adventure!
Mike
Mike, this thread could never be a burden. I've said many times to watch me like a hawk and not let me get sloppy....where it really matters. Seriously, everyone who has contributed here has my best intentions at heart I'm sure. You're all just trying to help me become a better person and who wouldn't want that?
I have a thick skin and no big ego (that I'm aware of) so always feel free to critic away.Right now, as per your suggestion, I'm contemplating getting that anvil inside the bench somehow for those future folks and I'm coming up bump-kin.
As always, thank you for your interest and taking the time to share with us.
Thomas
Thomas, that barrel is begging for some stickers/labels/warnings/advertizing/nameplates; something! How about a fuel level sight glass? It's a cool tool that just needs a little something extra for show. Maybe a 'Good Gulf' logo; isn't it already that Gulf Co. blue? How are the airport fuel trucks done up?
It is a great idea well executed but this is the 'Restored 1930's Auto Shop'
Keep all that up and I will blush Omphaloskeptic!
I do need to label the drum DIESEL though, and will get around to it. While I hadn't thought of the T T embellishment you suggest it bares more thought. Watch this space!
BTW, around here the primary Gulf color I believe is orange?

Thomas
I think those two newer specialty wrenches are for hydraulic hoses and such. You don't need a ton of torque on them or they'll strip out so making something like that out of aluminum makes sense.
Hi there =--> (how DO you pronounce that anyway?) We have determined those aluminum wrenches are for dairy equipment. What or why Mr Johnson had them is anyone's guess. The aluminum aspect is to keep out rust from contaminating the milk. I do know that there are hydraulic wrenches in much smaller sizes that look very similar. Thanks.
Thomas
OK, there are a couple of blacksmiths hammers, red handled pliers are fencing pliers.
One reason the wrenches are beefier, they had all the room they needed. Engines were not as compact on tractors, cars or equipment.
I don't recall seeing any painted wrenches. Prior to chrome, they were less meticulously cleaned. A little oil/grease left over.
The oil cans were usually painted and often had a makers label.
Some of the wrenches could have come as part of a tool kit with a vehicle.
The wrenches are mostly painted and you are correct that some did come from various vehicle tool kits. They sure are beefy looking and have a nice solid feel in your hand.
Thomas
JC23
Well-known member
I would think if you really wanted to decorate your refueling barrel, some jet fuel stickers would not be too awful hard to find at your place of work, eh?
As usual, enjoying your work...
As usual, enjoying your work...
Hi Thomas & Chris,
This thread is a monster! But it sure is a testament to the hard work put in on what is obviously a well-loved, historic property there in Philo.
I must say I am overwhelmed having read this thread over the course of the last few weeks, taking in the restoration of the shop and many of its tools, to a level of detail I would never have thought possible by such a humble, everyday guy like Thomas. In fact, it's inspired me with regards to my own personal projects - I find myself thinking of Thomas when presented with project time, and making the absolute most of the time and delivering high-quality results instead of "just good enough" efforts.
Thanks for this wonderful thread, guys, and keep up the good work!
Mark, this thread has grown a bit more than I first had anticipated but folks don't seem to mind...... too much. I've mentioned before, I've got an index for it in the works that might make it a bit easier to navigate and reference. Problem is by the time I'm ready to post it, it's somewhat dated so I'm waiting to catch up before I do so.
I have to thank you for the kind words and what I feel is an accurate description of me, as an "everyday guy". A little more stubborn or persistent than some, but a regular guy none the less, thanks to Dad's inspiration.
As I look back over the years, I can't think of a project that I've regretted spending too much time on, but there are many I am so glad I did spend the time to "do it right". Never regretted that.More projects coming....
Thomas
I would think if you really wanted to decorate your refueling barrel, some jet fuel stickers would not be too awful hard to find at your place of work, eh?
As usual, enjoying your work...
There ya go, great idea JC23. They might not all that easy to find, but when did I ever let that discourage me?

Thomas
wow i think i just had an oprah moment.. lolMark, this thread has grown a bit more than I first had anticipated but folks don't seem to mind...... too much. I've mentioned before, I've got an index for it in the works that might make it a bit easier to navigate and reference. Problem is by the time I'm ready to post it, it's somewhat dated so I'm waiting to catch up before I do so.
I have to thank you for the kind words and what I feel is an accurate description of me, as an "everyday guy". A little more stubborn or persistent than some, but a regular guy none the less, thanks to Dad's inspiration.
More projects coming....
Thomas
seriously though that is pretty insightful..
mdbeck1
Well-known member
Keep all that up and I will blush Omphaloskeptic!
I do need to label the drum DIESEL though, and will get around to it. While I hadn't thought of the T T embellishment you suggest it bares more thought. Watch this space!
BTW, around here the primary Gulf color I believe is orange?
Thomas
No more excuses....

Ya, I'd say that was "a couple"
This is the reverse side of mine...

Here's what my research says about it...
Diamalloy , marked with "Forged Diamalloy Steel" and "Made in U.S.A." forged into the shank, with "Diamond Calk Horseshoe Co." and "Duluth, Minn." forged into the reverse. Both sides are also marked with the "12 In." nominal size.
I think I still have one of those that I use regularly, got it from my father who got it from his. Still works fine.
willy3486
Well-known member
thomas i have to say i have learned at least one thing about you while reading this thread , you do it right .
some times i have a hard time deciding whether i want to do some thing the right way or the easy way, now i say wwtd ...lol
I have to agree with this as well. One of the reasons I come here is this thread. I like autos and such but I don't like to work on them like many here do. But I do like the atmosphere of a garage. I have my own workshop/garage and I have to say Thomas was one of the main inspirations to clean it up and get organized. I also have to give credit to Kiwi Kev, do a search for him on the internet.
This site and the threads here got me to wanting to clean up my shop and I have done so on most of it. I plan on going through my car area this spring which shouldn't take more than a couple of weekends and my side shed which should be about the same. I have the main area that is done to repair old radios and tube stuff. I am trying to put stuff in it from old repair shops and I hope to find a original TV shop sign eventually. I have received a 50s TV banner from a friend that sells radio parts. I plan on putting it in my shop. Anyway the way Thomas has inspired me to get my shop in order I hope those who see my shop get the same excitement as I have from looking at Thomas's shop. I have had some young college students who my daughter is in school with to see it and they enjoyed it. So I like others here would like to thank Thomas and his family for sharing their shop redo. I wonder how many here like myself have been inspired and redone their shops as well.
Kevin54
MEMBER EMERITUS
The three tools on the left...aren't thiose for horse hooves to cut and clean?
And as far as Page 191, I need to get out more. I had to back up more pages than I thought to get caught up on this thread.

I think I still have one of those that I use regularly, got it from my father who got it from his. Still works fine.
The metal used in many tools and equipment "back then" was often superior to what's in use these days. That and manufacturers took more pride in the finish of their products. Reputation seemed to mean more and the better quality manufacturers jealously protected theirs.
If you don't make that wrench do sometime it wasn't designed for it should last almost indefinitely I would imagine. Treat it well and you can pass it on to your son. That way it can act as a bridge between your grandfather, father, yourself and then your son. Anytime I use tools or equipment that have been passed on to me by my father, grandfather or even great grandfather I always think of them when I reach for the tool. I feel a special kinship to them that's a little hard to describe because of it but it certainly is there.
Thomas
Stuart in MN
Well-known member
I saw this in a thread over on the HAMB board, I figured it would fit right in here.

http://www.jalopyjournal.com/forum/showthread.php?t=640746
http://www.jalopyjournal.com/forum/showthread.php?t=640746
markviii
Well-known member
Very unique, but it isn't "one" with the tree! There's a picture of the internet someplace of a motorcycle with a tree growing in/around it. I can't find it, but it's more in keeping with our "yard art".
Chris
Chris
PlekVis
Member

that one?
hobbitss
Well-known member
Here is more on the buildings clean out....


The interesting thing about this scale is that the upright part of it is made of wood (still has it's original paint) and not metal. Don't know much about these but I'd guess it's somewhat old with all those wood parts.


This is what a bench grinder of the day looked like, belt driven. It was a light duty one. To lubricate the shaft you oiled the shaft, just outside the pulley in the center. The upper oil hole is missing its oil cap which kept "junk" out of the oil hole.

This bench grinder used a 2" wide drive belt ( pulley in the center) because it had larger grinding wheels and it needed the larger surface area of the 2" belt so it wouldn't slip. It also was heavier duty than the other grinder so it had grease cups to lubricate the shaft. Here's how grease cups work...

This is a grease cup on my 18" ( about 1/3 meter) Yates American thickness planer from my wood shop. This machine was made in 1944. The grease cup is the part sticking up and angling to the left.

Here's another grease cup on the other end of the planner, this one is installed at a 90 degree angle. The actual cup is to the far left.

Here part of the the cup has been unscrewed and removed.

Here you can see the 2 parts that make up a grease cup.The cup is full of grease (grease cup,eh?) Note the swirl pattern of the grease in the cup from unscrewing it. Also note the threads are fine threads to give you better control in the amount of grease dispensed.

Another view.

Here the cup is installed but not screwed down yet. Look closely and you'll see the threads still exposed.

Now you just screw the cup down and as you do so.......

...you force grease down the grease line under the cup which will then lubricate the shaft the line is connected to. Also note the cup has serrated edges on it to get a better grip. Older equipment had grease cups instead of bearings as it was much cheaper than an expensive bearing. How much a machine was used determined how often you would "grease" the machine by turning the cup. It is usually turned just a 1/2 turn whenever you "grease it.

This of course is the homemade floor grinder. The best part of this picture is all the space I now have around this floor grinder.

In the background is an old cabinet makers work bench with a black smith's vice installed on it ( thank you Kevin54 for identifying that vice (see post #891, page 45

The overhead line shaft for the trip hammer and camelback drill press.

Here the all the grinders and drill press plus numerous other items wait to be picked up by an agricultural museum which will use them in exhibits exemplifying agriculture as it was "back in the day". It is my hope that this equipment will now live on in use as this museum is a hands on one in which the equipment is used and not just as static displays.
Thomas
Bump from the bottom of page SEVEN!!!

I needed a Tool Fix as I impatiently wait for the full length film documentary on the exploration of the tool shed and other out buildings behind the garage...
BigAl62
Well-known member

Bump from the bottom of page SEVEN!!!
I needed a Tool Fix as I impatiently wait for the full length film documentary on the exploration of the tool shed and other out buildings behind the garage...
Bless your heart Joe, you have the patience of a saint and I'm not kidding.
I just finished my annual simulator training (a multiple day event), where we do emergency, unusual system malfunctions and normal procedures training and evaluations in a simulator. It's stressful at times and preparing for it removes me from circulation for a while until it's all done. I don't even turn on a computer to stay focused. This year with the merger, some of our procedures have changed and that took some extra preparation. Those procedures were implemented about a week before I left for training and so I didn't have much real world practice with them. With good preparation all went very well and I have been blessed for yet another year. As such I'll get back to business here.
To that end I've been trying to contact the Lisle Tool Co. to see what...


... this was used for. I'm completely stymied.
Thomas
Vernmotor
Well-known member
Well I don't have a clue ??? hummm things that make you go "WTH"