To avoid these ads, REGISTER NOW!

My Mr Heater Bigg Maxx Install

z28dad

Well-known member
Joined
Jul 20, 2010
Messages
172
Location
VA
There is alot of studying when it comes to where to put these heaters. I think I have maybe failed on my first attempt. Thank God I have not starting cutting anything yet.

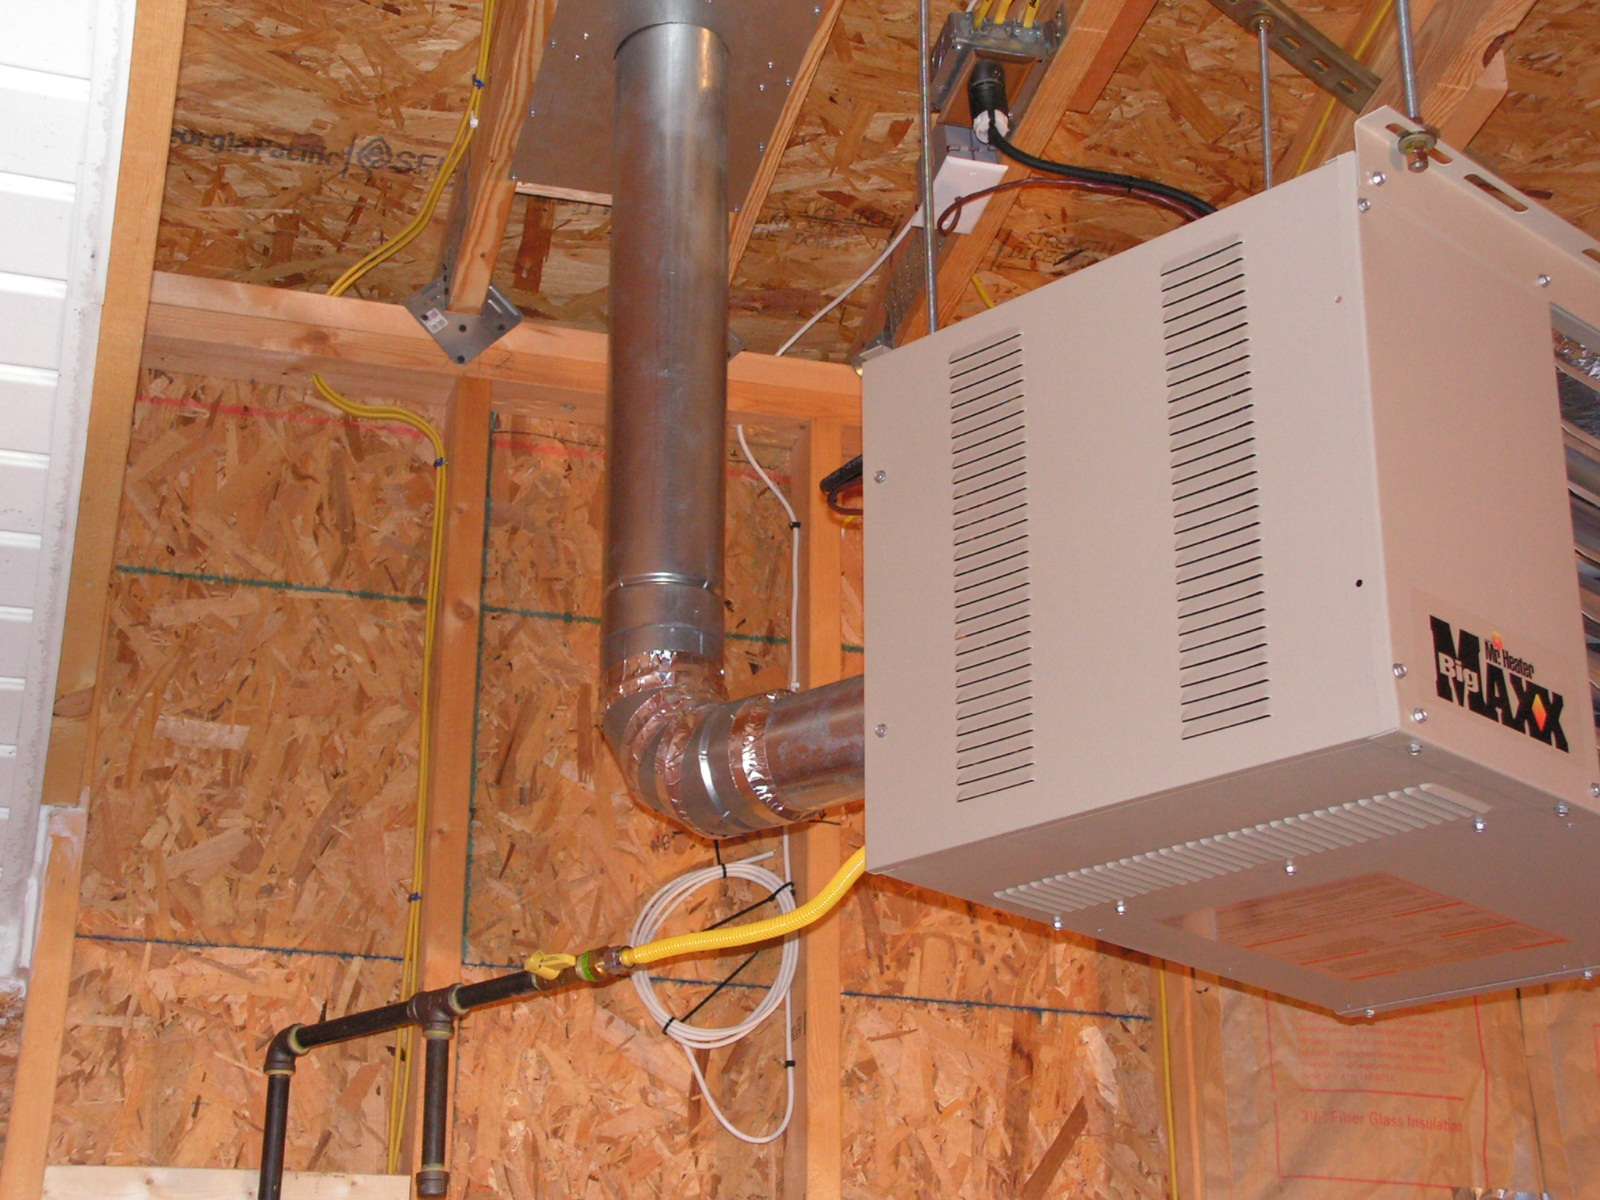
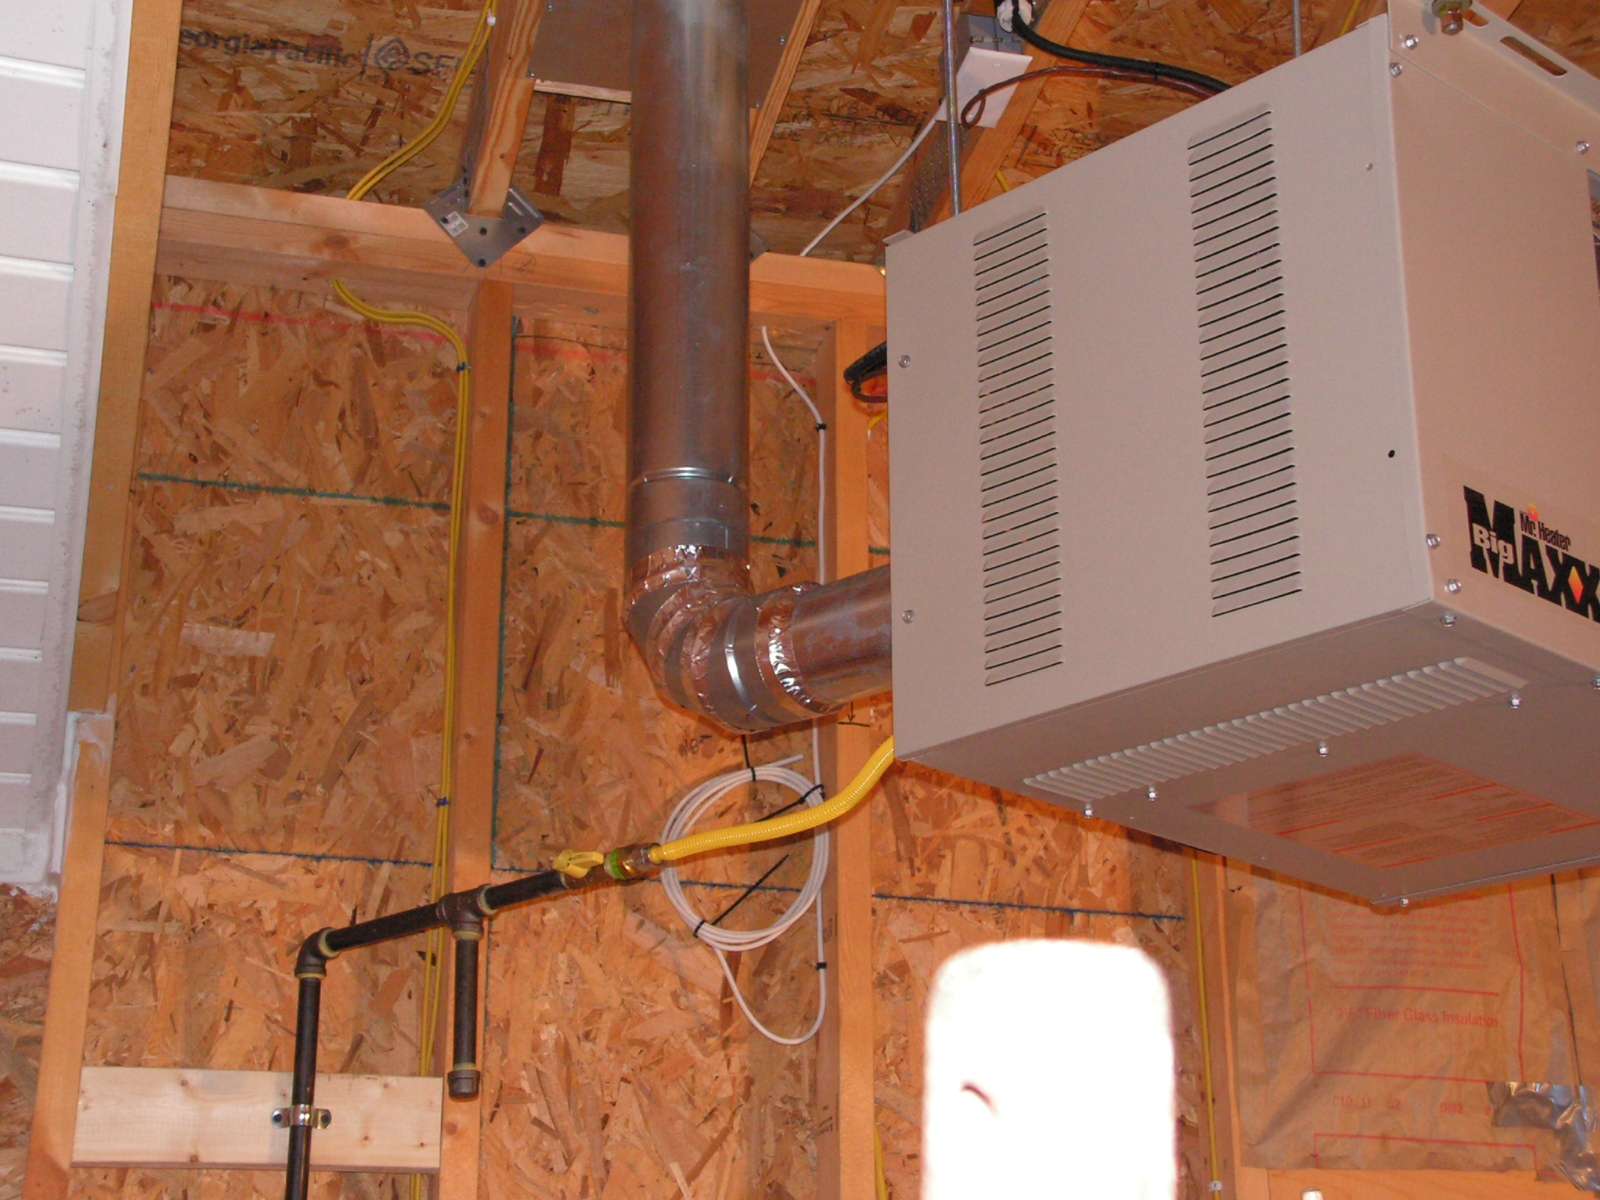
When I mounted the heater up in the ceiling earlier this year, I was planning on venting it horizontally. I was under the understanding that I had to be 18 inches below the soffit. Where I got this from I don't know. The manual says 4ft. That's pretty much a deal killer, because I would be over the 5 ft max length. Also lowering the vent exit through the wall puts me closer to a window.

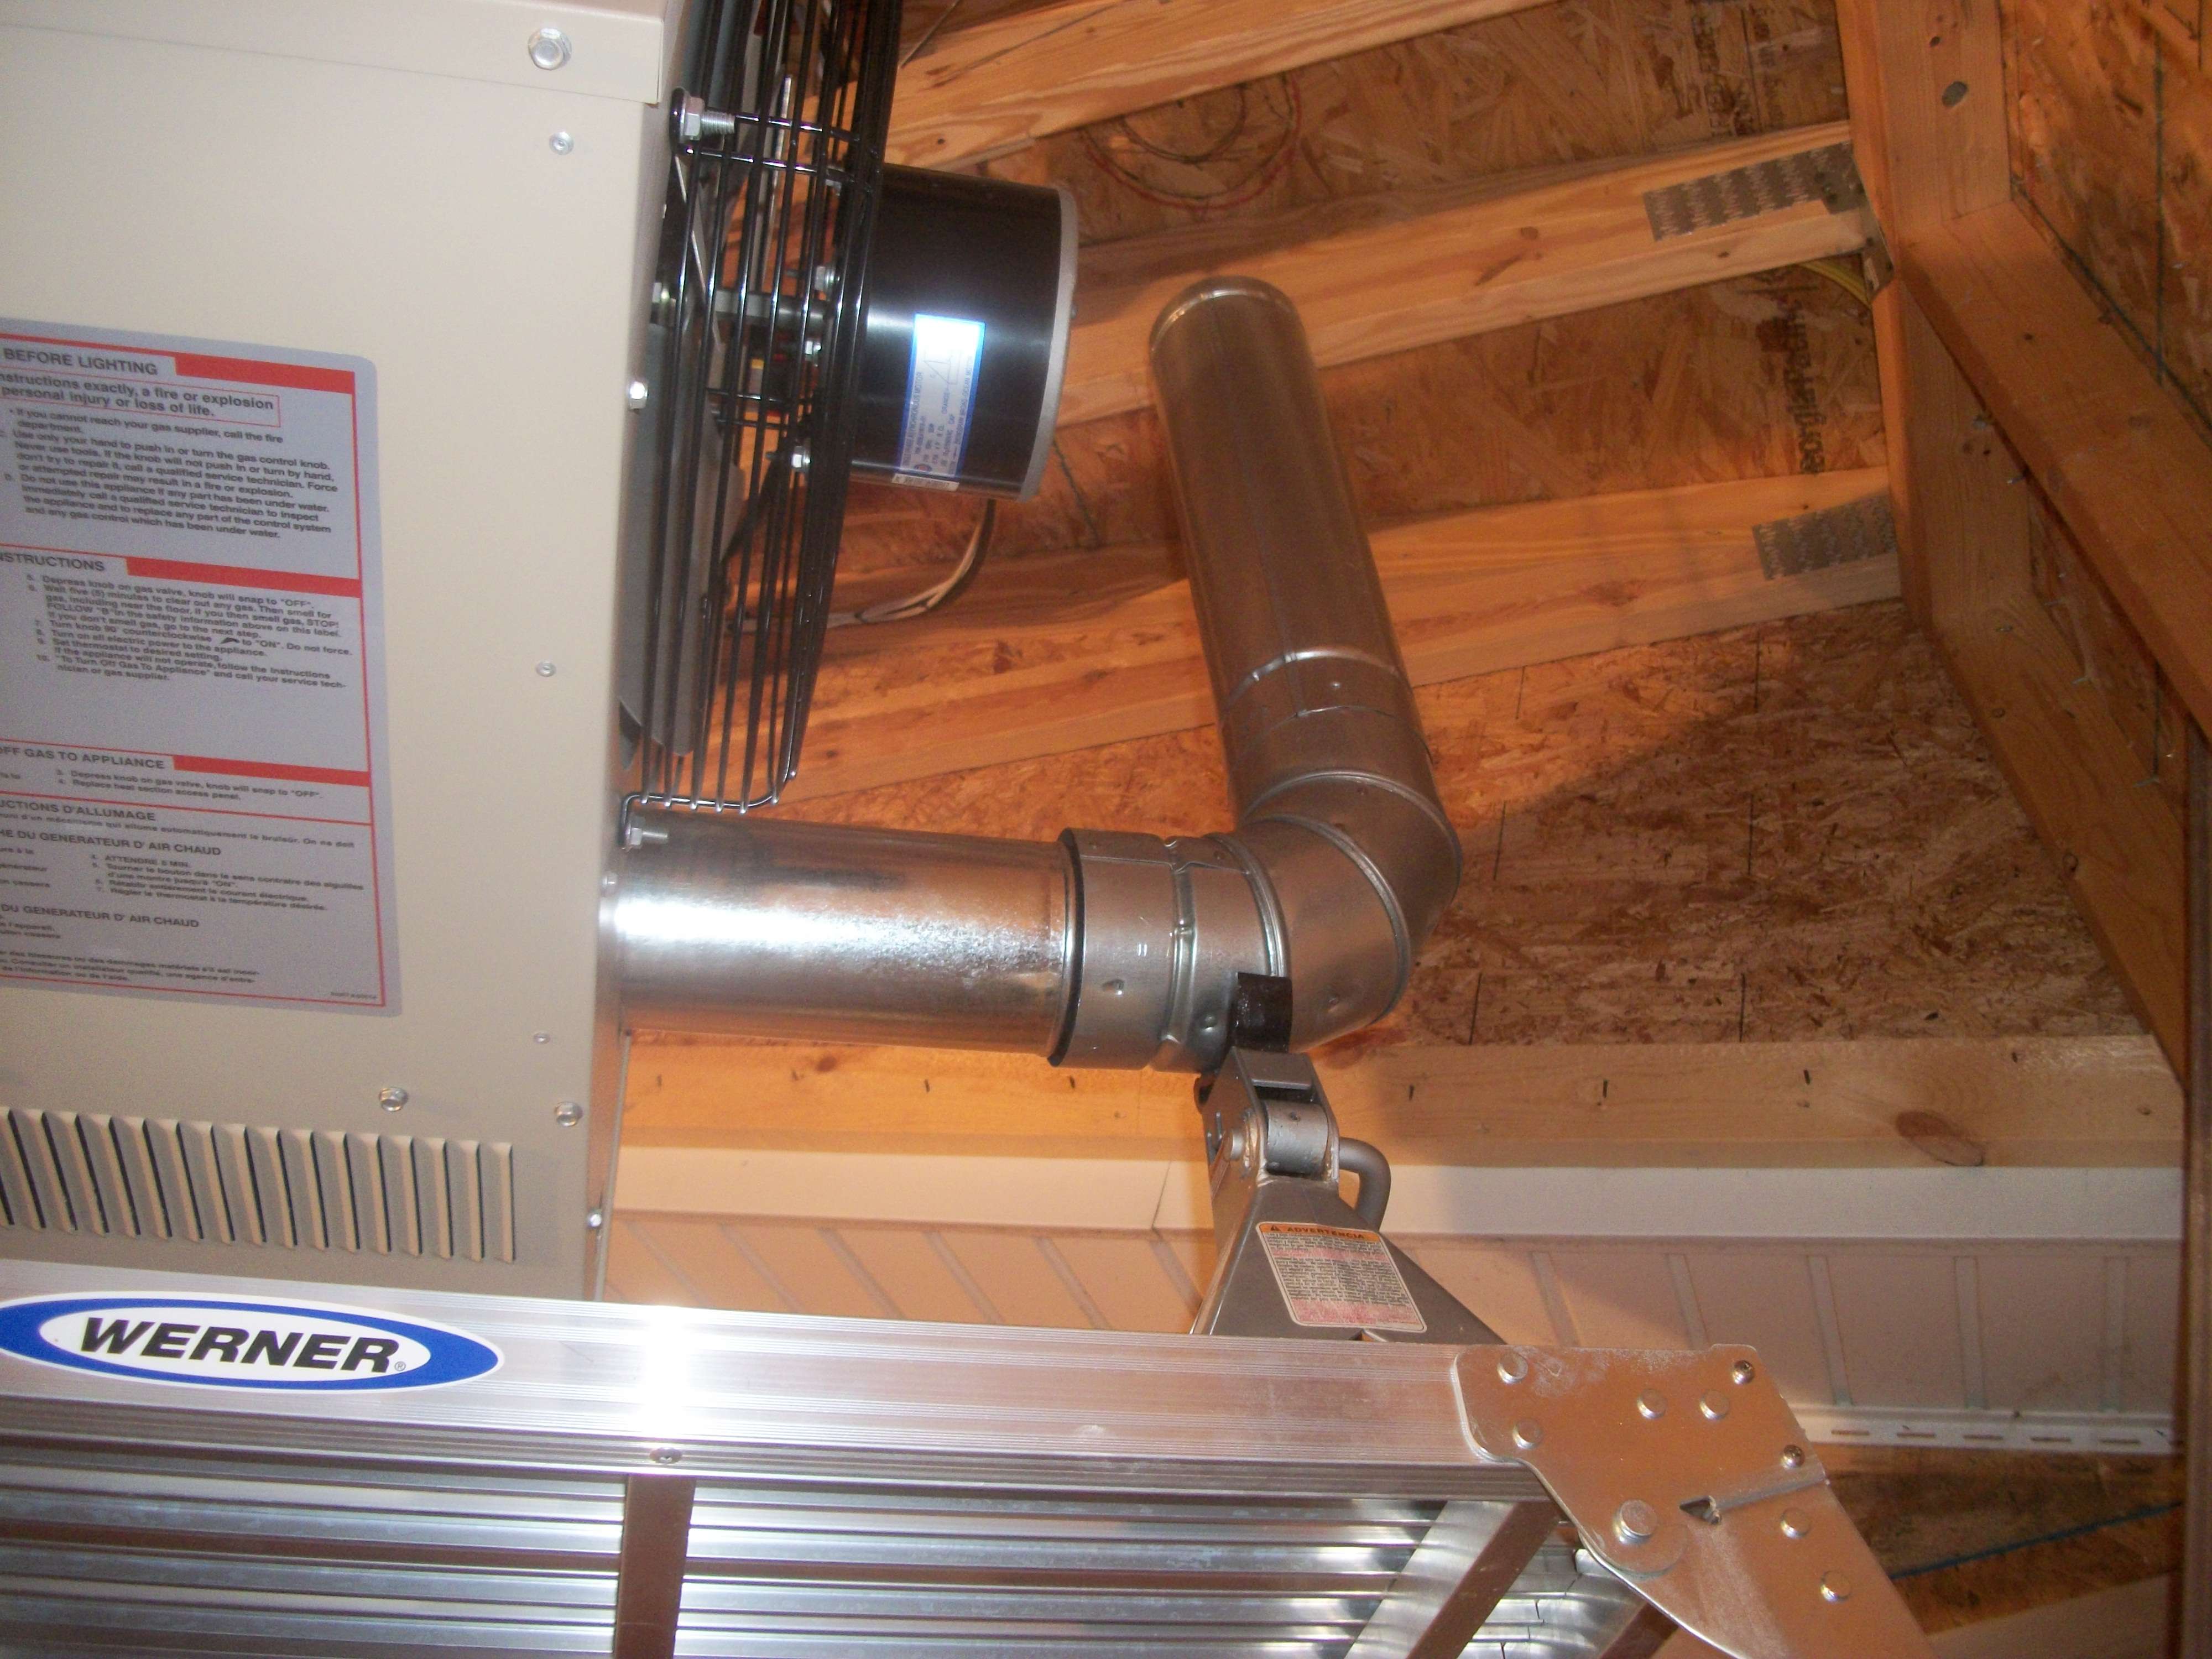
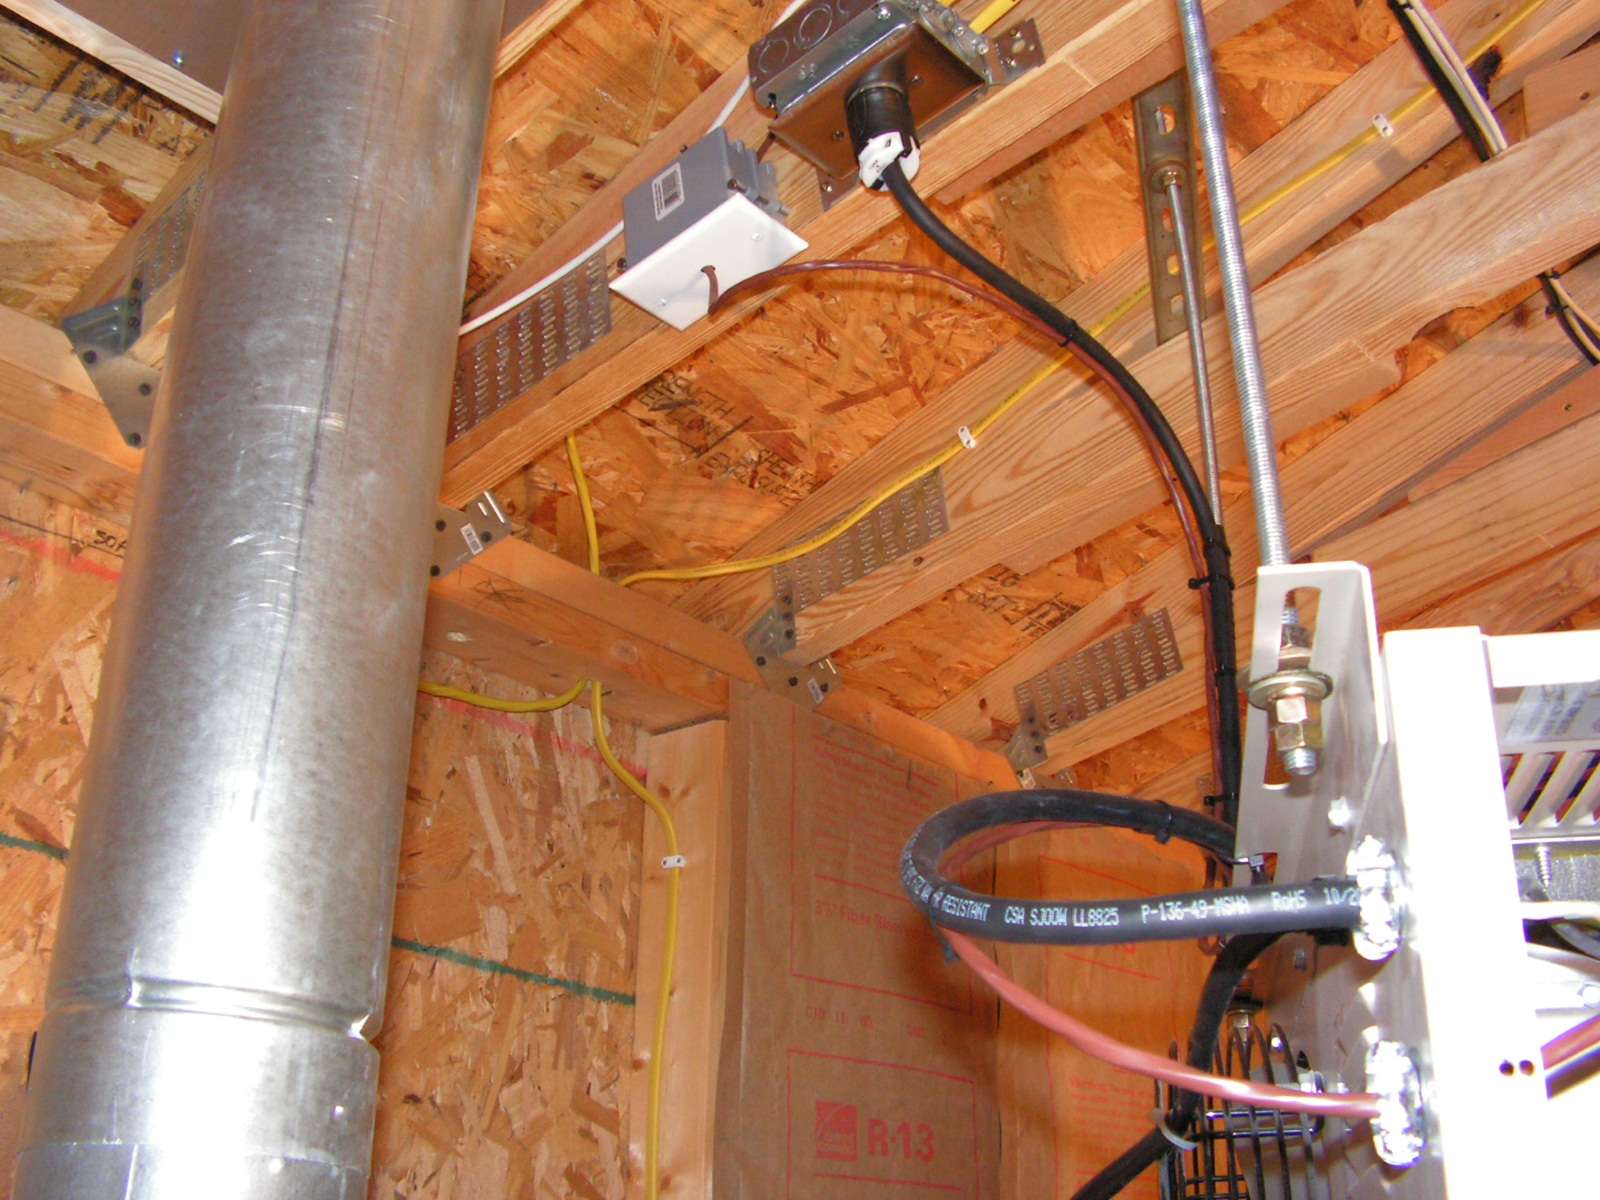
So my next option is to go through the roof, which by the way intimidates me some. The directions are not real clear about what pieces go where. Here is were it gets interesting. My builder must have had an extra truss left over. The far side of the garage where they started are on 16" center, but when it get closer to the other side where the heater is, they are just under 10" oc. I'm wondering if I will have enough clearance and air space to run a 4" vent kit through it. Also I will have to move a little wiring. That's no big deal. Here are some pics:

roofventjpg.jpg


If I'm reading the instructions right, it states 1" of air space for 3"-24" sizes. Which I should be ok.

I originally purchased a horizontal kit. I"m thinking I will need to purchase additional items:

roof flashing:

http://www.lowes.com/ProductDisplay...gId=10051&cmRelshp=req&rel=nofollow&cId=PDIO1

storm collar:

http://www.lowes.com/pd_373-41698-1...orm+collar&N=0&langId=-1&storeId=10151&rpp=48

Longer pipe:

http://www.lowes.com/pd_37418-41698...=1&currentURL=/pl__0__s?Ntt=b+vent&facetInfo=

Not sure if anything else is needed. I'm also concerned about the height of the pipe. The exit is on the backside of the building down towards the gutter. Its a 4X12 pitch.

I will also add that my trusses are scissor trusses, so I will have no attic access once the drywall is up.

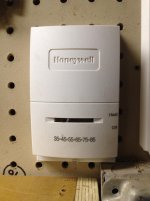
I'm planning on contacting a neighbor of mine that runs a burner service business, but wanted to ask you guys so that I may gain some knowledge before I call him.

Let me know what you guys think. Thanks, Russ
 
Last edited:
To avoid these ads, REGISTER NOW!

Freon

New member
Joined
Oct 31, 2011
Messages
3
firestop around the pipe. The metal one is probobly an 8x8 or 6x6 square with your round hole cut in center. Helps keep pipe centered on your 1" clearance from combustibles.
Don't think lowes has them. I know around here at least one side of a penetration has to have one.
 
OP
Z

z28dad

Well-known member
Joined
Jul 20, 2010
Messages
172
Location
VA
Freon, Thank you for the reply. I have been gathering parts for the install. I did see the fire stops at Lowes. I wasn't sure if I needed one or not. I may need to go back and pick one up. I might have to get creative on installing it. I made wedges to fit between the trusses to get the heater mounted level using kendorf. I can probably bend a flange on it and fasten it into the side of the trusses. I did purchase a pipe clamp for this area.

I do have a few more pics with some questions. I'm planning on using single wall 26 ga pipe coming out of the heater and then it will go into the B 90. From there I have a B vent pipe that is 5' long. It should stick out of the roof 2'. I hope it clears the peak. If not I have two more 18" pieces of B pipe.

My first question is attaching the pipe to the heater. Maybe I missed it in the directions, but what is the proper way? Right now I just pushed the adapter into the 4" pipe. I'm guessing from there a few sheet metal screws would do the trick. Is this correct?

picture017j.jpg


Here is a few pics of my mock up so far:

heaterjpg.jpg


heater1jpg.jpg


pipemockjpg.jpg


I would like to use the B pipe all the way, but was having trouble using it with the heater adapter. I may be missing something here.

Here is a few pics of the parts I picked up. I have adjustable flashing for the roof, a pipe clamp and thimble. Not included in the pic is a storm collar, roofing caulk and caulk for the pipe. I have a regular outdoor cap, but plan on looking for a high wind cap.

Also one more question concerning the thimble. I'm guessing the scissor trusses will present another challenge. It will only be for passing the pipe through the 1/2" drywall. I'm thinking that since there is such a small amount of space between the bottom cord truss and the roof, I may not use the thimble and make sure that I keep the drywall 1.5-2" from the b pipe. I then will have to find a trim piece, probably something from a larger pipe. If I only use one side of the thimble I can angle it enough to match the angle of the truss:

thimblejpg.jpg


Total flue length should be 6ft with a 90.

Thanks for any help. Russ
 
Last edited:

Freon

New member
Joined
Oct 31, 2011
Messages
3
Put firestop on the drywall. That will assure you keep centered away from it. Then just buy adjustable rain collar that is a size larger than your bvent. Fan the collar to make a funnel shape to cover your firestop.

Couple screws to put single wall to bvent is fine.
 

dave67fd

Well-known member
Joined
Apr 25, 2011
Messages
872
Location
Southern NH
My first question is attaching the pipe to the heater. Maybe I missed it in the directions, but what is the proper way? Right now I just pushed the adapter into the 4" pipe. I'm guessing from there a few sheet metal screws would do the trick. Is this correct?

Yes, use 3 corrosion resistant screws. In addition, seal the joint with hi-temp silicone or foil tape as long as it's rated for hi-temp. For sealing the single wall to double wall B-pipe pretty much same way. See below. Of course you would normally never drill thru both walls of B pipe to join to another B pipe only when attaching to single wall.

How to connect a single wall vent system to a double
wall (type B) vent pipe:
1. Slide the single wall pipe inside the inner wall of the
double wall pipe.
2. Drill (3) holes through both walls of the single and
double wall vent pipes. Using 3/4" sheet metal
screws, attach the two pieces of pipe. Do not over
tighten.
3. The gap between the single and double wall pipe
must be sealed but it is not necessary to fill the full
volume of the annular area. To seal, run a large bead
of 400°F silastic around the gap.
 
Last edited:
OP
Z

z28dad

Well-known member
Joined
Jul 20, 2010
Messages
172
Location
VA
I want to thank everyone for there help on this install. I have worked on it the past couple of days for a few hours and here is what I have:

Measuring the hole for the cut:

holejpg.jpg


Mocking it up and making adjustments. The fire stop came with a bracket that was suppose to keep the pipe from sliding down. With my ceiling being a cathedral ceiling the bracket only made contact at the front of the fire stop, so I added a couple of hangers on each side. I also put two brackets around the pipe to keep it centered in the hole. I wasn't sure if it was OK to add screws for the hangers, but I used short screws so that they would not puncture the inner pipe.

pipejpg.jpg


I still need to fill the gap between the double 90 and the single wall.

pipe2jpg.jpg


Next I added a couple pieces of wood so that my sheet rock would have something to bolt into.

pipe1jpg.jpg


I plan of having my drywall guys just barely go behind the fire stop.

pipe3jpg.jpg


Heater from the front:

frontheaterjpg.jpg


Heater from the rear:

rearheaterjpg.jpg


Pipe from the roof:

piperoofjpg.jpg


pipe1roofjpg.jpg


Hopefully I used the right silicone on the storm collar and at the top of the flashing. Its almost metal looking, so it looks like there is nothing there. Its not really labeled as high temp, but the label says service temp is -60-400 degrees F.

Next I have to finish the wiring and then start running the gas pipe. Let me know what you guys think. Thanks, Russ
 

MichMan517

Active member
Joined
Jul 29, 2011
Messages
39
Location
SE Michigan
Looks like a very clean install Russ. I'm getting ready to put it a NG 45K Mr. Heater. I'll have a much easier time than you had with the cathedral ceiling. Keep the pics coming, can't get enough.
 

NXGTS

Well-known member
Joined
Sep 15, 2009
Messages
275
Location
Indiana
I'm glad you were able to sort through the issues. Now I can take all the hard work you've been through and copy it. I am going to have all the same issues as I also have cathedral ceilings. Thanks for posting the install. I look forward to seeeing the rest. Keep us posted.
 
OP
Z

z28dad

Well-known member
Joined
Jul 20, 2010
Messages
172
Location
VA
I'm glad you were able to sort through the issues. Now I can take all the hard work you've been through and copy it. I am going to have all the same issues as I also have cathedral ceilings. Thanks for posting the install. I look forward to seeing the rest. Keep us posted.

NXGTS, here is a thread about mounting the heater with the scissor trusses.

http://www.garagejournal.com/forum/showthread.php?t=100185

Good luck with your install. I hope it goes smooth. I hope to get more time to work on mine later this coming week.
 
OP
Z

z28dad

Well-known member
Joined
Jul 20, 2010
Messages
172
Location
VA
I completed the wiring of the unit this afternoon. Hopefully later this week I can get the gas line installed.

I mounted a cooper combination switch on the wall that has a pilot light to give a visual when the heater is powered up. I'm not sure exactly if I will run the unit at all times. I'm thinking I might, but this will also act as a safety switch if something should go wrong especially since the plug is on the ceiling and would require a ladder to access it.

heaterwiringjpg.jpg


Next I installed a twist lock receptacle in the ceiling. I also installed the T-stat wiring.

heaterwiring1jpg.jpg


heaterwiring2jpg.jpg


I went round and round on where to mount the t-stat. The heater is at the back wall and on an angle toward the farthest wall of the garage. I decided to mount the t-stat as close to the farthest corner as possible. It is near the overhead door and man door, but most likely I will using the man door from the side entrance anyway. My thinking was if I had it warm in this location, the whole space would be warm. I may try it for awhile and if needed I will relocate it. My next option was to mount it behind the heater.

I had a friend give me a really nice programmable t-stat. He couldn't get it to work well with his heat pump. He actually got so aggravated with it that he had a new heat pump installed. (Kinda of a long story), so I'm going to see if it will work with this unit. It would be nice to have a programmable t-stat, although this is probably going to be like cadillac emblems on a chevette, but it was free.

heatertstatjog.jpg


heatertstat2jpg.jpg


I still need to find something suitable for sealing the single wall pipe to my B 90. Does anybody know how hot the single wall pipes get coming right out of these units? After that I need to run the gas line, pressure test, and then hopefully get it inspected.

Thanks, Russ
 

dave67fd

Well-known member
Joined
Apr 25, 2011
Messages
872
Location
Southern NH
z28dad,
Beware of the programable thermostat. If it is micro-processor based it "could" cause problems with the Big Max. They recommend using an isolation transformer between the therm and heater.

Also, you might consider mounting another switch right at the heater or to the ceiling in close proximity for local service/testing, it's also code in some locals.

The Permatex Red or copper Hight temp RTV will work well. Any auto parts store will carry it. You can also get the Dow Corning Silastic but i think it's harder/more expensive to get.

Installs looking good. Nice detail on the pics.
 
Last edited:

KCarGuy

Well-known member
Joined
Feb 5, 2009
Messages
2,075
Location
50 miles outside Chicago, illinois
Nice Job so far.
I like the switch with the indicator light. (I might steal that idea)

I had a Programmable Thermostat and switched it out for a Super Simple Honeywell Unit.
It is meant for garages, because its a Heat Only Mechanical Unit, needs no back-up batteries, and can be set as low as 35 degrees.
It has an Off switch that is also nice.

I use single wall pipe off of my Beacon Morris Unit (90 straight out, about a foot over, another 90 back, through the back wall, out another 16", and 90 up three feet)
Every seam is wrapped in aluminum tape.
I can take a Temp reading on the pipe with it running if you would like.
 

brddog

New member
Joined
Aug 24, 2011
Messages
3
I had a Programmable Thermostat and switched it out for a Super Simple Honeywell Unit.
It is meant for garages, because its a Heat Only Mechanical Unit, needs no back-up batteries, and can be set as low as 35 degrees.
It has an Off switch that is also nice.

Can you post a link or give the model number of this Honeywell Thermostat your talking about, sounds interesting since you can set the temp that low and its meant for garages.
 

KCarGuy

Well-known member
Joined
Feb 5, 2009
Messages
2,075
Location
50 miles outside Chicago, illinois
I wish I would have kept the packaging, but here is a few Pics of it.
Inside it says; CT50K 1028

I like it because I need no Batteries, it has an "Off" switch and it can be set to 35 degrees for the winter to keep everything from freezing. Most dont go that low.

Also, Checking with my "Handy Dandy" Craftsman Infrared Thermometer...the temp of the Tubes blowing heat out of my 75K Beacon/Morris Heater reads 243 degrees!
(heats my 25 deep by 30 wide garage with 9 foot ceiling quickly)
The Reading on the Vent tube going out was 116 Degrees about 2 feet from the Heater.
Not bad.
 

Attachments

  • IMG_0413.jpg
    IMG_0413.jpg
    142.3 KB · Views: 110
  • IMG_0414.jpg
    IMG_0414.jpg
    138.8 KB · Views: 104

dave67fd

Well-known member
Joined
Apr 25, 2011
Messages
872
Location
Southern NH
Yeah,
I saw this one as well but decided to get one that gave me the option of turning the fan on/off in the summer. I may decide to swap out to the 35 deg therm. if i don't find myself really using/needing the fan option.
 
To avoid these ads, REGISTER NOW!
OP
Z

z28dad

Well-known member
Joined
Jul 20, 2010
Messages
172
Location
VA
First let me say thanks to all the replies in this thread. It has been very helpful. I did go ahead and purchase the thermostat from amazon today. I finished up the plumbing and passed my inspection. I still need to seal the pipe and I found some tape by 3m that is rated for 600 degrees that I have ordered. The tape at Lowe's was only rated for 250.

gaslinejpg.jpg


gasline1jpg.jpg


gasline2jpg.jpg


flamejpg.jpg


propanetankjpg.jpg


pressuretestjpg.jpg


Overall it turned out looking good. I started to change the copper pipe outside. To me it kinda looks like an eye sore. After I ran the copper outside, I just thought it looked weird. I was going to change it and run the black iron down to the tank and connect there with just a short piece of cooper. My wife said, quit being so **** and get the darn thing connected so we could finish the garage project in the warmth.:lol_hitti 
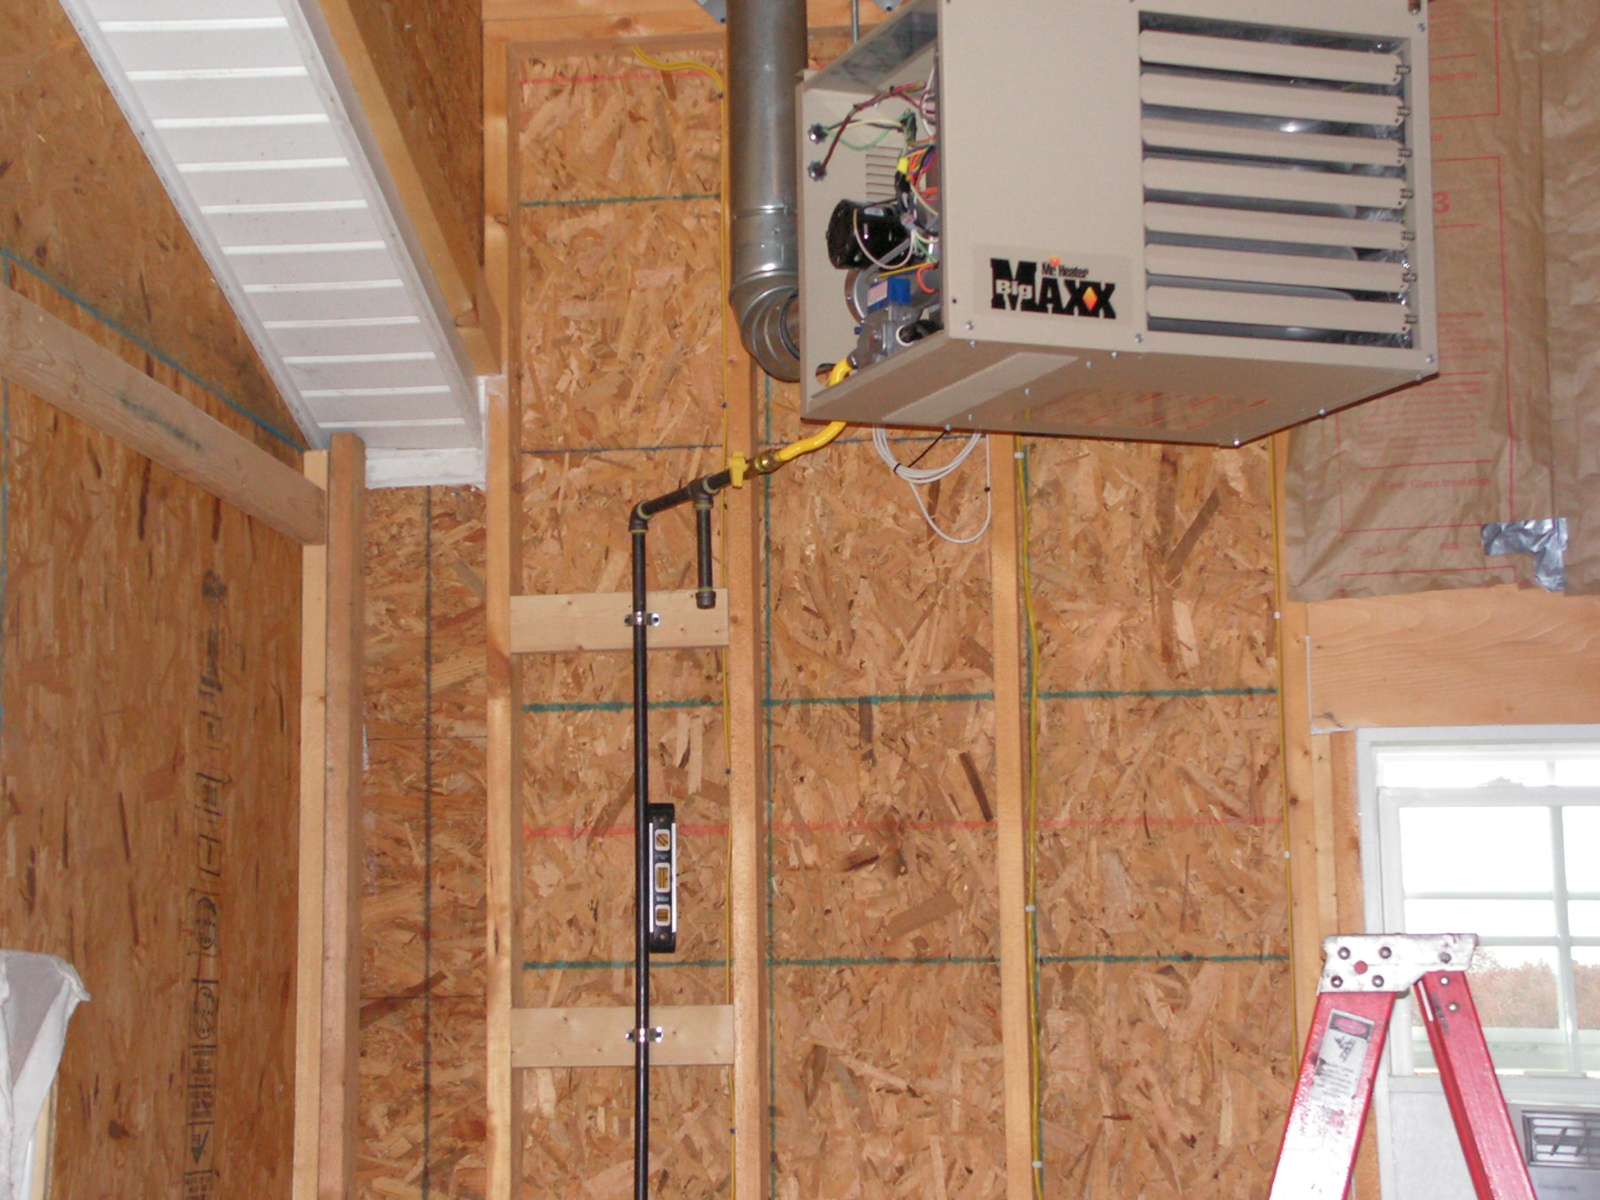
After looking at it for awhile the long piece of cooper doesn't bother me as much. Never mind the gutter pipe eyesore. That is getting fixed in the spring.:)

I passed my inspection and got my tank filled. I went ahead and fired the unit up. I really like it. I do have some concern. I turned down the pressure to where the flame would not roll around the corner of the heat exchanger, but the heater really lost its ability to put out much heat. So I put it back where the factory had it preset. I may see if I can get a manometer so I will know what it is set at.

To me I expected the heat output to be really hot. If I put my hand directly in front of the heater it is putting out hot air, but from the floor it just feels really warm. The temp in the room does increase, but I haven't ran it that much. Most gas heaters I have been in front of are really hot. My 30k btu gas logs will actually burn your skin if you stand too close for too long. Is this the norm for these heaters?

Also I'm a little worried about the fuel consumption. You can really here the propane being sucked out of the tank when outside. It sounds almost like water running. The tank that my gas logs pull from only sounds like a slight hiss when its running. I think I read that the big maxx is using about 3.5lbs/hr. Only time will tell how long a 100lb cylinder will last. As of now I still need to insulate, I'm also planning on installing 3 ceiling fans running in reverse direction. Thanks, Russ
 

Steevo

Well-known member
Joined
Aug 18, 2009
Messages
8,738
Location
43.49600, -112.04300
Looks like a very clean and well done install.
All except for that ugly copper pipe . . . (just busting your chops)
Nice work on the vent and roof jack.
 
OP
Z

z28dad

Well-known member
Joined
Jul 20, 2010
Messages
172
Location
VA
I received the parts I was waiting on:

New t stat:

pict0896j.jpg


And 3m high temp tape that I used to wrap the joints. I wrapped the joint between the double and single wall pipe that I know was a requirement. I also added a wrap around the slip joints of the adjustable 90. Not sure if that was required, or not really needed. What do you guys think?

pict0895a.jpg


pict0894.jpg


pict0893.jpg


The heater really seems to put out the heat. I have noticed that when the garage light is off the first bends in the heat exchanger glows a light red. Does anybody else's heater do this?
 

dave67fd

Well-known member
Joined
Apr 25, 2011
Messages
872
Location
Southern NH
z28dad,
Looks good. Yes you want to seal "All" joints as you did. I'm not sure about the reddening of the tube, might want to somehow check if there is an imbalance on one of the burners.

Couldn't help notice the "Fairlane" on your calender.

Dave
 

KCarGuy

Well-known member
Joined
Feb 5, 2009
Messages
2,075
Location
50 miles outside Chicago, illinois
Nice Job on the Install.
Its pretty common for the tubes to turn red (with light off)
For the first few Runs, check the tape and make sure it stays nice and tight, and as long as everything is sealed well, and there are no leaks at all, You should be all set!
Its great to have a nice warm garage, isn't it?
 
OP
Z

z28dad

Well-known member
Joined
Jul 20, 2010
Messages
172
Location
VA
Thanks guys. It sure is nice to have heat. Thanks for everyone's help in this thread. Hopefully now I can press on and get some insulation installed.
 

KCarGuy

Well-known member
Joined
Feb 5, 2009
Messages
2,075
Location
50 miles outside Chicago, illinois
I did get a chance tonight...since I was thinking about it...to turn off the lights in my Garage and look at my Furnace in the dark.
The Tubes were not Red, or even a slight Glow to them.
I am wondering if its a Propane thing and not a Natural Gas Thing.
I get great heat from My Hanging Furnace. but no glow.
just thought that I would mention that.
 
OP
Z

z28dad

Well-known member
Joined
Jul 20, 2010
Messages
172
Location
VA
Thanks for the info. Mine just has a slight glow in the first bend of the heat exchanger. Im going to check my gas pressure. Im using a 100lb cylinder.
 

Innov8tive1

Well-known member
Joined
Jun 22, 2011
Messages
171
Location
NW ON, Canada
Thanks for posting all the info. especially about the low temp. thermostat. Definitely something I will be getting for my garage, it'll be just perfect. My Reznor (UDAP 75KBTU) should be hooked up tomorrow.......I hung the furnace and did the venting and electrical myself but I am getting a gas fitter in for the rest of the job. It is HARD to find a gas fitter around here, especially this time of year.
 

Mmfh

MEMBER EMERITUS
Joined
Oct 8, 2011
Messages
1,423
Location
Portland Oregon
I just hung the exact same heater at a friends shop, 75k going to be using Propane. At this point it was so much work just to get it hung from the ceiling that we stopped for the night.

I'm wondering about the gas regulator, In your pictures I don't see an additional regulator other than what is built into the heater. Is that right?

Can we just plumb this into a tank with a shut off valve on both sides and call it a day?

How is yours working for heating your shop/ versus how much propane it uses??

How high is it off the ground, and can you feel the air down on the ground? Only applies if you have high ceilings. We put this one up 16'.

Thanks
 
OP
Z

z28dad

Well-known member
Joined
Jul 20, 2010
Messages
172
Location
VA
I do have a regulator at the tank. I purchased it at lowes. I think its rated up to about 100k btu's, but would have to check. My unit is about 9.5-10 ft from the floor. The air is really warm at floor level depending on how I adjust the louvers. I have not had enough time to use it to comment on the gas usuage. Its been about 55-60 degrees lately. I'm not complaining. Thanks Russ
 

Mmfh

MEMBER EMERITUS
Joined
Oct 8, 2011
Messages
1,423
Location
Portland Oregon
I do have a regulator at the tank. I purchased it at lowes. I think its rated up to about 100k btu's, but would have to check. My unit is about 9.5-10 ft from the floor. The air is really warm at floor level depending on how I adjust the louvers. I have not had enough time to use it to comment on the gas usuage. Its been about 55-60 degrees lately. I'm not complaining. Thanks Russ


Thank you, We will pick up a regulator with our other supplies.
 

lucrestyle

Member
Joined
Nov 25, 2011
Messages
5
Location
North Bay
I just ordered this same unit from Northern Tool.

This post is very helpful.

One question - does the unit plug into a regular wall plug or require a special plug or hard-wire to the electrical box.

do i need any special wire or is regular 'plug' wire ok?

sorry i'm a newb to this stuff

thanks
 

KCarGuy

Well-known member
Joined
Feb 5, 2009
Messages
2,075
Location
50 miles outside Chicago, illinois
My Unit...Like Most, does not come with a power cord.
it has terminals inside to hook up the wiring and a hole for a cord connector.
I used a 3 wire round cord and watertight compression fitting (10 gauge)
and a standard 120 volt, 15 amp, 3 prong plug that plugs straight into a wall outlet.

so...no special wire or plug needed.

*but i wouldnt use a lamp cord or a 2 prong plug.
 
OP
Z

z28dad

Well-known member
Joined
Jul 20, 2010
Messages
172
Location
VA
I struggle with my decision if i should use a plug or hardware it with a piece of flex. The plug just makes it quicker if you ever need to take it down. I used a twist lock plug and recepticle since I was plugging the unit in overhead. Its probably overkill, but I felt better doing it this way. I purchased the whip cord at lowes where you can buy it by the foot. I used 12ga and used a 15a plug and outlet.
 
Last edited:

lucrestyle

Member
Joined
Nov 25, 2011
Messages
5
Location
North Bay
Thanks for the help.

I purchased and installed my wiring and boxes. I'm installing switch with an indicator as well. I looked at the twist lock plugs at hd today but opted to go with a regular plug as I had a few extras at home.

I have a electrican friend coming to
Make the connections, I could
Do it but would rather have a professional.

Still waiting for heater will add my pics when it
Comes.
 
To avoid these ads, REGISTER NOW!
Top Bottom