Forgot to throw in there that I ran RG6 from my electrical pole as well to hook up to a dish. Figured since I had the trench dug, I might as well get as much stuff as I could in there- so I added a switch to the outside light too; this runs to the garage so that I don't have to run out to the pole to turn on and off. I filled the trench in 1/2 way before adding the cable line to hopefully protect against any interference.

You are using an out of date browser. It may not display this or other websites correctly.
You should upgrade or use an alternative browser.
You should upgrade or use an alternative browser.
32x40 Finally getting my Garage
- Thread starter matouse3
- Start date
milner351
Well-known member
Great looking building!
We are hoping to buy a house with a similar building (roof pitch is different) on site. I will be looking at your thread to see what you do with the upstairs space. I'm debating between storage / wood-shop (metal work and car work downstairs) / "man-cave".
We are hoping to buy a house with a similar building (roof pitch is different) on site. I will be looking at your thread to see what you do with the upstairs space. I'm debating between storage / wood-shop (metal work and car work downstairs) / "man-cave".
Got around to putting in a 6 pack of can lights this past weekend. They turned out well I think. I put 2 above the stair way and 2 in the main room. I spaced them so that they wouldn't interfere with the tv area viewing. I'm running a halogen bulb over the stairs for instant bright light and CFL bulbs in the rest for long running efficiency. I'll probably splurge for some LED bulbs in the future when I find them on sale. For now the CFLs work well once I give them a few minutes to warm up.
I also put up the separation wall for the bedroom toward the South end of the room. I wanted to get that up to hang one of the switches for the room and not have it hanging from the ceiling and then have to tear it apart to run it down the wall. Left out a few studs to give me space to pull in the shower unit, which will likely be 36" wide, but we'll see what the wife picks out.
I also put up the separation wall for the bedroom toward the South end of the room. I wanted to get that up to hang one of the switches for the room and not have it hanging from the ceiling and then have to tear it apart to run it down the wall. Left out a few studs to give me space to pull in the shower unit, which will likely be 36" wide, but we'll see what the wife picks out.
Attachments


Great looking building!
We are hoping to buy a house with a similar building (roof pitch is different) on site. I will be looking at your thread to see what you do with the upstairs space. I'm debating between storage / wood-shop (metal work and car work downstairs) / "man-cave".
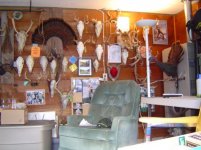
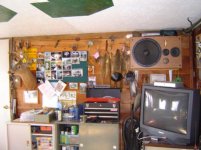
Thanks, you'll have your hands full trying to decide what to do. The best thing that I have done is take it slow and spend many an evening out there with a cold one thinking about options. My original and still current plan is to essentially replace a building (mantown) that I had used at my previous house that I used for storage and organization of all my outdoor gear. I included a couple pics for some background reference. It was an old grain storage building that started off with an old propane furnace installation and morphed into its current condition. All my stuff is still over there and once the upstairs in the new place is complete I plan to move it over into its new home.
Attachments


LuckyRugger
Well-known member
Nice build. Who did your spray foam and concrete? I'm in Mid-Michigan too, I need to get my barn insulated soon and have a little crete work done.
Chilliwack Murray
Well-known member
Any updates for 2013?
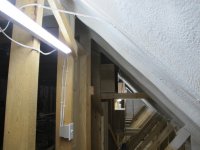
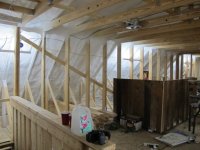
Well, its been some slow movement, but some movement none-the-less. I've been working on getting my walls upstairs laid out so that I can start putting up the siding. I'm trying not to rush it as its much easier to run wire and such behind the walls with the siding off.
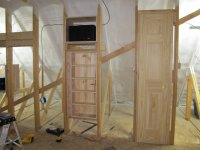
I ran some lights behind the walls to light the storage space, threw in a couple of 18" doors that fit in the stud gaps, framed in my speaker system, and built a little shelf to go in the wall. I'm trying to make as much in-wall storage as possible since that space is more or less wasted in some areas upstairs and will be most useful with a built-in installed.
I also scored some fire extinguisher cabinets from a surplus place near work. They were all new, all stainless, and fire proof/insulated. The place had them for $10 each, so I bought all 5. The words on the front are stickers and can be just shaved off with a razor blade. The one in the photo I plan to have on the front wall and actually use it as a fire extinguisher cabinet. I plan to put the others on the back wall and just use as cabinets.
Attachments

porschedude996TT
Well-known member
Wow, that togue and groove looks great.
ITSWILL
Well-known member
nice garage, I am starting a build of a 40 x 50 with a gambrel roof but pole barn construction.
I don't think I saw you mention it, what size is your pex?
I don't think I saw you mention it, what size is your pex?
Found time to finish off the trim work on the one wall and apply my sealer. Went with a coat of sanding sealer followed by 2 coats of poly. Turned out very nice with only light sanding between the first 2 coats.
Once the wall was done it opened up the ability to hang all the built in cabinets as well as the tv mount.
Once the TV mount was up we had to hang the tv and hook up the satellite!
Once the wall was done it opened up the ability to hang all the built in cabinets as well as the tv mount.
Once the TV mount was up we had to hang the tv and hook up the satellite!
Attachments

Last edited:
Omphaloskeptic
Well-known member
TV! A major milestone! lol
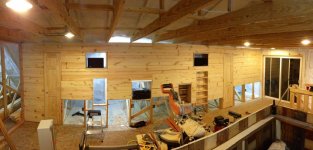
Still picking my way along with the room finishing. I got the back wall up and finished and we got the majority of the ceiling done this weekend.
I decided to go with 1/2inch plywood on the ceiling to break up the tongue and grove pattern, but keep the wood look. I coated it with sanding sealer, and two coats of poly before hanging. Picked up a drywall hoist which saved the job. I honestly don't know how you could have done it without that hoist- we raised and lowered and adjusted all those sheets so many times that it would have destroyed me if we had to lift it each time AND there is no way you could have looked at it to fine tune each sheet. Definitely worth the $180.
I hung the sheet with 1.5" Spax screws with the fine heads made for plywood. They went in really easy without any predrilling needed and you can hardly see them once you tuck them lightly under the surface. They are there when you look up, but from an angle they are generally invisible.
Attachments


Go Spartans
Finished up the ceiling and got started on my ceiling feature for the center of the game watching area. Priorities--football season is fast approaching.
I ran an electrical outlet to the center of the ceiling with a switch. I had picked up some green rope lighting (after Xmas clearance) for this specific project and put them to use behind the block S. 2x4s served as spacers on the back and its all held up by some dark, bronzeish colored 3" screws which I placed all around the block S, evenly spaced about 3 inches apart along the entire perimeter. The light with only one strand of the lights was a bit too low, so I ended up running 3 strands around the S.
The S is constructed of 3/4 inch birch plywood with forest green stain and 3 coats of poly. The stain came out OK, but I should have used a wood prepper for soft woods on it. I think that would have helped with the blotchy areas.
Attachments


Last edited:
80ECLT
New member
Nice build! Any updates?
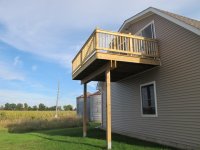
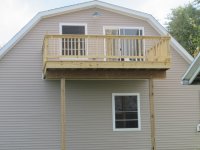
Loft Deck
Overdue for an update, but here's a photo of the deck we put up on the loft. 6x6 support posts anchored with some support brackets I sunk into some 4ft cylinders I filled with cement. These brackets were really heavy duty.
I had the ledger board flashed in when the building was put up in preparation for this. The job was fairly straight forward from there. 2x10 joists and premium deck board for the top. I constructed the railing from pre-made spindles and rail posts and 2x4s with a deck board on the top as a drink shelf. Nothing fancy, just all PT lumber, but I think it turned out well.
Attachments
PERFORMANCE-RED
Well-known member
- Joined
- Sep 18, 2008
- Messages
- 62
Very very nice i want to build something like this as well. How tall it the ceiling in the man cave?
I like the idea of the hunting deck off the back of the shop/garage.
I like the idea of the hunting deck off the back of the shop/garage.
Hunting Deck
Thanks--The ceiling in the loft is 7'8"; tall as I could get with that roof type.
The back deck serves us well for archery practice. Really a nice place to shoot from.
Very very nice i want to build something like this as well. How tall it the ceiling in the man cave?
I like the idea of the hunting deck off the back of the shop/garage.
Thanks--The ceiling in the loft is 7'8"; tall as I could get with that roof type.
The back deck serves us well for archery practice. Really a nice place to shoot from.
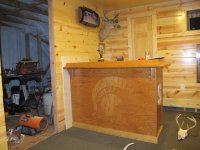
The Bar
Got around to installing the bar- put up an Old Style light that was gifted to me. Put an outlet up high and a switch beside the bar to clean it up a little.
The bar was a craigslist find that fit the Spartan theme. I figured for $100 I couldn't even buy the wood. I was fairly limited on where I could put it, but it works well where it ended up. It fits a small fridge in the space next to the wall.
Attachments


Last edited:
Kevin54
MEMBER EMERITUS
Wow!!! That place looks great. I really like the plywood on the ceiling. It's different and really does the ceiling justice to blend in with the wood covered walls.
sunsation288
Well-known member
Seriously Matouse3 , you have a one of a kind garage !!! and living space , please keep the picture coming !!
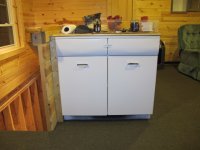
Countertop and Decor
Thanks for the kind words fellas. Thought I'd share a couple more photos as I forgot to post some pics of the countertop and cabinet that I put in the corner. I just used some scrap carsiding along with some birch plywood with a simple routered edge for the countertop and the cabinet doors. The metal cabinet that I built this unit around is an old Crane cabinet that was in my Grandmother's house when we moved in. I don't think she ever used it for much, but it was always in the upstairs in the house and I must have moved it a hundred times when I was remodeling before finally taking it out to the barn. I saw it out there one day and knew I had found its home. I pulled it completely apart, sanded off the rust, primed and painted it and it looks like the day it rolled out of the factory.
I also had carpet installed in the last couple weeks. An industrial, office style carpet with no pad. Nothing fancy, but it cleans up quick and I don't have to worry too much about boots walking around up there.
Also getting around to moving a few of my deer racks and such into the place as well as getting some recliners moved in. Starting to look the part now.
Wow!!! That place looks great. I really like the plywood on the ceiling. It's different and really does the ceiling justice to blend in with the wood covered walls.
Seriously Matouse3 , you have a one of a kind garage !!! and living space , please keep the picture coming !!
Thanks for the kind words fellas. Thought I'd share a couple more photos as I forgot to post some pics of the countertop and cabinet that I put in the corner. I just used some scrap carsiding along with some birch plywood with a simple routered edge for the countertop and the cabinet doors. The metal cabinet that I built this unit around is an old Crane cabinet that was in my Grandmother's house when we moved in. I don't think she ever used it for much, but it was always in the upstairs in the house and I must have moved it a hundred times when I was remodeling before finally taking it out to the barn. I saw it out there one day and knew I had found its home. I pulled it completely apart, sanded off the rust, primed and painted it and it looks like the day it rolled out of the factory.
I also had carpet installed in the last couple weeks. An industrial, office style carpet with no pad. Nothing fancy, but it cleans up quick and I don't have to worry too much about boots walking around up there.
Also getting around to moving a few of my deer racks and such into the place as well as getting some recliners moved in. Starting to look the part now.