Omphaloskeptic
Well-known member
The grass is always greener at the Center of the Universe! lol

Thank you Jim. If you're going to do specific mid-year Corvette seats I can send you a link for a more detailed post I did on that project on another forum.
Haven't forgotten about the wood shop pictures either.
Thomas
")
 Still love your shop ...
Great progress on all fronts. Landscaping is a joy for me and a green thumb is not necessary, because, if it was, I'd be out of luck!
In looking at the seat restoration, I was shocked to see the level of rust on the seat frames for my 356 project. I'll have more on that aspect posted in my thread a little later on.
Just a note to say that I thoroughly enjoy my time reading about all that happens at your home/shop/garage.
Best,
Ody.
 When I do, I am planning on going on a "Great Garage Tour". Chris and I want to visit as many folks as we can from this thread who don't mind us visiting. Even those in Australia and New Zealand (is Sick Puppy even still around??) Love all your pictures and great sense of humor! What, me worry.
 Thomas,
Are you a member of the National Corvette Restorers Society? That seat story would be great in the membership publication – The Corvette Restorer. I know a lot of the members would welcome it. Via PM I can make all the connections you need to get that done, if you wish.
Remember Hans Norberg!
Terry
Thomas,
again thanks for all the inspiration you are giving me, almost every day I see another item in your garage and I think hmmm I like that, I want that
I have a question, is that a (Original) Milton driveway bell above the man door?
I'm thinking of installing one myself.
Hugo.


 It was disassembled, cleaned, painted (again, long before I knew about Rick and his powder coating skills) and I had the bell and attachment acorn nut re-chromed. Milton bells just ring twice with a ding, ding. This one will ring the bell continuously as long as the points under the black dome are in contact with each other. So if someone parks...


The circled LP album cover is titled Bakersfield '64 which a recording of the 1964 Fuel and Gas Championships drag race meet held in..........Bakersfield, California.......
Was a senior in high school and traveled down with 3 buddies from the small town we lived in for the 1964 Fuel and Gas Championships. Great times.


I have the younger brother (or maybe the son) of your fan - I don't know the exact age but I imagine it's late 1950s, light grey in color, with a 16" blade. Very quiet and moves a lot of air. http://www.garagejournal.com/forum/showthread.php?p=2075472
The fan blades are shaped differently but you can see they used the same oscillating mechanism and base design for quite a while.
Ya know, if you have something that works and works well, why change it? Watch this space.Here's a Corvette project I've recently finished that has been detailed on another forum but I'll share some highlights here. There is some material that has greater application than just servicing a seat for a Corvette.
The drivers seat didn't move and wouldn't stay latched in position to my satisfaction so I decided this winter to solve the problem. I doubted that it had any service work in the last 45+ years so to begin...

...I removed all the upholstery to leave the bare seat frame. The factory never puts much paint on areas like this which are unseen. In time that paint will break down and the exposed metal will begin to rust. It's worse in a convertible car which at times can get caught in the rain with the top down which will soak the carpet and create a very humid environment for the seat metal. Here is the seat frame is viewed upside down.

The seat latch mechanism (there are 2, one on each side) and seat tracks were all gummed up with decades old dirt and dried out grease.

Additionally there were broken parts like these seat bushing springs and latch return springs that were distorted so they wouldn't put proper tension on the latches.

Some of the problems with the seat not latching properly are due to the return springs not putting proper tension on the latches (circled yellow) and the seat notches themselves (circled blue) which had a build up of old grease and debris keeping the lever from fully engaging the track notch. Cleaning and lubricating would help but there is more to it than just that.

A bit of a surprise was finding how poor quality the factory spot welds were and that most were either cracked or broken.
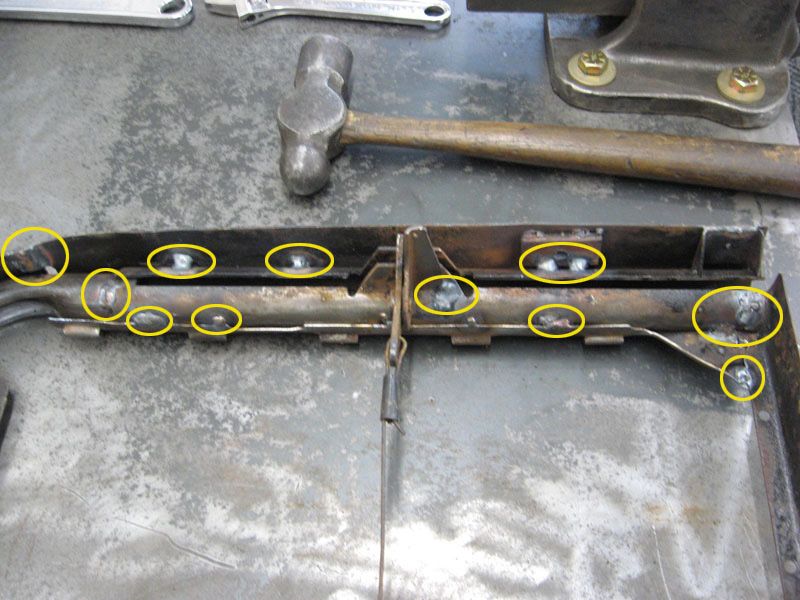
Here is one side of the seat frame with all those spot welds repaired. Once this was all done the seat frame was remarkably more rigid and stronger.

The metal is thin so if you're going to MIG weld use the lowest setting and just use a momentary spot. Better still is TIG welding (results seen here) which gives greater control and localized heat to minimize warping the frame.

There were also a couple of tapped screw holes that were stripped so they were filled, drilled and then...

...re-tapped as seen.

Both latch levers had some wear. That notch was worn into this lever, it shouldn't even be there. So a piece of aluminum was used on the backside of the notch to back up the notch and it was then TIG filled with metal. The new metal won't attach to the aluminum as this was done.

After the new metal filled in the notch, it was reground and filed to shape. Both of the latches were thus repaired.

With all those repairs done, all the various parts were prepared for new paint by removing the old paint and rust...


...and then painted. This was done in the winter so I used the heat from my house boiler (seen in the background) to help dry the paint. Powder coating might have caused some clearance problems with the moving parts plus I didn't really need the durability of powder coating. Priming and painting will be plenty durable enough in this application.
This is the end of Part 1. To be continued.
Thomas
what is the type of boiler? Wood? Gas? Oil?
 .
.


Did you consider painting the metal parts of the castors? Or are they left deliberately to maintain authenticity?
........... It's always my preference to leave things original if possible but if it's too far gone, either visually or functionally, then I'll restore to the highest degree that I can. It's only original once. Embrace the patina!
Thomas
 ) I finally found one I was happy with. That is was for sale in Knoxville, Tennessee, about an 8 hour drive away, wasn't a problem either. For the right equipment I don't mind traveling a little bit to go get it.


Looking good Thomas. I can't wait to see the end result. Also, great tip on using ziplock plastic bags. I use them all the time in the shop, particularly when I'm taking apart a machine and trying to keep track of small parts/hardware. Just drop the parts in a ziplock bag and you're organized. I also label the bags with a "Sharpie" marker so I know exactly what they are upon re-assembly.
Jim C.
Those lines looked pretty good for some I've seen and worked on over the years Thomas. Since they're multi-layered with a woven steel liner they usually hold up really well even if the outer layer of rubber is gone.
Correct me if I am wrong but you have two tractors now or just a loader to fit on the one you already have ?
I had to look at that.. just one.. I think he took it . To get the loader
I had to look at that.. just one.. I think he took it . To get the loader
HOTFR8 I really could have written the paragraph much better, my apologies for the confusion. Vernmotor is correct, I trailered my existing JD 855 to Knoxville just to make sure the 70A loader I was buying would install and work compatibly with my existing tractor. I have and need only 1 tractor, the 855. Should the need arise for a larger tractor, I have friends who will readily loan one to me. As happy as I am with my 855 I can't imagine ever replacing it in my lifetime. The 70A loader is self supporting when off the tractor as you can see in the pictures and is extremely easy to remove or install by myself. Takes about 2 minutes. Really clever, well thought out piece of engineering. In winter I remove the loader and install the snow blower and soft cab. Thanks for keeping me on my toes!
Thomas
Gotcha..... thank you.OK I went back through post #6749 and added some additional information and also edited it for clarity. I hope that will prevent any misunderstanding.
Thomas
Sorry to keep you on your toes......
Oh no, it's quite all right. Someone has to give poor Miss Chris a break from keeping me on my toes! I'm quite sure she appreciates the help!
Thomas
 Now that made me laugh.
Looking good Thomas. I can't wait to see the end result. Also, great tip on using ziplock plastic bags. I use them all the time in the shop, particularly when I'm taking apart a machine and trying to keep track of small parts/hardware. Just drop the parts in a ziplock bag and you're organized. I also label the bags with a "Sharpie" marker so I know exactly what they are upon re-assembly.
Jim C.


