
You are using an out of date browser. It may not display this or other websites correctly.
You should upgrade or use an alternative browser.
You should upgrade or use an alternative browser.
Between 705 & 1200 SQ/FT The Time Machine Garage - 32x24 with loft
- Thread starter Gerald O
- Start date
Workspaces between 705 and 1200 squarefeet.
Blue Seducer
Well-known member
Good find on the tiles. How will the loft be finished? 
vr4joe
Well-known member
Wow. I really like this build. I love how you've decided to make another attached garage, making it look like it was part of the house right from the beginning.
Thanks. These are actually new product that I modified slightly.Nice lamps. Good find.
Tim
Got the fixtures and shades here:
http://www.warehouse-lighting.com/commercial-lighting/vapor-tight-lighting.aspx
http://www.warehouse-lighting.com/p...ndescent-Vapor-Tight-fixture__WL-MTAC01S.aspx
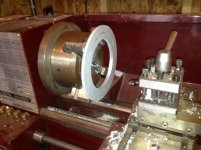
Repainted them in black wrinkle.
I wanted the top of the fixture to peek through the shade a bit, so I modified the shade flange and the guard cage on the lathe and added a few screws.
Attachments
The loft is going to get insulated and sheetrocked. I was originally planning on a split-system heat pump with the traditional air-handler tucked away in an attic corner, but now I'm leaning toward a ductless mini-split.
This will be typical man's land decor -- old leather couch, random ugly furnishings that wife wants out. If I can figure a way to get a pool table up there...

Wife wants to turn the existing bonus room in the house into a theater room. All my hobby stuff that's in there right now will have to get moved into here (part of the deal): pinball machines, model airplane junk, computer stuff.
This will be typical man's land decor -- old leather couch, random ugly furnishings that wife wants out. If I can figure a way to get a pool table up there...
Wife wants to turn the existing bonus room in the house into a theater room. All my hobby stuff that's in there right now will have to get moved into here (part of the deal): pinball machines, model airplane junk, computer stuff.
Weekly update
It's starting to look like I imagined when designing it. Siding and exterior trim is all up now. I'm not crazy about the baby-**** yellow color, but thankfully that's all getting painted to match the house.
Tiles arrived for the floor. It's going to be quite a while before I can get to them though. I had to jump on the deal while it was hot -- $0.99 /sqft!
Attachments


jlylec
Well-known member
Very nice! Looking really great!
MoparTrucks
Well-known member
Looks great and I am enjoying the thread, the overhead view of your property really was interesting to see your layout and what you were doing.
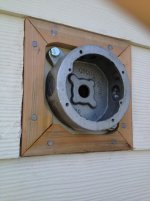
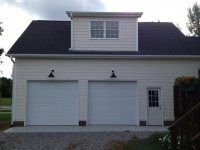
Got the paint and roofing finished. Now it's starting to look like it belongs to the house. Started on mounting my exterior over the door lights. I found these heavy duty cast iron Crouse Hinds junction boxes to mount the gooseneck light fixture bases to. Lagged into the studs with 5/16" x 2" lag bolts. These aint going anywhere.
I got myself committed to a mess of work over the weekend. I had been wanting to do some of the inside walls in brick veneer, but the cost for the stuff is insane. Then craigslist happened. I found someone selling off some old inventory at about 1/3 the going retail price. So I picked up about 450 sqft of the stuff. It'll be a while before it goes up.
I'm thinking some Pink Floyd might be the right music when I get going on it.
Attachments


scootermcrad
Well-known member
Wow! I love this build! I'm also in NC and have some questions for you. I'll shoot you a PM, as not to take away from your thread.
Keep the posts coming!
Keep the posts coming!
Progress!
Sheetrock is up in the mudroom, One window in the mudroom that was part of the original house has been converted to a 15-lite door. So now there is access to the garage from the house.
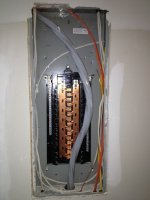
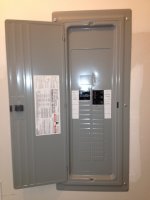
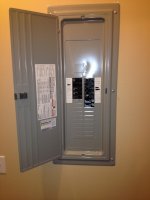
The basic electrical is done. This is the part that was contracted as part of my original build. For now I have a few basic outlets, including one 240V outlet, and a few lights and switches. But to support all the stuff that is going to be added later, I had my whole electrical service upgraded. A new 320/400 dual-lug meter base was put in that splits the feed from the meter to two 150amp main disconnect panels. One of these panels now feeds the original house main panel, and the other feeds the new garage subpanel.
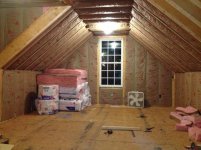
The garage panel looks pretty sparsely populated at the moment, but I've got plans to fill about 50% of that soon.
I put in two keyless light bases in the garage ceiling which will serve until I get the sheetrock all up. But the two 43watt CFLs I stuffed in there (300 watts equivalent) light the place up surprisingly well.
Sheetrock is up in the mudroom, One window in the mudroom that was part of the original house has been converted to a 15-lite door. So now there is access to the garage from the house.
The basic electrical is done. This is the part that was contracted as part of my original build. For now I have a few basic outlets, including one 240V outlet, and a few lights and switches. But to support all the stuff that is going to be added later, I had my whole electrical service upgraded. A new 320/400 dual-lug meter base was put in that splits the feed from the meter to two 150amp main disconnect panels. One of these panels now feeds the original house main panel, and the other feeds the new garage subpanel.
The garage panel looks pretty sparsely populated at the moment, but I've got plans to fill about 50% of that soon.
I put in two keyless light bases in the garage ceiling which will serve until I get the sheetrock all up. But the two 43watt CFLs I stuffed in there (300 watts equivalent) light the place up surprisingly well.
Attachments


Buzz Lightyear
Well-known member
How have I missed this one?
It looks really nice and it matches into the rest of the house very well.
Keep the updates coming.
It looks really nice and it matches into the rest of the house very well.
Keep the updates coming.
My builder is just about finished with his part. After garage doors and a few details it'll be ready for final inspection. I still have to get the driveway paved, but I couldn't resist doing a test fit of the Suburban.
It fits pretty well, but I won't be putting any permanent workbenches in front of that spot.
It fits pretty well, but I won't be putting any permanent workbenches in front of that spot.
Attachments

YarSmythe
Active member
Looks great! Can't wait to see the hobby room come to life.
Thanks Lee.Looks great! Can't wait to see the hobby room come to life.
Got my final inspection ok'd yesterday by the building dept. Garage doors go up this Monday. So it will be all closed in and lockable then, and I'll be able to move a few things in. I've got the door connecting to the house at the mudroom all in and trimmed out and painted (on the inside of the house side) now.
For inside finish I'll probably be doing the loft first. Next steps in the loft will be plumbing the bathroom, wiring, insulation, HVAC and then drywall. It's going to go at a slower pace from here on since I'll be doing all the rest by myself.
It's a garage!
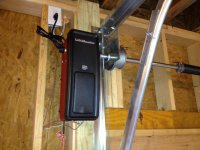
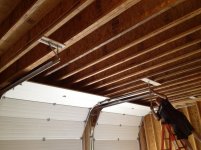
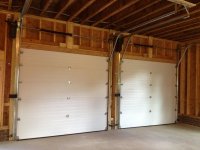
Got the overhead doors installed yesterday! Now I can safely start putting things in here. It took a while because the installers had to special order the high-lift tracks. With the doors up I've still got 10'-6" of clearance underneath--plenty of room for raising a vehicle on the lift. With them down it will be about 11'-2". To make it easier for when I do the sheetrocking later, I put up small shims of sheetrock above the ceiling brackets for the rails.
This is the first time I've had insulated garage doors. One thing I noticed right away was that the inside is metal covered and smooth. There is no exposed door framework to collect dirt and spiders. It will be so much easier to keep them clean that even if I didn't need insulated it would be worth the extra cost. I think it makes them quieter too. With the new Liftmaster 8500 openers the doors operate almost silently ... that should make it easier to sneak in when I get home late at night.
Attachments


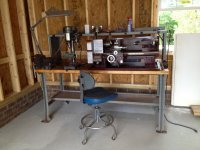
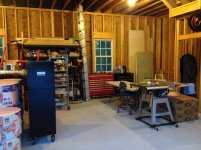
Moved in a couple of things. The workbench and lathe have been in storage back in the garden shed for a couple of years. First thing after hearing that I had a big empty garage, my brother convinced me to get it out and make him some parts for his 1930 Buick Coupe restoration project.
Oh, and it needed some wheels to keep it company.
Oh, and it needed some wheels to keep it company.
Attachments

Update
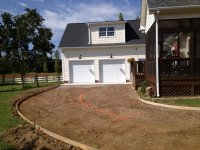
Time to catch up a bit. We got the driveway extension done a couple weeks ago. I had the same guy that did my garage slab do the driveway work. This was just your basic 4" thick 3500 psi concrete.
The base soil was a hardpan mix of clay and gravel so we didn't need to add more base to it. The natural contour was also already pretty close to where I wanted it. So we just had to scrape off the thin topsoil and do a minor bit of grading.
By the time it was all done it ended up taking about 21 yards of concrete. we placed 14 yards the first day, then measured what we had left to do. One more 7 yard delivery the next day finished it.
Attachments


It's been 2 weeks since the concrete was poured. Long enough for me to drive the Suburban over it into the new shop to do a brake job. The garage isn't finished yet but I've got no choice but to start using it.
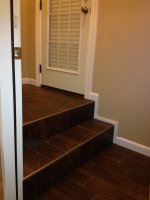
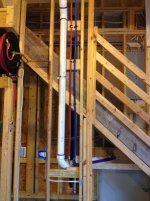
In the meanitime, while I was waiting for the driveway to cure, I built a new stairway to the deck. I thought I might be able to reuse the old one but it was too brittle to save. Wife is happy to get new stairs anyway.
I tried to get the same angle in this picture as the computer rendering from my CAD software at the beginning of this thread. I think it came out pretty close!
Attachments

Last edited:
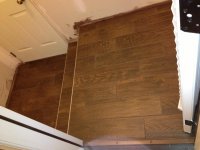
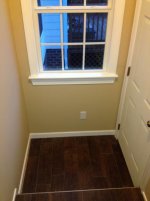
Started to do a little tile work too. This is the small mudroom that connects the garage to the house. The tile is a 6" x 24" porcelain that looks like rough wooden planks. I used Ditra under these on top of the Advantech subfloor.
Next I can trim this room out, paint it, and check it off the list. The window casing needs to get furred out due to the 2 x 6 wall construction. All the windows in the building are going to need this done.
Next I can trim this room out, paint it, and check it off the list. The window casing needs to get furred out due to the 2 x 6 wall construction. All the windows in the building are going to need this done.
Attachments


larry4406
Well-known member
Very nice build!
I am surprised you were able to have a 15 light door connect the house to the garage. The counties I build in require us to have a B-label fire door between the house and the garage with spring loaded auto-close hinges.
I really like the tile with the wood plank look. Never seen that before.
I am surprised you were able to have a 15 light door connect the house to the garage. The counties I build in require us to have a B-label fire door between the house and the garage with spring loaded auto-close hinges.
I really like the tile with the wood plank look. Never seen that before.
That's a mudroom that sits between the garage and the house. You can see it better on the floor plan in the beginning of the thread. It has a fire-rated door on the side where it connects to the garage.Very nice build!
I am surprised you were able to have a 15 light door connect the house to the garage. The counties I build in require us to have a B-label fire door between the house and the garage with spring loaded auto-close hinges.
I really like the tile with the wood plank look. Never seen that before.
I put the 15 light door in to make the wife happy. We had a window there previously and she didn't want to lose all the light.
It's been 2 weeks since the concrete was poured. Long enough for me to drive the Suburban over it into the new shop to do a brake job. The garage isn't finished yet but I've got no choice but to start using it.
In the meanitime, while I was waiting for the driveway to cure, I built a new stairway to the deck. I thought I might be able to reuse the old one but it was too brittle to save. Wife is happy to get new stairs anyway.
I tried to get the same angle in this picture as the computer rendering from my CAD software at the beginning of this thread. I think it came out pretty close!
I've been researching garage build projects and came across your thread. Looks like a great build. Any updates with photos? I was also wondering whether you considered putting in a "turn out" so you could back out of the garage and turn perpendicular to the house (nose of the car facing the stairs) and then turn right and drive nose first away from the garage.
It loos like it is a long back up otherwise?
Hi Bob, thanks. I've been busy working on this thing all summer, but most of the work is detail stuff that isn't very exciting. I'll post up some pictures.
Yeah, it is a long backup. I'm kinda limited in the curved section because my septic tank and drain field is just past that and I can't pave over it. When I get the boat out of there there's a wider area in front of the old garage that I could turn around in.
I find that just following that curve backing out can be a bit tricky and I often end up going onto the grass.
New Google maps views:
Attachments


Last spring I took out permits for finishing the upstairs loft area with a full bathroom, electrical, and heating/cooling. Since that put me under a deadline that forced me to finish work in a particular order to meet inspections timetable, I've had to focus all my time on that part of the garage.
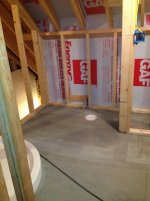
The bathroom was a tight squeeze, but I found an arrangement that worked and just barely has the required clearances.

The bathroom was a tight squeeze, but I found an arrangement that worked and just barely has the required clearances.
Attachments
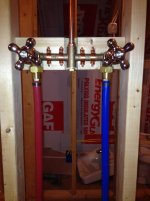


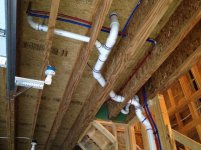
The plumbing was a pretty challenging puzzle. Lots of critical angles and measurements. The drain line runs through the house crawlspace to join with the house main drain.

Attachments


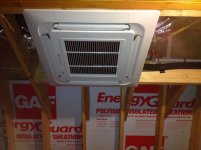
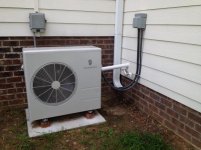
I just got the mini-split HVAC installed and operational. Even though the room is not closed up yet the AC still cools pretty well. Before you know it though I'll be needing to run it in heat mode.
I covered the installation extensively in a thread on the Heating and AC forum here:
My multi-zone mini split install


I covered the installation extensively in a thread on the Heating and AC forum here:
My multi-zone mini split install
Attachments

Already running out of room with stuff moved in. A lot of this stuf on the floor is building materials that will become part of the garage: porcelain tile for the floor, brick veneer for some of the walls, insulation...


Attachments


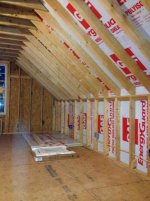
I'm at the stage now of insulating the loft. Because of adding the HVAC it's now going to be considered as living space and it has to meet the insulation codes. This requires me to have a minimum of R-15 in the walls, R-19 in the floor, R-30 in the 'cathedral ceiling' areas (the sloped sections under the roof rafters), and R-38 in the horizontal ceiling area.
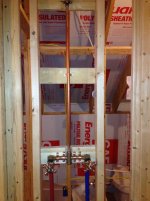
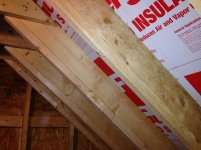
Though I would have preferred closed cell foam, I didn't want to break the bank. Fiberglass turned out to be the cheapest option, but it's exceedingly time consuming to install it to a high standard. One big problem was the shallow depth of my roof rafters: 2x8. This gave me only 7-1/4 inches to achieve R-30. With foam that would have been easy, but going with the fiberglass meant that I would need to have roof vent baffles under the insulation, further reducing the available depth.
I came up with a scheme that would do it but it was a ton of work. First, I made baffles from 1/2 polyisocyanurate foam board. I had to have a 1" clear vent channel depth, so I used spacer strips cut from the foam board. Then foam board panels had to be cut to size to fit snugly for each rafter bay. This reduced the available depth for insulation by 1-1/2 inch leaving only 5-1/2 inches.


One benefit of the polyiso board is that it has a high R- value of R-3.6 in only 1/2" thickness. Another benefit is that this is foil faced, so it provides a great radiant barrer when applied with the foil side facing the ventillation gap. The R-3.6 gets to be deducted from the amount of fiberglass I would need, leaving me with about R27 to do in fiberglass.


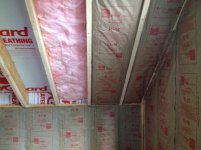
The code also required me to have a solid backing behind the insulation in my knee walls; the bats can't be left open faced. So I used the foam board behind the knee walls too.
Though I would have preferred closed cell foam, I didn't want to break the bank. Fiberglass turned out to be the cheapest option, but it's exceedingly time consuming to install it to a high standard. One big problem was the shallow depth of my roof rafters: 2x8. This gave me only 7-1/4 inches to achieve R-30. With foam that would have been easy, but going with the fiberglass meant that I would need to have roof vent baffles under the insulation, further reducing the available depth.
I came up with a scheme that would do it but it was a ton of work. First, I made baffles from 1/2 polyisocyanurate foam board. I had to have a 1" clear vent channel depth, so I used spacer strips cut from the foam board. Then foam board panels had to be cut to size to fit snugly for each rafter bay. This reduced the available depth for insulation by 1-1/2 inch leaving only 5-1/2 inches.
One benefit of the polyiso board is that it has a high R- value of R-3.6 in only 1/2" thickness. Another benefit is that this is foil faced, so it provides a great radiant barrer when applied with the foil side facing the ventillation gap. The R-3.6 gets to be deducted from the amount of fiberglass I would need, leaving me with about R27 to do in fiberglass.
The code also required me to have a solid backing behind the insulation in my knee walls; the bats can't be left open faced. So I used the foam board behind the knee walls too.
Attachments


There was a pretty good a sale on R-13 kraft faced insulation this summer so I stocked up on some. I think they were trying to clear it out since it no longer meets new building code. With the R-3.6 of the foam board I could use the R-13 in the knee walls for a total of R-16.6 which exceeds the code minimum. That took care of the knee walls, but the cathedral ceiling was still a problem. It turns out that Owens Corning is now making R-15 bats in the 3-1/2' thickness. So if I could get two layers of that in the ceiling I'd have my R-30.
Since I only had 5-1/2" left from space taken up by the ventillation baffles, I decided to furr the rafters out by 1-1/2" to get the 7" I would need. I ripped up a bunch of cheap 2x4s down the center and nailed them to the rafters along with a bead of liquid nails glue.

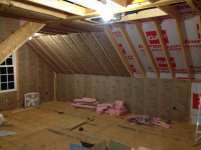
I had gotten enough of the cheap R-13 fiberglass on rolls that I decided to use one layer of that with the paper peeled off along with a layer of the R-15. That gives me 13+15+3.6 (the foam board) for a total of R-31.6... good enough!

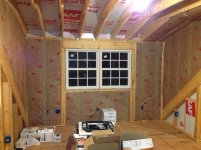
The outside walls that are 3-1/2" get the straight R-15.


Since I only had 5-1/2" left from space taken up by the ventillation baffles, I decided to furr the rafters out by 1-1/2" to get the 7" I would need. I ripped up a bunch of cheap 2x4s down the center and nailed them to the rafters along with a bead of liquid nails glue.
I had gotten enough of the cheap R-13 fiberglass on rolls that I decided to use one layer of that with the paper peeled off along with a layer of the R-15. That gives me 13+15+3.6 (the foam board) for a total of R-31.6... good enough!
The outside walls that are 3-1/2" get the straight R-15.
Attachments
bonecrrusher
Well-known member
Was the mini-split really expensive to put in?
The mini-split cost me about $3100 for the system itself, keeping in mind that it is a 24k btu multi-zone system with two 12k btu indoor cassette units. I spent another couple hundred on miscellaneous hardware, supplies, ductwork, etc; let's call it $300. Then I had a big expense of about $700 investment for the HVAC service tools instead of paying for someone else to do it. So total cost was about $4100 installed and I still have the tools. This is for 2-zone heating and cooling of two levels totaling about 1200 square feet.
It was a very unconventional installation. My DIY cost was not cheap, but if I had chosen to pay a contractor to install this up to my standards it would have been very expensive indeed--probably more than double.
It was a very unconventional installation. My DIY cost was not cheap, but if I had chosen to pay a contractor to install this up to my standards it would have been very expensive indeed--probably more than double.
Steelhorse27
Well-known member
Gerald, I love the build. I am planning a 24x32 with loft also (Although oriented the opposite direction) and love your design. Can you tell me what rating and size your I-joists are (width and height) and how the deflection of the loft floor is/feels. I'm having a hard time deciding what specs to use
Thanks
Thanks
Thanks! Do you mean that the garage doors are on the gable end in your plan or something else?Gerald, I love the build. I am planning a 24x32 with loft also (Although oriented the opposite direction) and love your design. Can you tell me what rating and size your I-joists are (width and height) and how the deflection of the loft floor is/feels. I'm having a hard time deciding what specs to use
Thanks
The I joists we used are "Boise Cascade BCI 60S 2.0", 16in depth and on 16in centers. The span tables rate this joist under the following specs for load rating:
"Residential living area live load = 40psf, dead load = 20psf, L360 for live loads, L240 for total loads: 29'-2" span.
Live load deflection is more relevant to how 'bouncy' the floor feels. L360 is considered the minimum for a general living area. In my build the span is far less at 23'-1" (24' minus 2-2x6 wall studs) so my floor stiffness is much higher than L360. The floor sheathing is 3/4" Advantech and is nailed and glued to every joist.
Overall my impression is that the floor feels very solid. I have never noticed any sensation of floor movement or bounce while working on it, walking, or dropping loads on it. I wouldn't hesitate to load it up with anything that you would typically put in a home living space.
Steelhorse27
Well-known member
Thanks! Do you mean that the garage doors are on the gable end in your plan or something else?
The I joists we used are "Boise Cascade BCI 60S 2.0", 16in depth and on 16in centers. The span tables rate this joist under the following specs for load rating:
"Residential living area live load = 40psf, dead load = 20psf, L360 for live loads, L240 for total loads: 29'-2" span.
Live load deflection is more relevant to how 'bouncy' the floor feels. L360 is considered the minimum for a general living area. In my build the span is far less at 23'-1" (24' minus 2-2x6 wall studs) so my floor stiffness is much higher than L360. The floor sheathing is 3/4" Advantech and is nailed and glued to every joist.
Overall my impression is that the floor feels very solid. I have never noticed any sensation of floor movement or bounce while working on it, walking, or dropping loads on it. I wouldn't hesitate to load it up with anything that you would typically put in a home living space.
Thanks, that is exactly what I was wondering was your actual impression of the feel vs just me studying these span tables And coming to an educated guess.
To answer your question yes, I plan to put a 16' door on the gable end and then a dormer on each side
Rosco
Well-known member
Thanks, that is exactly what I was wondering was your actual impression of the feel vs just me studying these span tables And coming to an educated guess.
To answer your question yes, I plan to put a 16' door on the gable end and then a dormer on each side
Not trying to hijack, but mine is a 26x30 with a 16' garage door on the gable end and two dormers above. PM me if you want specifics on my build.
Starting on sheetrock
After about 5 months of tedious cutting and fitting, the insulation is done! Fiberglass may be cheaper for the material, but man is it time consuming to do a good job with it! The county inspector was very impressed with my workmanship. He must have repeated a half dozen times how good it looked. Leads me to suspect that if I had it done by an insulation contractor that it wouldn't have been done this carefully. If I were to do it over again I'd seriously consider having it foamed instead just to save all the time and labor.
Now on to the sheetrock installation!
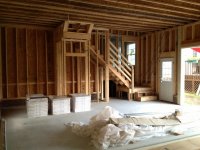
Apart from having to lug the sheetrock up the stairs, I'm kind of enjoying this task, at least by comparison to the fiberglass work .
.
I finally get to use my HF drywall lift that I got on sale more than a year ago. This thing makes installing the ceiling panels a breeze. Well worth the $100 dollars price. Another $100 investment was the Ridgid collated drywall screw gun. That thing zips the screws in almost effortlessly as fast as I can point it at the next spot and only takes one free hand.

After about 5 months of tedious cutting and fitting, the insulation is done! Fiberglass may be cheaper for the material, but man is it time consuming to do a good job with it! The county inspector was very impressed with my workmanship. He must have repeated a half dozen times how good it looked. Leads me to suspect that if I had it done by an insulation contractor that it wouldn't have been done this carefully. If I were to do it over again I'd seriously consider having it foamed instead just to save all the time and labor.
Now on to the sheetrock installation!
Apart from having to lug the sheetrock up the stairs, I'm kind of enjoying this task, at least by comparison to the fiberglass work
.I finally get to use my HF drywall lift that I got on sale more than a year ago. This thing makes installing the ceiling panels a breeze. Well worth the $100 dollars price. Another $100 investment was the Ridgid collated drywall screw gun. That thing zips the screws in almost effortlessly as fast as I can point it at the next spot and only takes one free hand.
Attachments

Last edited: