To avoid these ads, REGISTER NOW!

Reed 4C vise repair

Grigg

Well-known member
Joined
Jul 31, 2010
Messages
268
Location
Lexington, VA
Just starting on this project and could use some info and or pictures of another Reed 4C, you'll see why shortly.

I have wanted a "big" vise for many years now and at least the ones I've seen at auctions go for unreasonable prices around here. Talking to a good friend one day he mentioned a big vise he wanted to sell. He had bought it (used) back in the mid 80's and never used it, decided recently he's never going to build a bench for it and therefore could let it go.

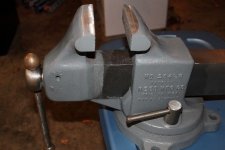
It's in reasonable shape overall and doesn't appear abused other than a pretty nasty "repair" to keep the handle in. I'd like to correct that as it was originally. I have already tried to find new replacement parts and it's apparently too old for that, not really surprised.

Here's the whole album where I'll upload pictures as it progress https://picasaweb.google.com/118082002072608219229/Reed4CVise?authuser=0&feat=directlink

IMG_20140119_114522_753.jpg

IMG_20140119_114440_284.jpg


Here's the trouble.
IMG_20140119_114636_059.jpg


Looks like at some point the split nut was welded in place (or something else was), and sooner or later the split nut was lost altogether. At that point they welded a block on the moving jaw so a Parker (cast as such) C shaped retainer could be used, and they stuffed a ground down plain milling cutter in as a washer/spacer.

Also they welded together some "jaw inserts" from cut up, probably smaller, jaws. Luckily enough though my friend has already made replacement A2 tool steel jaws and I can send them out to a professional heat treating place he uses/recommends after I either mill some teeth in them or decide not to.

Questions:
1. Is this the correct screw for it?
IMG_20140119_114624_411.jpg


2. Was there any thrust bearing or washer on the screw originally?

3. Any pictures or measurements of the 2 piece nut so I can machine one to suit?

I'll start by removing the welded on stuff and then have it all hot tanked at NAPA.

Thanks,
Grigg
 
To avoid these ads, REGISTER NOW!

oldldh

Well-known member
Joined
May 22, 2012
Messages
3,700
Location
Fairhope, AL
Our resident vise repair guru, Brother Scott (KMScott) will probably be able to help you, there's going to be some machining required, which is beyond my capabilities...

Like Dirty Harry said, "A man's got to know his limitations..."

Reverend Scott preaches over on the main vises thread...
 
Last edited:

bigcaddy

Well-known member
Joined
Jan 17, 2012
Messages
2,418
Location
Orange County/ San Fernando Valley
Grigg,

Reeds did have a washer behind the operating handle and it was not a worn out milling cutter.

Ask EOCJason about your vise. He's got a few 4C's laying around and could give you and exact measurement of what you are looking for. As far as the split nut goes, thats gonna be a hard one to track down but its possible Reed stocks them in the parts department.
 
OP
G

Grigg

Well-known member
Joined
Jul 31, 2010
Messages
268
Location
Lexington, VA
Thanks,
I have a machine shop and can make the split nut, washer and pretty much whatever else I'll need.
Mostly looking for more info on what exactly I'm missing.

The present day Reed folks don't have the parts for this one, or didn't a few months ago when I asked.

Just got the whole thing disassembled and the rest looks good and tight, nut looks about new.

Grigg
 

drivesitfar

Well-known member
Joined
Oct 23, 2013
Messages
36,015
Location
Pacific Northwest
Oldie: you were close our vise repair genius is (KMScott) and Kevin might even have an old Reed parts vise laying around.

just wondering how much Napa charges you to give the vise a bath or do you plenty of work with them that they give you a personal freebie now and then?

nice vise and i'll be watching because I have a few Reed's on my bench to restore and a 209 on my wish list.
 

oldldh

Well-known member
Joined
May 22, 2012
Messages
3,700
Location
Fairhope, AL
Drivesitfar---

I apologize for botching Kevin's middle initial, but I'm typing through one eye that's closed due to an attack of SHINGLES...

Bubba, let me told you, this stuff hurts...

If you haven't gotten the shot, get the Shingles vaccine!!!
 

bl00

Well-known member
Joined
Oct 6, 2006
Messages
1,014
Location
Chantilly, Virginia
The screw is correct. I've seen them both with and without a washer. If you have space for it then I'd go with a thrust bearing. Might as well improve it while you have it apart. Here are a couple links where others have taken apart a Reed, so you can see how the parts fit together. The last link has a drawing that shows the parts (scroll down).

http://www.garagejournal.com/forum/showthread.php?t=127723
http://www.garagejournal.com/forum/showthread.php?t=104808&highlight=Reed
http://www.garagejournal.com/forum/showthread.php?t=159701

You could probably sell the Parker collar to someone here if you don't have a use for it.
 

bluebolt

Well-known member
Joined
Dec 28, 2008
Messages
5,441
Location
Benton LA
Do you still have good threads for the split nut? I think any of the 6" Reed split nuts will work, 106, 206 or 4C. If the casting threads are bad or you can't find a split nut you might consider using a slip collar on the backside of the screw.
 
OP
G

Grigg

Well-known member
Joined
Jul 31, 2010
Messages
268
Location
Lexington, VA
Thanks for those other threads, one I had seen and the others had some good info too, like those catalog pages.

Yep, I figured someone will want that Parker retaining color, it's in fine shape.

I guess I have about enough info to figure out and make the missing parts now. I'll look if there is a thrust bearing that'll fit, and if not probably use a couple hardened washers sandwiching a bronze thrust washer.

This vise may have been red originally, or at least that's the first color on it now, then yellow and then greenish.
Any idea what the original color was from Reed, or were they even painted?

All in pieces
IMG_20140119_131621_489.jpg

IMG_20140119_131629_832.jpg


Here's that nasty part, only took one small tap with the hammer and chisel to split it off, it was hardly stuck on there at all.
IMG_20140119_134025_653.jpg


To answer the question about the threads, I think they survived well enough to use again. They aren't real pretty though, and that welding around them is ugly. Probably have to use some JB or similar filler/epoxy to improve on the looks, and the nasty welded part as well as where some of the casting was ground off to weld that part on.
IMG_20140119_134101_754.jpg

Here are some missing threads not from damage but because the casting was lacking, never had any here.
IMG_20140119_134111_769.jpg


The threads are 3"-12
 

Packard V8

Well-known member
Joined
Mar 16, 2009
Messages
7,380
Location
Spokane, WA
Thass an ugly baby. However, the basic castings are sound and worth the effort.

Since the threaded collar is missing and the threads themselves are pretty weak looking, maybe another method might be needed.

What would our experts think about machining the front flat and making a thick two-piece round collar retained by four screws?

jack vines
 
OP
G

Grigg

Well-known member
Joined
Jul 31, 2010
Messages
268
Location
Lexington, VA
I'd say it cleaned up quite nicely in the hot tank at NAPA, and it cost $12. Pretty well fills the trunk of the car.

IMG_20140123_165935_117.jpg


I found an appropriate sized Timken thrust roller bearing which happens to fit the swivel hook on some 5 ton chain fall. It was cheap and is already on the way.With luck I can deal with the thickness being as I have to make a new split nut any how, I'll know better when it gets here. Going to stick with something like the original system on the split nut because the threads do look plenty good enough to reuse.

Next is more cleanup and fill in some of the nastiness of previous "repairs".
Any recommendation for something like JB weld or Devcon or something else?

Grigg
 

EOC_Jason

Well-known member
Joined
Jun 25, 2012
Messages
11,388
Location
Bentonville, AR
Just found this thread. Looks like you are making good headway. Hard to believe how much damage was done to the vise, they must of been using a sledge with it or something.... I don't know how someone would damage the split-nut, unless it was seized / stuck and they were trying to beat it open, otherwise it shouldn't ever have that much force on it.

Is the hole in the side where the set-screw goes still intact? Those other threads that were posted, there is that 3C with a good shot of how the split-collar looks & functions. The part that isn't threaded but has all the horizontal grooves, you simply line a valley up with the hole for the set-screw and that's what keeps the split-ring from rotating in/out.

The stock washer looked the typical thickness for one its size, except it was ground smooth on both side. I can't wait to see your pics of the thrust bearing, should be interesting.

I've seen Reeds where the split collar is threaded way in there, and also ones that have a thread or two sticking out the front. But then again I haven't taken them apart to see if they were installed properly. My 4C the ring is almost flush with the face, just a hair in, and that is set perfect to where it has very very little backlash but more importantly doesn't cause any binding. When I put mine back together I put plenty of grease on all the surfaces inside.

Since you are having to make your own split-ring, you can obviously compensate for the wear in your vise and the thickness of the thrust bearing and whatever else you might shove in there. It just has to fit in that width on the handle, but the guessing game is how much threads to cut as you can see how only the front half inside the vise is threaded.

As for the recommendations on filler...

Personally I've used JB Weld (the two squeeze tubes) for filling minor holes and gashes. It sands down easily and you can't even tell once its painted over. One negative thing is the JB Weld tends to shrink so you have to over-fill otherwise you get these valleys instead of being flush.

I have a friend that is a riflesmith, and he uses Devcon for bedding. That stuff does NOT shrink and is much more durable. If you have some of that I would use it for sure!!!

If you need any pictures, just let me know. I don't mind doing a little dissassembly if it will help you out. I'm working on cleaning up my 2nd 4C right now, the lockdown handle and bolt on the bottom are seized up good, probably take a torch to them this weekend if I have some spare time.

Gregg has some finger savers on eBay (search for "Vise Finger Savers"), the largest size he sells 1-1/2"x1"x1/4" will fit on your handle. I highly recommend them. It takes a little fighting to get them over the ball ends but they will go. Your fingers will thank you for it.

Also be careful when swinging that handle around! One of these days I just know I'm going to get it either in the head or in the nuts. Pictures just don't do large vises justice, when you see them in person you are like "Whoa..."
 
Last edited:
OP
G

Grigg

Well-known member
Joined
Jul 31, 2010
Messages
268
Location
Lexington, VA
My guess is the split nut was lost because other than the bad repairs resulting from it the vise seems to have had little use.

The set screw is there and undamaged.

The Timken bearing I ordered is on the thick side... about 3/4" which leaves only about 1/4" for the split nut. I'll check out the options when it gets here. Might be able to make a thin nut and secure it in a different way. Wish the bearing was thinner though, and not so sure I want to remachine anything on the handle or moving jaw to allow it to work better. Perhaps a few washers and a thrust bushing is the better option.


Grigg
 
OP
G

Grigg

Well-known member
Joined
Jul 31, 2010
Messages
268
Location
Lexington, VA
The bottom bolt on mine was seized to the base and the whole thing unscrewed from the vise body. Then some penetrating oil and a dead blow knocked the bolt out of the base.

Thanks for the picture offer but I should be fine for now, I'll let you know if I do need any.

Grigg
 

EOC_Jason

Well-known member
Joined
Jun 25, 2012
Messages
11,388
Location
Bentonville, AR
The Timken bearing I ordered is on the thick side... about 3/4" which leaves only about 1/4" for the split nut. I'll check out the options when it gets here. Might be able to make a thin nut and secure it in a different way. Wish the bearing was thinner though, and not so sure I want to remachine anything on the handle or moving jaw to allow it to work better. Perhaps a few washers and a thrust bushing is the better option.

Yeah that is pretty thick, your handle is going to be sticking out quite a bit. If anything I would just buy a bronze oilite thrust washer and call that good enough. As long as you put plenty of grease in the front there and also on the screw, it's going to clamp anything you put in it! lol...
 

EOC_Jason

Well-known member
Joined
Jun 25, 2012
Messages
11,388
Location
Bentonville, AR
This vise may have been red originally, or at least that's the first color on it now, then yellow and then greenish.
Any idea what the original color was from Reed, or were they even painted?

Forgot to respond to this. Most NOS late-model Reed's that I've seen were the machine-tool gray. However, I've also seen some old ones that looked like their original color was a satin/flat black.

I say paint it whatever color you want. That's half the fun! Get a paint-pen from a hobby shop and do the lettering in a contrasting color to really get it to pop.

Here's a couple pics from one off eBay that was still in the box!
 

Attachments

  • Reed1.jpg
    Reed1.jpg
    155.6 KB · Views: 102
  • Reed2.JPG
    Reed2.JPG
    54.5 KB · Views: 132
OP
G

Grigg

Well-known member
Joined
Jul 31, 2010
Messages
268
Location
Lexington, VA
Thanks,
I'll probably use a nice dark red because I want to.

I got this bearing because I was sure it'd be strong enough and the ID and OD worked. Wishful thinking on thickness but it was cheap, I'll use it somewhere one day.
IMG_20140128_172529_409.jpg


With it in there no threads are left..
IMG_20140128_172637_311.jpg


I know a washer would be OK but I still like the idea of a roller thrust bearing.
Next I looked in the Timken catalog and found a needle thrust bearing assembly that is only 3/16" thick with suitable diameters although I'll need to make a bushing to keep it centered. Part number FNTKF-4872 which I was surprised to see is rated for 40,200 lbf static and as slow as it'll turn I think that ought to be plenty. Happened to be one on ebay for less than $9 delivered; worth a try.

Grigg
 

EOC_Jason

Well-known member
Joined
Jun 25, 2012
Messages
11,388
Location
Bentonville, AR
I know a washer would be OK but I still like the idea of a roller thrust bearing.
Next I looked in the Timken catalog and found a needle thrust bearing assembly that is only 3/16" thick with suitable diameters although I'll need to make a bushing to keep it centered. Part number FNTKF-4872 which I was surprised to see is rated for 40,200 lbf static and as slow as it'll turn I think that ought to be plenty. Happened to be one on ebay for less than $9 delivered; worth a try.

That just might work. Without pulling mine apart, I seem to recall the stock washer was probably around 3/32 - 1/8 thick...

I just pulled the main body of the other 4C I've been working on out of my e-tank and put the slide to get cleaned. If it warms up a little later today I might take a jab at trying to get the lock-down handle off or the bottom bolt. I hate when everything is seized up like a rock.
 
To avoid these ads, REGISTER NOW!
OP
G

Grigg

Well-known member
Joined
Jul 31, 2010
Messages
268
Location
Lexington, VA
Warm enough yesterday to get a few parts cleaned, primed, and later painted.
IMG_20140201_135225_497.jpg


That new needle thrust bearing is perfect. Had to make a washer to center it on the screw.
IMG_20140202_103237_137.jpg

IMG_20140202_103256_840.jpg

IMG_20140202_103623_993.jpg


This coming week I hope to make the split nut and get it all back together.

Grigg
 

drivesitfar

Well-known member
Joined
Oct 23, 2013
Messages
36,015
Location
Pacific Northwest
coming along nicely Grigg. can hardly wait to see how you clean up that old weld and what the vise looks like put back together. also the color is a nice choice.

good luck on making that split nut and if you can show some pictures of that process that would be great. :thumbup:
 
OP
G

Grigg

Well-known member
Joined
Jul 31, 2010
Messages
268
Location
Lexington, VA
Moving on to that split nut. Originally thought I'd make it out of bronze starting with two pieces doweled together and then machined to suit. But the material I had in mind was only 3" and not worth the aggravation and wasted material to do it that way; had it been 3-1/8 it would have worked nicely.

So the next obvious choice is cast iron like the original, broken in two after machining. I looked but didn't have a large enough piece of cast either. Well except for an old 71 series Detroit Diesel piston that looked like it just might have enough meat in it to do the job.
IMG_20140204_092044_658.jpg


Turning it down looking for the reed 4C split nut in the center.
IMG_20140204_093341_622.jpg


Getting closer
IMG_20140204_094550_245.jpg


Turned to diameter, bored to size, faced to thickness and the spanner holes drilled. Starting threading.
IMG_20140204_162714_937.jpg


All I could figure to do on the size is trust that they used a standard 3"-12 and make the nut by the book. Checking pitch diameter here, I made it on the small side of the tolerence as I'm not at all interested in setting it up for a skim cut on the threads if it didn't fit.
IMG_20140204_164758_779.jpg


And it fits!
IMG_20140204_183927_002.jpg
IMG_20140204_183942_198.jpg


There wasn't enough material to clean up all surfaces or make the flutes for the set screw but it actually worked out well being as it was all I had to work with. With the thrust bearing it shouldn't need adjusting more than the first time. I'll just mark and drill one spot for the set screw at assembly.
IMG_20140204_184118_798.jpg


I'm filling in the nasty spots with some JB weld. When it gets warm again I'll paint the moving jaw and reassemble.
Sometime I need to crack the nut still.
 
Last edited:

EOC_Jason

Well-known member
Joined
Jun 25, 2012
Messages
11,388
Location
Bentonville, AR
Like a BOSS!!! That sure turned out nice.

If your setscrew was like mine it has point on the end? I would think that would be more than adequate against that rough texture of the ring. Just put some grease on the back side of the ring and the opposing face of the handle so it won't have much friction at all when you are opening the slide. I doubt it will turn on you.

Good to know the thread size, I' having ZERO luck getting my split ring out. I'm going to give it a few more days with penetrating oil and give it another go. Not sure what I'm going to have to do to get it out. I'll keep grabbing a bigger hammer till something gives!
 

KMScott

Well-known member
Joined
Feb 14, 2012
Messages
4,641
Location
Daufuskie Island, South Carolina
Nice job Grigg, did you re-thread the dynamic jaw support, it looked pretty wore. If so then did you do it on a CNC. I was going to suggest that but you did not need my suggestion, you have the skills and machines to fix it without any suggestions. I have a vise similiar to yours with everything missing so I was watching your progress. Great job and I liked that 6 jaw you used before finishing up on that 4-jaw chuck. Did you make a spanner wrench too, the cast iron will need one. Great job.

Jason, heat on the dynamic body might help release your split nut before the nut gets hot too. I like how Grigg added the spanner pin holes, is that a original design, a great idea to get more force on the split nut with a spanner wrench. I am sure one of us can make a simple spanner wrench for you.
 
OP
G

Grigg

Well-known member
Joined
Jul 31, 2010
Messages
268
Location
Lexington, VA
Thanks guys.

I didn't rethread the dynamic jaw, would have been a good option but there are enough good threads still there. Also tooling was the big factor, I do have a horizontal boring mill but it's just an old manual not CNC, I couldn't think of a good way to do it in my shop.

The original did have spanner holes but from the looks of them hard to get a spanner in there because of the large knob on the screw. I already had an adjustable spanner.

Here is the filing process, used JB because it was handy even though I'm sure there would have been a better choice. This may be all that's necessary and hold up fine, time will tell. first I used red loctite on some studs in the extra holes and filed the tops to shape. Sorry for the fuzzy pictures.
IMG_20140204_192002_699.jpg

IMG_20140204_193126_627.jpg


I was a little concerned that the nut would stick even with a coat of wax on it... so I tried to move it to soon, pulled the JB weld with it and had to do that part again. It did work out well and released fine. I then filed the JB weld to blend in.
IMG_20140204_214158_409.jpg

IMG_20140205_073639_345.jpg


With spanner
IMG_20140205_073725_261.jpg
 
Last edited:

bluebolt

Well-known member
Joined
Dec 28, 2008
Messages
5,441
Location
Benton LA
Wow Grigg when you said you were going to make a split nut I didn't realize the skills you had! Awesome job!

Could you have made that ring out of steel?
 

EOC_Jason

Well-known member
Joined
Jun 25, 2012
Messages
11,388
Location
Bentonville, AR
Could you have made that ring out of steel?

If you did, it would only complicate the process. First, it doesn't take that much stress, it's just there to hold things together as you OPEN the vise. (Much like the Parker collar.) Second, it has to be two pieces to fit around the screw, which if you used a saw then it wouldn't be round anymore. You would either have to mill it as two pieces, or use cast and crack it in half like they did on the original ones.

I was a little concerned that the nut would stick even with a coat of wax on it... so I tried to move it to soon, pulled the JB weld with it and had to do that part again. It did work out well and released fine. I then filed the JB weld to blend in.

I use paste wax, a riflesmith friend of mine does it that way when bedding rifles and he has no problem pulling the barrels out afterwards. He also used Devcon, much harder (and expensive) stuff. I'm sure the JB weld will work fine, its pretty tough stuff. I've used it in a few of my vises but for mostly cosmetic repairs (like yours).

I might try making a spanner, the holes are just square-ish in the stock one. I can fab up something with scrap pieces of metal. Just haven't had much free time lately.
 
OP
G

Grigg

Well-known member
Joined
Jul 31, 2010
Messages
268
Location
Lexington, VA
Could have made it from steel but cracking it would be more difficult. If steel I would have tried two pieces pinned together and then machine same as I was thinking for bronze.
Because I only wanted to make one of these cast iron was a logical choice because it is easier to crack in half. That said I should have used some liquid nitrogen to make that process easier and cleaner.

I did split it and it worked out well but I'd do it a different way if I had to do it again. Probably should have made two half round wedges that fit the inside to then crack it by forcing them together in the bore. This could be done quickly with a hammer after dropping the frozen ring on. Any how, It's done and I don;t expect I'll ever need to do it again.

First marked and filed a nick where I wanted it to break, both sides.
IMG_20140205_091131_624.jpg


Found a few scraps and such to support it, the wood is a cushion when it does split. That turned out to be a good idea because the wood ended up in splinters and the ring survived.
IMG_20140205_092130_271.jpg


Seems to have worked fine. May need to file the split a tad to get it to screw in again but I'll try without. Ideally it'd break so clean and crisp to not need anything. That's why I should have used liquid nitrogen and some wedges in the center.
IMG_20140205_092449_374.jpg


Now I need a warm enough day to paint the moving jaw, the last part, and assemble.

Grigg
 

bluebolt

Well-known member
Joined
Dec 28, 2008
Messages
5,441
Location
Benton LA
How would a modern technique like water jetting or laser cutting have worked? I know you didn't need to do that but was wondering on your thoughts if you made one from steel. Wondering in case I ever break one of my Reed split collars LOL.
 
OP
G

Grigg

Well-known member
Joined
Jul 31, 2010
Messages
268
Location
Lexington, VA
...I use paste wax, a riflesmith friend of mine does it that way when bedding rifles and he has no problem pulling the barrels out afterwards. He also used Devcon,...
That sounds like a good idea too. The Devcon I would have liked, should probably buy some to have on hand for future projects and to keep me from using JB weld in a pinch.

I had never tried any sort of release agent and epoxy so I was nervous. Now that I know it works the second try went perfect. I just set the nut on the woodstove for a few minutes and then melted some parifin on it. not enough to really see but it did soak in the cast some and left a thin film. I figured if it gave me trouble I could warm the ring some to melt that film. A light tap of the hammer on the spanner was all it needed to break free.

Grigg
 
OP
G

Grigg

Well-known member
Joined
Jul 31, 2010
Messages
268
Location
Lexington, VA
How would a modern technique like water jetting or laser cutting have worked? I know you didn't need to do that but was wondering on your thoughts if you made one from steel. Wondering in case I ever break one of my Reed split collars LOL.

The issue is it ought to be a true round nut, so any material removed to cut it apart makes it not round. I think the thinest kerf would come from a wire EDM machine.
Before, and better than, doing that I'd just start with 2 half round pieces of material and use a couple dowel pins to locate them.

One other advantage to cast iron is the break is irregular so the two halves fit snug together, no dowel pins necessary. You can buy cast iron bar stock... I was trying to do this with stuff on hand but buying some cast iron would be a good option if you had to buy something.

Grigg
 
Last edited:

EOC_Jason

Well-known member
Joined
Jun 25, 2012
Messages
11,388
Location
Bentonville, AR
That turned out to be a nice break. Certainly flatter than the rings I've dealt with. The rough texture does give it a good fit back together so you can screw it in.

You say that is the only one you will probably make, but now that others have seen your skills don't be surprised if someone comes begging... ;)
 

Packard V8

Well-known member
Joined
Mar 16, 2009
Messages
7,380
Location
Spokane, WA
This thread has been an education on several levels.

I've never owned, operated or repaired a Reed, but for those who have, does the complication of the split nut provide enough benefits for the extra hassles?

jack vines
 
OP
G

Grigg

Well-known member
Joined
Jul 31, 2010
Messages
268
Location
Lexington, VA
If you happen to have the split nut I don't see any downside to it. It's strong, nicely adjustable, and simple.
My problem was I didn't have one and someone cobbled together stuff to keep the screw in.
 

EOC_Jason

Well-known member
Joined
Jun 25, 2012
Messages
11,388
Location
Bentonville, AR
I've never owned, operated or repaired a Reed, but for those who have, does the complication of the split nut provide enough benefits for the extra hassles?

The split nut is actually a nice feature. It allows you to adjust the backlash in the handle area. That combined with the set-screw tightener on the main nut removes almost all backlash opening & closing the vise. As surfaces wear down over the years (decades) you can adjust as necessary to keep things nice and tight.

When they are rusted in place it can be a pain, but no different than any other screw that gets rusted, just needs persuasion to get free.

The few that I've seen missing them looked very abused, the only way I could figure they would break is if someone is beating down with a sledge on the handle, or somehow applying a lot of force opening the vise...
 
To avoid these ads, REGISTER NOW!
Top Bottom