To avoid these ads, REGISTER NOW!

Modifications to the HF 4 and 5 drawer service carts - what changes have you made?

monomach

Well-known member
Joined
Oct 8, 2013
Messages
1,489
Location
Illinois
What, in particular, are the reasons you like that one better?

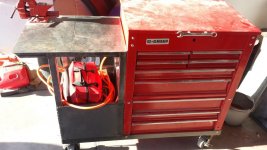
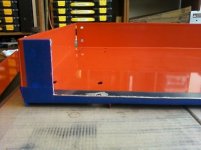
The steel on the red 5 drawer is muuuuccccch thicker. It's like a tank. I'm guessing that's what he likes.

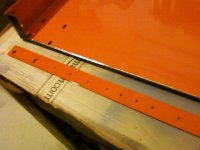
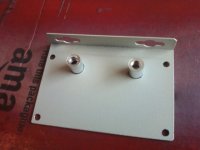
Quick question: The Snap-On KRBC8T9 hinges for $10.30, does that include both? It's described as if there's only one. Just want to be sure when placing an order.

I can vouch for that being the pair.

You can see on the page for the cart they were made for, it says "units required: 1"
 
To avoid these ads, REGISTER NOW!

Gareth68

Well-known member
Joined
Jul 22, 2009
Messages
1,233
Location
Missouri....West of Mexico
Any headway on it Gareth?

Got a little done today.

A good spray paint to use on these carts would be engine enamel from dupi-color if anyone wants some solvents resistant paint.

Oddly enough, that is exacty what I am using. Duplicolor Grabber Green engine paint.

Tht duplicolor bed spray peels bad once it I schipped or knicked. Vht wrinkle black is some nassty paint. Sspray in ssun heavy or use a heat gun. Makes the crinkles really tight with heat. Pretty durable too.

If it does, It will make it easy to replace with something tougher.....though I have to say I have had it on teh tree bars and a few other places on my baja for 4 years with no delamination.

Perhaps prep issues or compatibility issues with the substrate?

Anyhow, I got two drawers painted...put one edge guard on, applied a sticker and painted and installed the handle.

Sorry, this one is a bit blurry.

IMG_1172_zpsced71617.jpg


IMG_1173_zpsa3dada22.jpg


IMG_1174_zps0b00eaf8.jpg


:beer:
 

shopboy13

Well-known member
Joined
May 17, 2011
Messages
153
Location
NY
Looking REALLLL good. I'm really diggin the green too. Almost looks like a snap on green. If I was patient and careful I'd try it with my 4 drawer cart. But until then it will remain black.


Sent from my iPhone using Tapatalk
 

AndrewV

Well-known member
Joined
Dec 28, 2013
Messages
1,368
Location
Fl
The steel on the red 5 drawer is muuuuccccch thicker

I can tell you for a fact, the 4 drawer carts metal is good. Thick. And not a subpar steel.
With as much drilling, fileing, and shaping as im doing to my 2. It's strong. ;)
 

AndrewV

Well-known member
Joined
Dec 28, 2013
Messages
1,368
Location
Fl
Thought i seen a blue point sticker. Must have been the envy in my eyes. Lol
 

monomach

Well-known member
Joined
Oct 8, 2013
Messages
1,489
Location
Illinois
I can tell you for a fact, the 4 drawer carts metal is good. Thick. And not a subpar steel.
With as much drilling, fileing, and shaping as im doing to my 2. It's strong. ;)

Not saying it's of bad quality...just saying that the 5 drawer is MUCH better.
 

BladeExt

Active member
Joined
Apr 3, 2013
Messages
30
like that green paint @ Gareth68. Im in the process of painting my 2- 4drawer cart. Will not be a regular color box. multicolor. Just wanted try something different. will post pics when I am finish.
 

BikerDad

Well-known member
Joined
Apr 24, 2014
Messages
975
Location
Utah
So I hit up the sidewalk sale and got a new 5 drawer for $119. They had the price marked wrong but gave it to me anyway! Now I have a new welding cart:shocking:

So, I'm a bit confused. What did you do with the drawers? Are they a single unit that just gets plunked down in there during assembly? If so, I'm stoked, because I've been looking for a "more than 3" drawer middle chest.
 

paigej

Well-known member
Joined
Dec 5, 2012
Messages
253
Location
Arizona
So, I'm a bit confused. What did you do with the drawers? Are they a single unit that just gets plunked down in there during assembly? If so, I'm stoked, because I've been looking for a "more than 3" drawer middle chest.

I actually had 3 carts. I did a few modifications and ended up with 1 cart with drawers all the way down, 1 cart with the extra drawers, and 1 cart with no drawers and 2 welders. I just drilled new holes and riveted just like the original construction. Then I sold the cart with the extra drawers for $120.
 

Attachments

  • 2014-03-02 08.09.58 (Medium).jpg
    2014-03-02 08.09.58 (Medium).jpg
    126.3 KB · Views: 834
  • 2013-10-13 16.21.38 (Medium).jpg
    2013-10-13 16.21.38 (Medium).jpg
    85 KB · Views: 742
  • 2013-10-13 16.22.07 (Medium).jpg
    2013-10-13 16.22.07 (Medium).jpg
    143.4 KB · Views: 660

BladeExt

Active member
Joined
Apr 3, 2013
Messages
30
May not be the prettiest modification or paint job, but wanted to do something odd and different. Im just an DIY guy former military and government mechanic so this is just my home box and still an working progress.
 

Attachments

  • 20140426_133321.jpg
    20140426_133321.jpg
    57.9 KB · Views: 914

Gareth68

Well-known member
Joined
Jul 22, 2009
Messages
1,233
Location
Missouri....West of Mexico
It was a beautiful day today. Absolutely perfect weather. So, I had three drawers left to paint...

Killed it.

And, cut out a section of steel on my buddy's trailer to trim some 2x10's and replace teh deck (planks welded in).

Cooked a few pork steaks and drank a couple brews.... a perfect day.


So....here y'all go.

The finished product (for now).

IMG_1176_zps69097758.jpg


IMG_1179_zps9b730d5e.jpg


IMG_1175_zps77c61f54.jpg


I am happy. I think it looks awesome.

If you don't knock yourself out and paint one to your own tastes.....and by all means...POST PICS!!!
 

Askme42

Well-known member
Joined
Dec 9, 2012
Messages
2,538
Location
Goreville IL
Man that's a sweet cart. I would never bother with painting mine. Just don't have the time or patience.


How far west of Mexico? I'm in columbia.
 
To avoid these ads, REGISTER NOW!

AndrewV

Well-known member
Joined
Dec 28, 2013
Messages
1,368
Location
Fl
Came out great Gareth.
Trying to work on mine today, but not looking like i'll have a lot of time.
 

92integra

Well-known member
Joined
Jul 11, 2013
Messages
857
hey ford guy what were the spec's on that angle iron you used to make your awsome cart... 2 inch im guessing???
 

331CID

Well-known member
Joined
Dec 25, 2013
Messages
84
Not the greatest pics but here's my mods.
dagu9a8a.jpg
Regulator, filter and hose

u5equ8e9.jpg
Painted the drawer guards, custom machined snap on logo, and Sunex pry bar holder


Sent from my iPhone using Tapatalk
 

331CID

Well-known member
Joined
Dec 25, 2013
Messages
84
thats the cheapest snap on cart ive ever seen. never expect harbor freight to carry them either.

I know right haha. I work in a shop and refuse to beat my Mac cart up rolling it around everywhere. And I would never drill into a name brand cart. But these are so cheap you don't feel bad about modifying them. I want to put the seven drawer side box on, just have to wait for funds


Sent from my iPhone using Tapatalk
 

PelicanPines

ALLIANCE MEMBER
Joined
Apr 30, 2014
Messages
38,111
Location
New Jersey, USA, Earth, My own reality
My HF red 5 drawer cart arrived 2 weeks ago. The modifications began.

The first thing i did was cut the front of the bottom shelf off. I couldn't use the bottom of the cart without this modification. I temp installed the legs in the front and measured the front to keep some meat on the side of the opening. I also kept about 1/2 an inch of the bottom lip. Measured twice and cut the bottom shelf.

Next i took some flat bar stock and fabricated a brace to put across the new opening from swivel to swivel. I drilled oblong holes to match the swivel holes and then drilled a series of holes across the length to install 3/16th rivets. Spaced the middle 4 close then the rest a bit more spread out.

Painted the new support, the cut. Installed the base and continued with other modifications.

More to come... Some pictures.
 

Attachments

  • Bottom05.jpg
    Bottom05.jpg
    144.8 KB · Views: 621
  • Bottom04.jpg
    Bottom04.jpg
    45.6 KB · Views: 587
  • Bottom03.jpg
    Bottom03.jpg
    33.9 KB · Views: 588
  • Bottom02.jpg
    Bottom02.jpg
    139.1 KB · Views: 581
  • Bottom01.jpg
    Bottom01.jpg
    135.1 KB · Views: 652
Last edited:

NewEdgePerf

Well-known member
Joined
Nov 24, 2012
Messages
198
Good idea! I may have to do that with my HF 4 drawer. I have a Craftsman 2 drawer box on my lower shelf that would be easier to access the bottom drawer if I cut the bottom shelf like you did.

Would a door edge guard ( the plastic stuff) give a more finished look to the cut area and be easier on the hands?

Thanks for sharing!

Tony D
 

PelicanPines

ALLIANCE MEMBER
Joined
Apr 30, 2014
Messages
38,111
Location
New Jersey, USA, Earth, My own reality
(snip)

Would a door edge guard ( the plastic stuff) give a more finished look to the cut area and be easier on the hands?

Thanks for sharing!

Tony D


I painted everything individually before putting it all together. Here is a picture of how it ended up and how im using it.

I agree with the door edging. I will try it... I have some.
 

Attachments

  • Dewalt99.JPG
    Dewalt99.JPG
    96.2 KB · Views: 1,230

PelicanPines

ALLIANCE MEMBER
Joined
Apr 30, 2014
Messages
38,111
Location
New Jersey, USA, Earth, My own reality
Thanks Galvonzo.

I didn't like the way the open sides looked. Seeing the rivets from the drawer slides... it looked unfinished.

So this happened:

By the way... the last picture shows how I ran the electrical cord under the box...
If you are wondering... I used the side panel from an old PC frame from the early 90's.
 

Attachments

  • Electric04.JPG
    Electric04.JPG
    71.2 KB · Views: 834
  • Side05.JPG
    Side05.JPG
    80.4 KB · Views: 822
  • Side04.JPG
    Side04.JPG
    61.9 KB · Views: 779
  • Side03.jpg
    Side03.jpg
    32.4 KB · Views: 800
  • Side02.jpg
    Side02.jpg
    39 KB · Views: 792
  • Side01.jpg
    Side01.jpg
    32.6 KB · Views: 862

PelicanPines

ALLIANCE MEMBER
Joined
Apr 30, 2014
Messages
38,111
Location
New Jersey, USA, Earth, My own reality
To do that side panel... it posed a few assembly issues I want to clarify.

I positioned it... and ran blue tape along the uprights of the cart to mark the rivet holes. I then drilled out ONLY the cart holes and the RIGHT side thru the panel. I left the LEFT holes in the panel to drill later.

I took everything apart... cleaned the burrrrs and painted.

During assembly: I riveted the RIGHT side, using stainless 1/8 inch. I then installed the box itself, bolted and tighted everything on the cart.

ONLY THEN did i go back to drill the thru holes on the left side. The holes in the leg were already there so i was just drilling thru the panel at this point. I used a very stiff ruller in the gap at the top to hold the panel in place by giving some back pressure.

I ran the left side of rivets and cut a trim piece from 1/2 inch wide flat steel. Painted that and attached it with 3M molding tape.

Looks pretty clean now.
 

PelicanPines

ALLIANCE MEMBER
Joined
Apr 30, 2014
Messages
38,111
Location
New Jersey, USA, Earth, My own reality
The electric outlets... I really wanted to be able to plug stuff in on my cart. I figured a power strip would be simple but I wanted something that is all metal. I happened to have an all metal surge protector with a switch and fuse that can handle 12 amps...

I took the box apart and its full of "stuff" you don't want to run a screw into... I considered just attaching the outlet box with 3M tape but that would not have been solid enough from my OCD.

I took off the end panel and drilled holes for "nutserts", I used 2 x 1/4-20tpi. I then realized i had to thread a screw into this and wanted to protect the insides a bit more. I had these red rubber caps from something, so I epoxied them over the nutserts on the inside of the box.

I reassembled the box and attached it to the bottom of that side thing on the cart. I also stuck some 3M tape in there to soften the connection.

I ran the cord under the box and installed hooks on the back of the box, which allowed me to hang an extention cord too.

The hooks I attached on the back, I got them from Walmart and had to trim a tab off the back and mod one hole about 1/32 of an inch lower and the thing bolted into the existing holes. I had to use longer bolts to attach them correctly tho.
 

Attachments

  • Electric01.jpg
    Electric01.jpg
    124.4 KB · Views: 697
  • Electric08.JPG
    Electric08.JPG
    72.1 KB · Views: 852
  • Electric06.JPG
    Electric06.JPG
    112.3 KB · Views: 816
  • Electric03.jpg
    Electric03.jpg
    137 KB · Views: 639
  • Electric02.jpg
    Electric02.jpg
    127.1 KB · Views: 651
  • Electric05.JPG
    Electric05.JPG
    56.9 KB · Views: 925
  • Electric07.JPG
    Electric07.JPG
    84.4 KB · Views: 758
Last edited:

331CID

Well-known member
Joined
Dec 25, 2013
Messages
84
Same hook that I used for my cart, just not the monster drywall screws that it came with. I think I used 8-32 bolts


Sent from my iPhone using Tapatalk
 

PelicanPines

ALLIANCE MEMBER
Joined
Apr 30, 2014
Messages
38,111
Location
New Jersey, USA, Earth, My own reality
Same hook that I used for my cart, just not the monster drywall screws that it came with. I think I used 8-32 bolts


Sent from my iPhone using Tapatalk

Yes ! I saw your modification and remembered the hook. After holding it up to the cart... I noticed how close it was to fitting the existing holes. Kinda like it was made for it.

I got great inspiration from everyone here.

Thank you.
 

PelicanPines

ALLIANCE MEMBER
Joined
Apr 30, 2014
Messages
38,111
Location
New Jersey, USA, Earth, My own reality
Yup, and then you took it one step further by making some really practical changes. Good job, and thanks for the step-by-step descriptions w/pictures. I'm sure you'll inspire others. :thumbup:

More is coming, ...

1. Nice thick grommets on all the screw driver holes
2. 20 inch magnetic bars on lid
3. Snap on hinges
4. Hoffman 18 x 18 folding shelf "ebay SCORE"
5. Matt's Plier Racks !!!
 
To avoid these ads, REGISTER NOW!
Top Bottom