To avoid these ads, REGISTER NOW!

taking apart a S-O ratcheting screwdriver

Biomed

Well-known member
Joined
Mar 19, 2011
Messages
662
Location
Minnesota
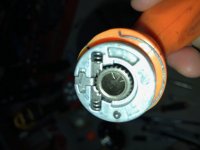
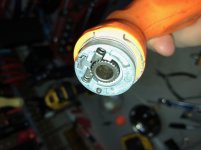
There are two types of S-O ratcheting screwdrivers out there: fixed shank and removable shank,

The fixed shank units came with and internal clip that holds the shank fixed into the handle. The removable shanks swapped that clip out with a friction fit o-ring and mechanism.

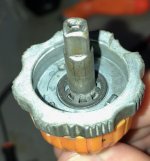
Swap out the guts with a OEM repair kit for a removable shank driver and just buy the shank length you want. They come in stubby, std. and long.

Kits work on both soft grip or hard handle.

IIRC, you can buy a new fixed shaft shank and then just replace it alone. My driver had done it once for a co-worker.

So what is the part number for this mysterious OEM repair kit? Everytime I search the Snap-on web site for SGDMRC4A repair kits the response is : "There are no parts currently available."
 
To avoid these ads, REGISTER NOW!

beamrider

Well-known member
Joined
Jan 21, 2013
Messages
533
Location
Columbus OH (displaced from Wheeling)
Just finished cleaning/lubing my SSOMR4B, pretty easy to do. Few things I learned:

If you completely remove the 2 pin/spring combinations (one for the direction selector, other is the cap tensioner), pay attention when putting them back in. They look identical to me, but after reassembly I couldn't ratchet without fooling around with the thing. Swapped the pin/spring assemblies, and it works like butter now.

I removed the shaft clip so I can swap out the shafts, and was able to nest 2 O-rings in there, to help hold in the shaft. They were metric O rings from a HF assortment, 112 (11.8 ID 16.6 OD 2.4 section) and 010 (6.8 ID 10.6 OD 1.9 section) I reassembled with the shaft thru the selector, to hold the 2 O-rings in place while I put it back together. Doing it like this adds a small amount of backdrag to the ratcheting mechanism also, but not a whole lot.
 

Adam.C

Banned
Joined
Jan 29, 2013
Messages
1,490
I bought a cap kit and it came without any washers in a sealed plastic bag. This sort of stuff frustrates me about Snap On. Somewhere is WI is a bin full of these washers. Why won't they just sell them to us? If they did we'd all be buying more shanks. Come on Snap On.

One more thing. For all the talk here about Snap On, where are the marketing reps? If they are t on this forum, what forum are they on?
 
Last edited:

Biomed

Well-known member
Joined
Mar 19, 2011
Messages
662
Location
Minnesota
I bought a cap kit and it came with any washers in a sealed plastic bag. This sort of stuff frustrates me about Snap On. Somewhere in WI is a bin full of these washers. Why won't they just sell them to us? If they did we'd all be buying more shanks. Come on Snap On.

Several GJ Members claim there are no "washers" used to hold the shanks in the soft grip ratcheting screwdrivers.

SO doesn't care about selling one or two shanks to individuals when they can sell quantities of ratcheting screwdrivers to large industrial customers.

I really wonder how many ratcheting screwdriver shanks are really sold. A short time ago I had a few on backorder for many weeks. In addition, about a year ago the phillips, flat tip and Torx shanks were all discontinued. Fortunately most (I'm not sure about the Torx) are available again.


One more thing. For all the talk here about Snap On, where are the marketing reps? If they aren't on this forum, what forum are they on?

The marketing guys are out marketing to the large industrial customers where the $$$ are.

It is a shame that they seem to avoid contact with individual users. I have a few questions I would like to ask but you will never get an informed answer from SO Customer Service.
 

Regal2800

Active member
Joined
Jan 15, 2013
Messages
36
This is a real nice fix, however there is one small difference between the hard and soft handles. I have both and took them apart to see if the internals of the soft and hard are exactly the same. The socket in the soft handle where the shank gets inserted has a small indent to accommodate the ball spring on the shank. It is this mechanism that really holds the shank in place. (Very similar to a socket wrench holding a socket) As the tutorial suggests using that rubber washer will help keep the shank in place on the hard handle, but it still wont be as secure as the soft handle. Just my thoughts...
 

supra90turbo

Well-known member
Joined
Sep 30, 2011
Messages
595
Location
Central MA
Correct. However, if one were to purchase the soft handle style shanks, or have a soft handle style around, the hard handle style has the indent for the removable shanks.

That sounds convoluted but its really not
 

Regal2800

Active member
Joined
Jan 15, 2013
Messages
36
ya, that is what i am saying, i looked at the hard handle and there is no indent in the handle socket.
 

supra90turbo

Well-known member
Joined
Sep 30, 2011
Messages
595
Location
Central MA
You are correct. It was annoying to have the shank just fall out so I ordered a couple shanks intended for the soft handle style so they have the detents.

I took the hard handle shank with no detent and pressed it into another snapon handle I had to make a standard screwdriver that will accept bits.

Worked out real well.
 

rusjack

Well-known member
Joined
Oct 11, 2013
Messages
57
Location
Ontario, Canada
CFdUM7.jpg


kaoguH.jpg


Here is a 1/4 speeder I made up for myself. I really like using my 3/8 speeder for most things (aviation) but I wanted something lighter just for opening and closing panels with ease. Used a Williams T handle and removed the lock ring, and popped in a snap on speeder shank. I didn't bother with any of the washer business, and it all works fine.
 

Adam.C

Banned
Joined
Jan 29, 2013
Messages
1,490
That tool makes no sense to me. To function as a ratcheting brace, the ratchet mechanism needs to be on the bit side of the crank handle.
 

Adam.C

Banned
Joined
Jan 29, 2013
Messages
1,490
This is a real nice fix, however there is one small difference between the hard and soft handles. I have both and took them apart to see if the internals of the soft and hard are exactly the same. The socket in the soft handle where the shank gets inserted has a small indent to accommodate the ball spring on the shank. It is this mechanism that really holds the shank in place. (Very similar to a socket wrench holding a socket) As the tutorial suggests using that rubber washer will help keep the shank in place on the hard handle, but it still wont be as secure as the soft handle. Just my thoughts...

I have several new HH ratchet screwdrivers and they all seem to have some sort of indent or recess for the ball. I suspect the only difference between new ratchets and old is the outer portion of the handle. The guts on mine are all identical.

To understand the function of the washer, read the thread in my signature line. This thread, while helpful, completely missed the mark on this subject.
 

rusjack

Well-known member
Joined
Oct 11, 2013
Messages
57
Location
Ontario, Canada
Adam.C thanks for posting the link to your thread > I bookmarked it a while back but couldn't find it when I needed it.

I know what you mean about the ratcheting portion of a speed handle having to be on the bit side - I use a ratchet adapter on my 3/8 speed handle all the time. The tool guy had these 1/4 speed handle shanks, and I remembered the thread you posted about converting hard handles to interchangeable so I bought it, took the 5 minutes to convert one of my T handles to accept the shank and now I have the option to use it as a speed handle - without the ratcheting mechanism.
 

Qualitytools

Well-known member
Joined
Apr 30, 2014
Messages
2,853
Location
SOCAL
I stumbled on this thread and really appreciate the write up and photos. I have the SSOMR4B is that different than the one that ends in A? Are they chronological or does anyone know what the letters and numbers stand for, color perhaps (mine is black hard handle)?
Thanks again :)
 

Harrison2

Well-known member
Joined
Jan 1, 2013
Messages
982
Location
Bay area and UK
I stumbled on this thread and really appreciate the write up and photos. I have the SSOMR4B is that different than the one that ends in A? Are they chronological or does anyone know what the letters and numbers stand for, color perhaps (mine is black hard handle)?
Thanks again :)

The end letter usually denotes color, Black being B, Orange BO, Red BR and so forth.

Secondly that O is a D, SSDMR4B.

I messaged snap on about buying a TMR4 shank to retro fit into a williams ratcheting driver, they sent me a rebuild kit for a TMR4/Ratcheting screwdriver so I gave up and just ordered a TMR4. That things mechanism is real stiff, lubed it up and its a little better, I have not used it much to bed it in so may just put it in the drill for a few minutes and see how it fairs after that.

This thread made me want to try doing the shank swap so I could keep one driver and a bunch of shanks but ive now formed a addiction with snap on/williams screwdrivers.
 

Qualitytools

Well-known member
Joined
Apr 30, 2014
Messages
2,853
Location
SOCAL
Thanks for the clarification and the correction, I guess my eyes are not as sharp as they use to be :)
 

Justind97

Well-known member
Joined
Oct 6, 2014
Messages
691
Location
Ottawa, Canada
If you completely remove the 2 pin/spring combinations (one for the direction selector, other is the cap tensioner), pay attention when putting them back in. They look identical to me, but after reassembly I couldn't ratchet without fooling around with the thing. Swapped the pin/spring assemblies, and it works like butter now.

Thank you for this thread and thank you for this tip! I had the same issue this evening and I couldn't figure it out.

The one spring has tighter coils than the other I could see, which means it has more resistance.
 

PFSard

Well-known member
Joined
Sep 12, 2013
Messages
2,423
Location
Mesa, AZ
Part numbers for the end caps:
SSDMR4B1TT - black
SSDMR4B1RTT - red
SSDMR4B1OTT - orange
SSDMR4B1GTT - green

Part numbers for the reverse caps:
SSDMR4A6TT - black
SSDMR4A6RTT - red
SSDMR4A6OTT - orange

Thanks to Jeff for supplying these part numbers.

I bought a frozen orange ratcheting driver SSDMR4B with a cracked reversing cap at a yard sale for $5.00. I disassembled, cleaned, and Superlubed the internals so that it is smooth, but I haven't been able to find a source for a reversing cap. Has anyone had any luck lately with locating these?
 
To avoid these ads, REGISTER NOW!

PFSard

Well-known member
Joined
Sep 12, 2013
Messages
2,423
Location
Mesa, AZ
Thanks to Jeff for supplying these part numbers.

Part numbers for the end caps:
SSDMR4B1TT - black
SSDMR4B1RTT - red
SSDMR4B1OTT - orange
SSDMR4B1GTT - green

Part numbers for the reverse caps:
SSDMR4A6TT - black
SSDMR4A6RTT - red
SSDMR4A6OTT - orange

I bought a frozen orange ratcheting driver SSDMR4B with a cracked reversing cap at a yard sale for $5.00. I disassembled, cleaned, and Superlubed the internals so that it is smooth, but I haven't been able to find a source for a reversing cap. Has anyone had any luck lately with locating these?

You might want to call customer service and see if they still sell them.

Followup : After emailing SO Customer service to confirm that SSDMR4A6OTT is a good number for the orange reversing cap, I tried ordering via SO's Website (does not show up on Snap-On Website). No joy. I ended up calling them. Little over $5.00 for the cap. Three days later, the cap arrived via UPS. They also sent a rebuild kit for free.

SO's customer service via email and phone was very good. Phone rep said that there are parts that do not show up on Website since they changed it over in the recent past.

Thanks again, Jeff.
 

stonesfan68

Well-known member
Joined
Apr 19, 2012
Messages
2,760
Location
Houston, TX
I realize that this thread is 7-years old, but I want to thank the OP for taking the time to document the disassembly process. I ordered a "brand-new, never-used" pink ratcheting screwdriver from eBay and discovered that the mechanism was jammed. Following the posted instructions I was able to fix the problem and still be able to give my daughter her birthday present.

:beer:

In case anyone needs the part number for the repair kit: RKRSSDMR4AC
 
Last edited:

Biomed

Well-known member
Joined
Mar 19, 2011
Messages
662
Location
Minnesota
In case anyone needs the part number for the repair kit: RKRSSDMR4AC

What comes in those repair kits? I looked online and Snap-on does not provide a parts breakdown.

A long time ago I bought some used SO ratcheting screwdrivers on EBay (because I wanted the phillips shanks that came with the deal) and the previous owner gummed them all up with some type of light brown gooey lubricant. Been thinking about taking them apart, cleaning out the brown stuff and replacing the internals.
 

BadBrains

Member
Joined
Apr 12, 2012
Messages
17
Location
AL
Thanks for the part number(SSDMR4A6TT BLACK PP REVERSE CAP), mine was cracked.

attachment.php
 

Attachments

  • SSDMR4A6TT_resized.jpg
    SSDMR4A6TT_resized.jpg
    148.6 KB · Views: 910

Qualitytools

Well-known member
Joined
Apr 30, 2014
Messages
2,853
Location
SOCAL
I recently had to find this thread to take mine apart to lube it. Thanks for the photos and description it made the job easy :)
 

Michael_in_DE

Well-known member
Joined
May 11, 2017
Messages
1,012
Location
Wilmington, DE
I spent an hour trying to get this thing back together. It will not seat down all the way. I was very careful to put everything back where it was exactly. Can anyone give any better tips on getting this thing back together?

The one I got was very clean on the inside but as another mentioned, had a super thick goo/oil/glue like substance around the shank-receiving-gear. But I spent an hour and CANNOT get it back together! I'ts 2-3 millimeters short of seating all the way. I even rotated the receiving gear one click at a time and tried to reseat it several times after each click but it would never seat all the way.

WTH am I doing wrong?!
 

Attachments

  • IMG_3358.jpg
    IMG_3358.jpg
    119.9 KB · Views: 67
  • IMG_3359.jpg
    IMG_3359.jpg
    118.1 KB · Views: 76
  • IMG_3361.jpg
    IMG_3361.jpg
    124.7 KB · Views: 70
  • IMG_3362.jpg
    IMG_3362.jpg
    131.1 KB · Views: 69
  • IMG_3363.jpg
    IMG_3363.jpg
    136.8 KB · Views: 70
  • IMG_3364.jpg
    IMG_3364.jpg
    134.5 KB · Views: 85
OP
P

plinker

Well-known member
Joined
Feb 28, 2007
Messages
4,286
Location
Northern Wi
I have one of that style new in wrap, never had it apart though. It looks to be the same. It could be the little detent is not holding in place/or in the right place or the ring getting compressed enough to allow it to seat, have had that happen before.

It should be in lock position when going back together so maybe try that first.
 

Michael_in_DE

Well-known member
Joined
May 11, 2017
Messages
1,012
Location
Wilmington, DE
I spent an hour trying to get this thing back together. It will not seat down all the way. I was very careful to put everything back where it was exactly. Can anyone give any better tips on getting this thing back together?

The one I got was very clean on the inside but as another mentioned, had a super thick goo/oil/glue like substance around the shank-receiving-gear. But I spent an hour and CANNOT get it back together! I'ts 2-3 millimeters short of seating all the way. I even rotated the receiving gear one click at a time and tried to reseat it several times after each click but it would never seat all the way.

WTH am I doing wrong?!

Just as a warning to those with the slightly older pistol grip ratcheting screw drivers. the shank/retention placement is extremely important. If it's off by even a little will not go back together. And even if you manage to rebuild it AND get it back together, one of the best features of the screwdriver, the thumb spinner at the top may have hardened, and shrunk over time, thereby negating it's purpose, and and will actually impede smooth rotation. I have not found a workaround for this problem...and and tons of lubricant only helps a little. My only idea to get it to work is to take the shank assembly apart an put some kind of spacer between the top of the ratcheting mechanism, and the thumb spinner. but as I previously mentioned, the tolerance is tight, probably too tight.

The screw driver in question:

View media item 33145
 

B.S.A. (ret.)

Well-known member
Joined
Mar 3, 2017
Messages
416
Location
Central Connecticut
Here's a little aid that I found for those of us who have one of the 5-position ratcheting screwdrivers.
 

Attachments

  • 7d1dc2993905bc4c5cb4627d2df78318.jpg
    7d1dc2993905bc4c5cb4627d2df78318.jpg
    55.9 KB · Views: 145
OP
P

plinker

Well-known member
Joined
Feb 28, 2007
Messages
4,286
Location
Northern Wi
T handles are the same.

The only one using a different mechanism is the mini ratcheting screwdriver, which cannot be disassembled, far as I know (not sure that it's still available).
 

be0tch

Member
Joined
Jan 26, 2019
Messages
11
Location
Brooklyn
I took my snap-on banana apart using the help in this thread and I can see now why it is slipping in reverse: the pawl on that side is broken. I am going to give rebuilding it a shot when the kit gets here.
 

JUNK-MAN

Well-known member
Joined
Nov 28, 2014
Messages
1,485
Location
PA
Great thread, i bought an orange one at the flea market last summer for $1 with all the original bits. I tore it apart and super lubed it, smooooth as silk man. That is my second one, first one is my green one, that i bought new for 65 bucks.

Sent from my SM-G930V using Tapatalk
 

be0tch

Member
Joined
Jan 26, 2019
Messages
11
Location
Brooklyn
eG3fADul.jpg


The rebuild kit arrived. The banana rides again!

Comparing the new pawls to the old pawls, it was clear that the old ones had seen better days.

Replaced everything and added oil, now its smooth as ever.
 

mikebaker1129

Well-known member
Joined
Oct 16, 2014
Messages
1,576
Location
Huffman,TX
I want to Thank the OP the detailed step by step instructions with pictures. This helped me fix a TMR4 that was jammed up . I have it working like a top !
 
To avoid these ads, REGISTER NOW!
Top Bottom