To avoid these ads, REGISTER NOW!

VISE REPAIR 101 all vise repairs, lubricants, sources for parts and the tricks to fix

McBrownie

Well-known member
Joined
Mar 27, 2014
Messages
1,827
Location
Cleveland, OH
Parker 203 Repair Post #5

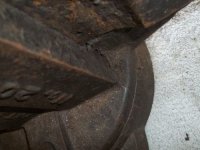
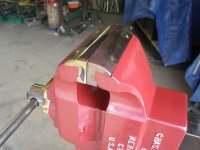
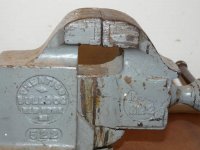
Kevin and I talked about various things that could be done to the jaws. I have that 12" sanding disc on the radial arm saw that does a really nice job of sanding down curved jaws. I used it on the 974. Parker jaws are fairly soft and all of their old advertisements talk about how they can "easily be replaced" Lies, Lies, Lies. We decided to go the welding and resurfacing route. I sent the jaws off to Kevin and here is what he had to say:

"Hi Bill
I made your handle last night and went to weld the jaws and found out that they are hard steel. This represents a problem that I want to share with you. When you weld tool steel you better know what material it is, the reason is it will crack when it cools. All tool steel shrinks at different rates when cooling and that is why it cracks. They must have made some of these jaws out of tool steel and yours is one of them. I could weld them but if they crack then the jaws are worthless, I welded a little section by the crack area to see what it looked like when I sanded the weld off to check compatibility and found the weld to be hard with soft welding rod. It did not crack but I welded just a little. Let me know your thoughts, my feeling is we can get away with the small welds on top of the jaws but welding underneath where the break is could cause a breakage due to unknown steel. If the jaws were made from O-1 tool steel then it is unweldable. This steel was a popular choice back in the day. We call it drill rod or oil hard tool steel."

Great. I have a weird set of jaws to boot. I decided to roll the dice and trust in Kevin's skill and judgment.
View media item 42936
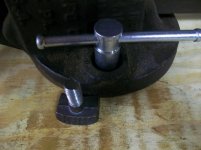
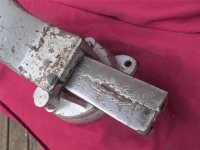
By the way, look at the great job he did on the handle. Looks absolutely stock which is what I wanted. Even you look at the screw threads, they look original. A very nice piece.
View media item 42946
At this point, it was time for me to get busy painting.
I went with a Satin because I think it looks better on old vises. This vise was originally black, and I was going to go with a dark green as Parker refers to in one of their old advertisements. However, I decided on Valspar Outdoor Satin Oceanic P/N 15309.

I am a big fan of letting the parts sit in direct sun for a few hours to let them warm up. The same can be done in an oven, but I didn't want to end up sleeping on the couch.
View media item 42561
Same for the paint. Another GJ member recommends letting the paint can warm up too:
View media item 42562
On last quick wipe down with lacquer thinner before painting and here you go:
View media item 42563
This paint seems to take a couple of days to fully dry, but once it does, it is very durable.

Now to wait to see how Kevin gets on with those jaws.
 
Last edited:
To avoid these ads, REGISTER NOW!

McBrownie

Well-known member
Joined
Mar 27, 2014
Messages
1,827
Location
Cleveland, OH
Parker 203 Repair Post #6

While I was waiting for the news on the jaws, I reassembled the vise and noticed a problem:
****! They still don't line up right.
View media item 42927
Now what? Looking at what was going on, I figured out that not only was the front bottom of the static worn, but the top back of the static was as well. Not the bottom back, but the top back. So, I was going to need two shims. The one on the front bottom and one on the top back. The problem was that I couldn't fit the top one in there with the full bottom shim in place, meaning that the bottom back was not worn. And that kind of made sense. If you go back and look at those marked up pictures with the lines you can see that the top of the dynamic would be dragging on the top of rear of the static. At this point, I'm really kicking myself for getting this vise. Here is what I came up with.

First the rear shim. Easy enough.
View media item 42922
It has to be held in place as the dynamic slide is inserted, then it pretty much stays in place:
View media item 42923View media item 42933
Now for the bottom front. I struggled with figuring out how to hold this one in place. There is nothing to grab on to. Then I realized that I could use the nut to hold it in place. So I cut down the old shim that looked like this:
View media item 42921
And made a new one with a tab to fit in the dovetail that holds the nut:
View media item 42924
View media item 42925
And that isn't going anywhere:
View media item 42926
Checked the alignment and things look really good.

At this point I get some pictures from Kevin. No cracks! But, I have my work cut out for me.
 
Last edited:

McBrownie

Well-known member
Joined
Mar 27, 2014
Messages
1,827
Location
Cleveland, OH
Parker 203 Repair Post #7

Yeesh, those have looked better, but I'm sure a welder would disagree. No cracks and that was the big concern.

View media item 42938View media item 42937
Even though Kevin moved very slowly trying to keep the heat off of these, they still "sprung" a bit and needed some coaxing to go back on the vise. How Parker ever made these things at a profit in the old days is beyond me. Time for a little dremeling, some time on the bench grinder, some tough love with an angle grinder and a lot of time with the disc sander and they start looking better:
View media item 42929
It's starting to look like a vise. I use #4 O1 Drill Rod for the pins. #4 Drill Rod is .207" diameter and neither of my Parkers has had tapered holes. I mention this because there are numerous posts that mention tapered holes for Parker jaws. In my limited experience, I have seen tapered pins, but never tapered holes. So, the #4 drill rod goes right in with a nice press fit. It can be found at Graingers and a 3ft length is about $6.
View media item 42930
Getting better:
View media item 42931
This is what I was looking for!
View media item 42932
All of the foundational work pays off and it is looking to be a useful vise again.
 
Last edited:

McBrownie

Well-known member
Joined
Mar 27, 2014
Messages
1,827
Location
Cleveland, OH
Parker 203 Repair Post #8

The final installment! Here is the finished product. In case you are wondering how I do the lettering, here is the method I use. I fold up a paper towel fairly tight and make a flat end. Then I use it to "stipple" the lettering. I use a small paint brush to get in any hard to get places. I also used an off-white on this vise to make it look a little more period.

View media item 42945

Here is the finished product:
View media item 42876
View media item 42878
The finished jaws after hitting them with a "scotch brite" type pad on an angle grinder:
View media item 42934
And what drew me to this vise in the first place, the curious "1810" casting mistake that should read "1910". There have been a couple of these posted and I can only imagine that it must have been a slow day in the foundry.
View media item 42877
I have more hours into this than I would care to count and I realize now that I like my 974 better. The 974 is just a better built vise, much more stout, and it turns out that it isn't too big for my bench. :D However, I'll hold onto this one and pass it on to the kids when the time comes. It is still better than anything you can buy in this price range today. In the meantime, I'll keep looking for that swivel jaw!

I almost forgot to mention, the screw and the nut were both in excellent condition and as this vise sits finished, it has about 1/4 turn of backlash. Not bad for 90 years old!

I hope that this gives you some useful tips and teaches you what to look out for at least when shopping old Parker vises.

-Bill
 
Last edited:

EOC_Jason

Well-known member
Joined
Jun 25, 2012
Messages
11,388
Location
Bentonville, AR
Wow... That is really cool, thanks for sharing, a wealth of info. Where others might have just set it aside or parted it out, you took the time to bring it back to life and make it look practically new!
 

McBrownie

Well-known member
Joined
Mar 27, 2014
Messages
1,827
Location
Cleveland, OH
Wow Brownie, even a Pit Bull would have let go of the bone at some point ! :bowdown:

Thanks! I think. ;) I did go a bit OCD on this one, that is for sure. :) But, I work for a big corporation where most decisions are made by committee and full of compromise and always tied to an ROI. This is kind of therapeutic in that I get to decide what is going to be done, when it is going to be done, and the ROI depends on my definition of "value". That makes for nice change of pace. :thumbup:

Also, all of this took about 4 months to complete and there were stretches that this vise sat on the bench gathering dust. The important thing to note is that I didn't do this in a week or two. All in all, it was a fun little project.
 
Last edited:

Fretters

Well-known member
Joined
Jan 25, 2014
Messages
4,217
Location
South Yorkshire, England
Definitely a credit to you. :) Nice to see that type of perseverance instead of just calling it a day.

I understand what you mean about it being therapeutic. Working on the machinery is the one place and thing where I can control how everything is done, without having to deal with numpties introducing avoidable problems etc., or doing half arsed work. We may not always achieve perfection, but we can sure as Hell try. :D Plus, sheds/workshops are bally quiet and peaceful, being woman free zones and all. :evil:
 

Outlawmws

Well-known member
Joined
Aug 9, 2011
Messages
39,264
Location
The Badlands
Kudos to both Mac and Padre Scott. VERY impressive, especially considering the challenges!

Makes a de-rust, de-grease and paint into a cakewalk!
 

zkling

Well-known member
Joined
Jan 23, 2007
Messages
16,939
Wow McBrownie, that is one heck of a resurrection. I probably would have given up at the cracked shelf. The shimming was a great idea and solution. I wonder what would have happened if you put it in a press and tried to slowly nudge the shelf back into plane. :headscrat
 

McBrownie

Well-known member
Joined
Mar 27, 2014
Messages
1,827
Location
Cleveland, OH
Wow McBrownie, that is one heck of a resurrection. I probably would have given up at the cracked shelf. The shimming was a great idea and solution. I wonder what would have happened if you put it in a press and tried to slowly nudge the shelf back into plane. :headscrat

I can see 3 possible outcomes, 2 of them being bad. ;) Kevin and I talked about that, although I don't think it has moved much, if at all. There is pretty substantial wear on that surface. We also talked about brazing it, but Kevin was afraid to put heat to it and cause more problems. Then we talked about machining it flat and screwing in an aluminum bronze shim. But again, we would putting a sharp corner right at the stress point and both felt that wasn't a good idea either. I think the best thing to do is to keep big hammers away from it. There are no visible cracks down the sides or on the base. With the shims, it operates fine and is perfectly OK for home use, imo. However, I wouldn't want to try bending 1/2" rebar in it. :bounce:


In the spirit of learning there is a 4" (model 204?) on eBay right now that has a bad crack in it. This is not repairable, imo. Unless you are looking for parts, this is one to stay away from.

http://www.ebay.com/itm/Chase-Parke...830?pt=LH_DefaultDomain_0&hash=item35d811e7ee
 

Attachments

  • 205_crack.jpg
    205_crack.jpg
    28.2 KB · Views: 178
Last edited:

red73mustang

Well-known member
Joined
Dec 18, 2012
Messages
138
Location
New Jersey
Great thread! Most people just bolt their vise to the workbench and don't think of it until they need it.
I have a Wilton 8" Mechanics vice that will no longer open unless I spin the handle and pull the jaw open. It has to do with a spring clip that came off of the screw, but I can't remember how it goes back on. Any help would be appreciated.

Chet
 
OP
D

drivesitfar

Well-known member
Joined
Oct 23, 2013
Messages
36,032
Location
Pacific Northwest
Red: can you post a few pictures of your vise and i'm sure we'll help you figure it out? if you can't post a few pictures of your vise and a close up of your issue maybe from below or on it's side can you get us a model # or a few online pictures of a similar vise so we might have a few more details?

McB: what can i say, but AWESOME job bringing that Parker back from the dead. nice work and i guess a great assist from KMScott too. Did Ritzblitz make the handle on this vise or just your other Parker vises? very nice pictures, comments and way to stick with the process. :thumbup::thumbup:
 
OP
D

drivesitfar

Well-known member
Joined
Oct 23, 2013
Messages
36,032
Location
Pacific Northwest
McB: First of all i want to thank you for taking the time to post all the pictures and taking the time to explain the processes you did to repair that old Parker vise. Again you did an absolutely amazing job and that is still an understatement. I'm sorry i thought Ritzblitz made that handle after reading your posts more carefully when i had time and there wasn't all the noise of the household going on. somewhere i had read that you just wrote a check to Ritzblitz to get the handle looking so good, but i'm betting that was on the vise thread and about one of your other Parker vises where you did have him make you a handle.

now for my questions if you don't mind sharing some of your thoughts and wisdom.

1) how did you press fit the brass shim around the screw into the dynamic jaw? also in afterthought if you would have put that in a little off center would that maybe have straightened up the dynamic slide so you wouldn't have had to make brass shims for the top back and bottom front of the slide?

2) i saw how you shimmed up the front brass shim on the bottom of the slide and held it in with the vise nut which was genius by the way, but after you made that shim for the top back of the slid what is holding that shim in place?

3) as far as the jaws go I've tended to stay away from buying not perfect Parker vises because I've heard the jaws weren't even a possibility to have a new set made until KMScott starting making some this year. also I've heard they are a bear to get the pins out and then get the new jaws to fit. Kudos to you and KMScott for working hard to repair your jaws. also how did you press fit the pins back into the jaws? since they do come up all the way through the jaws i couldn't see the tops of the pins in your finished vise so how did you do that to make them disappear?

4) would you take on another vise like this one or maybe only for a special one of a kind rare vise which i guess yours is somewhat with the mis marked patent?

5) any chance to get a few pictures of the 3 Parker vises you have now restored which are all showpieces?

thanks for sharing with us

KMScott: you are very humble to give McB 95% of the credit, but I'm betting McB wouldn't have taken on this restoration without having you close by to answer a quick or long question about a fix. also amazing job welding the jaws so McB didn't have to spend the extra money to have a new set made. Also i wish you some luck selling all those vises you have been working on and would hope to see a few of them on this thread when you get some time to post a few. your pictures and expertise on these old vises is at the top of my list and i'm sure many others too.

All: i'm still cleaning out my shop and storage and hopefully will get to start a few of my restorations as the summer ends and the rain starts. I would appreciate any other members sharing their stories and pictures on this thread so i don't have to stop in the middle of a repair to spend time looking for a quick answer when hopefully some day it will be on this thread. some of you have done amazing jobs maybe not as amazing as the one McB just posted, but i'm sure worth sharing your information. thanks in advance

in case some of you haven't seen some of KMScott's new Parker jaws he has made that need to be fitted exactly to each Parker vise since they weren't all the same even in the same model and year of vise. here is a pair of the new jaws on one of my favorite Parker vises that a new member on GJ now owns. KMScott made the jaws for the person restoring it that i think had to ship the vise to KMScott so he could fit them exactly. now that's a custom fitted pair of jaws. it's a Parker 978 which means it's about 250 pounds approximately not including the stand and it has 8 inch jaws.
 

Attachments

  • 00z0z_6rqQ3pfhC7i_600x450.jpg
    00z0z_6rqQ3pfhC7i_600x450.jpg
    20.9 KB · Views: 345
  • 00707_9AEyHNN9ohN_600x450.jpg
    00707_9AEyHNN9ohN_600x450.jpg
    28.8 KB · Views: 334
  • 00101_3P5wlB1Cbbp_600x450.jpg
    00101_3P5wlB1Cbbp_600x450.jpg
    28.5 KB · Views: 327
  • 00I0I_aQKQrZ2dmPw_600x450.jpg
    00I0I_aQKQrZ2dmPw_600x450.jpg
    32.6 KB · Views: 311
Last edited:

EOC_Jason

Well-known member
Joined
Jun 25, 2012
Messages
11,388
Location
Bentonville, AR
Either Charles Parker had some cheap labor, or the words "mere trifling" were secret code for, "We're going to **** you on fitting some new jaws." lol...

drive - The shim on the top-back side he said was held in place when the slide was inserted. He kind of formed it along the top-inside so I guess it can't move too much.

You can sand the pins down smooth with the jaws if you want them to disappear. Later models (from union mfg) simply used roll-pins, which I think are just as effective and probably a heck of a lot easier to remove.

I've thought about using like a bronze flanged sleeve bearing to center the screw better and also give a surface for the handle to wear against instead of the dynamic. Though it would only work for certain style vises...
 

Attachments

  • bearing.jpg
    bearing.jpg
    13.6 KB · Views: 66

McBrownie

Well-known member
Joined
Mar 27, 2014
Messages
1,827
Location
Cleveland, OH
Drives, Thanks for the questions. Here are my answers in blue:

1) how did you press fit the brass shim around the screw into the dynamic jaw? also in afterthought if you would have put that in a little off center would that maybe have straightened up the dynamic slide so you wouldn't have had to make brass shims for the top back and bottom front of the slide?

I just tapped it in with a soft faced hammer. It's not a super-tight press fit, but enough so that it doesn't move around. Just to be clear, it is a slip fit on the spindle and a press fit in the dynamic.

I was worried about getting it off center because I though it might cause the screw to bind. Also, having the weight of the dynamic riding on the spindle seems like it would cause more trouble.

2) i saw how you shimmed up the front brass shim on the bottom of the slide and held it in with the vise nut which was genius by the way, but after you made that shim for the top back of the slid what is holding that shim in place?

The back shim is mainly held in with the dynamic. When that comes out, the shim falls out. There wasn't a nice clean edge inside of the housing which is why I have those various angles on the front side of the shim. It moves back and forth about 1/16" when the slide goes in and out, but that was as good as I could get it without drilling holes and I really didn't want to do that. There is probably a better fix, but it involves skill out of my range.

3) as far as the jaws go I've tended to stay away from buying not perfect Parker vises because I've heard the jaws weren't even a possibility to have a new set made until KMScott starting making some this year. also I've heard they are a bear to get the pins out and then get the new jaws to fit. Kudos to you and KMScott for working hard to repair your jaws. also how did you press fit the pins back into the jaws? since they do come up all the way through the jaws i couldn't see the tops of the pins in your finished vise so how did you do that to make them disappear?

#4 O1 Drill Rod is a nice press fit. Just cut off pieces to about 1 1/4" and bang them in with a hammer. Then I cut them off close with a cut off wheel and hand file them the rest of the way down. It files down fairly easily, so don't make a mess trying to get too close with the angle grinder.

4) would you take on another vise like this one or maybe only for a special one of a kind rare vise which i guess yours is somewhat with the mis-marked patent?

I would not unless it was a swivel jaw!!!! There is no way you can get your money back out of a project like this if you are thinking about selling it. But, if a swivel jaw comes my way, that would be a fun project and a cool vise to own. :beer:

5) any chance to get a few pictures of the 3 Parker vises you have now restored which are all showpieces?

I've got the 974 that I'll post up. That was an easy one to do. I also have a Wilton that needed some repairs done to the swivel lock down plate and I'll be putting that up too. But, I think I'll let my keyboard cool off first. I put more time into posting about the 203 than I did painting it! :D


Thanks for everyone's remarks and comments.
 
OP
D

drivesitfar

Well-known member
Joined
Oct 23, 2013
Messages
36,032
Location
Pacific Northwest
McB: take a rest because you've earned it that is for sure. thanks for all time it took to remember and post all that information and post all those pictures of your Parker. Also for the answers to my questions. i'm sure i'll always have some more questions, but happy to say i learned a few more things today.

ALL: one thing i did learn over the years and was reminded by McB's vise restoration is that i'm always going to pull out the dynamic jaw before buying a vise i'm planning on keeping or reselling. and wear my glasses and maybe a flashlight to so i can see a crack or weld i wouldn't have seen until later.

i used to do that all the time especially on the big ones because they were easy to carry that way, but i know there are a few i didn't take apart until i owned them and i'm lucky so far that no issues have been hidden.

i did pull out the jaw of a 6 inch Wilton Tradesman vise i tried to buy off a Craigslist seller and saw a crack and a chunk of cast missing on the static jaw next to the slide. I asked the guy if he knew about it. the idiot said he did and what difference did it make because it still worked. since i had asked if there were any cracks or broken parts before driving 30 minutes to meet the guy it was the first time in a long time i wanted to deck somebody and instead just walked away even as he was trying to reduce the price.

it happens that the sellers of these old tools really don't know their issues so you need to do your own inspections before you own their problems.
 

jakemac

Well-known member
Joined
May 21, 2013
Messages
9,035
Location
New England
Well, I can attest that the locking hardware for the new(ish) Reed's (available from viseparts.com under the Columbian/Reed banner) will not fit the older (20's/30's) Reeds. (I had been told that on another thread, but did I listen ? ............... NO. I thought I'd take a chance. Now you know why I don't play the lottery)

It seems the newer 604-1/2 / 204-1/2 's use a 1/2"-13 bolt to lock the swivel down. My older 204-1/2 uses a 5/8"-11 bolt. In addition, the tooth count on the base is different as well.

I also ordered the center bolt for the base. Wrong again. The new vises use a 5/8"-11 while the older vise uses a 7/8"-14 bolt (try finding one at the hardware store, I dare you).

I was hoping to use the new center bolt as a locking bolt, but it won't fit into the older base slot (from the top or the bottom) and was too short anyway. So it wasn't worth trying to file teeth onto the head to make it work.

Back to square one on getting the 204-1/2 to swivel again. Time for a re-think. :dunno:


Edit - Pictures added

Pic 1
The Reed 204 1/2 and an NOS older 3-footed base.

Pic 2
The newer locking handle and nut. Notice how the handle nut is too small for the recessed hole. The lock on the older vises is 5/8-11, not the 1/2-13 used today.

Pic 3
Notice the teeth on the newer lock don't match the teeth on the base. In addition, the casting isn't sharp.

Pic 4
The new center bolt is too small for the older vise. But, it is the same size as the hole for the lock (the hole above).
 

Attachments

  • 100_1291.jpg
    100_1291.jpg
    133.2 KB · Views: 142
  • 100_1288.jpg
    100_1288.jpg
    72.9 KB · Views: 142
  • 100_1287.jpg
    100_1287.jpg
    134.2 KB · Views: 149
  • 100_1286.jpg
    100_1286.jpg
    128.1 KB · Views: 170
Last edited:

EOC_Jason

Well-known member
Joined
Jun 25, 2012
Messages
11,388
Location
Bentonville, AR
You *can* order the OEM Reed swivel kits, but their price is crazy to where you could buy an entire vise on eBay... I found the part #'s on Reed's website somewhere (not to be confused with their newer columbian parts) and did some googling and had sticker shock.

Maybe if you find the proper bolt for the base you can use a bronze bushing to go between the bolt & base? Then just either trim the bolt to the proper length or use some washers?
 
To avoid these ads, REGISTER NOW!
OP
D

drivesitfar

Well-known member
Joined
Oct 23, 2013
Messages
36,032
Location
Pacific Northwest
Jake: sorry to hear you are having issues trying to put the 3 footed swivel base on your old Reed. i haven't had a chance to try my Rock Island swivel nuts out on my Reed yet and will hopefully do so soon so you can see if that might be an option for your parts from another vise.

would you mind posting pictures of your Reed and the swivel base you are trying to put on it so the ones that don't follow the Vise thread or other areas might know more what you are trying to accomplish?

thanks and best of luck just finding the 4 footed one that you've been looking for.
 

macgee

Well-known member
Joined
Jan 11, 2014
Messages
2,834
Location
Sepulveda Pass, CA
Parker 203 Repair Post #3

Ok, here is where things start getting ugly. The jaws are not lining up right. There is alot of slop between the dynamic slide and the static housing. This vise is old, tired, and worn out. I wish I knew about its' history. This thing had to do some serious work in its' day.

It is at this point that I send a note to Kevin (KMScott) asking if he can help out with the jaws. He begins to ask some questions about the squareness of the vise, so I get to work measuring.

So, let's see what we have. By the way, sorry about these next pictures. The lighting was not the best. Also, the Parker 974 is the workhorse in this project. You can't fix a vise without a vise. ;)
First a little bit of good news. The dynamic jaw is perpendicular with the top of dynamic slide. Whew!:

Then the same good news about the static jaw face, except what is going on with the dynamic support?

Oh ****, or crack, I should say.

This was more than a little disappointing. The angle of the support is largely due to wear. You can see that the groove that is normally cast into the surface is almost worn away and I could not see any cracks running down the side of the support. Regardless, this vise can only be a light duty vise from now on. Kevin and I messaged back and forth about options for shiming, welding, resurfacing of this support and decided that it was safest to leave it alone.

Here is a markup of what was going on with this vise:
View media item 42308Line A is my reference plane - the top of the dynamic slide. If the previous owner would have used this as an anvil, I would have been screwed. But, I was lucky and it was flat. I don't have a picture of the bottom of the slide, but it had worn and needed to be resurfaced. More on that to come. As a result of all of this wear, you can see how things are "sagging" much like the foundation of house starting to crumble. Only these repairs are a whole lot easier and cheaper to deal with.

On to the bottom of the dynamic slide. It was concave, due to wear, by about .025" (half a mm for our international readers) from front to back. The easy thing to do would have been to "fly cut" this on a milling machine, but I don't have a milling machine. I do, however, have a radial arm saw with a 12" sanding disc. So, here is what I did. Remember, the top of my dynamic slide is what I'm using as a reference for flat and square.

You can see the difference between the shiny and dark areas as I get started.

And the finished product. I took off only enough to get it flat. This was also not a fast process, but it was a good homeowner solution. There was also a bit of a casting problem that needed to be fixed on the front left side as pictured. I used an angle grinder to make a relief so it matched the right side as pictured.
View media item 41450
Now we are rolling. Time to figure out how to get everything back in line with some shims.


I don't think there is a finer example and description on why is it so important to inspect a vise prior to buying. Only buy from respectable and knowledgeable sellers. Be sure to request certain photo's of the vise and ASK questions. Look/stare very carefully at all the pics.

That inexpensive good looking vise can look like a smoking deal but can quickly bite you in the behind once you try using it. Take McBrownie's comments to heart and remember when trying to buy a vise.

Jaw alignment is probably the best telltale way to judge internal problems with a vise. Make sure the ad has pics with jaws closed tight against each other and see if the tops of the two jaws align flush and one not one higher than the other. You want a vise with the perfect parallel jaws all the way from the top to the bottom (and side to side), look at the light gaps (if there is any), do you see any angles (pie slice) or they parallel? If there's an angle, a very small difference could mean there's a problem. It could just be worn replaceable jaws but as McBrownie says, those also can be very expensive, almost the price of the vise itself.

*It's also important ask about backlash. Ask: "How much do you have to move the handle before the jaw moves after changing handle directions, is there a delay of less of a quarter turn or more?". This could be an important clues to troubles with the vise. I like to think a 1/4 turn or less is desired.

Look for cracks on the rear of the slide. Look for exposed threads coming out of the rear of the slide, it could mean the slide had cracked and they cut and shortened the slide to get rid of the crack. I see this a lot with smaller vises done by previous owners who overloaded a small vise.

McBrownie has done an excellent repair job (a labor of love, way above the call of duty) but as you can see with all his notes, work, cost of materials and all the time and effort to get this vise back up to snuff is way more than the price difference between a smoking deal and an expensive vise.

Just something to think about for new vise buyers.

I've been burned myself for not taking the time to check a vise, some smoking deals have become boat anchors or expensive door stops.

I have to commend Mcbrownie for the excellent repair and taking the time to post it.

Edit: Can you tell what the problems are with these vises below? There currently being sold on ebay, Three of them described as clean and in excellent condition. Buyers beware!
 

Attachments

  • $_57-27.jpg
    $_57-27.jpg
    145.9 KB · Views: 306
  • $_57-26.jpg
    $_57-26.jpg
    120.2 KB · Views: 279
  • $_57-25.jpg
    $_57-25.jpg
    142.1 KB · Views: 297
  • 777356052_o.jpg
    777356052_o.jpg
    138.9 KB · Views: 269
Last edited:

jakemac

Well-known member
Joined
May 21, 2013
Messages
9,035
Location
New England
Jake: .....................
would you mind posting pictures of your Reed and the swivel base you are trying to put on it so the ones that don't follow the Vise thread or other areas might know more what you are trying to accomplish? ..............

Pictures have been added to the original post.
 
OP
D

drivesitfar

Well-known member
Joined
Oct 23, 2013
Messages
36,032
Location
Pacific Northwest
Jake: thanks and we'll try to help solve your problem or maybe somebody will see this that has a 4 foot Reed swivel base to ship to you for a reasonable cost.

Mac: dang those are some bad things the guys (or gals) on Ebay don't disclose. i haven't bought a vise off of Ebay yet, but i have read the listings and always wonder why the sellers won't list defects and say to examine the pictures. i'll let others look and enjoy finding Waldo (defects in those vises) so to speak. thanks for the post
 

Fretters

Well-known member
Joined
Jan 25, 2014
Messages
4,217
Location
South Yorkshire, England
*It's also important ask about backlash. Ask: "How much do you have to move the handle before the jaw moves after changing handle directions, is there a delay of less of a quarter turn or more?". This can be an important clues to troubles with the vise. I like to think a 1/4 turn or less is desired.

Backlash can be misleading. Not something you tend to find any of on the sprung leadscrews, but the likes of our Swindens can have a huge amount when they're functioning perfectly. It's the designs where a collar for the leadscrew is used which are most prone. A little bit of wear on the collar can lead to a notable amount of backlash.


Edit: Can you tell what the problems are with these vises below? There currently being sold on ebay, Three of them described as clean and in excellent condition. Buyers beware!

Number 4, whilst it looks minging, seems to be a common problem with a certain make of vice over there. I can recall seeing that type of crack on several slides in this thread. Can't remember what make of vice it is though.
 

ganymede

Well-known member
Joined
Nov 29, 2012
Messages
2,332
Location
New England
Number 4, whilst it looks minging, seems to be a common problem with a certain make of vice over there. I can recall seeing that type of crack on several slides in this thread. Can't remember what make of vice it is though.

I think that would be Parker.
The same steel bar that makes the slide resistant to breaking in normal use becomes detrimental when the back of the slide is used as an anvil.
I've seen several damaged specimens in person over the years and a bunch more on line.
 

McBrownie

Well-known member
Joined
Mar 27, 2014
Messages
1,827
Location
Cleveland, OH
Either Charles Parker had some cheap labor, or the words "mere trifling" were secret code for, "We're going to **** you on fitting some new jaws." lol...

drive - The shim on the top-back side he said was held in place when the slide was inserted. He kind of formed it along the top-inside so I guess it can't move too much.

You can sand the pins down smooth with the jaws if you want them to disappear. Later models (from union mfg) simply used roll-pins, which I think are just as effective and probably a heck of a lot easier to remove.

I've thought about using like a bronze flanged sleeve bearing to center the screw better and also give a surface for the handle to wear against instead of the dynamic. Though it would only work for certain style vises...

"mere trifling" - that is the term and your comment made me laugh out loud. Obviously that description was written by a marketing guy who never walked out on to the shop floor to see the "jaw fitters" slaving away next to the blast furnaces. At least that's how I picture them working. :)

You are correct on the back shim. It moves back and forth a little bit. I could try tweaking the bends to get it tighter, but it works fine as it is.

The solid pins really do file down quickly. On both vises, I thought that would be a huge pain, but it really isn't.

I agree that a flanged bushing would be a better way to go if you had a milling machine and could countersink the hole.
 
Last edited:

macgee

Well-known member
Joined
Jan 11, 2014
Messages
2,834
Location
Sepulveda Pass, CA
Fretters,

First I would like to say thank you for your post to me in the other thread. You made me jealous of what's available on your side of the pond (grass is always greener) and thank you for the offer of acquiring a vice to ship back to me, sadly you are correct the shipp. cost would be too high but I very much do appreciate the offer.

Back to your comment about backlash, you are correct and that's why I wrote "could" be a clue to problems. There's several vises on this side that don't really allow for adj. the backlash. Athol Starrett is a classic example, you maybe able to insert a custom shim (time & $) to take up slop but (correct me if I'm wrong) most of time you can not due to tired threads on the spindle and on the main nut ($$$). There vises that do have to ability to adj. backlash like Reed vises among some others and that's one of the reason why there cherished as good long term vises.

I think backlash can help define how good (or bad) a vise is and how it performs. I hate working with vises with lots of backlash. Finding a vise with very little backlash can only speak for it's condition and could exemplify that it has low hours on it.
 

McBrownie

Well-known member
Joined
Mar 27, 2014
Messages
1,827
Location
Cleveland, OH
I think that would be Parker.
The same steel bar that makes the slide resistant to breaking in normal use becomes detrimental when the back of the slide is used as an anvil.
I've seen several damaged specimens in person over the years and a bunch more on line.

Parkers... They are cool looking, but.... :headscrat :D

I think #3 is the best of the bunch. It might be broken, but with that tag just imagine the stories you can make up. "So, I was defusing this bomb...."
 
Last edited:

Outlawmws

Well-known member
Joined
Aug 9, 2011
Messages
39,264
Location
The Badlands
Well, I can attest that the locking hardware for the new(ish) Reed's (available from viseparts.com under the Columbian/Reed banner) will not fit the older (20's/30's) Reeds. (I had been told that on another thread, but did I listen ? ............... NO. I thought I'd take a chance. Now you know why I don't play the lottery)

It seems the newer 604-1/2 / 204-1/2 's use a 1/2"-13 bolt to lock the swivel down. My older 204-1/2 uses a 5/8"-11 bolt. In addition, the tooth count on the base is different as well.

I also ordered the center bolt for the base. Wrong again. The new vises use a 5/8"-11 while the older vise uses a 7/8"-14 bolt (try finding one at the hardware store, I dare you).

I was hoping to use the new center bolt as a locking bolt, but it won't fit into the older base slot (from the top or the bottom) and was too short anyway. So it wasn't worth trying to file teeth onto the head to make it work.

Back to square one on getting the 204-1/2 to swivel again. Time for a re-think. :dunno:


Edit - Pictures added

Pic 1
The Reed 204 1/2 and an NOS older 3-footed base.

Pic 2
The newer locking handle and nut. Notice how the handle nut is too small for the recessed hole. The lock on the older vises is 5/8-11, not the 1/2-13 used today.

Pic 3
Notice the teeth on the newer lock don't match the teeth on the base. In addition, the casting isn't sharp.

Pic 4
The new center bolt is too small for the older vise. But, it is the same size as the hole for the lock (the hole above).


Jake, I checked my large bolt drawer, and I have some 7/8 NC, but not NF, (14). Oddly I DO have a 7/8-14 NF nut... :dunno:
 

jakemac

Well-known member
Joined
May 21, 2013
Messages
9,035
Location
New England
Jake, I checked my large bolt drawer, and I have some 7/8 NC, but not NF, (14). Oddly I DO have a 7/8-14 NF nut... :dunno:

That's the funny thing, I went around to all the hardware stores in my area (one more tomorrow). HD and Lowes had nothing (no surprise there) but all the other local stores had both the nuts and washers in 7/8 NC and NF, but no-one carried the bolts in either.

I'm starting to check internet sources, but so far they're only sold as packages not singles. Not that I'm crazy about paying shipping on a single bolt, but I may not have a choice. It's a good thing I'm not in a hurry to finish this. It took me a year to find the base. I've got time. :lol:

Thanks for looking though. :beer:

I didn't really mean to hijack this thread, my OP was to pass on some info for the next guy so he can avoid buying parts that won't work for an older Reed.
 
Last edited:

McBrownie

Well-known member
Joined
Mar 27, 2014
Messages
1,827
Location
Cleveland, OH
Well, I can attest that the locking hardware for the new(ish) Reed's (available from viseparts.com under the Columbian/Reed banner) will not fit the older (20's/30's) Reeds. (I had been told that on another thread, but did I listen ? ............... NO. I thought I'd take a chance. Now you know why I don't play the lottery)

It seems the newer 604-1/2 / 204-1/2 's use a 1/2"-13 bolt to lock the swivel down. My older 204-1/2 uses a 5/8"-11 bolt. In addition, the tooth count on the base is different as well.

I also ordered the center bolt for the base. Wrong again. The new vises use a 5/8"-11 while the older vise uses a 7/8"-14 bolt (try finding one at the hardware store, I dare you).

Here is a 7/8-14 at Fastenal. I'm not sure what length you need, but this is only $5.

http://www.fastenal.com/web/product...pcode=&filterByStore=&filterByVendingMachine=
 
OP
D

drivesitfar

Well-known member
Joined
Oct 23, 2013
Messages
36,032
Location
Pacific Northwest
McB: nice find for Jake.

Jake: this thread was designed to help all of us fix and repair our vises so you are "using" the thread as was intended and not hijacking it. i hope McB's bolt works for your Reed. good luck

Outlaw: some day i hope to be as organized as you seem to be. did you ever do a thread on how to organize your shop or is it still a work in progress and just a bit better than most?
 

Outlawmws

Well-known member
Joined
Aug 9, 2011
Messages
39,264
Location
The Badlands
SNIP
Outlaw: some day i hope to be as organized as you seem to be. did you ever do a thread on how to organize your shop or is it still a work in progress and just a bit better than most?

I have done one on fastener/parts organization, but that and every other aspect of organization is always a work in progress.


http://www.garagejournal.com/forum/showthread.php?t=117174

The first pic actually shows the "Large Bolt" drawer open (the lower one) - that drawer row has both NF and NC SAE bolts in the drawers, roughly divided in the middle with (mostly) washers separating...
 
Last edited:

macgee

Well-known member
Joined
Jan 11, 2014
Messages
2,834
Location
Sepulveda Pass, CA
Parkers... They are cool looking, but.... :headscrat :D

I think #3 is the best of the bunch. It might be broken, but with that tag just imagine the stories you can make up. "So, I was defusing this bomb...."

The #3 is cool, the tag is awesome, too bad it was cracked and welded. Maybe a bomb damaged it.

Mac: dang those are some bad things the guys (or gals) on Ebay don't disclose. i haven't bought a vise off of Ebay yet, but i have read the listings and always wonder why the sellers won't list defects and say to examine the pictures. i'll let others look and enjoy finding Waldo (defects in those vises) so to speak. thanks for the post

The sad thing is, I found those within the first 5 mins out about 20 vises, there's a ton more like that.

There are bad apples on eBay but I think it's just sellers who have no idea, it's passing through there hands, flipping it. I did do a sort of a anthropology/moral study and emailed two of the sellers mentioning in detail about the repairs and welds on the vises to see if anything happens. One didn't responded back, the other said thanks for the info but neither changed there description; disappointing.

I think it would be a good idea to have a sticky post for Buying 101 of vises, what to look for and what to avoid for newbie's.
 
Last edited:

Outlawmws

Well-known member
Joined
Aug 9, 2011
Messages
39,264
Location
The Badlands
SNIP

I think it would be a good idea to have a sticky post for Buying 101 of vises, what to look for and what to avoid for newbie's.

A better thread would be one outing the vises for sale with clear issues that are listed as "in excellent condition" or " in great working shape" or that are plainly misrepresented.

If we can spot them in the pics, and they don't list the issues in their ads... :dunno:

I could fill a page with local CL ad for "Machinist Vises" that are exposed screw homeowners vises, or mechanics shop vises...
 

Fretters

Well-known member
Joined
Jan 25, 2014
Messages
4,217
Location
South Yorkshire, England
One of my personal favourites over here on Ebay at the moment is this one. The seller note is:

replacement bar otherwise in good used condition
 

Attachments

  • knacked_vice1.jpg
    knacked_vice1.jpg
    147.1 KB · Views: 291
  • knacked_vice2.jpg
    knacked_vice2.jpg
    146.3 KB · Views: 285
  • knacked_vice3.jpg
    knacked_vice3.jpg
    145.9 KB · Views: 264

macgee

Well-known member
Joined
Jan 11, 2014
Messages
2,834
Location
Sepulveda Pass, CA
A better thread would be one outing the vises for sale with clear issues that are listed as "in excellent condition" or " in great working shape" or that are plainly misrepresented.

If we can spot them in the pics, and they don't list the issues in their ads... :dunno:

I could fill a page with local CL ad for "Machinist Vises" that are exposed screw homeowners vises, or mechanics shop vises...

Are you kidding? If we had a "thread of outing the vises for sale with clear issues that are listed as "in excellent condition" or "in great working shape"" then we would sadly compete with the other big Vise thread of over a 1000 pages. There's so many.

The bad ones have been so obvious to spot to me and I'm sure to lots of members here as well so I just scan right by them but I've been opening them and looking at the descriptions and blown away how many sellers are describing the vises as excellent working condition and we're talking about bad worthless vises. It *****

Fretters very favorite vise above exemplifies it.

You have to admit, most people and new members to the GJ and to shopping around for vises will have a hard time knowing the difference between a good vise and bad vise just by looking at a few fuzzy pics unlike us weirdo's who look at vises every day.


One of my personal favourites over here on Ebay at the moment is this one. The seller note is:

That's a classic, thanks for posting it. That's a keeper, did you buy it? :) At least it shows the owner had some resistance to giving up and not chucking it in the trash. He may not know how to weld but he wasn't giving up so easily and put his mechanical skills to work on that vise. You at least could give him an A for effort, just don't ask for a grade on execution. At least the jaws looked lined up, just wouldn't want to try too hard on clamping anything. Probably works fine for clamping/holding a piece of balsa wood (just maybe).
 
Last edited:

rusty65

Well-known member
Joined
Mar 20, 2012
Messages
2,279
Location
Pekin,IL
How I made my Vise handle:
1. Cut the round stock to a proper length.
2. Find the proper nuts for the stock and grind a relief on the ends.
3. Find the correct die for the thread you want.
4. Start threading the rod.
5. Run one nut on and then insert rod in the lead screw handle and run the other nut on and add loctite or jb weld.
6. Cut off the extra rod sticking out of the nut.
7. Wrap lead screw in rags with hose clamps while grinding the nuts round.
8. Grind the corners off the nuts and make them as round as possible.
9. Deburr all the sharp edges.
10. Sit back with a beer/soda and relax.
bcd22e02a9a6cd22fad7b852a869b36e.jpg


Sent directly from the Snap On Kool Aid factory.
 
Last edited:
To avoid these ads, REGISTER NOW!
Top Bottom