To avoid these ads, REGISTER NOW!

Jake's Projects ...... or, .... How I waste my time

OP
J

jakemac

Well-known member
Joined
May 21, 2013
Messages
9,035
Location
New England
Snow, still?

Yup, it's been known to snow sometimes past Easter. Usually we get a good thaw between big storms, but not this year.

Further north, the area around my house in Maine usually still has a few snowmobile trails open 'til mid-May (packed trails).

New England seems to be the focal point for everything headed out to to sea. The cold comes here from Canada before heading up to Greenland and the moisture comes up from down south before joining the Canadian Express. If we're lucky they come separately, but most of the time they meet up just off Cape Cod and hammer the coast all the way up to New Brunswick.

Lucky us. :dunno:
 
Last edited:
To avoid these ads, REGISTER NOW!

KamiCrit

Well-known member
Joined
May 25, 2013
Messages
322
Location
North Of The 49th And West Of Everything.
Well, it's been some time since I've been able to spend any time in the shop. Since the end of January, we've been hammered with snow every few days. 12" or more at a time. By the time I get my place and then my Grandparent's place cleaned up, we get hit again and it starts all over again (I even snowblow the streets on my property line because our town plow guy only makes a one lane pass and I live on the corner. The schoolbus was getting stuck trying to turn around.). I've had to re-tune my snowblower twice in one month, replace two cables, and I wore out one of the shoes. The blower is only 6 years old. Usually I tune it at the beginning of the season and that's it.

So, now that we're only getting nuisance snow (2"-4" at a time every few days), I've had a little time to catch up on one of my projects in-between emptying buckets due to ice dams leaking into the house.

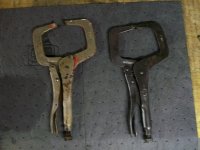
At the end of January, just before Snowmaggedon commenced, Marty in NJ sent up a pair of c-clamps as a thank you for helping him smuggle a 5197 across state lines in a mad dash to freedom. We used the GJ Underground Railroad both ways.

I know that I've posted a lot of these clamps in this thread, but I wanted Marty to see that they have finally gotten the love they deserved. One is a 10" Cincinnati (Hargrave), and the other is an un-named 8".

Before and Afters -

Wow those look amazing! I quite like the colour, reminds me of pastel like. Interesting "W" on the large one.

Will the third small C-clamp get some love?
 
OP
J

jakemac

Well-known member
Joined
May 21, 2013
Messages
9,035
Location
New England
The color is Rustoleum 2X Ultra Cover Gloss Sage Green.
The "W" is a welded owner's mark from a previous owner.
The third clamp is a Quilting Clamp. I haven't decided what I'm going to do with it yet. :dunno:
 
OP
J

jakemac

Well-known member
Joined
May 21, 2013
Messages
9,035
Location
New England
Very nice. What is your process to get the threads so nice and clean?

Thanks.
Wire wheel, soak in EvapoRust, rinse in water, wire wheel, repeat as needed.
Then I mask and paint. Once the paint cures, I wipe the bare metal parts with a thin coat of
PB Blaster to keep them from rusting.
 
Last edited:

gipraw

Well-known member
Joined
Apr 25, 2013
Messages
1,033
Location
Cypress, TX
Thanks.
Wire wheel, soak in EvapoRust, rinse in water, wire wheel, repeat as needed.
Then I mask and paint. Once the paint cures, I wipe the bare metal parts with a thin coat of
PB Blaster to keep them from rusting.


Thanks .. always looking for better ways to do things. I am getting ready to take on a bunch of old family tools.
 

danstead

Well-known member
Joined
Jan 14, 2015
Messages
181
Location
Western, Pa
Re: Wire Wheel cont. -

JakeMac,

Really like the look of your CM bench grinder, nice job! Any idea how old it is??
 
OP
J

jakemac

Well-known member
Joined
May 21, 2013
Messages
9,035
Location
New England
Which one ? :lol_hitti

I have :
4 block grinders
1 pre-block
1 Drill Press motor with arbor adaptors for wire wheels
1 Table Saw motor with arbor adaptors for polishing/buffing wheels
1 disk/belt sander
and
1 12" disk sander

All vintage Craftsman :bounce:
 
Last edited:
OP
J

jakemac

Well-known member
Joined
May 21, 2013
Messages
9,035
Location
New England
That's a 1947 1750rpm motor off a drill press with arbor adaptors from Zoro.com.
The build for that contraption started this thread. Glad you like it. It's been one of the most used tools in my shop since I built it.
 
OP
J

jakemac

Well-known member
Joined
May 21, 2013
Messages
9,035
Location
New England
Well, it's been a while since I posted in this thread. I haven't done much in my shop lately, other than a little tinkering, due to other things keeping me busy.

Today I thought I'd take a little time to filter out my bucket of Simple Green. Since I haven't used it in a few months, I figured it was due. Imagine my surprise when I opened the lid and found .............


........ two visegrip clamps sitting in the brine that I had forgotten about. View media item 38281

I had bought them at an estate sale last november. I can't remember when I put them in the bucket. I think it might have been in march when I got distracted by ice dam leaks over the winter. They were only supposed to be there for a few hours overnight to degrease and remove the red paint that was sprayed on them. Ooops.

So I spent a few hours this evening taking them apart and standing at the wire wheel.


Question - Does Simple Green eat chrome ?
Answer - Yes, if you leave it soaking for a few months.


To be fair, much of the chrome was missing or chipped anyway. I ended up stripping the chrome down to bare metal, or smoothing out the sharp edges.

The first picture is from the day I found them.
The second picture is from today. The one on the left is how it came out of the bucket. The one on the right is after stripping on the wire wheel and a light coat of PB Blaster to ward off rust.

They were never going to be shiny again unless I spent a lot of time on the buffer. It seemed like too much work for it to be worth it, so they'll stay as they are.
 

Attachments

  • 100_1538.jpg
    100_1538.jpg
    137.4 KB · Views: 142
  • 100_1717.jpg
    100_1717.jpg
    132.2 KB · Views: 170

drivesitfar

Well-known member
Joined
Oct 23, 2013
Messages
36,042
Location
Pacific Northwest
Jake: I've done a similar thing when i left a rusty Prentiss vise in a bucket of vinegar for 3 or 4 months. i found out that vinegar actually can start to eat cast iron if you don't wash it all off and dry it completely.

i really like the dull finish on the vise grip on the right and never have really liked chrome vise clamps.

so did your simple green solution survive or did you have to put it in a bucket and drop it off at hazardous waste?

is the snow finally all gone?
 
OP
J

jakemac

Well-known member
Joined
May 21, 2013
Messages
9,035
Location
New England
The snow's been gone here for a few weeks. Now the damage to the house needs to be dealt with. There might have been some snow left in the woods up at my house in Maine up until last week. I'm not sure. The demo contractor is coming next week to gut a bunch of walls and dry things out. After that I need to find a GC to put things back together. I'll probably do some of the work myself first, just to close the walls back up until l can get someone to do the finish work.

The SG should be ok once I get around to filtering it. I could feel a thick sludge at the bottom of the bucket when I dug around with my hand to see if I left anything else in there. This batch has been going for a while now, I cut some fresh stuff in there every so often when the level drops due to spillage or evaporation. In the last 3 years, I think I've only dumped out about a quart. I use it to water the Poison Ivy at the edge of my lawn. It didn't kill it, but it made me feel like I was getting even. :evil:
 

drivesitfar

Well-known member
Joined
Oct 23, 2013
Messages
36,042
Location
Pacific Northwest
Jake: did all that snow up in your area this winter collapse the roof on your place in Maine? sorry to hear that and i hope you didn't lose a lot of your personal belongings and that the insurance company is going to help with the cost of repairs. any pictures of the damage?

good luck

on a positive note at least you didn't have to mow the grass all this time on the acreage around your Maine house like i have since the first week in February this year with our warm weather here in Seattle area.
 
OP
J

jakemac

Well-known member
Joined
May 21, 2013
Messages
9,035
Location
New England
I never have to worry about the roof in Maine. It's a steel roof at a steep angle. Everything just slides off no matter how cold it gets.
 
OP
J

jakemac

Well-known member
Joined
May 21, 2013
Messages
9,035
Location
New England
Go to the border towards Quebec, turn around and come back 16mi. It's the house with the purple door. :lol:
 
OP
J

jakemac

Well-known member
Joined
May 21, 2013
Messages
9,035
Location
New England
The house is outside the town line.
When I was a kid, I knew just about everyone in town (I was related to most of them). Now, with all the new faces, most people up there don't even know my family's name. It kinda makes me sad.

When I go up, I stay in camp about 10mi out of town and only go in to mow the lawn, buy more beer, or drink at the bar.
 
To avoid these ads, REGISTER NOW!

Strouty

Well-known member
Joined
Mar 21, 2010
Messages
38,221
Location
Southern Maine
schmooses?

I installed the tower on the hill coming into town and the border patrol tower. I have been to Jackman more times than I care to admit. We liked to eat at Bigwood, grab something to drink from bishops and head over there for a serious meal.
 
OP
J

jakemac

Well-known member
Joined
May 21, 2013
Messages
9,035
Location
New England
Schmooses = Karaoke hell !! :lol:
Bigwood Steakhouse was good eatin. :thumbup:

My family was drinking at the Northland for generations before it burned down and was rebuilt. My grandmother's oldest brother had a reserved stool at the bar. I used to go in and sit with him when I was 14. Margaret (her son owns it now) used to yell at me to get out (officially), but she'd let me sit with him and sip a Coke for a little bit and then I'd leave some money on his tab when I left. His picture is hanging on the wall by the side door. Raise a glass to Jay the next time you're in town. :beer:
 
OP
J

jakemac

Well-known member
Joined
May 21, 2013
Messages
9,035
Location
New England
I finally found a little time to play in the shop this weekend.

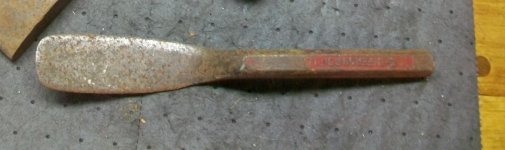
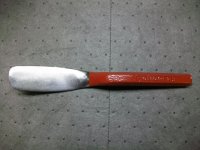
The first project was bringing a Ferguson #E-6 body spoon back to life. It wasn't in too bad of shape, but there were some burrs on the spoon from someone using it as a hammer (they don't show up in the before pic). Once it was derusted, I cleaned up the edges with roloc disks. The paint isn't as bright as I thought it would be (the picture shows up brighter than it really is), but it works. (pics 1-3, before and afters)

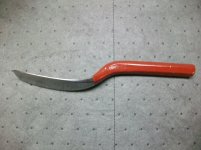
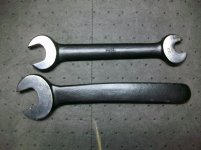
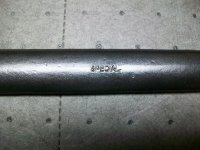
The next two are some Billings wrenches that I picked up off of ebay to use with my table saw. The SOE is 1-1/4". The handle is bent and curved. I left the bends in it, because that makes it perfect for changing the blade as it keeps my knuckles away from the teeth. The DOE is a Billings #33 special (13/16"- 1-1/4"). I'll use this one with the saw as well. They got a polish to the faces with roloc's and the buffer, then masked and painted.


I still haven't had the time to set up the table saw. It's just sitting in the middle of the floor with parts all over the shop. :(
 

Attachments

  • 100_1798a.jpg
    100_1798a.jpg
    103.6 KB · Views: 67
  • 100_1831.jpg
    100_1831.jpg
    143.2 KB · Views: 81
  • 100_1832.jpg
    100_1832.jpg
    138.5 KB · Views: 72
  • 100_1833.jpg
    100_1833.jpg
    139.4 KB · Views: 78
  • 100_1834.jpg
    100_1834.jpg
    142.8 KB · Views: 69
OP
J

jakemac

Well-known member
Joined
May 21, 2013
Messages
9,035
Location
New England
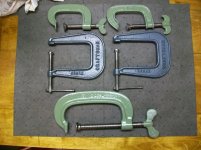
Another project done. Yup, you guessed it - more clamps. :lol:

The winged clamps were in their usual state of barely usable rustiness. They got my standard Sage Green paint job.

The Craftsman's were in better shape, but still got stripped and painted. I used Valspar's Cobalt Cannon because it's the closest color I could find to the original Blue/Gray.
 

Attachments

  • 100_1872.jpg
    100_1872.jpg
    139 KB · Views: 74
OP
J

jakemac

Well-known member
Joined
May 21, 2013
Messages
9,035
Location
New England
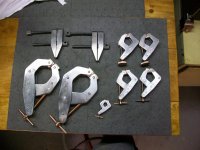
Yesterday was spent cleaning up a bunch of Kant-Twist clamps I picked up over the weekend. It turned out to be easier than I was expecting. Each clamp spent an hour or so in a Simple Green bath, then 5-10 minutes on a fine wire wheel. I had thought that they'd need a dip in EvapoRust, but it wasn't necessary.

I followed up with a light coating of PB Blaster to stave off rust.

They turned out better than I thought they would. Especially the burnt 2".

Before and Afters :
 

Attachments

  • 100_1889.jpg
    100_1889.jpg
    139.1 KB · Views: 113
  • 100_1880.jpg
    100_1880.jpg
    145 KB · Views: 102
Last edited:

GETRIDAONE

Well-known member
Joined
May 21, 2013
Messages
1,549
Location
Auburn, GA
I have been using Blaster all purpose lubricant on stuff lately and haven't had any rust come back yet. I used PB Blaster in the past for rusty stuck stuff but have switched to
Acetone & Trans fluid I guess because I have a lot of it.
 
OP
J

jakemac

Well-known member
Joined
May 21, 2013
Messages
9,035
Location
New England
PB Blaster is my all around oil for wiping down my tools. I try to keep a very thin coat on everything to keep rust away. My last shop was in a short basement with a dirt floor. The humidity was killing everything down there. For years, I was using WD40 on my tools (not realizing that it wasn't leaving a film when it evaporated). I would have to wire wheel the rust off all my tools at lease once a month. It's a good thing I had a lot fewer tools back then. Now it would be a full time job trying to keep up.

My new shop can still get humid (I run a dehumidifier to control it), but not as bad. Even so, I'm still in the habit of wiping down my tools before I put them back into my box.

Switching to PB Blaster was the best thing I could have done. It's cheaper than Kroil and is available everywhere I go. I'm used to the slight oily feel and it goes away with time, so that isn't an issue for me. I know that others would have a problem with it though.
 
Last edited:
OP
J

jakemac

Well-known member
Joined
May 21, 2013
Messages
9,035
Location
New England
Just a quick note on how I get a mirror finish on the wrenches and hammer faces that I've posted previously (I'm working on a Fairmount body hammer now).

If the face is really buggered, I start on the belt sander to remove the worst of it and even out the surface. Otherwise I just go to the next step.

I use an angle die grinder with rotoloc's to smooth out the face. (yes that's a HF grinder, get over it)
I start with a 100 grit sanding disk, and then a 180 grit disk.
Next is a course brown scotchbright disk, followed by a medium red disk.
Then, I use a fine blue disk, and finish with a well used blue disk (a used disk leaves an extra fine finish)

To get the mirrored look, I then go to the buffing wheel. I start with red rouge and finish with white rouge. The last step is to buff with a clean cloth to remove any residual buffing compound.

The metal can get real hot during each of these steps, so I keep a bucket of water nearby to cool things off periodically and rags to dry things off.

It may not be a professional finish, but it works for me. :thumbup:
 

Attachments

  • 100_1894.jpg
    100_1894.jpg
    137.9 KB · Views: 115
Last edited:

msgtsmithret

Well-known member
Joined
May 5, 2013
Messages
409
Location
Raleigh NC
After de-rusting operations, I've been using CLP . . .commonly used for rifle cleaning. It's touted as a Cleaner, Lubricant, and Preservative, thus the acronym. It works fantastic and seems to keep the "patina" of the old tool. Give it a try!
 
OP
J

jakemac

Well-known member
Joined
May 21, 2013
Messages
9,035
Location
New England
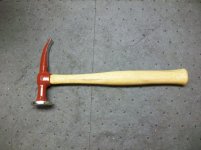
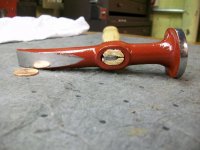
I just finished restoring a Fairmount body hammer head that I picked up at an estate sale. It's original condition wasn't too bad, but since I needed to clean it up and give it a new handle, I decided to make it betterer :D.

The remains of the original paint showed that the original color was black, but I went red because all my cheap body hammers are black and I had the paint on on hand.

I talked about how I did the mirror finish in a previous post. The handle was found at a yard sale (I keep an eye out for thin handles at sales because they can be harder to find than the standard handles). So, the total cost for the hammer ended up being under $5. :bounce:
 

Attachments

  • 100_1890.jpg
    100_1890.jpg
    141.7 KB · Views: 90
  • 100_1891.jpg
    100_1891.jpg
    128.4 KB · Views: 84
  • 100_1892.jpg
    100_1892.jpg
    142.1 KB · Views: 79
  • 100_1902.jpg
    100_1902.jpg
    142.1 KB · Views: 98
  • 100_1903.jpg
    100_1903.jpg
    135 KB · Views: 110
  • 100_1904.jpg
    100_1904.jpg
    134.1 KB · Views: 130
  • 100_1905.jpg
    100_1905.jpg
    136.5 KB · Views: 96
OP
J

jakemac

Well-known member
Joined
May 21, 2013
Messages
9,035
Location
New England
That's how it was oriented in the stump that was left of the original handle. It should have been more centered, but it moved on it's own as I hammered it in. :dunno:
 

Outlawmws

Well-known member
Joined
Aug 9, 2011
Messages
39,305
Location
The Badlands
I like to use a wood wedge in that starter slot, and then (for something that size) a tiny steel wedge at about 45 -60 deg. from that
 

zkling

Well-known member
Joined
Jan 23, 2007
Messages
16,939
Looks great. :thumbup: Something about a red hammer head with polished faces and light wood really makes it pop.
 
To avoid these ads, REGISTER NOW!
Top Bottom