To avoid these ads, REGISTER NOW!

Above 1200 Sq/FT Restored 1930's Auto Shop

Wokspaces above 1200 squarefeet.

Redwolf947

Well-known member
Joined
Feb 13, 2015
Messages
613
Location
South East WI
Thomas, I just wanted to to say what an awesome thread this is.. I've waited to post until I was done reading it all. I was sucked into the vortex right away. Yup I finally made it to this temporary end. You had a vision of what you wanted and were steadfast in making it happen, I commend you. The detail you put into everything you do is inspiring. The actions you do show great integrity. 451 pages and 9000+ posts WOW!!! I enjoy how this thread covers a verity of topics and projects. As a note I think most of the people here like to see all the projects you might be working on. Even if they seem trivial. I agree with the others comments of how well your posts are constructed clear pictures and readability. Thank you for all you've done here. Keep the updates comming.. I recall a corvette top that needs explaining? Oh and congratulations on your retirement.. Hope all is well and we hear from you soon..

Mike
 
Last edited:
To avoid these ads, REGISTER NOW!
OP
B

BB767

Well-known member
Joined
Dec 24, 2009
Messages
3,724
Location
Philo, IL
Thomas, I just wanted to to say what an awesome thread this is.. I've waited to post until I was done reading it all. I was sucked into the vortex right away. Yup I finally made it to this temporary end. You had a vision of what you wanted and were steadfast in making it happen, I commend you. The detail you put into everything you do is inspiring. The actions you do show great integrity. 451 pages and 9000+ posts WOW!!! I enjoy how this thread covers a verity of topics and projects. As a note I think most of the people here like to see all the projects you might be working on. Even if they seem trivial. I agree with the others comments of how well your posts are constructed clear pictures and readability. Thank you for all you've done here. Keep the updates comming.. I recall a corvette top that needs explaining? Oh and congratulations on your retirement.. Hope all is well and we hear from you soon..

Mike

Now you see, that's the kind of thing that has kept me going almost 6 years with this thread .... for better or worse. Mike and others, thank you so very much for all the encouragement I have received from these kinds of posts and PM's. It is humbling to know that folks are all that interested in what's going on out here. As I've mentioned before, I check this thread everyday so if you post it, rest assured I'll read it, but I do seem to lag behind in posting what's going on put here and for that I do apologize. :eek:

Here's an example of just part of today's activities...


The day started with this out in the barn...


...and then moving into the old shop...


...I was doing some maintenance on the '66 Corvette coupe...


...that among other things involved correcting some poor fitting trim...


...that surrounds...


...the windshield.


But the main problem was...


...correcting a problem with some annoying leaks around the windshield which, you can see above, has been removed. Since I have a class tomorrow for which I'm getting up awfully early, I'm sorry but the rest of this and an explanation for the first 2 pictures will just have to wait.

Also Mike, I appreciate the reminder about the Corvette convertible top saga and it is indeed a Simply Sorry Saga (SSS) but with a happy ending. Yeah, I do need to fill you in on that and others and I will.......just a bit later. Congratulations on wading through 451 pages and making it this far. :)

So many posts and so little time to do them.................Thanks everyone.

Thomas
 
OP
B

BB767

Well-known member
Joined
Dec 24, 2009
Messages
3,724
Location
Philo, IL
Re: Paintless Dent Removal

Those bent wire tools look like the sort of thing I have seen used to get to the back of minor dents.

That's exactly right David...


... they are used in paintless dent removal. Since I'm sure many here always wondered how this was done, here's a look.

As the name implies, it's a way to remove minor dents without having to repaint the repaired area.


The tools used are long handled with rather interesting looking working ends.


Another essential tool is the movable translucent plastic reflective surface seen here suctioned cupped to the side of the car. That's a flashlight laying on the floor under it, shining upward through it.


Here's the view it gives you as seen from above. The dent in question is circled, arrow pointing at it. This dent was very hard to see on the door, but using that plastic surface to reflect onto the door, it was easily seen.


To do paintless dent removal you have to be able to get the pry tool behind the dent and use leverage to slowly work it out. We were working on the door, so the pry tool was inserted through the glass slot. The white shaped tool to the right (orange arrow) is a tapered piece of plastic. That was wedged against the door glass which was protected by a vinyl covered piece of plywood, (red arrows). That opened up the glass slot to help give more room for the pry tool.


Then the pry tool was inserted from above, down into the glass slot.


Then it's a matter of twisting the pry tool back and forth, slowly working the dent out.


Using light pressure on either side of the dent working it back and forth.


After several minutes, voilá, no more dent! It cannot be seen or felt and no need for touch up paint. It takes training to do this type of repair plus several specialty tools as seen. For a modest cost it can restore your car back to factory appearance.

Next up we'll see how the Corvette windshield reseal project turned out.

Thomas
 

1949 caddyman

Well-known member
Joined
Oct 5, 2010
Messages
1,778
Location
Arizona
I had a PDR done on my 67 Chevelle & 06 Silverado. The body shop quote was for $8-900 for the pu. He was there for 1hr, fixed both dents for $200. I am very happy with the results.
 

Lyndon

Well-known member
Joined
Aug 11, 2014
Messages
2,535
Location
Sydney, Australia
Re: Paintless Dent Removal

After several minutes, voilá, no more dent! It cannot be seen or felt and no need for touch up paint. It takes training to do this type of repair plus several specialty tools as seen. For a modest cost it can restore your car back to factory appearance.

Next up we'll see how the Corvette windshield reseal project turned out.

Thomas

Thomas

Damn it - is there anything you can't do...... :lol_hitti

Very impressive - I don't know if I could justify the expense on the tools to just do it once (or maybe twice), so the XJR might have to get a pro to do it, but I love the explanation. It will help me understand what I'm going to be paying for. :beer:

Lyndon (yes, still waiting patiently for you know what).
 

djones1a

Well-known member
Joined
May 30, 2014
Messages
140
Location
Wright city Mo.
We chased a windshield leak on a friends 66 vett, it ended up leaking from underneath the grill under the wiper. There is a body seam there where the seam sealer failed.The floor board would get wet every time he washed it but you could never see where it was coming from.
 

stillp

Well-known member
Joined
May 5, 2015
Messages
428
Location
Midlands, UK
Re: Paintless Dent Removal

Thomas

Damn it - is there anything you can't do...... :lol_hitti
Lyndon, there seem to be very few things that Thomas can't do, but that's not him working the PDR tools.

I bet he would have a good try at it though!

Pete
 

Lyndon

Well-known member
Joined
Aug 11, 2014
Messages
2,535
Location
Sydney, Australia
Re: Paintless Dent Removal

Lyndon, there seem to be very few things that Thomas can't do, but that's not him working the PDR tools.

I bet he would have a good try at it though!

Pete

Pete

Sorry, you're correct (of course :lol_hitti). I was concentrating too much on the tools and not the holder of said tool. :lol:

Lyndon
 

bazzateer

Well-known member
Joined
Oct 8, 2009
Messages
6,075
Location
Watford, Great Britain
Just like the BS this thread is a great read.

I hadn't thought about my Police patch going around the world! Pretty cool really.

I wonder if someone would be able to produce a map of the world showing each journey of the BS, including distances? Now that would be really cool!
 

dpljmurphy

Well-known member
Joined
Oct 13, 2015
Messages
200
Location
Near Agnew WA
OK so i've been reading the shop posts and like everyone I'm impressed with the attention to detail and quality of the planing and work. Was just reading this post and in the last photo it looks like a Bendpak asymmetric 2 lift in the background with the power post on the left side of the approach. So either I've been lied to when i was told that it has to be on the right side or the photo is flipped, or something I can't think off is going on. What's the story there? Thank you! David :beer:

So last weekend Chris and I drove to Bob Telpe's to pick up the refurbished Sun Distributor Machine. It was a 13 + hour round trip but I didn't want to have it shipped, it was too easy for it to get damaged. To make sure it arrived back in the shop safe it was worth a day of our time.

IMG_6345.jpg


Bob's been detailing here in his posts all the various improvements/repairs he's made to the machine over the last few months.

IMG_6344.jpg


I asked him to just clean it, not to restore it visually, and leave the natural patina it's acquired over the last 50 years.

IMG_6343.jpg


He did an exceptionally detailed job updating everything, getting the Sun ready to work for the next 50 years.

IMG_6342.jpg


Bob went over everything he had done and then we mounted a distributor and put the Sun through it's paces.

IMG_6347.jpg


Nice work all around and perhaps he'll continue with his updates on here on what was done to the Sun.

Thank you Bob!!!:thumbup:

Thomas
 
OP
B

BB767

Well-known member
Joined
Dec 24, 2009
Messages
3,724
Location
Philo, IL
Re: Paintless Dent Removal

I had a PDR done on my 67 Chevelle & 06 Silverado. The body shop quote was for $8-900 for the pu. He was there for 1hr, fixed both dents for $200. I am very happy with the results.

PDR is a procedure many folks are unaware of. As you said, it's much less expensive than old fashion dent removal with impressive results, especially considering the savings. I thought posting about it would be helpful to those who were curious.

Thomas, I'll be glad to follow your directions. Dennis

Dennis, first show me the dent you want removed on your Corvette and then I'll take it into consideration. :D

Thomas

Damn it - is there anything you can't do...... :lol_hitti

Lyndon (yes, still waiting patiently for you know what).

Sorry, sorry, sorry Lyndon. There's a LOT I can't do and PDR is one of them. I was helping out and getting some instruction but I thought the pictures would indicate I was not the one doing the work, I was taking all the pictures. I was recommending hiring the procedure done, not buying all the various specialty tools and undergoing the training. I wasn't clear about that and I apologize for the misunderstanding.

BTW, 63Nova apologized to me yesterday for taking so long with BS. He said and I quote "I'm enjoying the book so much I'm savoring reading it. I just don't want to rush through it. I'm almost exactly the same age as Cary and the memories he's bring back of that time are just incredible. He's spot on". So it'll be a bit longer before (you know what) finds its way down south but it is getting closer. ;)

Lyndon, there seem to be very few things that Thomas can't do, but that's not him working the PDR tools.

I bet he would have a good try at it though!

Pete

Thanks for the vote of confidence Pete! I did try my hand in it. It is clearly an art, not a science. There is no substitute for practice and experience. The results that can be achieved are remarkable.

Thomas
 
OP
B

BB767

Well-known member
Joined
Dec 24, 2009
Messages
3,724
Location
Philo, IL
Thomas did you go on Drag week with the Nova?

No I've never done that. A acquaintance of mine from a nearby town did one of those tours with a '68 Corvette in 2005. He enjoyed it but it seems grueling to me. Not for the faint of heart for sure.

Just like the BS this thread is a great read.

I hadn't thought about my Police patch going around the world! Pretty cool really.

I wonder if someone would be able to produce a map of the world showing each journey of the BS, including distances? Now that would be really cool!

Your patch is indeed on a 'round the world tour with BS right now. And yes, I too think it's pretty cool. Thanks for sending it along. :thumbup:

I've talked with my Darling Daughter about doing just exactly that using Google Maps to put a stick pin where BS has been. She said it'd be relatively easy to do but she's way to busy at the moment to do it herself and I certainly don't have the expertise. :eek: I'll check back with her again at Christmas to see what it would take to generate such a map with Philo being The Center of The Universe of course. :D

Thomas
 
OP
B

BB767

Well-known member
Joined
Dec 24, 2009
Messages
3,724
Location
Philo, IL
OK so i've been reading the shop posts and like everyone I'm impressed with the attention to detail and quality of the planing and work. Was just reading this post and in the last photo it looks like a Bendpak asymmetric 2 lift in the background with the power post on the left side of the approach. So either I've been lied to when i was told that it has to be on the right side or the photo is flipped, or something I can't think off is going on. What's the story there? Thank you! David :beer:

David, those pictures were taken in Bob Telpe's shop. He's the talented gentleman pictured with me who reconditioned my Sun distributor machine several years ago. Those pictures were not reversed, they are shown correctly. For proper Bendpak information, Bob will have to be the one to explain how it was configured that way...


I'm more of a Rotary Lift kind of guy ya know? :dunno:

Wait, what, who's red 69 Camaro??:dunno: ****, I must have fell asleep in class again...:sad:


Bob Telpe's red '69 big block Camaro that's who...


...the PSMCDR one that ran a 12.667 @ 112.10 last fall at Stanton. If you snooze, you lose............:D

Having fun Thomas
 
Last edited:

dpljmurphy

Well-known member
Joined
Oct 13, 2015
Messages
200
Location
Near Agnew WA
Wow, just reading Mark Donohue's "Unfair Advantage" and finishing the highlighted posts from the Restored 1930s Auto Shop Thread Index on Google Docs and i see them converge in this photo, if you are ever out in the Olympic National Park/sequim WA area: drop me a note, would love your comments on finishing out the shop (still studs and electrical but the Bendpak asymmetric 2 post lift is in).

http://i171.photobucket.com/albums/u288/BB767/Race shop/RoadAmerica2012/IMG_8955.jpg
 

dpljmurphy

Well-known member
Joined
Oct 13, 2015
Messages
200
Location
Near Agnew WA
Ah, well that would explain it, Rotary makes a great product,thanks for teh reply! Happy Holidays and have a great 2016!
David, those pictures were taken in Bob Telpe's shop. He's the talented gentleman pictured with me who reconditioned my Sun distributor machine several years ago. Those pictures were not reversed, they are shown correctly. For proper Bendpak information, Bob will have to be the one to explain how it was configured that way...


I'm more of a Rotary Lift kind of guy ya know? :dunno:


Bob Telpe's red '69 big block Camaro that's who...


...the PSMCDR one that ran a 12.667 @ 112.10 last fall at Stanton. If you snooze, you lose............:D

Having fun Thomas
 
To avoid these ads, REGISTER NOW!

Grizz1963

Well-known member
Joined
Jan 7, 2010
Messages
12,014
Location
Rochester, KENT. UK
The old saying of "nothing changes" applies to your thread 100% Thomas.

"Nothing changes" as I continue to love your thread, the sharing and the way it has become a place of pilgrimage for many of us who have to check in regularly, just for a fix or to contribute something interesting.

Thank you as always for sharing your exploits on here.
 

shortymgee

Member
Joined
Jul 9, 2012
Messages
24
Fairly new to gj. This stuff takes way to much time from my everyday life but I can't seam to stay away from gj for more than a day. Awesome thread.
 

Ayrton

Member
Joined
Jan 1, 2013
Messages
16
Location
Atlanta
I finally made it to the end, and what a fantastic journey thus far.

Congratulations to you Thomas and Chris
 
Last edited:
OP
B

BB767

Well-known member
Joined
Dec 24, 2009
Messages
3,724
Location
Philo, IL
1966 Corvette Windshield Re-seal

Here's what was done to the '66 Corvette windshield to stop it from leaking and correct some poor fitting trim.


Both of the wipers and all the exterior and interior trim was removed.


Next the glass was removed. It just pushes out of the gasket from the inside.


Since no sealant was used on the previous windshield installation, the glass gasket lifted out easily.


Inspecting the old gasket showed no damage and it was still soft and pliable so it was reused.


The gasket channel all along the windshield frame was thoroughly cleaned.


These are the replacement trim clips on the bottom pile which replaced the old rusty, damaged clips.


Before the clips were installed, a bonding primer, made by Sika, was applied to the gasket channel. This primer helps ensure a good bond with the new Sika urethane adhesive.


The old tinted glass was inspected and cleaned.


The glass gasket was cleaned and then reinstalled as was the windshield.


Before each section of trim was installed Sika urethane was applied between the gasket and the body.


After all the trim was reinstalled...


...it fit...


...much better than before. That was mainly because some of the old trim clips had been damaged during the previous installation and so they didn't provide proper grip and fit on the trim.


Once everything was cleaned up...


...inside the car was high and dry...


...ready for spring and more road trips.

This was not intended to be a "how to" post, but just an example of some of the behind the scenes activity going on in Mr Johnson's old shop. Note the cast iron bench with a small Wilton vise in the background, beyond the hood of the car.


Here's that same cast iron bench and vise 10 years ago in much the same spot it is today. Now it's sharing space with a shiny 50 year old Corvette and not a bunch of rusty metal and an almost 100 year old Hay-Budden anvil seen in the foreground. What would Mr Johnson think? :willy_nil

Thomas
 
OP
B

BB767

Well-known member
Joined
Dec 24, 2009
Messages
3,724
Location
Philo, IL
We chased a windshield leak on a friends 66 vett, it ended up leaking from underneath the grill under the wiper. There is a body seam there where the seam sealer failed.The floor board would get wet every time he washed it but you could never see where it was coming from.

Chasing those leaks can drive you crazy can't they? Thanks for the tip in case water still shows up on the carpet. :headscrat

Thomas
 
OP
B

BB767

Well-known member
Joined
Dec 24, 2009
Messages
3,724
Location
Philo, IL
wow ! that is so cool that you saved that place !! great job. doug

Fairly new to gj. This stuff takes way to much time from my everyday life but I can't seam to stay away from gj for more than a day. Awesome thread.

I finally made it to the end, and what a fantastic journy thus far.

Congratulations to you Thomas and Chris

A most warm welcome to all of you and many thanks for the nice compliments. As you've read, it took some effort, but it was still enjoyable. Now is the payoff; getting to spend time out there in a comfortable work environment and just enjoy myself. :thumbup:

More is on the way, don't go away.

Thomas
 
OP
B

BB767

Well-known member
Joined
Dec 24, 2009
Messages
3,724
Location
Philo, IL
The old saying of "nothing changes" applies to your thread 100% Thomas.

"Nothing changes" as I continue to love your thread, the sharing and the way it has become a place of pilgrimage for many of us who have to check in regularly, just for a fix or to contribute something interesting.

Thank you as always for sharing your exploits on here.

Grizz you're one of the "old hands" here. You've been reading and posting in for many years now. I think it's so cool you and other long timers are still enjoying what I'm posting. Thank you for your continued interest in all the happenings in the Center of The Universe! :bowdown:

A most sincere Thomas
 

Spareparts

Well-known member
Joined
Mar 12, 2010
Messages
2,042
Location
Lansing Ks.
I found this thread when you and your son were pulling the rotary out of the ground and repairing it. Your ability and attention to detail are amazing, even after all these years LOL, I will be 70 on St. Pats Day next year and you Sir keep me motivated. Thank you Sir for sharing your dream with us.
 

gordyy

Well-known member
Joined
Jan 10, 2013
Messages
180
Location
North Dakota
Every time I come check on things more and more interesting STUFF is going on.
I think reading this thread should be mandatory for every student starting Auto Shop in Schools today, so they can learn how to care for things and see what happens when you do share them. Although that pesky promised test the Mrs. keeps threatening us with will probably scare them off LOL.
Still enjoying the goings on in Mr. Johnson's old shop and hoping all is well at the center of the universe, Merry Christmas to You and Chris.
Off to move more snow been at it for a few hours today.
 
OP
B

BB767

Well-known member
Joined
Dec 24, 2009
Messages
3,724
Location
Philo, IL
I found this thread when you and your son were pulling the rotary out of the ground and repairing it. Your ability and attention to detail are amazing, even after all these years LOL, I will be 70 on St. Pats Day next year and you Sir keep me motivated. Thank you Sir for sharing your dream with us.

The father and son aspect of this thread is kind of a back story.
Any long time readers might have noticed you don't see any pictures of Cameron anymore. Now he's the one taking pictures of me at times out there.
He has asked me to not to post his picture on the internet and I'm respecting his privacy.
It's hard for me as a father since I'm very proud of him and what we have been able to accomplish together as father and son.
I'm just happy he still likes working with me years later, on shop projects when he has time to lend a helping hand.
We are also still drag racing together; he's in the '64 Impala, chasing my little Chevy II.

So when you mentioned about us restoring the Rotary Lift I thought back to when we did that.
He asked me at the time if I'd ever done anything like that before. I remember telling him "no, but we'll figure it out together."
And he stood by me the whole time we were doing the shop reconstruction, from beginning to end.
It did fill him with confidence I will say that. There's nothing now he's not willing to tackle.

So thanks Spareparts for your comments. That's the kind of thing that keeps me motivated! :thumbup: Credit my father for my attention to detail. That's how he raised me and after all, I am my fathers son.

Thomas

Every time I come check on things more and more interesting STUFF is going on.
I think reading this thread should be mandatory for every student starting Auto Shop in Schools today, so they can learn how to care for things and see what happens when you do share them. Although that pesky promised test the Mrs. keeps threatening us with will probably scare them off LOL.
Still enjoying the goings on in Mr. Johnson's old shop and hoping all is well at the center of the universe, Merry Christmas to You and Chris.
Off to move more snow been at it for a few hours today.

Hi again gordyy. Yeah there's always something going on around here it seems. More than what I post about if you only knew. I've been distracted with new house "stuff" lately.


We were shooting elevations out there last week. I've got about 14' (4.2m) of fall where my floor drain lines will tie into the drainage tile in the far, far background by the street. I told you I'm on a hill! The ground falls away from the house site in 3 directions so I have every expectation the basement will be dry.

But I still find time to putter about in the old shop. That's my real love.......and Chris too, did I mention that? :bounce:

Thomas
 

Lyndon

Well-known member
Joined
Aug 11, 2014
Messages
2,535
Location
Sydney, Australia
.
.
.
.
.
.

But I still find time to putter about in the old shop. That's my real love.......and Chris too, did I mention that? :bounce:

Thomas

Thomas

Yes, you mentioned that..... :bounce:

If I don't have a chance to say it before hand, you and Chris have a fantastic, warm Christmas and a productive and Happy New Year. :thumbup:

From the heat Down Under. :shocking:

Lyndon
 
OP
B

BB767

Well-known member
Joined
Dec 24, 2009
Messages
3,724
Location
Philo, IL
Beltsville Shell Is On The Move

63Nova has sent Beltsville Shell to Roscoe in FL. Andrew, aka Craptain, you're now in the on deck circle.

Lyndon, it's getting closer to you all the time. A bracing 20ºF, (-6ºC) here tonight but it's a dry cold - no snow anywhere. Just a bit cooler than you I suspect! :eek:

Cheers, Thomas
 
Last edited:

9C1

Well-known member
Joined
Feb 3, 2006
Messages
153
Location
Illinois, USA
Thomas
I know a magazine and it's editor that would like a photo story about that windshield fix; but that makes two stories you could do and no time to do them.

Merry Christmas & Happy New Year to You, Chris and Cameron.
Terry
 
OP
B

BB767

Well-known member
Joined
Dec 24, 2009
Messages
3,724
Location
Philo, IL
Nice work on the vette windshield. Merry Christmas ya'll...

Many thanks Redwolf947. Once I found out the windshield leaked last summer, I've wanted to get it corrected and then fix the trim at the same time. Safe and fun holiday wishes to you as well.

Thomas

Thomas
I know a magazine and it's editor that would like a photo story about that windshield fix; but that makes two stories you could do and no time to do them.

Merry Christmas & Happy New Year to You, Chris and Cameron.
Terry

Terry, I hope you know how much I treasure your friendship, honest! Once I read your post I realized I am behind on that magazine article and now it looks like I'm behind a second article. :eek: I'll contact the editor and get something going. I'll keep on top of it! Watch for an email from me also.

Glad your health is so much better this year, that's all the present Chris and I need! All the very best to you this coming Christmas season.

Thomas
 
OP
B

BB767

Well-known member
Joined
Dec 24, 2009
Messages
3,724
Location
Philo, IL
The Wonderful World Of Helicoils


Last fall I found some threads stripped on the '66 Corvette convertible top frame. In the back two corners are...


...two locating/latch pins. Look closely at the right side and you'll see the pin, the arrow on the left is pointing to where the left pin should be. Note the towels and plastic sheet in place to protect the paint while working on the frame.


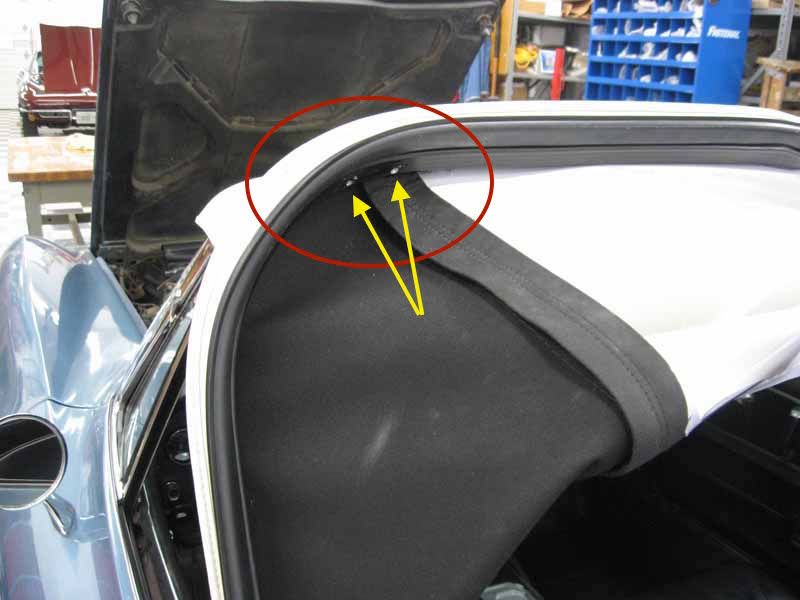
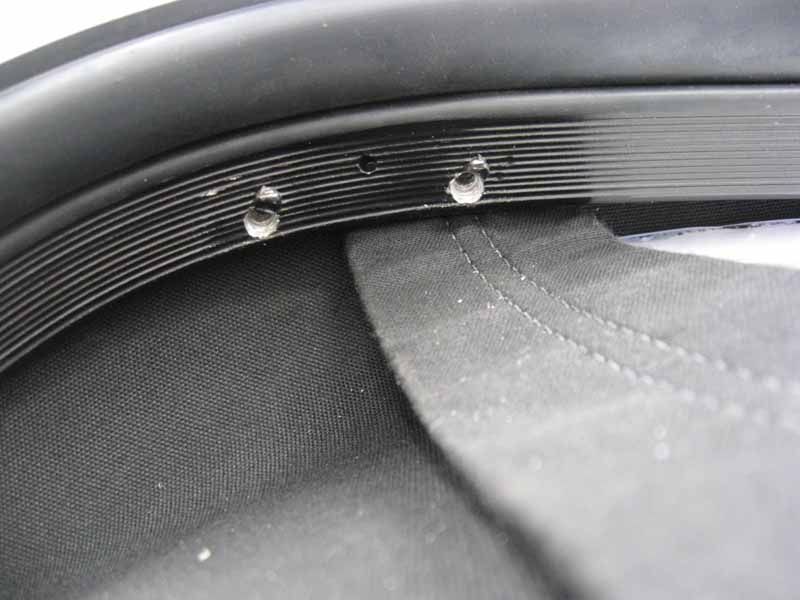
That locating pin is missing because these two holes in the aluminum frame had been stripped out.


Not a pleasant situation but there is a relatively easy way to repair it. Here's how to repair the frame or any part that has been stripped out for that matter. Think..... Helicoil! :)


A helicoil, seen on the left, is basically just a thread insert that can be installed to repair previous threads that have been damaged. For more technical information about heilcoils click here: http://www.repairengineering.com/helicoil.html

The old, damaged threads are drilled out, a special STI tap is used to tap threads for the helicoil.


Helicoils come in various sizes and thread pitches. For my repair I needed a 12-24 pitch helicoil since that's the screw size that was damaged. Note the drill size for the STI tap is clearly stated on the package, 15/64" drill size in this case.


Each helicoil repair kit comes with the correct size STI tap, yellow arrow. STI stands for "Screw Thread Insert" tap. Those are the only taps that should be used with a helicoil. Also included with each kit is an insertion tool, red arrow.


Here are the metal chips from the holes that were drilled out with the 15/64 drill. That's why I had a plastic sheet over the back of the car to keep those chips off the paint and out of the interior.


Next the holes were tapped using the proper STI tap. To insert the helicoil...


...the helicoil is threaded onto the insertion tool. Note the yellow arrow pointing at the drive "tang" on the bottom of the helicoil. (I'll come back to the small notch the white arrow is pointing to in a moment)


That drive tang engages a special spot on the bottom of the insertion tool and allows the helicoil to be turned by the insertion tool...


...threading the helicoil into the newly tapped hole.


Not the greatest picture I know :sad:, but it was the best my poor camera was capable of. Use your imagination to see a clear, sharp, in focus image here. Insert the helicoil approximately 1/4 to 1/2 turn beyond where it first starts to engage the threads. When done, peen the threads on the frame to prevent the helicoil from backing out.


Now we'll come back to that white arrow 4 pictures back. It was pointing out a small notch on the helicoil that is provided to help remove the drive tang once the helicoil is installed. The removed drive tang is seen on the right.


Here's what the drive tang looks like at the bottom of the now installed helicoil. Again my apologies for poor a quality picture.


The drive tang is removed by using a flat bottomed punch and a hammer to contact and sharply bend the drive tag, breaking it off.


So if we could look in cross section at everything installed, here's what the helicoil with the screw threaded onto it would look like.


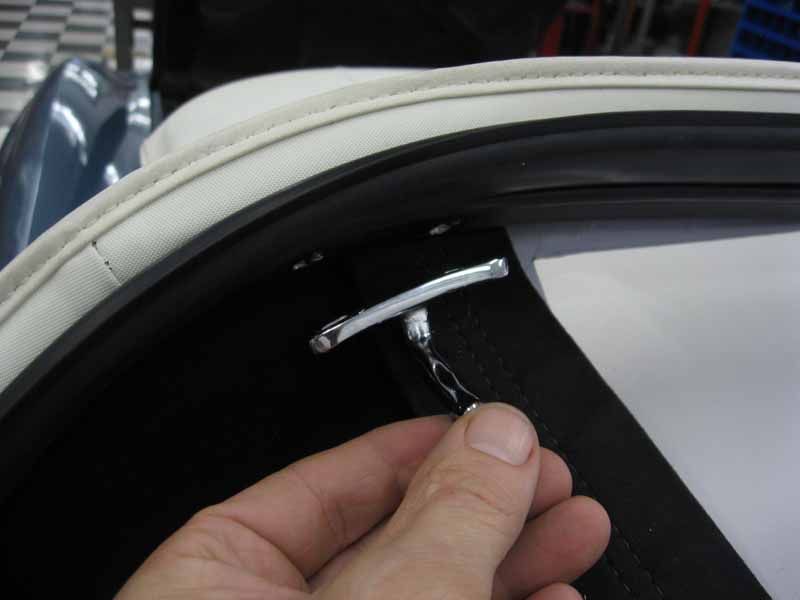
Inside the car, here's a look at that locating pin...


...securing the convertible top frame.


Helicoils are a very clever invention that can be used in many applications. They're especially helpful when working with threads in aluminum which is soft and can be easily stripped out. Aluminum Muncie transmission cases and aluminum intake manifolds have all benefited from repairs over the years utilizing helicoils as have small lawn mower engines with stripped spark plug holes. :eek:

So here we have another successful repair greatly aided by a wonderful working environment. Thank you Mr Johnson. :thumbup:

Thomas
 
Last edited:

Redwolf947

Well-known member
Joined
Feb 13, 2015
Messages
613
Location
South East WI
Helicoil's are great. Almost used one on the head of my truck when replacing the exhaust manifold but the stud torqued up to spec so I passed.. Very clever invention.. Thanks for sharing this great tutorial of this project with us. ..
 

robin1731

Well-known member
Joined
Dec 25, 2007
Messages
483
Location
Decatur, Indiana
If I may add to the Helicoil post just a bit. Once you have broken off that drive tang I always remove the broken off piece. (I use Helicoils a lot on motorcycle engines) Anyway, if you don't remove the broken off tang it is possible for it to damage the threads on the nice bolt you just put in your newly repaired threaded hole. Don't ask me how I know this. :rolleyes:

I just use a small magnetized screw driver to pull it out.
 
Last edited:
To avoid these ads, REGISTER NOW!
Top Bottom