To avoid these ads, REGISTER NOW!

Finishing a Metal building Interior - What works and what to stay away from

gbcamp72

Well-known member
Joined
Dec 17, 2006
Messages
47
Location
Magnolia, TX
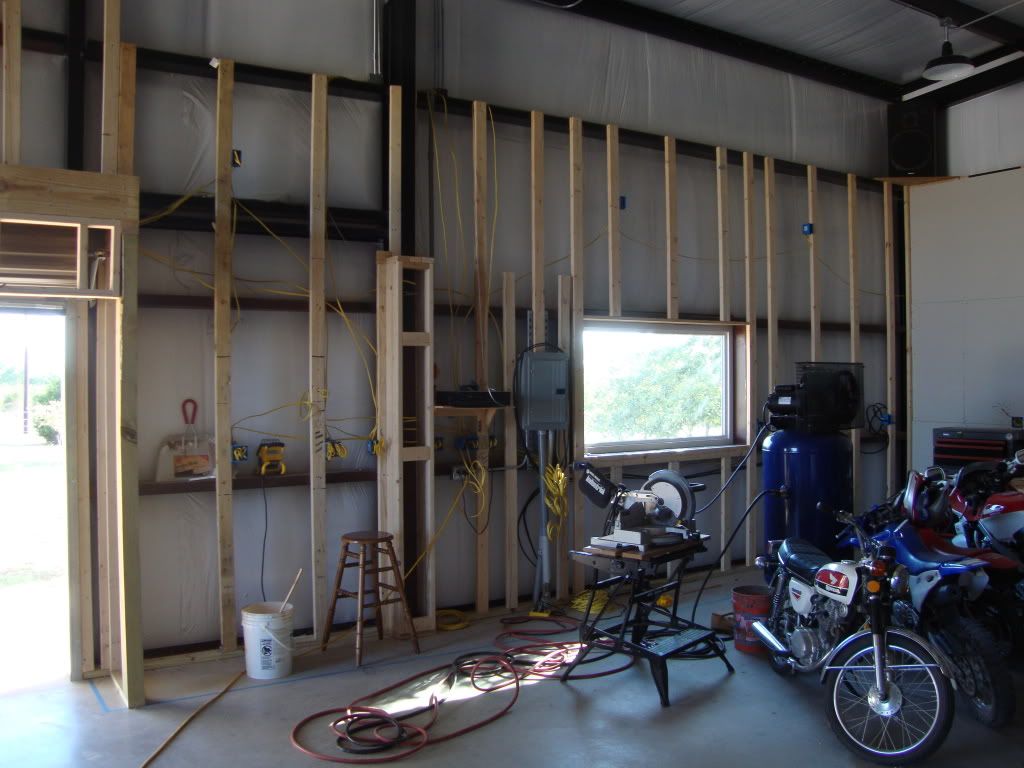
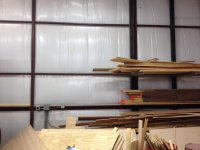
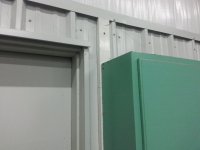
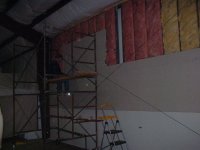
Need some knowledge from you guys that have finished off the inside of a metal building. I have a 30x50x16 uninsulated blank canvas. Ryan’s atomic headquarters has finished off the interior of a metal building and what I’m interested is what worked and what did not when filling in-between the horizontal girths to support eight feet of plywood down and eight feet of drywall up.

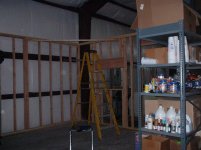
I’m looking for pictures of how you framed between the girths and dealt with the red steel vertical beams. I do not want to lose seven inches by studding in front of the girths. I do have one section with diagonal cables which I will need to deal in so if you show how you handled that it would help as well.

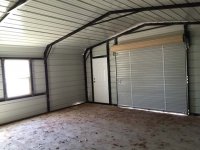
The girths are at 5, 10, and 15 on the side walls and box in a 12x14 and 8x7 roll up doors a double set of man doors and three windows. Will I need to run 16” centers or will 24” do? How about do I need horizontal blocking at 4, 8 and 12 to end the plywood and drywall on?

I have seen once a few years ago where someone used metal studs and flattened the faces where it crossed the girths. Only time I have ever seen that approach used.

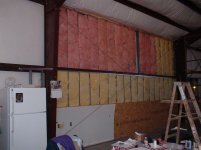
When filling in the wall what is the best way to attach it? Should I bolt plates above and below each girth and toenail a stud between them? I really would like to see pictures how you framed around the red metal, and when butting it worked vs. boxing it fully.

Any tricks on using some sort of trim/materials would be greatly appreciated. I would like to tap into the wealth of knowledge from this community so that I can begin from a greater knowledge perspective.

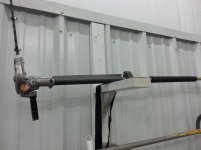
As all GF threads pictures will be greatly appreciated, tips on wiring hiding air lines and tricks insulating what worked and even what to stay away(did not work) from will be gratefully accepted.

Thanks,
 
To avoid these ads, REGISTER NOW!

mtwaterguy

Well-known member
Joined
Nov 16, 2007
Messages
3,518
Horizontal girts should have been installed at 2' intervals. Installing diagonal cables to prevent racking is not needed. Only option now is to add additional framing to support your plywood/sheetrock. I would probably go with 16" centers.
 

mtwaterguy

Well-known member
Joined
Nov 16, 2007
Messages
3,518
I seem to remember that another member used a diagonal brace setup. Hopefully he sees your post. I believe he framed on the diagonal. I think it's Bull, but not certain. Good luck
 

green.bubbly

Well-known member
Joined
Dec 14, 2008
Messages
2,156
Location
Lafayette, LA
I put R19 fiberglass batts of insulation. I just have a few pieces of insulation left to put in and then I am calling for my inspection on Tuesday. after that, I am going to be putting 23/32 T&G OSB. It is 11.97/sheet at Lowes. On my 24x24x10, I have three wall girts about 29" apart plus the top girt and the 2x4 I ran along the bottom of the wall. I will be screwing the T&G plywood directly to the girts.

I used this on my last shop where I last lived and it worked very well. I like the tongue and groove because it does not require a 2x4 or anything behind it to line the seams up.


In the pic below, you can see the three girts and the 2x4 on the floor along one wall.
 

Attachments

  • garage insulation 1.jpg
    garage insulation 1.jpg
    146.6 KB · Views: 2,284

jimp

Well-known member
Joined
Nov 20, 2010
Messages
561
Location
oo
These are the options I have used, wood studs in my shop areas and Steel in the open area. I just work around the bracing and made no attempt to hide the vertical steel, the sheet rock and OSB just slid behind it.

The steel studs are attached to a top and bottom plate like normal and I used self tapping sheet metal screws to attach the plate to the building steel, one every 8" and blue screws to attach to concrete on the bottom section. On the top two sections the bottom was cut one inch long and the face was cut off (to allow flush surface) with the body bent 90 degrees and two screws each stud into the building steel, the top was like the bottom row, top plate attached to building steel.

A fare amount of effort, but a very stable wall and big space for insulation, R48.

I used the space behind the steel studs to lay wire and install air lines.
 

Attachments

  • 2009-11-30img (01).jpg
    2009-11-30img (01).jpg
    148.4 KB · Views: 2,157
  • 2009-11-30img (02).jpg
    2009-11-30img (02).jpg
    148.7 KB · Views: 1,755
  • 2010-04-05img (11).jpg
    2010-04-05img (11).jpg
    147.3 KB · Views: 1,739
  • 2010-06-01img (04).jpg
    2010-06-01img (04).jpg
    148.6 KB · Views: 1,579
  • 2010-01-12img (02).jpg
    2010-01-12img (02).jpg
    151.8 KB · Views: 1,543
  • 2010-04-05img (02).jpg
    2010-04-05img (02).jpg
    156.2 KB · Views: 1,815

Nighttrain

Well-known member
Joined
Aug 6, 2009
Messages
2,682
Location
Dripping Springs, Tx
Here is what I am doing on mine. I have a girt at 4', 7', and 12'. I laid the 2"x4" flat against the girt and used self tap 3" screws. Used PT 2"x4" on the plate. Ran all my wires behind the studs. Also ran 2"/3" PVC along the back wall for my dust collection. Was going to run my airlines behind the wall too but if I am going to spend the $$$ on the brass its going to show it off.<?xml:namespace prefix = v ns = "urn:schemas-microsoft-com:vml" /><v:shape style="WIDTH: 11.25pt; HEIGHT: 11.25pt" id=_x0000_i1025 alt="0" type="#_x0000_t75"><v:imagedata o:href="http://www.garagejournal.com/forum/images/smilies/eyecrazy.gif" src="file:///C:\DOCUME~1\REIDJ~1.TRA\LOCALS~1\Temp\msohtml1\01\clip_image001.gif"></v:imagedata></v:shape> You will see that I also framed around the columns. This is for the wires to snake around the column. I did not want to cut holes in the steel. Also wanted to hide the 6' rollup door so I enclosed that. I plan on putting a motorcycle above that door for display. I did not place any additional insulation behind the sheet rock. Hope this gives you and idea. I also like the above post of the metal studs. That seems very solid.<O:p></O:p>
DSC02571.jpg

DSC02478.jpg

<O:p></O:p>
DSC02450.jpg
 
OP
G

gbcamp72

Well-known member
Joined
Dec 17, 2006
Messages
47
Location
Magnolia, TX
Wow I am constantly impressed with the knowledge and peoples willingness to share on this site.

Mtwaterguy, extra horizontal girths would have made the project simpler that’s for sure. Filling in-between them right now is my best (only) option.

Green.bubbly, I did not consider tongue and grove to reduce the about of blocking needed to support the edges. With my girths five feet apart I will need to reduce the span to versus along the lines of your 29” approach.
Jimp, your infilling with metal studs seems to be a great approach which gives me the support I need without taking away interior width. I have never worked before with metal studs but it seems straightforward. If anyone can point me to a web based instruction set that they feel is accurate I would appreciate it. I get several from Goggling it but I would love your collective feedback on with resource is most applicable.
Also Jimp I’m trying to understand the details. On the bottom you attached a channel which the verticals go into. The Grits appear to have the face turned up. So the first section gets another channel on the top. Looking at the pictures it appears you have put the metal studs in 16” apart. On a section with the upturned face you cannot use a full channel. I believe this is where you explained trimming back the front edge then making a 90 degree bend. Do you make the bend into the box and screw the flanges together or back flat against the girth?
Jimp when butting the drywall did you use a piece of trim on the edge that butts to the frame steel? Do you caulk it or is there a gap? I like the approach of dropping the plywood/drywall behind the cables. Very elegant solution and keeps the depth of the wall to the minimum.
Nighttrain, Your approach of using the face of a 2x4 was something I had not considered. That drops the loss by two inches, versus the traditional stud on edge approach. I just when out and looked and that solution would handle a myriad of situations like where the angles on the columns to which the girths attach protrude. This approach seems straight forward and uses wood for the studding which I am more familiar with. Curious on how you attached the studs from the front with a screw(s) through the wood and then into the girth? Or did you approach from the back with a wood screw threading through an open whole in the metal landing in the wood? Carriage bolts? If the back how did you handle driving the screws with only 8” of clearance?
Thanks again for the ideas and solutions all have elements which I can leverage.
 

jimp

Well-known member
Joined
Nov 20, 2010
Messages
561
Location
oo
Sorry, I lost track of the thread.

I just bend a 1" flap on the bottom of the steel stud and use two screws to fasten the stud to the grith. It is real stable.

As far as web info, never used it. The steel process is simple, cut to size, one screw front and back for each stud to fasten it to the top and bottom channel. Then fasten the channels to the floor or building steel.

As far as finished edges go, my building had the girts just about 5/8" back from the structural steel, so my sheet rock and OSB just slid behind the steel. Neat finished edge without any effort.
 

Carl B

Well-known member
Joined
Feb 3, 2006
Messages
525
Location
Clearwater, Florida USA
After considering some of the options show above - a friend of mine ordered more of the same metal panels that were used on the outside of his metal building - and installed them inside. That cut weeks of work to a few days and eliminated painting.

Turned out that the sheet metal panels from the same manufacturer - cost less than the conventional framing, dry wall and painting supplies he would have needed.

FWIW,
Carl B.
 

Paladin306

Well-known member
Joined
Jun 25, 2014
Messages
136
Location
Oklahoma City, OK
This is a great thread.

My ultimate shop has endured a couple of setbacks to include the normal rigor of moving and unpacking as well as a back surgery which has put me in neck brace for six weeks, (only 6 weeks left) to go. :bowdown:

But, now that we actually own the place here's a few pics.

This is a 40' x 60' shop with an inner "office" in the back that's about 16' x
16'. There is a large loft on the right hand side which provides a large amount of extra storage. As you can see it already has pretty good insulation. Hopefully, by next summer it will be turned into a class A workshop along with storage space for my tractor, mower and possibly my truck and trailer. We obviously still have a lot of unpacking etc. to do. And, we're keeping the prior owners RV trailer until their home is built. So, things are going slowly but, going none the less.

One of the first things I'd like to do, after I get clearance from the doc and get things cleared away a little is install wood walls with tongue and groove pine or cedar planks on top of the existing steel walls and insulation. I plan on doing this with 2x4 or 2x6 construction lumber on 16" centers. I'm not totally convinced that I will do this all the way to the roof as the tall side is about 19' high. But, on the other hand, if I'm going to do it might as well do it right.

I still have a couple of novice questions though. I understand I can use a Ramset on the sole plate (versus a framing gun).

But, what's the best way to attach the 2 x 6 studs to the girts?

Thanks in advance. I've already researched these questions through several other threads but I still don't "get it" totally.
 

Attachments

  • IMG_0888.jpg
    IMG_0888.jpg
    143.1 KB · Views: 764
  • IMG_0887.jpg
    IMG_0887.jpg
    129.6 KB · Views: 913
  • IMG_0886.jpg
    IMG_0886.jpg
    141.2 KB · Views: 1,057

Paladin306

Well-known member
Joined
Jun 25, 2014
Messages
136
Location
Oklahoma City, OK
I framed 2x4 walls to fit within the space between the floor and purlins, and secured them to the metal framing with deck screws and nuts and bolts.

Thanks EarlyBroncoGuy!! Pics are very helpful and I viewed your entire shop build. Great project you have there
 

Stephenrosborn

New member
Joined
Feb 8, 2015
Messages
2
I am just starting my interior. I wanted to put the 2 x 4's flat on the outside wall. Any suggestions?
87a57b294ac0dbe96c7f4505721b81ae.jpg
8be00a83d39bc94c0f89ae0d6e845971.jpg


Sent from my iPad using Tapatalk
 
To avoid these ads, REGISTER NOW!

TheEquineFencer

Well-known member
Joined
Jan 15, 2009
Messages
9,278
Location
Farmville, NC 27828
I am just starting my interior. I wanted to put the 2 x 4's flat on the outside wall. Any suggestions?
87a57b294ac0dbe96c7f4505721b81ae.jpg
8be00a83d39bc94c0f89ae0d6e845971.jpg


Sent from my iPad using Tapatalk

When I need to attach a 2x4 to the siding or metal for shelving ect I use Buildex Brand self-tapping Teks #12x2-3/4 screws from Lowes. #21394 is the Teks #. I screw them into the girts. Mine are at the floor, 4ft and about 7ft8in. then I just screw whatever into the 2x4s.

The screws cut through the wood with the "Flutes", then cut into the metal and breaks the "flutes" off so it can go into the metal. That way the wood doesn't ride up and get pulled away from the wall as you try to go through it.
 

Stephenrosborn

New member
Joined
Feb 8, 2015
Messages
2
TheEquineFencer, thanks for the tip. I could use some pictures on how to tie the outside flat furring to the inside framed walls. Here are some pictures of my project.
e7d84527c3e085e50ffa5796c4c8bf1b.jpg

0f115c23163cf7c577f3a566eb09f9ca.jpg


Sent from my iPad using Tapatalk
 

TheEquineFencer

Well-known member
Joined
Jan 15, 2009
Messages
9,278
Location
Farmville, NC 27828
Here's some pictures of the two screws I use a lot. The fluted ones are the ones I use to attach wood 2x4s to the girts and such. The lath screws I have in several lengths. I use them for attaching conduit clamps to the steel, sheet metal, mounting the metal boxes for the wiring to the wall on the girts and such.
 

Attachments

  • 20150209_004759.jpg
    20150209_004759.jpg
    153.3 KB · Views: 717
  • 20150209_004733.jpg
    20150209_004733.jpg
    155.8 KB · Views: 643
  • 20150209_004652.jpg
    20150209_004652.jpg
    146 KB · Views: 632
  • 20150209_004926.jpg
    20150209_004926.jpg
    145.7 KB · Views: 698

TheEquineFencer

Well-known member
Joined
Jan 15, 2009
Messages
9,278
Location
Farmville, NC 27828
FWIW, Here's how I did the wiring for the receptacles. I used some free 12ga. BX cable and the "snap-it" connectors through the back of the boxes. I figured out where the box needed to sit on the girt and be able to get in the backside without hitting the girt. Then I ran a conduit in the trough at the top of my liner panels and dropped down through the raised rib to get to the boxes. When I added my outside lights I used that same conduit.
 

Attachments

  • 20150209_011336.jpg
    20150209_011336.jpg
    127.9 KB · Views: 536
  • 20140723_140910.jpg
    20140723_140910.jpg
    129.2 KB · Views: 560
  • 20140723_143239.jpg
    20140723_143239.jpg
    147.7 KB · Views: 512

Steve Larkin

New member
Joined
Oct 17, 2015
Messages
1
Hi Guys,
I'm brand new to the forum and am hoping to learn a lot here. I have a 24'x32' section of my naked metal building that I am going to finish out as an addition to an apartment of about 900 sq ft already in this building. One wall will share with the existing living quarters and one wall will be free standing across the 24' dividing it from my wood shop, and two walls will be built on outside walls. My outside walls are typical metal building construction sloping from approximately 11' to 9'. There is only one 8" horizontal purlin between I beam posts. I plan to build typical 2x4 walls inside the purlins, but because the walls will be to thick, I am having trouble figuring out how to install one outside door and two windows. I will begin reading all I can on the existing posts and would appreciate any help offered.
 

fabjunkie

Well-known member
Joined
Jul 24, 2008
Messages
110
Location
Magnolia, TX
On the current shop the girts are at 7'. I framed everything out in 2x3's on 24" center. For the channel portion of the top of the girt I used a 2x3 layed on edge to create a base for the upper wall framing. Those and the upper plate for the lower framed section are screwed through the girt with the above mentions Tek screws. Bottom plate is nailed into the slab with a Ramset.

Older pic showing the framing.
20150410_203204_zps424yz5if.jpg


On the new shop, I'm having them put the girts at 4' intervals and probably going to use R panels to speed up the process. Framing and OSB was cheaper, but after doing it that way once and the amount of time spent, I think the R panel will be cheaper when figuring in what my time is worth.

If wood/sheetrock is the choice of covering, I think the way Nighttrain did it would be ideal although you lose another 1.5" of interior space.
 

lakeroadster

Well-known member
Joined
Jan 19, 2015
Messages
5,166
Location
Central Colorado
I framed 2x4 walls to fit within the space between the floor and purlins, and secured them to the metal framing with deck screws and nuts and bolts.

DSCF1215_zpsb691cffb.jpg

I know the above quote was from an old post... But it is worth noting that cutting through the flange of the steel purlin to clear a wall stud is not a good idea.
 

Paladin306

Well-known member
Joined
Jun 25, 2014
Messages
136
Location
Oklahoma City, OK
Hi Guys,
I'm brand new to the forum and am hoping to learn a lot here. I have a 24'x32' section of my naked metal building that I am going to finish out as an addition to an apartment of about 900 sq ft already in this ...

Howdy Steve and welcome to the boards. There's a ton of info on here that I think would probably be very helpful.

Right after we moved in, here's what I started with:

View media item 47401
I started with the ceiling, by adding extra insulation:

View media item 53232
Then studded all the walls:

View media item 53238
And, just recently added a bathroom which, although this is my latest pic it is almost finished:

View media item 54015
Plenty more pics on my 40 X 60 Shop Renovation thread which can be found here: http://www.garagejournal.com/forum/showthread.php?t=256595

The build threads that are on here are probably endless. But, here's a few that I found especially helpful:

Nighttrain's My Texas Dream Garage http://www.garagejournal.com/forum/showthread.php?t=42257

SpeedinLemon's 30X40X12 - After Fire Rebuild: http://www.garagejournal.com/forum/showthread.php?t=129284

as well as this one: http://www.garagejournal.com/forum/showthread.php?t=227069

If I can help with specific questions just let me know. I was helped tremendously by all the responses I received.

Mark
 

LHB_Texas

New member
Joined
Nov 23, 2015
Messages
1
I'm a noob. This is my first post. This thread has been running for a long time, but seems to be a logical place for my question.

I will be framing off one end of my building as a small living area. Wall girts are 8" C channel. The building is insulated. I will most likely just build walls inside the girts rather than trying to infill between them. I know I lose space that way, but it's much simpler for me. So 3 walls are attached to the girts and the 4th crosses the open area between building walls creating a partition between living and working areas. My question is this... If walls are attached to inside of girts, I have an 8" gap between framing and exterior building skin (width of girt). How can I seal off that space to keep it from becoming a giant home for vermin? I don't need to seal the entire space, just the openings where the interior wall that goes across the building between the two sides meets the girts. So assuming 8' wall framing tied into girts at 4' and 8', I'll have 2 8" x 4' openings that will allow access to the space between exterior and interior walls. If not properly sealed, it becomes a giant nest. Hope that makes sense.

Thanks.
 

[email protected]

New member
Joined
Mar 13, 2016
Messages
2
Location
Arkansas
This is my first post. This thread has been running for a long time, but seems to be a logical place for my question. This is a great forum and I have learned a lot. I would like suggestions on a new 24 X 24 garage interior finishing. A picture of the type is attached to let you know. It comes on 6'centers with 2 1/2 steel tubing, 14 gauge. I am thinking about putting it on 4' centers so I can attach interior paneling. Or, attaching 1 X 4 furring strips on the 8' walls. Would I be better off with the 4' centers and attaching the paneling directly to the steel frame or putting up the furring strips? Thanks again.
 

Attachments

  • IMG_0312.jpg
    IMG_0312.jpg
    74 KB · Views: 323
Last edited:

TheEquineFencer

Well-known member
Joined
Jan 15, 2009
Messages
9,278
Location
Farmville, NC 27828
This is my first post. This thread has been running for a long time, but seems to be a logical place for my question. This is a great forum and I have learned a lot. I would like suggestions on a new 24 X 24 garage interior finishing. A picture of the type is attached to let you know. It comes on 6'centers with 2 1/2 steel tubing, 14 gauge. I am thinking about putting it on 4' centers so I can attach interior paneling. Or, attaching 1 X 4 furring strips on the 8' walls. Would I be better off with the 4' centers and attaching the paneling directly to the steel frame or putting up the furring strips?
IMG_0312.jpg
. Thanks again.

Try posting the picture again.....BTW, Welcome.
 

TheEquineFencer

Well-known member
Joined
Jan 15, 2009
Messages
9,278
Location
Farmville, NC 27828
This is my first post. This thread has been running for a long time, but seems to be a logical place for my question. This is a great forum and I have learned a lot. I would like suggestions on a new 24 X 24 garage interior finishing. A picture of the type is attached to let you know. It comes on 6'centers with 2 1/2 steel tubing, 14 gauge. I am thinking about putting it on 4' centers so I can attach interior paneling. Or, attaching 1 X 4 furring strips on the 8' walls. Would I be better off with the 4' centers and attaching the paneling directly to the steel frame or putting up the furring strips? Thanks again.

http://http://glcarports.com/img/Garages-Standard/IMG_0312.jpg

Below is what I got when I tried the link in your post.

This site can’t be reached

http’s server DNS address could not be found.
 

TheEquineFencer

Well-known member
Joined
Jan 15, 2009
Messages
9,278
Location
Farmville, NC 27828
Sorry about the mess up. I have finally got it in th epost. Thanks again

No problem.

Have you thought about insulation?

It looks like the building you have really doesn't have much of a frame as the roof skin is what's really holding everything up. if you're going to cover that, it'll add a lot of weight to it.

Looking at the picture, I'd be inclined to add 2 1/2 steel tubing on 2ft centers to the walls and just screw my 4x8 panels straight to it.
 

Dieselndixie

Member
Joined
Jan 5, 2015
Messages
7
This is such great info! Can I revive this thread to get this information specific to the “other” type of metal building wall framing setup?

My building has vertical metal columns/studs in 12 gauge steel. Can I simply run 1x4 boards, horizontally, spaced at 2’ along them? And then attach plywood/osb to the 1x4 horizontal boards?

*spray foam insulation and wiring will be behind the plywood sheathing. I plan to use a French cleat on the plywood to hang hand tools.
 

Attachments

  • 593B3A81-663E-4E62-A667-BEDE8BA05BE8.jpg
    593B3A81-663E-4E62-A667-BEDE8BA05BE8.jpg
    133.4 KB · Views: 195
  • 89B3C0C7-8305-411E-BDC9-2A20A077B1B7.jpg
    89B3C0C7-8305-411E-BDC9-2A20A077B1B7.jpg
    113.7 KB · Views: 237
Last edited:

xsethelsenx

Member
Joined
Nov 14, 2020
Messages
5
Location
WA
This is such great info! Can I revive this thread to get this information specific to the “other” type of metal building wall framing setup?

My building has vertical metal columns/studs in 12 gauge steel. Can I simply run 1x4 boards, horizontally, spaced at 2’ along them? And then attach plywood/osb to the 1x4 horizontal boards?

*spray foam insulation and wiring will be behind the plywood sheathing. I plan to use a French cleat on the plywood to hang hand tools.


Any update on your project? I have a similar metal garage with 5' spacing that I'm trying to figure out how to finish off to allow for mounting stuff. Thanks!
 
To avoid these ads, REGISTER NOW!
Top Bottom