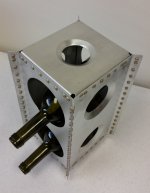
Hopefully this is relevant to the thread. I'm building a box for a squirrel fan blower filter for the shop. What rivets would you recommend to affix 18gauge sheet to 1"x1/8" angle iron? Looking for size, length, and material.
I plan to weld a frame from the angle iron with supports for the fan and then sheet it in 18 gauge, probably affixing the top with sheet screws so it can be removed for maintenance.
I got a solid rivet kit from Eastwood earlier this year and it will be my first project after some practice.
It is ABSOLUTELY relevant to this thread! Thanks for stopping by.
Good job on getting a solid riveting kit! What got you into solid rivets?
This is a great project to practice riveting on. I look forward to seeing pics of any of your riveting projects.
This is the LONG answer...skip to the summary below, if you don't care 'why' I am recommending a certain size)...
1. As far as the actual size of the rivet (rivets are sized by their shank diameter, in 32nds of an inch), that is all up to you. For general projects, I use a lot of -5 rivets (pronounced "dash five"). These would be 5/32" in diameter. That's just my 'go to' rivet size, for the size of projects I usually build. I keep the largest variety of rivet lengths, rivet materials, tooling and clecos in this size. I have the stuff to work in any size, but I default to -5's when there is no compelling reason to use another size. It's just an artistic choice I made in my studio.
You can go larger (though NOT likely needed, for strength, in this application). You can go smaller, since this is hardly a critical application (nobody is going to die, if it fails--other than the squirrels in the cage). You will have to decide what you like for appearance.
You also need to determine what you want, as far as spacing between rivets. If you are going with 'aircraft' spacing, then ANY size rivet will be enough for this application--just make your choice based on what you prefer in appearance. If you're only going to put one rivet every 3 inches, you'll probably want to stick to a -5 (5/32nds) or -6 (3/16ths).
2. Material: Generally, you would be advised to use the same material for the rivet that the project is made from. For this situation that would be steel.
Now me...I'd probably still use aluminum for this. I use aluminum rivets to fasten sheet steel all the time. No...scratch that...I'd use brass. That would look WAY COOL (and I stock brass and copper rivets in all sizes, so it would be a no-brainer in my studio). I haven't used steel rivets yet. I suspect they are a bit harder than aluminum rivets. If you choose steel, I'd go with a smaller rivet, to make it easier to set.
Generally, when you stick non-similar metals together, you end up with essentially a battery, which increases corrosion of the part. That doesn't really bother me, because I am not building aeroplanes--I am building functional art. If it corrodes a little, that just adds to the vintage look I am going for. I even actually damage, then rivet a patch over the damage, in every project I build...just so it looks cooler.
If you really want to use dissimilar metals and don't want corrosion, you can dip the rivets in wet primer right before you set them. This method is often used in the assembly of aeroplanes to ward of corrosion.
3. Length: The rivet should be approximately 1.5 diameters longer than the material thickness.
If you choose a -5 rivet, this will be 0.234 sticking out...just under 1/4".
0.125" for the angle iron
-PLUS-
0.048" thickness of 18 ga steel
-PLUS-
0.234 for the shop head
-EQUALS-
rivet length of 0.407 length.
Rivets come in lengths to the nearest 1/16". So, you will use either a '-6' (dash 6) in length (0.375") or a '-7' in length (0.438"). They aren't commonly sold in the 'odd' lengths, so I'd pick the -6.
They make a great little gauge, which quickly measures stick-out for you.
http://www.browntool.com/Listview/tabid/344/txtSearch/gauge/ProductID/38/Default.aspx
4. Drill Bit: You didn't specifically ask, but it is kinda important. You need to size the hole correctly. Don't go looking for fractional bits in your big-box-store drill bit set. You're going to need 'number' sizes for this task:
-3 use #40 drill bits
-4 use #30 drill bits
-5 use #21 drill bits
-6 use #10 drill bits
I generally mark the spacing on one piece, then drill the first hole through both pieces. Put a cleco in that hole and drill another. (I usually drill all #40 hole first, no matter what size rivet I will end up using, cleco with #40 clecos, then go back and drill to proper size and use the correct cleco for that size). If you don't have clecos yet, you'd be surprised how far 2 dozen in each size go on projects like this...just make sure you buy the cleco pliers too.
If you don't already have a favorite place to buy numbered drill bits, see my sources at the beginning of this thread (the aircraft supply stores listed).
Sorry...that was probably a MUCH longer answer than you wanted (I'll bet you thought that driving the rivets would be the hard part!).
Here is the simplified version:
- Brass rivets (base on appearance-completely an artistic decision)
- Universal head (rounded with a flat spot...fits the most-common tooling)
- "-5" (dast five, 5/32nds) diameter.
- "-6' (dash six, 6/16ths) in length
- use a #21 drill for your holes.
NOW...on to your second question...being able to remove the panel, so you can service the blower.
Look into nut plates or anchor nuts (2 names for the same thing), which would allow you to rivet a captive nut to the frame, then use your favorite machine screw (you know...socket head cap screws) to fasten the panel you want to be able to remove. If you go this route, you are also going to need a supply of -3 countersink head rivets in the correct length for the 1/8" angle iron.
You could move to the 'blind'/pop rivet side for this and choose rivnuts (another way to put a threaded hole in the angle frame, for easy removal of the service panel. You DO need the special installation tool, though, since a standard pop rivet gun won't do it) There are plenty of videos out there on rivnuts.
Of course, for this non-critical application, you could also just drill and tap the angle iron and use your favorite machine screw (i.e. socket head cap screws) to fasten the panel. It would be perfectly adequate, strength-wise, to complete that task for this project. (this is probably the way I'd go, on this project). Any of these options would be MUCH better looking than just using self-tapping sheet metal screws.
Hope this helps.
If I've confused you, please ask for clarification.
Above all, POST PICS of whatever you do.
KDub