ez-duzit
Well-known member
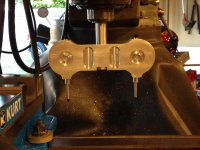
Good job on the tramming head. I picked up a couple Starrett indicators to build one for myself.

Thanks, it's not quite finished. I considered the cost of the USA made indicators and by the time I spent the money for those I could just buy an edge unit.Good job on the tramming head. I picked up a couple Starrett indicators to build one for myself.

Thanks John, I guess it will be another weekend before it's totally finished though.That looks really good, Howard!


If your 4 jaw chuck has t slots in it, use those to bolt some weight on opposite your part.

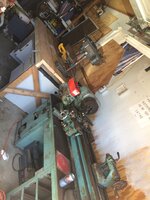
Well my early 17th birthday present well more of my uncle ran out of room and asked if I wanted it before he sold it, which is why I normally don't get something in November from him, is a metal lathe.
Only picture I have until I get back to moms house Wednesday. Took that pic to show off the bench I made but there's the lathe. Stepdad is Working on getting a phase inverter for it and then we have to balance the legs. What are some good first projects
Sent from my iPhone using Tapatalk
Well my early 17th birthday present well more of my uncle ran out of room and asked if I wanted it before he sold it, which is why I normally don't get something in November from him, is a metal lathe.
You're 17 and excited about a lathe? I couldn't be prouder of you. And heck, if you were in my area I'd probably hire you.
First lathe project? How about a plumb bob? I made one over 25 years ago and still use it. Plus, there is nothing like using tools you made yourself.
Keep the faith; our industry needs more young folk who would rather work with their hands and brain rather than sit in front of a computer all day.


I want to learn now, I'm getting the small wood lathe from harbor freight would love to learn wood turning as well. Then I plan next summer I join the navy do twenty years come out and live off my hobby of making things.
Back on topic. Plumb bob so I just turn the handle to make the tool go right and the other one for in correct. What are some good YouTube videos for me to watch
Sent from my iPhone using Tapatalk
Here's a pic of a counter weight at work.What's the best way to balance out
your chuck/work if you want to do
some off center turning ?
I have a 2.5" dia piece of round stock
and I want about a 1/2" ****** on one
side of it.
The lathe shakes pretty good at a
certain speed, I can go faster and it
smooths out some but I don't really
want to spin it that fast.
Should I just tape on some weight on
the opposite side ?

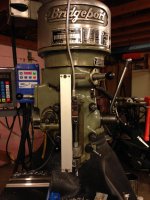
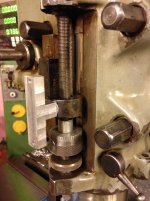
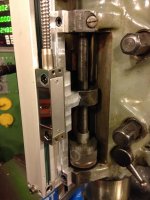
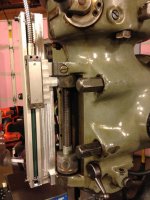
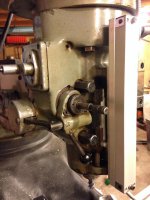
The handle knob was made by the guy I bought the mill from, and I was thinking the adjustable stop was a standard Bridgeport feature ?Very nice!
Nice quick stop on the quill and nice quill handle. Quality stuff that saves a lot of time.
If you get a chance try my method (its my island) of setting depth.
Put a small block under that bottom quill nut, and thread into it a bit. Makes the stop much more solid. No flex form the snap ring.
Touch your tool on your work. Slide the quick stop up against the quill with the appropriate size spacer in between. I use cheap gauge blocks.
Drop the table slightly. Turn on spindle, use knee crank to touch off on work and remove the spacer.
Now you have a very accurate depth set. Quicker and more accurate than looking at a DRO.
The handle knob was made by the guy I bought the mill from, and I was thinking the adjustable stop was a standard Bridgeport feature ?
I'm not sure I follow you on the rest.


never in a million years would I have guessed my shop would be this tooled up to do some unlimited machining and fabrication! I just picked up my last piece of the puzzle to officially make my shop Full! was searching high and low for a small tool room lathe and ended up running into this 15x41 beast of a lathe it needs a lot of love and attention but the price was so right it will be worth the extra time to make it right again. a couple of weeks from now hopefully firing this beast up! now it is time to rearrange the entire shop to make room for this thing!


Sorry, details would help. That was an 80mm boring bar, the insert added about 1/2", it's going 32" down a 3.5" hole. It only fits because of the material that it cuts away. Was my first time boring a deep hole like that. If things go wrong, it can happen in a hurry. It went OK, but was nerve-racking. (Doesn't help that I'm also at a new job learning a new control)What was frustrating ?
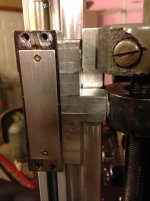
I agree, I've made gibs for lathes a handful of times, never hardened or ground.Erodz, my lathes are older than yours, but none of them have ground gibs, they are all milled finish. I wouldn't be afraid to make one on a mill, may have to do some guess and check to get the fit you want, but it will be worth it if you can't find one easily. The compound typically doesn't get alot of travel miles, so you just need it to hold it well enough to be predictable and still be able to move it when needed.

lol. yep about twice the size I had planned on so the entire shop has to be rearranged and the power from my phase converter also is not big enough.Congrats! That's a Big-un !

Looks very nice! I hope you have it up and running with no problems. lol. that never happens to me .
Sent from my iPad using Tapatalk
the one that is missing is trapezoidal shaped and tapered from front to back too! not a deal breaker but a difficult piece to make no doubt.Erodz, my lathes are older than yours, but none of them have ground gibs, they are all milled finish. I wouldn't be afraid to make one on a mill, may have to do some guess and check to get the fit you want, but it will be worth it if you can't find one easily. The compound typically doesn't get alot of travel miles, so you just need it to hold it well enough to be predictable and still be able to move it when needed.
I agree, I've made gibs for lathes a handful of times, never hardened or ground.
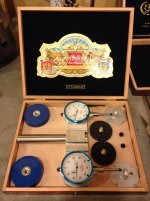
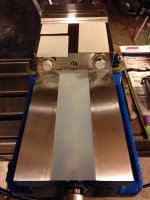
Just made this set.
must be a lathe you can ride on too!
Just made this set.
[emoji38]_hitti must be a lathe you can ride on too!